Archive for May, 2019

How to Change Language in Microsoft Office 2019 / 2016

May 29th, 2019 by Admin

“I have a copy of Microsoft Office 2016 on my laptop that is defaulted to the Thai Language. How do I change it to English? Thanks!”

No matter what the default language is, Office can easily be switched to the language of your choice. In this tutorial we’ll walk you through the procedure of changing the editing and display language in Microsoft Office 2019 / 2016.

Part 1: Find Your Office Version

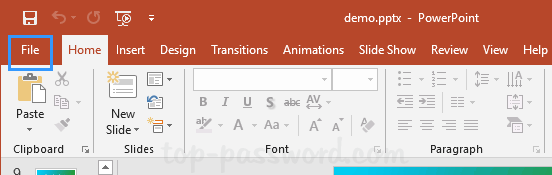
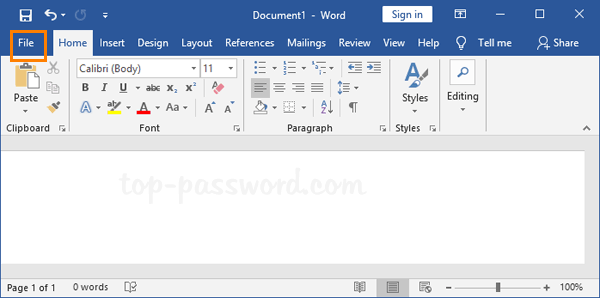
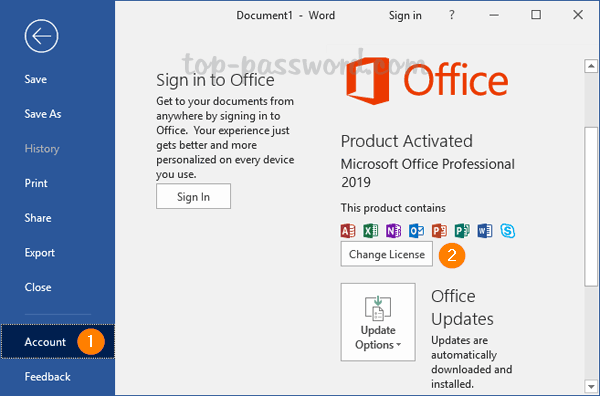
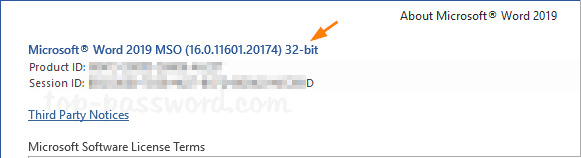
The first thing you’ll need to do is find your Office version. Open the Word program, click the File tab and choose Account. You’ll see which version of Office you’re running. For more information such as the architecture of Office, click on the About Word button.

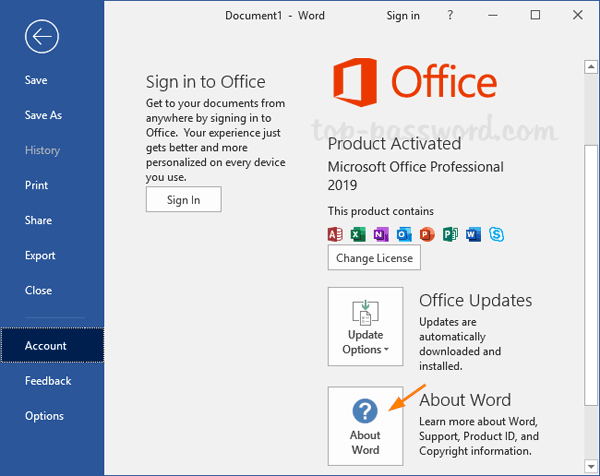
A dialog box opens, showing you the full version number and if you are running 32-bit or 64-bit Office.

Part 2: Add Keyboard Layout Language

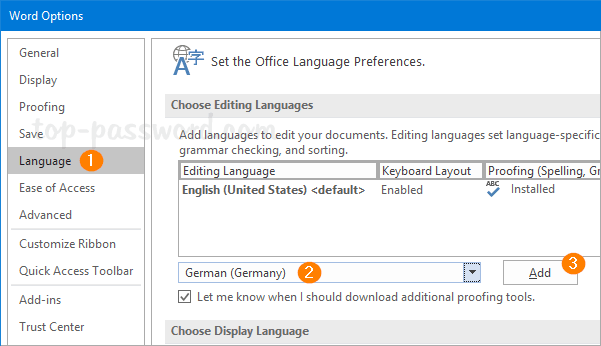
Open your Word application and go to File -> Options. When the Options dialogue box opens, select the Language tab. Under the “Choose Editing Languages” section, select your desired language from the drop-down list and click Add.

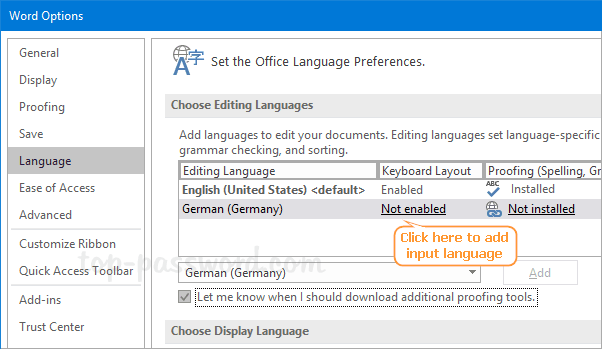
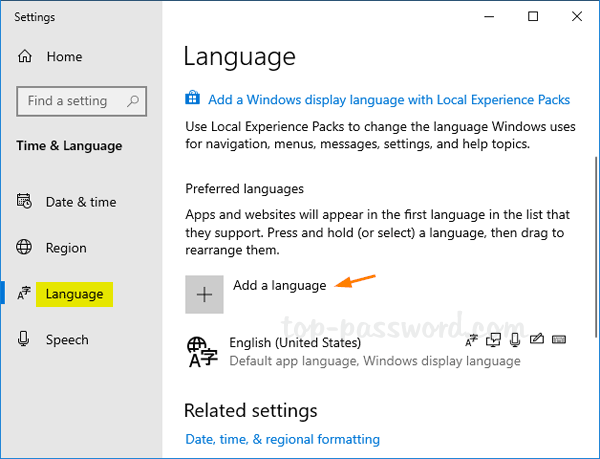
If the Keyboard layout column show “Not enabled“, then you have to add the input language to your Windows OS. Just click that link and it will directly open the Language page in the Settings app.

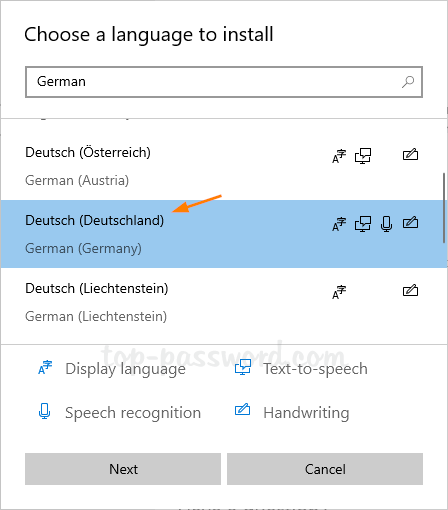
Click the Add a language button.

Find the desired language you want to add, and click Next.

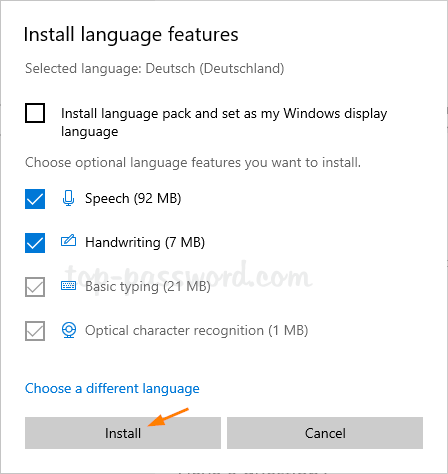
Click the Install button to download the language pack and keyboard for that language.

Part 3: Add Proofing Tools

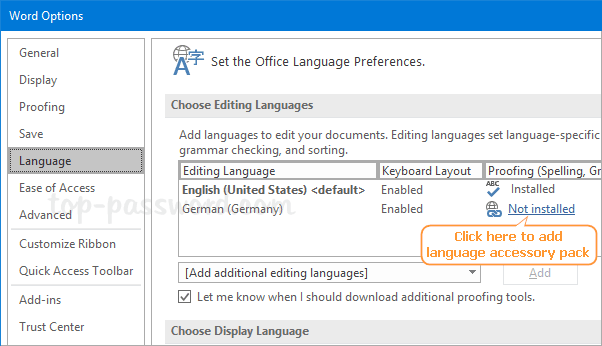
If the Proofing column show “Not installed“, then you have to download language accessory pack for spelling and grammar checking. Just click that link and it will open the Language Accessory Pack for Office page with your web browser.

Click the “Newer versions” drop-down list and select your desired language. The Language Accessory Pack comes with both 32-bit and 64-bit versions. You need to download the appropriate one depending on the architecture of your Office.

After the download is complete, just double-click it and you can go through the installation process in a minute or two.

Part 4: Change Editing and Display Language for Office

Under the “Choose Editing Languages” section, you should see that the keyboard layout and proofing tools for your desired language are successfully installed. Just select your desired language and click on Set as Default.

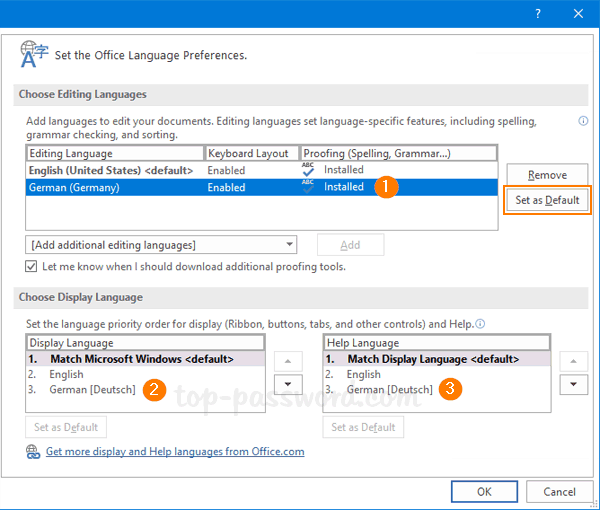
Go to the “Choose Display Language” section to change the language for the display (user interface) and the Help files. Once you’re finished, restart Office for the new language to take effect.

How to Unlock the Keyboard on Windows 10 / 8 / 7 Computer

May 28th, 2019 by Admin

Keyboard is locked and you can’t type anything? If you’ve locked the keyboard unintentionally and couldn’t recall how you did it, just follow this troubleshooting tutorial and you should be able to unlock the keyboard on your Windows 10 / 8 / 7 computer.

Before getting started, you have to find if certain keys or the entire keyboard has broken physically. For external USB / PS2 keyboard, you can connect it to a different computer. If the issue still exists, it is possible that your keyboard is physically damaged. Otherwise, it should be a software issue and you can fix it with the steps below.

Step 1: Turn Off Filter Keys

If your entire keyboard is locked, it’s possible that you’ve turned on the Filter Keys feature accidentally. When you hold down the right SHIFT key for 8 seconds, you should hear a tone and the “Filter Keys” icon appears in the system tray. Just then, you’ll find that the keyboard is locked and you can’t type anything.

To unlock the keyboard, you have to hold down the right SHIFT key for 8 seconds again to turn off Filter Keys, or disable Filter Keys from the Control Panel.

Step 2: Turn Off NumLock

If your keyboard doesn’t type the correct characters, it’s possible that you’ve turned on NumLock or you’re using a incorrect keyboard layout. To fix such issue, you have to disable NumLock or change your keyboard layout by following these tutorials:

Step 3: Reinstall or Update Keyboard Driver

The keyboard may become locked due to a faulty or outdated driver. To get your keyboard back to work, you may need to reinstall or update the keyboard driver. Follow these steps:

Open Device Manager and expand the Keyboards category. Right-click on your computer’s keyboard and select either Update driver or Uninstall device.

If you’ve chosen the “Uninstall device” option, restart your PC. Windows will automatically install the default keyboard driver.

Conclusion

With these troubleshooting tips you should be able to unlock your keyboard most of the time. If you problem still persists, try to contact your computer’s manufacturer or seek help from their forums. For HP Pavilion laptop, you might unlock the keyboard by pressing the Ctrl + PrntScr keyboard shortcut.

How to Reduce PowerPoint File Size in Office 2019 / 2016

May 27th, 2019 by Admin

How can I reduce the size of my PowerPoint presentation and make it easier to upload or share? Embedded pictures are the common cause for large PowerPoint files. In this tutorial we’ll show you an easy way to compress the embedded images and reduce the PowerPoint file size in Office 2019 / 2016.

How to Reduce PowerPoint File Size in Office 2019 / 2016

  1. Open the PowerPoint file you want to compress with Office 2019 / 2016 application. Click the File tab in the upper-left corner.

  2. In the new window, select the Save As tab on the left side and then click on the Browse icon.

  3. You’ll then need to choose where to save the compressed PowerPoint file and give it a new file name.

  4. Click the Tools drop-down list in the lower right of the Save As dialog, and select Compress Pictures.

  5. Uncheck the “Apply only to this picture” option so you can reduce the size of all the images in your PowerPoint presentation. Leave the “Delete cropped areas of pictures” option checked, and select E-mail (96 ppi): minimize document size for sharing. Click OK.

  6. When you come back to the Save As dialog, click on Save. You’ll get a smaller PowerPoint file with all the embedded images compressed. It’s as simple as that to reduce PowerPoint file size in Office 2019 / 2016.

How to Disable Windows 10 Face Recognition or Fingerprint Login

May 22nd, 2019 by Admin

How do I remove Window Hello from the Lock Screen? Windows Hello is a new feature based on biometric technology that lets you log in to Windows 10 with fingerprint or facial recognition. If you want to disable Windows Hello for saving battery life, here are several ways to disable Windows 10 Face Recognition or Fingerprint login.

Method 1: Remove Windows 10 Face Recognition or Fingerprint Login

  1. Press the Windows logo + I keyboard shortcut to open the Settings app, and head to Accounts -> Sign-in options. In the right-side pane, look for the Windows Hello section and click the Remove button under Face Recognition or Fingerprint.

  2. After completing the steps, you can once again sign in to Windows 10 using a password.

Method 2: Disable Windows Hello Biometrics Using Group Policy

  1. Open Local Group Policy Editor and navigate to: Computer Configuration -> Administrative Templates -> Windows Components -> Biometrics. Double-click the “Allow the use of biometrics” policy on the right pane.

  2. Select the Disabled option. Click Apply and then OK.

  3. Now, the Windows Hello feature is removed from the lock screen. If you open up the Settings app and head to the Sign-in options page, you should see a “Face and fingerprint recognition are not available on this device” message appear under Windows Hello.

Method 3: Disable Windows Hello Biometrics Using Registry Editor

  1. Open Registry Editor and browse to: HKEY_LOCAL_MACHINE\SOFTWARE\Policies\Microsoft\Biometrics. If the Biometrics key doesn’t exist, you have to create it.
  2. Right-click on the Biometrics key and select New -> DWORD (32-bit) Value. Name it Enabled and leave its value data to 0. (0: disallow the use of biometrics; 1: Allow the use of biometrics)

  3. Close Registry Editor and reboot your PC to apply the changes.

How to Disable Early Launch Anti-Malware Protection in Windows 10 / 8

May 20th, 2019 by Admin

In Windows 10 / 8, Microsoft has implemented Early Launch Anti-Malware (ELAM) protection which can check the integrity of system files and prevent malicious drivers or programs from starting very early in the boot process. The well documented sticky keys exploit lets you escalate privilege from Windows login screen, but it is no longer working because of ELAM.

However, if a driver is classified as malware by ELAM because it is malicious or a false positive, it may prevent your system from booting. To solve this issue, you may need to temporarily turn off ELAM so that you can either update your antivirus software or remove the problematic malware driver. In this tutorial we’ll show you a simple way to temporarily disable Early Launch Anti-Malware protection in Windows 10 / 8.

How to Disable Early Launch Anti-Malware Protection in Windows 10 / 8

  1. When you are on Windows login screen, click the Power button, hold down Shift key and choose the Restart option to access the Advanced Boot Options screen.

    If you don’t even get to the Windows login screen, just boot your PC with Windows installation media and click on “Repair your computer“.

  2. Next, click on the Troubleshoot option.

  3. Click on Advanced options.

  4. If you couldn’t see the Startup Settings option, click on See more recovery options.

  5. Click on Startup Settings.

  6. Click on the Restart button.

  7. Your computer should automatically reboot into the Startup Settings menu as shown below. Now, you can press the 8 or F8 key on your keyboard to disable early-launch anti-malware protection.

  8. This will launch Windows, but with the early launch anti-malware protection disabled temporarily. Note that the next time you restart the computer, early-launch anti-malware protection will automatically be enabled again.

How to Change Office 2019 / 2016 Product Key with Ease

May 18th, 2019 by Admin

Your Office license has expired and need to replace it with a new product key? Need to change Office product key because it’s already activated by the maximum number of times? In this tutorial we’ll show you 2 easy ways to change Office 2019 / 2016 product key without re-installing.

Method 1: Change Office 2019 / 2016 Product Key from Office Application

  1. Open your Word or Excel application included in your Office 2019 / 2016 suite. Click on the File tab at the top-left.

  2. Select the Account tab. On the right side, click on the Change License button under the Office logo. If you’re using Office 2016, click on the Change Product Key link instead.

  3. You’ll be prompted to sign in to your Microsoft account which is linked with your new Office product key, or enter the product key instead.

Method 2: Change Office 2019 / 2016 Product Key with Command Prompt

  1. Open the Command Prompt as administrator. Navigate to Office installation folder by running this command:
    cd C:\Program Files\Microsoft Office\Office16

    If Office 2019 / 2016 32-bit is installed on 64-bit Windows, type this command instead:
    cd C:\Program Files (x86)\Microsoft Office\Office16

  2. Now, you can change your Office product key by running the command below:
    cscript ospp.vbs /inpkey:new_product_key

  3. Finally, type the following command to immediately activate your copy of Office 2019 / 2016 installation:
    cscript ospp.vbs /act

The methods given above are the options to directly change the product key in your Office 2016 / 2019 application. Of course, you can also choose to remove & deactivate your current Office license first and then enter your new product key the next time you launch Office application.

Free Ways to Optimize and Defrag Drives in Windows 10

May 16th, 2019 by Admin

As files are created or deleted over time, your disk will become fragmented, causing your system not to run as efficiently as it used to. To improve the performance of your PC, you have to defrag hard drive on a regular basis. Here are some free ways to optimize and defrag drives in Windows 10.

Method 1: Using the Built-in Optimization Drive tool

In File Explorer, right-click on the drive you want to defrag and select Properties from the context menu. When the Properties window appears, select the Tools tab and then click on Optimize.

A new window will appear with details about your hard disk drives. You can click on the Analyze button to tell you how fragmented the drives are, and then click on the Optimize button to begin the defragmentation.

Method 2: Optimize and Defrag Drives with Command Prompt

Open the Command Prompt as administrator, and then run the following command to optimize and defrag a specific drive in Windows 10:
defrag D: /O

Remember to replace D: with the actual drive you want to defrag. If you need to perform a boot-time defragmentation, try boot into Advanced Boot Options and access Command Prompt. From there you can run the above command to defrag your drives.

Method 3: Optimize and Defrag Drives with PowerShell

Open Windows PowerShell as administrator, and type the following command to analyze your drive. Look at the bottom of the output, it will advise whether or not you need to defrag the drive.
Optimize-Volume -DriveLetter D -Analyze -Verbose

If you decide to defrag a drive, execute this command:
Optimize-Volume -DriveLetter D -Defrag -Verbose

For Solid State Drive, defragging can cause performance issues and even reduce the life of the drive. You should use the trim command to erase unused blocks which are no longer in use:
Optimize-Volume -DriveLetter D -ReTrim -Verbose

Conclusion

There are also many free defragging tools (such as Auslogics Disk Defrag Free, Defraggler) that can make disk defragmentation easier and faster, but I think the built-in defrag tool in Windows 10 should be enough.

How to Find Office 2016 / 2019 Product Key or Backup Activation

May 15th, 2019 by Admin

Lost your Office 2016 product key? How can I backup or transfer Office activation to another computer? If you need to reinstall Windows or Office but you’ve lost 25-character product key, here are all possible ways to find Office 2016 / 2019 product key, or backup your Office activation so you can restore it later.

Method 1: Find Office 2016 / 2019 Product Key from Microsoft Account

If you bought Office online (e.g. Microsoft Store) without physical disc, your product key is stored in your Microsoft online account or arrived in your email receipt. Just sign in to Services & subscriptions with your Microsoft account, locate the Office one-time purchase and then click on the “View product key” link.

The Office product key associated with your Microsoft account will appear there. You can write down the product key and keep it somewhere safe.

Method 2: Find Office 2016 / 2019 Product Key from Windows Registry

If Microsoft Office 2016 or 2019 came preinstalled on your computer or your product key sticker is totally unreadable, then try to decrypt and extract the product key from Windows registry using the third-party software like KeyFinder Plus.

After launching the KeyFinder Plus program, click on Start Recovery and then choose “From current system” from the drop-down menu. It will scan the registry for available activation keys for Windows, Office and other softwares installed on your computer.

Method 3: Backup and Restore Office 2016 / 2019 Activation

If you still couldn’t recover your Office product key, the last resort is to backup Office activation before reinstalling Windows or Office, so you can reactivate it later. To do this, open File Explorer and browse to the location: C:\Windows\System32\spp. Make a backup copy of all its folders / files and save them to an external USB drive for safe keeping.

After installing a fresh copy of the same edition of Office, you can activate it by restoring the backup files to its original location: C:\Windows\System32\spp. When pasting the files, you may get an error messages informing me that “The action can’t be completed because the folder or a file in it is open in another program“. To get around this problem, just close the Office application and run the following command to stop the sppsvc service:
net stop sppsvc

When the files are restored, re-launch your Office application and you’ll find the product is already activated. You can also use this method to transfer Office activation over to another computer. But remember to deactivate Office on your old PC before restoring the activation to your new PC.

2 Ways to Export and Import Local Security Policy in Windows 10 / 8 / 7

May 13th, 2019 by Admin

How can I backup local security policy or transfer all policy settings from one system to another? In this tutorial we’ll show 2 simple ways to export and import local security policy in Windows 10 / 8 / 7.

Method 1: Export and Import Local Security Policy with GUI

The Local Security Policy Editor comes with the import / export feature, making it much easier to migrate or replicate the same local security policy settings across multiple computers.

Export:

  1. Press the Windows key + R together. When the Run dialog box shows up, type secpol.msc into it and hit Enter to open the Local Security Policy Editor.

  2. Right-click on Security Settings in the left-side pane, and you can then select “Export policy” from the context menu.

  3. Browse to the location where you want to save the security settings file (.INF), give it a name and click on Save.

  4. Open the .inf file with your text editor. As you can see, it contains all your local security policy, including your account lockout and password policy.

Import:

  1. Open the Local Security Policy Editor as before, right-click on Security Settings in the left pane and this time choose “Import policy“.

  2. Browse to the location where you saved the security settings file, select the INF file and click on Open.

  3. Reboot your computer to apply the new local security policy.

Method 2: Export and Import Local Security Policy with Command Prompt

To export the local security policy settings to a file (for example, security-policy.inf), open the Command Prompt as administrator and type the following:
secedit.exe /export /cfg D:\security-policy.inf

When you need to import the local security policy settings from the .INF file, simply run this command:
secedit.exe /configure /db %windir%\security\local.sdb /cfg D:\security-policy.inf

This method is very useful especially when you’re using the Home edition of Windows which has no Local Security Policy Editor.

How to Hide Wireless Network Password in Windows 10

May 8th, 2019 by Admin

Having Windows remember your WiFi password is a great convenience, but this will also make your wireless password exposed to anyone who has physical access to your computer. Just open the Properties of a WiFi adapter and we can check the “Show characters” option to view the saved wireless network security key/password.

This might inadvertently leak your WiFi password. In this tutorial we’ll show you a simple way to hide wireless password from the WiFi adapter’s properties window in Windows 10.

How to Hide Wireless Network Password in Windows 10

  1. Open the Registry Editor. Copy and paste the below line into the address bar and then hit Enter.
    HKEY_CLASSES_ROOT\AppID\{86F80216-5DD6-4F43-953B-35EF40A35AEE}

  2. Right-click on the subkey named {86F80216-5DD6-4F43-953B-35EF40A35AEE} in the left-side pane and then select Permissions from the context menu.

  3. Click on Advanced button.

  4. By default TrustedInstaller is showing up as the owner, and we need to click the Change link.

  5. Type the name of your Administrators group and then click the “Check Names” button to validate the account name. When that’s done, click OK.

  6. Now, back to the Advanced Security Settings window. Just keep the permission entry for the “System” account and remove all other entries from the list. When done, click OK.

  7. From now on, you should no longer be able to view your wireless password from the WiFi network adapter’s Properties window.

  8. However, this won’t prevent users from recovering your wireless password using third-party password cracking software or other methods described in this article: 3 Ways to Find Saved Wi-Fi Passwords on Windows 10

Whenever you need to get the the “Show characters” option back to work again, just grant your account access to the registry key: HKEY_CLASSES_ROOT\AppID\{86F80216-5DD6-4F43-953B-35EF40A35AEE}. Follow these steps:

  1. Open Registry Editor and navigate to HKEY_CLASSES_ROOT\AppID\{86F80216-5DD6-4F43-953B-35EF40A35AEE}. Right-click on the {86F80216-5DD6-4F43-953B-35EF40A35AEE} subkey and select Permissions.
  2. Click on Add button.

  3. Type Administrators in the “Enter the object names to select” text box, and click on Check Names button. If there is no error found, click OK.

  4. Back at the Permissions window, select the Administrators group and then click the Allow check box next to the “Full Control” permission.

  5. Click OK and close Registry Editor.