Archive for September, 2022

Add or Change Extensions for Multiple Files in Windows 11

September 29th, 2022 by Admin

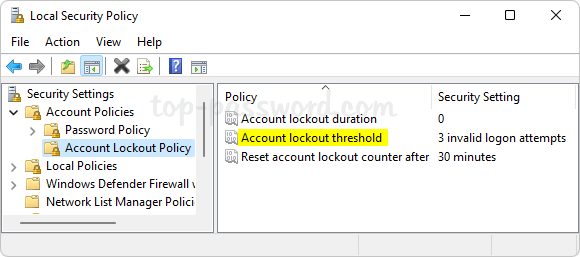
Is there an easy way to add an extension to multiple files which do not have an extension? How can I change file extension for all files in a folder? Changing file extension one by one can be a frustrating task if you have to process a large number of files. In this tutorial we’ll show you how to batch add or change extensions for multiple files located in a folder on Windows 11.

Part 1: Add Extension to All Files in a Folder

If you need to append file extension to all files in a folder, just open an elevated Command Prompt. Use the cd command to navigate to the target folder. To add an extension to all files at once, run this command. Replace .jpg with your desired file extension.
ren * *.jpg

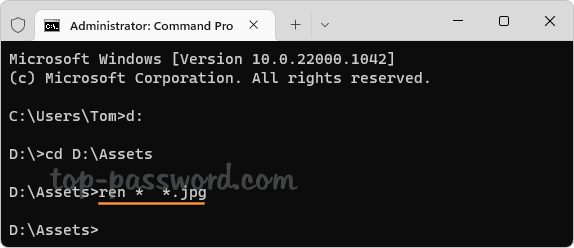
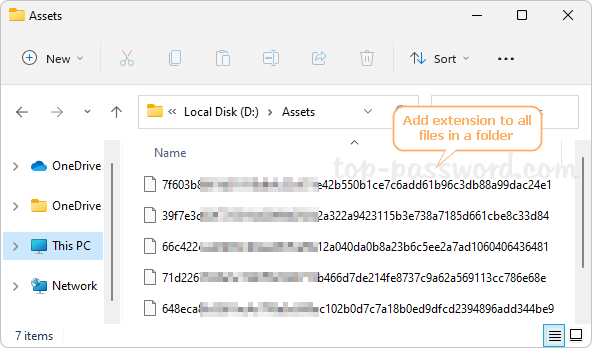
You can use this method to easily rename Windows spotlight images located in the directory: %LocalAppData%\Packages\Microsoft.Windows.ContentDeliveryManager_cw5n1h2txyewy\LocalState\Assets.

Part 2: Add Extension to All Files without Extension

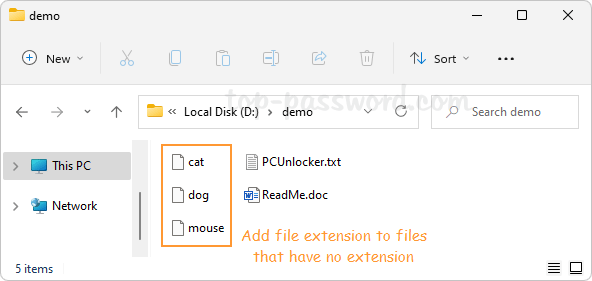
What to do if you have a folder with a bunch of images inside and you want to add .jpg file extension, but you need to exclude existing files which end with .doc or .txt?

To add .jpg extension to all files which have no extension, open Windows PowerShell as administrator and execute this command:

Get-ChildItem -exclude '*.doc','*.txt' | WHere-Object{!$_.PsIsContainer} | Rename-Item -newname {$_.name + ".jpg"}

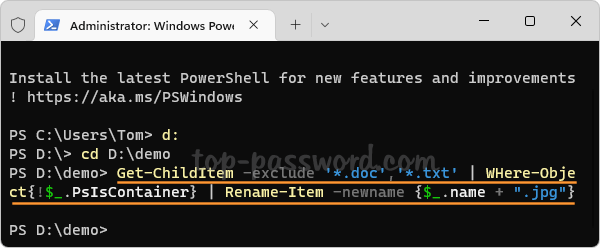
The “-exclude” parameter allows you to specify certain file types which you wish to exclude from appending file extension.

Part 3: Change File Extension of All Files in a Folder

When you need to change file extension for all files in a folder, open Command Prompt as administrator and run this command:
ren *.old_extension *.new_extension

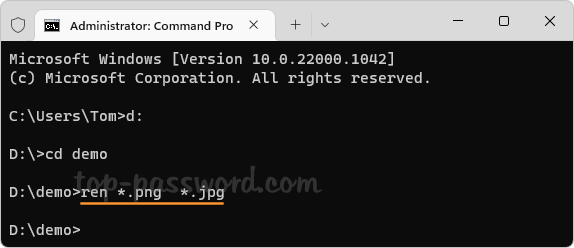
It will quickly rename all files with the new extension available in the command.

Proven Way to Prevent Creating New Scheduled Tasks in Windows 11

September 26th, 2022 by Admin

How can I prevent users from creating new tasks in task scheduler? There is a group policy named “Task Scheduler – Prohibit New Task Creation“, but it works with Windows 2003/XP only.

In this tutorial we’ll show you a proven way to prevent creating new scheduled tasks from either Task Scheduler or Command Prompt in Windows 11.

Part 1: Prevent Creating New Scheduled Tasks in Windows 11

  1. Right-click the Start button from the taskbar, and then choose “Windows Terminal (Admin)“.

  2. If Windows Terminal opens with a PowerShell prompt, click the downward arrow in the title bar, and select Command Prompt.

  3. At the elevated Command Prompt, run the following commands to change permissions of the folder “C:\Windows\System32\Tasks” and grant read & execute rights to Authenticated Users only.
    cacls C:\Windows\System32\Tasks /P "Authenticated Users":R

  4. From now on, nobody can create a new task using Task Scheduler or elevated Command Prompt.

Part 2: Restore Ability to Create New Scheduled Tasks in Windows 11

Whenever you need to allow users to create new tasks again, follow these steps:

  1. Open an elevated Command Prompt, run this command to take ownership of the directory “C:\Windows\System32\Tasks“.
    takeown /f C:\Windows\System32\Tasks /r

  2. Next, execute these commands to reset the folder permissions to defaults, and change ownership back.
    icacls C:\Windows\System32\Tasks /reset /T /Q /C
    icacls C:\Windows\System32\Tasks /setowner "System" /t

  3. When done, users can create new tasks from either Task Scheduler or elevated Command Prompt.

That’s it!

2 Methods to Change DPI Scaling for All Displays in Windows 11

September 21st, 2022 by Admin

By default, Windows uses a default display DPI of 96. If you find that the size of the text, icons and images is too small or bigger, you can consider increasing or decreasing DPI for your monitor. In this tutorial we’ll show you 2 simple methods to change DPI scaling level for all displays in Windows 11.

Method 1: Change DPI Scaling for All Displays via Settings App

  1. Open the Settings app by pressing Windows + I keyboard shortcut. Next, click Display on the right side.

  2. Click Scale under the “Scale & layout” section.

  3. Enter a scaling factor between 100 and 500 in the “Custom scaling” field, and click the tick button on the right-hand side to save your change.

    Here is the conversion table between DPI and scale factor/level:

    DPI Scale factor/level
    96 100
    120 125
    144 150
    192 200
  4. Click the “Sign out now” link to apply the new DPI.

    Whenever you need to use the default 96 DPI again, open the Settings app and navigate to System -> Display, click the “Turn off custom scaling and sign out” option.

Method 2: Change DPI Scaling for All Displays via Registry Editor

  1. Open Registry Editor and browse to the location: HKEY_CURRENT_USER\Control Panel\Desktop. In the right pane, double-click the DWORD Win8DpiScaling and change its value data to 1.

  2. Next, double-click the DWORD LogPixels to edit its value data. Enter a DPI value (in Decimal) of your choice from 96 to 480.

  3. You will now have to restart Windows to make the custom DPI take effect.

Whenever you need to disable custom DPI again, just open Registry Editor and browse to the same location, change the value data of Win8DpiScaling to 0. Windows 11 will ignore the LogPixels setting and use the default 96 DPI.

How to Make Text Larger in Windows 11 without Changing DPI

September 19th, 2022 by Admin

Is there a way to change the system font without scaling in Windows 11? If you feel the default font is too small, you can consider increasing the font size on your screen, which can help reduce eyestrain. In this tutorial we’ll walk you through the steps to make text larger in Windows 11, without changing DPI or scaling.

How to Make Text Larger in Windows 11 without Changing DPI

  1. Press the Windows + I keys to open up the Settings app. Choose the Accessibility category in the left sidebar, then click Text size on the right pane.

  2. Drag the slider next to “Text size” to increase the system font size until the sample text in the “Text size preview” is easy to read.

  3. Once you have reached the desired font size, click Apply. Th new text size will be applied system-wide. No need to restart your computer.

That’s it!

5 Methods to Open Local Security Policy Editor in Windows 11

September 13th, 2022 by Admin

Local Security Policy Editor can help you manage accounts policy, local policy, user rights assignment, and more. In this tutorial we’ll show you 5 fastest methods to open Local Security Policy Editor in Windows 11. Note that Local Security Policy Editor is not available in the Home edition of Windows 11.

Method 1: Open Local Security Policy Editor via Run

Press the Windows key + R together to open the Run dialog, then enter secpol.msc and click OK.

This should be the most common way to launch the Local Security Policy Editor.

Method 2: Open Local Security Policy Editor via Windows Terminal

Right-click the Start button on the taskbar and choose either “Windows Terminal” or “Windows Terminal (Admin)“.

When it opens the Windows PowerShell or Command Prompt tab, you can run the secpol.msc command to open the Local Security Policy Editor.

Method 3: Open Local Security Policy Editor via Search

Click the Search button on the taskbar, then type “Local Security Policy” in the text box at the top of the pop-up window.

The Local Security Policy Editor app will appear under the “Best match” section. You can open it with / without admin rights.

Method 4: Create a Desktop Shortcut to Open Local Security Policy Editor

Open File Explorer and browse to the directory: C:\Windows\System32. Click the Search box in the upper right-hand corner, type secpol.msc and press Enter.

Right-click the secpol.msc program which appears in the search result, and choose “Show more options” from the pop-up menu.

Select “Send to“, and then “Desktop (create shortcut)“.

You can then double-click the secpol.msc shortcut on your desktop to open Local Security Policy Editor.

Method 5: Using Local Group Policy Editor

Local security policy is a subsection of group policy. After opening Local Group Policy Editor, go to Computer Configuration -> Windows Settings -> Security Settings, and you can view and edit local security policy over there.

That’s it!

Another Way to Backup and Restore Drivers in Windows 11

September 3rd, 2022 by Admin

Need to save all your installed drivers on your PC? Before doing a clean install, it’s advise to backup all existing drivers so you don’t need to spend time downloading each driver and avoid compatibility issues. We’ve already covered how to backup & restore device drivers using the DISM command. In this tutorial, we’ll show you another way to backup and restore drivers in Windows 11.

Part 1: Backup and Restore Drivers Using Windows Terminal

  1. Right-click the Start button on the taskbar and click “Windows Terminal (Admin)“.

  2. When the Command Prompt or Windows PowerShell launches, enter the following command and press Enter to backup all your drivers. Make sure you replace D:\DriverBackup with the folder you created for saving the exported drivers.
    pnputil /export-driver * "D:\DriverBackup"

    Just like creating driver backup, restoring it is also pretty simple and easy to perform. Just run this command to reinstall all the drivers you’ve saved.
    pnputil /add-driver "D:\DriverBackup\*.inf" /subdirs /install

Part 2: Restore All Drivers Using Device Manager

  1. Press the Windows key + R together to open a Run window. Type devmgmt.msc and then click OK to launch Device Manager.

  2. Right-click your computer’s name at the top of the device list, and choose Add drivers.

  3. Click on Browse to select the location where you’ve backed up the device drivers, tick the “Include subfolders” checkbox and click Next.

  4. The program will restore and install all your drivers and Windows 11 can then identify the unknown devices with their proper drivers.

That’s it!

Prevent Standard Accounts from Changing Password in Windows 11

September 1st, 2022 by Admin

Look for a way to restrict standard users from changing their own password? How can I disable change password option in the Settings app? If you’re ready to create a standard local account to share a PC with your family or friends, it’s advisable to restrict them from changing the password without your permission. In this tutorial we’ll show you 2 methods to prevent standard accounts from changing password in Windows 11.

Method 1: Prevent Standard Accounts from Changing Password via lusrmgr. msc

  1. Press the Windows key + R together to launch the Run box. Type lusrmgr.msc and then press Ctrl + Shift + Enter to open Local Users and Groups MMC snap-in. If you’re logged in as a standard account, it will prompt you to enter admin password.

  2. In the left pane, expand Local Users and Groups and click Users. Double-click the standard user which you want to disable the password change option for.

  3. Tick the box next to “User cannot change password“. Click Apply and then OK.

  4. When other people sign in to your PC with that standard account, open the Settings app and navigate to Accounts -> Sign-in options -> Password, they will find the Change button is greyed out.

Method 2: Prevent Standard Accounts from Changing Password via Windows Terminal

  1. Right-click the Start button on the taskbar and choose “Windows Terminal (Admin)“.

  2. Run the following command to prevent a user from changing password. Replace user_name with the actual user name of your standard local account.
    net user "user_name" /PasswordChg:No

  3. The standard user account should be unable to change its own password without admin password.

That’s it.