Archive for March, 2022

How to Reset or Change Default Apps for File Types in Windows 11

March 29th, 2022 by Admin

Windows doesn’t open your desired app for .jpg file extension? File type associations messed up? File associations decide which application opens when a file is double-clicked. In this tutorial we’ll show you how to restore corrupted file associations to default, or change default apps for file types in Windows 11.

Part 1: Reset Corrupted File Type Associations

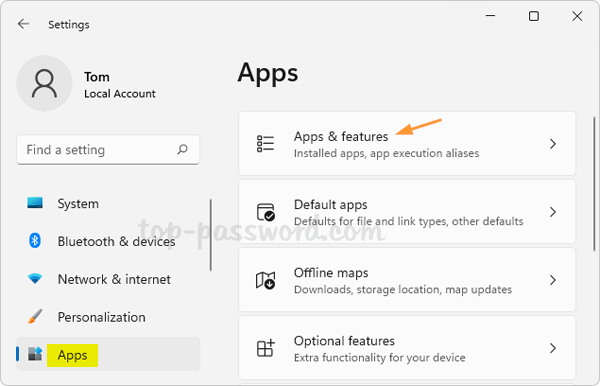
Press Windows + I on the keyboard to open the Settings app. Select Apps in the left navigation pane, and then click “Default apps” on the right.

You’ll see a list of default apps. Scroll down to the bottom and click the Reset button.

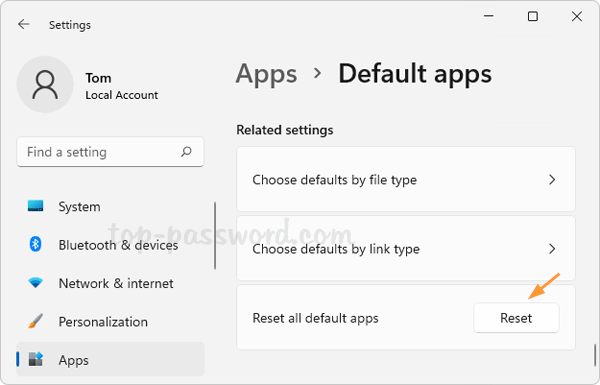
A pop-up window will ask you to confirm. Click OK and it will restore all file type associations to Microsoft recommended defaults.

Part 2: Change Default App Associations

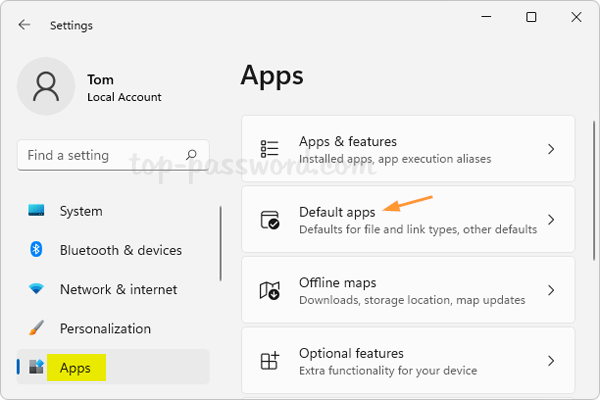
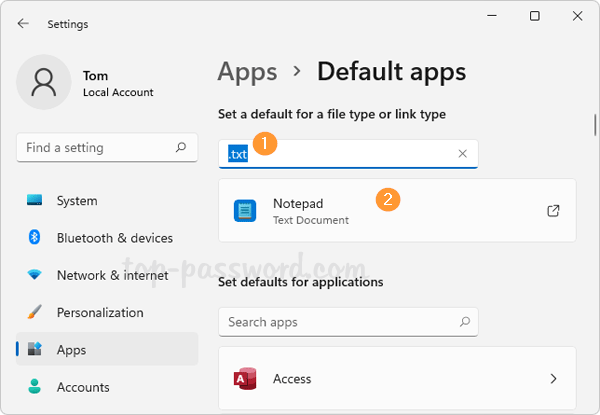
Open the Settings app using the same method as above, and navigate to: Apps -> Default apps. In order to quickly change default apps for specific file extensions, you can search for either file type or or default app.

Change File Associations by File Types:

Just type the file extension (for example, .txt) in the text box at the top and press Enter. You’ll see the app with which it is currently associated. Just click on that app to change the association.

You’ll get a pop-up which asks how do you want to open this file extension from now on. Click the More apps option and select the desired app you want to use, and click OK.

Change File Associations by Default App:

Click the text box labeled “Set defaults for applications“, and type the name of the current default app which you would like to change. When the app you’re searching for comes up, click on it.

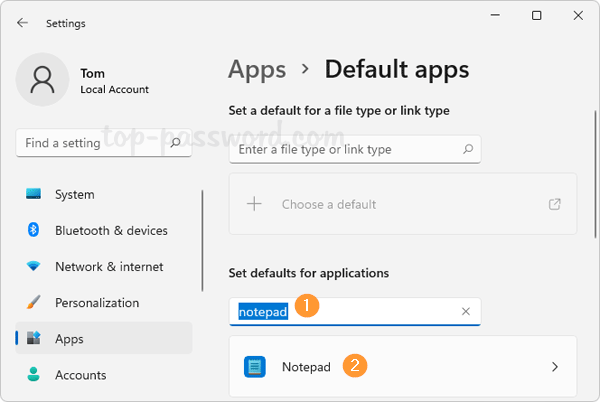
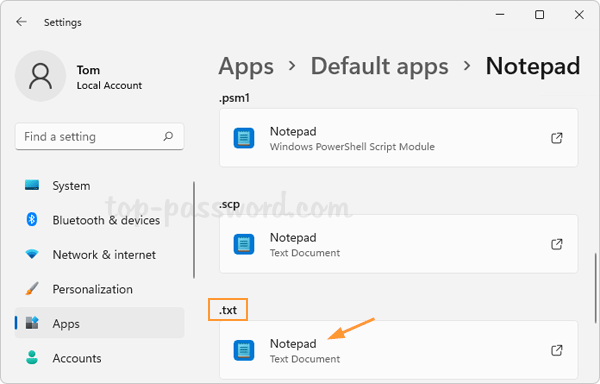
It will display a list of file extensions which can be associated with this app. You can click your desired file type and change the file association to a different program.

That’s it!

How to Create Execution Aliases for Specific Apps in Windows 11

March 23rd, 2022 by Admin

Unable to turn on App Execution Aliases for your desired application through the Settings app? Don’t worry! You can make a program alias using a registry tweak. In this tutorial we’ll walk you through the steps of creating an execution alias for any specific app in Windows 11.

How to Create Execution Aliases for Specific Apps in Windows 11

  1. Open Registry Editor and navigate to: HKEY_CURRENT_USER\Software\Microsoft\Windows\CurrentVersion\App Paths. In the left pane, right-click on the “App Paths” key and select New -> Key.

  2. Name the new key with a meaningful alias of your desired app. The alias should end with the “.exe” extension. Next, double-click the (Default) value in the right pane.

  3. Enter the absolute filename of your app’s executable file, and click OK.

  4. Next, right-click the blank area in the right pane and select New -> String Value.

  5. Name the string “path”, and change its value data to the full path (minus the filename itself) of your app.

  6. Close Registry Editor. Now you can type that alias in the Run command box, Command Prompt or PowerShell to launch your app quickly.

Conclusion

That’s how you can create an execution alias for any specific app in Windows 11. When you need to rename the app alias, just open Registry Editor and browse to: HKEY_CURRENT_USER\Software\Microsoft\Windows\CurrentVersion\App Paths, expand the “App Paths” key in the left pane. Right-click the subkey which is named with your app alias, and rename it with a new alias.

How to Enable or Disable App Execution Aliases in Windows 11

March 22nd, 2022 by Admin

In Windows 11, apps can declare an unique alias name used to run the app from Command Prompt. When the App Execution Aliases feature is turned on, you can use an alias to start your app without having to specify the full path to your app. In this tutorial we’ll show you how to enable or disable App Execution Aliases in Windows 11.

How to Enable or Disable App Execution Aliases in Windows 11

  1. Open Windows Settings app by pressing the Windows + I keyboard shortcut, and then navigate to Apps -> Apps & features.

  2. Click More settings on the right side.

  3. Click App execution aliases.

  4. You’ll see a list of apps as well as their alias names. The alias names always end with the “.exe” extension. You can turn on or off the toggle switch next to your desired apps.

    For example, if you’ve enabled App Execution Aliases for the “Windows Terminal” app, then you can simply type wt.exe in the Command Prompt to launch Windows Terminal. When you disable its alias name, you’ll get the error message:

    ‘wt’ is not recognized as an internal or external command, operable program or batch file.

That’s it!

How to Remove the “ENG US” Language Bar from Windows 11 Taskbar

March 17th, 2022 by Admin

How can I hide the “ENG US” language switcher icon in the notification area? If you get used to changing the input languages with keyboard shortcut, it’s not necessary to show the language bar icon in the taskbar. In this tutorial we’ll show you how to easily remove the “ENG US” language bar from Windows 11 taskbar.

How to Remove the “ENG US” Language Bar from Windows 11 Taskbar

  1. Press the Windows + I shortcut keys to bring up the Settings app. Select Time & language from the left navigation pane, and click Typing on the right side.

  2. Choose the “Advanced keyboard settings” option.

  3. Tick the “Use the desktop language bar when it’s available” checkbox and then click the “Language bar options” link.

  4. Select the Hidden option under the Language Bar section. Click Apply and then OK.

  5. This should immediately remove / hide the “ENG US” language icon from your taskbar.

Conclusion

This method can also remove floating language bar from Windows 11 desktop. If you keep using the system default language on your computer, just uninstall the other language packs and the “ENG US” language switcher icon will automatically disappear from the taskbar.

Show Language Bar on Taskbar or Desktop in Windows 11

March 14th, 2022 by Admin

How can I remove floating language switch bar? Can I dock the language bar in the taskbar? If you have installed more than one language, you can switch languages using the language bar. In this tutorial we’ll show you how to configure Windows 11 to show language bar on the taskbar or desktop.

How to Show Language Bar on Taskbar or Desktop in Windows 11

  1. Press the WIN + I keyboard shortcut to launch Windows Settings app. Click Time & language on the left side, and click Typing on the right pane.

  2. Click the “Advanced keyboard settings” option.

  3. If you would like to configure the language bar to be docked in the taskbar, just uncheck the “Use the desktop language bar when it’s available” option and you’re done.

    When you need to show floating language bar on the desktop, check the “Use the desktop language bar when it’s available” option. Next, click the “Language bar options“.

    Make sure that at least the “Floating On Desktop” option is selected. You can optionally configure desktop language bar to show text labels or show as transparent when inactive.

That’s it!

4 Methods to Disable / Remove Widgets on Windows 11 Taskbar

March 8th, 2022 by Admin

How can I remove the Widgets icon from the taskbar in Windows 11? If you accidentally hover over the Widgets icon on the taskbar, the Widgets panel will pop out from the left side of the screen. This could be quite annoying if you are not interested in news, weather or stocks.

In this tutorial we’ll show you 4 methods to disable, remove or uninstall the Widgets button from the taskbar on Windows 11.

Method 1: Remove Widgets from Taskbar Using Settings App

  1. Right-click the blank area in the taskbar and choose “Taskbar settings“.

  2. The Settings app will open and take you to the page: Personalization -> Taskbar. On the right, turn off the toggle next to Widgets.

  3. The weather widget will no longer be present in your taskbar.

Method 2: Remove Widgets from Taskbar Using Registry Editor

  1. Open Registry Editor and navigate to: HKEY_CURRENT_USER\Software\Microsoft\Windows\CurrentVersion\Explorer\Advanced. On the right-hand pane, look for the DWORD TaskbarDa and double-click on it.

  2. When a small pop-up window appears, change its value data from 1 to 0. Click OK.

  3. Close Registry Editor. The weather widget will disappear from the Windows 11 taskbar. Whenever you need to restore the Widgets icon, simply change the value data of TaskbarDa to 0.

Method 3: Disable Widgets in the Taskbar Using Group Policy

  1. Open Local Group Policy Editor and browse to: Computer Configuration -> Administrative Templates -> Windows Components -> Widgets. Double-click the “Allow widgets” policy on the right pane.

  2. Choose the Disabled option. Click Apply and then OK.

  3. Restart your computer to apply the changes. The widgets icon will be removed from the taskbar and you will also find the “Widgets” option in the Settings app is greyed out.

Method 4: Uninstall Widgets Using PowerShell or Command Prompt

  1. Open Windows Terminal as administrator and run the following command to uninstall the Widgets feature.
    winget uninstall "windows web experience pack"

  2. When you’re asked if you agree to all the source agreements terms, type Y and press Enter.

  3. After a while, the Windows Web Experience Pack will be uninstalled successfully. Restart your computer and the widgets icon will no longer show up in the taskbar. If you launch the Settings app and go to: Personalization -> Taskbar, you’ll see that the Widgets option is also removed.

Whenever you need to enable the Widgets feature, use your Web browser to visit the Windows Web Experience Store link and click the Get button. It will launch Microsoft Store and let you download and install the Windows Web Experience Pack with ease.

Add File Explorer to Different Areas of Start Menu in Windows 11

March 7th, 2022 by Admin

Is File Explorer shortcut missing from the Start menu? In this tutorial we’ll show you how to add File Explorer to different areas of the Start menu in Windows 11.

Method 1: Add File Explorer to the Pinned Section of Start Menu

  1. Click the Search button (a magnifying glass) on the taskbar, and then type “file explorer” in the search field at the top. When you see the File Explorer app, right-click it and select “Pin to Start“.

  2. The File Explorer icon will appear in the Pinned section of the Start menu. You can drag your pinned apps on the Start menu to change their order.

Method 2: Add File Explorer to the Bottom of Start Menu

  1. Press the WIN + I keyboard shortcut to launch the Settings app. Select Personalization in the left sidebar, and then click Start on the right pane.

  2. Click the “Folders – These folders appear on Start next to the Power button” option.

  3. Turn on the switch next to the “File Explorer” folder.

  4. The File Explorer shortcut will immediately appear on your Start menu next to the Power button.

That’s it!

How to Enable Dark Mode for Notepad in Windows 11

March 2nd, 2022 by Admin

Since Windows 11 February 2022 update, the Notepad app is redesigned and it adds new highly requested features like multi-level undo, dark mode and a modern search interface. In this tutorial we’ll show you how to enable dark mode for Notepad in Windows 11.

How to Enable Dark Mode for Notepad in Windows 11

After launching the Notepad app, click the Settings button (the gear icon) on the top right corner.

Click the App theme button to expand its settings.

Simply select the Dark option to turn on the dark mode for Notepad only.

If you choose the “Use system settings” option, Notepad will automatically switch between dark mode and light mode depending on the system-wide setting in the Settings app.

Windows 11 Fix: No power options available in Start Menu

March 1st, 2022 by Admin

When you click the Power button in the Start Menu, you may get this message saying “There are currently no power options available” and can no longer use the restart and shut down options. In this tutorial we’ll show you exactly how to fix such issue in Windows 11.

Method 1: Grant Permissions to Shut down PC

  1. Press the WIN + R keyboard shortcut to bring up the Run box, type secpol.msc and hit Enter.

  2. When the Local Security Policy window opens, navigate to: Security Settings -> Local Policies –> User Rights Assignment. On the right pane, double-click the policy called “Shut down the system“.

  3. Click on the “Add User or Group” button.

  4. Type the name of the user account that you want to grant shutdown permissions to, and click OK.

  5. Log out of your account and log in to see if the power options are available.

If you’re on Windows 11 Home, the Local Security Policy snap-in (secpol.msc) is missing and the above steps don’t help. In that case, you can choose to reset your local security policy settings to default. Just open the elevated Command Prompt and execute this command:
secedit /configure /cfg %windir%\inf\defltbase.inf /db defltbase.sdb /verbose

Method 2: Disable the Group Policy which Causes No Power Options Available

  1. Open Local Group Policy Editor and browse to: User Configuration -> Administrative Templates -> Start Menu and Taskbar. On the right pane, double-click the “Remove and prevent access to the Shut Down, Restart, Sleep, and Hibernate commands” policy.

  2. If this policy is enabled, just change it to “Not Configured” or “Disabled“. Click Apply and then OK.

  3. Restart your computer to make the changes take effect.

Since the Local Group Policy Editor is missing in Windows 11 Home edition, you may need to disable the above group policy using Registry Editor. Just navigate to the registry location: HKEY_CURRENT_USER\SOFTWARE\Microsoft\Windows\CurrentVersion\Policies\Explorer, and then delete the NoClose value on the right pane.

Method 3: Run the Power Troubleshooter

  1. Press the WIN + I keyboard shortcut to launch the Settings app. While the System category is selected in the left sidebar, click Troubleshoot on the right pane.

  2. Click on “Other troubleshooters“.

  3. Scroll down to find the Power troubleshooter and click on the Run button.

  4. The Power troubleshooter will automatically fix any power related problems.

Conclusion

That are the most common methods to fix the issue “There are currently no power options available”. If you’re still encountering the issue, try to reset power plan settings to default or perform a system restore.