Archive for October, 2017

Print a List of Currently Running Processes in Windows 11 / 10 / 8 / 7

October 30th, 2017 by Admin

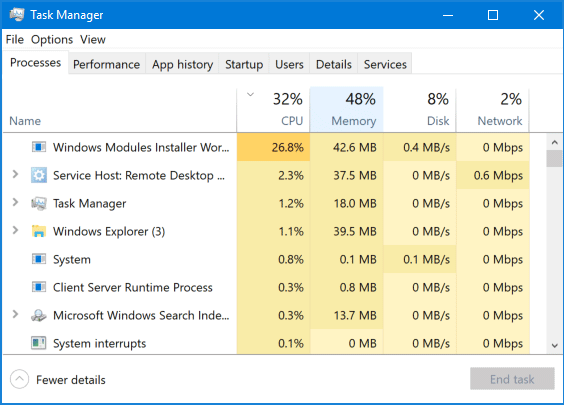
How can I list out all the running processes on a Windows machine? You can use Task Manager to view a list of processes running on your computer, but it doesn’t provide you an option to print or save the processes list. In this tutorial we’ll show you 2 simple ways to print a list of currently running processes in Windows 11 / 10 / 8 / 7.

Method 1: Print the List of Running Processes Using Command Prompt

  1. Open the Command Prompt.
  2. Run the following command and it will save the list of running processes in a file named processes.txt.

    tasklist > C:\processes.txt

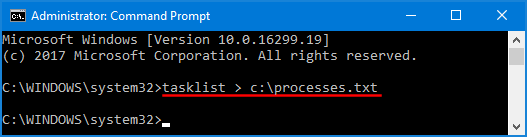
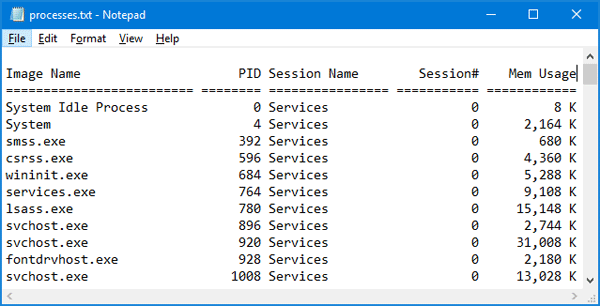
  3. Open the output text file in NotePad which allows you to print the processes list.

Method 2: Print the List of Running Processes Using PowerShell

  1. Open the Windows PowerShell.
  2. In order to save the list of running processes in a file named processes.txt, on your C:\ drive, type the following command and press Enter.

    Get-Process | Out-File C:\processes.txt

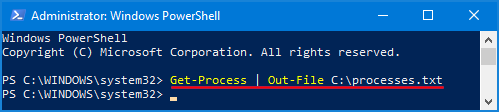
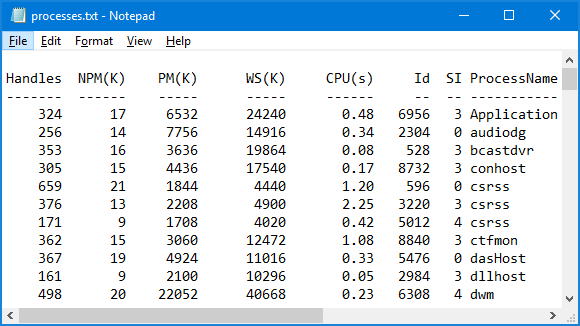
  3. The output text file is formatted as shown below.

Conclusion

Of course, you can also find other ways to print out the list of the processes that are running in Windows 11 / 10 / 8 / 7. For example, you can run the following command at Command Prompt:

wmic /output:C:\process.txt process

Or use the third-party freeware PsList that is developed by Sysinternals.

How to Turn On / Off Game Mode in Windows 10

October 26th, 2017 by Admin

Game Mode is a new feature introduced since Windows 10 Creators Update, which can improve gaming performance by preventing any other programs from hogging CPU and GPU cycles. While playing game, you should enable Game Mode if you don’t wish to be bothered by Windows Update or you’ve got some CPU/RAM-intensive programs like Chrome running in the background. In this tutorial we’ll show you how to turn on / off Game Mode for your preferred game in Windows 10 Fall Creators Update.

Part 1: Check If Your System Supports Game Mode

Before getting started, you need to check if your computer supports Game Mode. Press the WIN + I shortcut to open the Settings app. Click on Gaming.

Select the Game Mode tab in the left pane. You should see a text saying “This PC supports Game Mode“.

Next, move to the Game bar tab and find out the keyboard shortcut which we’ll later use to open Game bar. By default, it’s WIN + G.

Part 2: Turn On / Off Game Mode in Windows 10

While you are in the game, press the WIN + G keyboard combination to open the Game bar. Next, click the Settings icon to the extreme right.

In the next screen that opens, check the box labeled “Use Game Mode for this game“. If you want to disable Game Mode later, just uncheck that box.

Now close the dialog box. You need to restart the game for the changes to take effect.

How to Download and Use Offline Maps in Windows 10

October 25th, 2017 by Admin

Windows 10 comes with a built-in Maps app that can help you get to where you need to go. If you would like to search for places and get directions even when Internet connectivity is not available, you should download maps for offline use. In this tutorial we’ll show you how to download and use offline maps in Windows 10.

Part 1: Download Offline Maps in Windows 10

Press the WIN + I keyboard shortcut to open the Settings app. Go to Apps > Offline maps. Click the plus symbol next to Download maps.

Select the continent, country and specific region you wish to download. If you want to download the entire USA map available, you can choose “All regions”.

You’ll be shown the progress while your map downloads.

If a map update becomes available, it’ll be downloaded automatically when your device is plugged in and connected to Wi-Fi.

Part 2: Use Windows 10 Maps App for Offline Navigation

Now that you’ve downloaded the offline maps, you can use Windows 10 Maps app for offline navigation when you’re in a location without Internet connection.

First, type maps into the Cortana search box and launch Maps app from the search result.

When the Maps app is launched, you have the same search and navigation functionality offline as you do online.

That’s it!

How to Change RDP Port for Windows Remote Desktop Connection

October 25th, 2017 by Admin

By default, Windows uses TCP/IP port 3389 for remote desktop connection. Since this port is well known and it could pose a security risk, you’d better change remote desktop RDP port for your Windows computer as an added security measure. The following method works with Windows 10, 8, 7 and Windows Server.

How to Change RDP Port for Windows Remote Desktop Connection?

  1. Press the Windows + R keys to open the Run command box. Type regedit and press Enter.

  2. On the left-side of Registry Editor, navigate to the following key:
    HKEY_LOCAL_MACHINE\System\CurrentControlSet\Control\TerminalServer\WinStations\RDP-Tcp\PortNumber

    Scroll down on the right until you see the PortNumber value, and then double-click it to modify.

  3. Click Decimal, and type in the new port number that you want to use for remote desktop and click OK.

  4. Close the Registry Editor and reboot the computer. Note that the next time you connect to your PC with RDP you will need to add a colon followed by the port number to the IP address.

That’s it!

How to Access Safe Mode Command Prompt in Windows 10 / 8

October 23rd, 2017 by Admin

Safe Mode Command Prompt is a special boot mode that lets you start Windows with the minimum of drivers and services possible. This is really useful for troubleshooting when you can’t load Windows (for example, user profile is corrupted or broken). In this tutorial we’ll show you how to access Safe Mode Command Prompt in Windows 10 / 8.

Tips: If you’re running Windows 7/Vista/XP, just hold down the F8 key as your computer starts and you can access “Safe Mode with Command Prompt” under Advanced Startup Options.

How to Start Windows 10 / 8 in Safe Mode with Command Prompt?

  1. When you get to the Windows 10/8 login screen, hold down the SHIFT key while you click the Power icon and then select the Restart option.

  2. The system will restart into Advanced Startup Options. Click on Troubleshoot.

  3. Click Advanced options on the next screen.

  4. Click on the Startup Settings option.

  5. Click Restart.

  6. After restarting, you’ll be presented with a list of features and boot options. Here you should press the number 6 key or F6 on your keyboard to enter Safe Mode with Command Prompt.

  7. You will be prompted to choose the account to sign in. After you sign in, you will be brought directly to a administrative Command Prompt rather than the normal Windows desktop.

Disable / Enable Control Panel in Windows 10 / 8 / 7

October 23rd, 2017 by Admin

How to prevent others from accessing the Control Panel? Control Panel exposes lots of system settings to users that you may not want to mess up. In this tutorial we’ll show you 2 simple ways to disable or enable Control Panel in Windows 10 / 8 / 7.

Tips: The Settings app is supposed to replace the classic Control Panel in Windows 10. If you want to disable Settings, you can try this method: Hide Certain or All Settings Pages in Windows 10.

Method 1: Disable / Enable Control Panel Using Group Policy

  1. Use the Windows key + R keyboard shortcut to open the Run command. Type gpedit.msc and click OK to access Local Group Policy Editor.
  2. Navigate to the User Configuration > Administrative Templates > Control Panel option from the left sidebar. Next, double-click the “Prohibit access to Control Panel and PC settings” or “Prohibit access to the Control Panel” policy on the right side.

  3. Select the Enabled option, click Apply and then OK. If you want to enable the Control Panel later, just set the value to Not Configured or Disabled.

  4. This policy should take effect immediately. No restart is required. When you try to open the Control Panel, you’ll get this error message: “This operation has been canceled due to restrictions in effect on this computer. Please contact your system administrator.

Method 2: Disable / Enable Control Panel Using Registry Editor

  1. Use the Windows key + R keyboard shortcut to open the Run command. Type regedit and click OK to access Registry Editor.
  2. Navigate to HKEY_CURRENT_USER\Software\Microsoft\Windows\CurrentVersion\Policies\Explorer from the left sidebar, right-click empty space in the right pane and choose New > DWORD (32-bit) Value.

  3. Name your new value NoControlPanel and change the value from 0 to 1.

  4. Restart needed for the registry changes to take effect. After rebooting you’ll be unable to open Control Panel. If you want to restore access to Control Panel, just change the NoControlPanel value from 1 back to 0. That’s it!

Restrict Windows 10 from Collecting Diagnostic and Usage Data

October 20th, 2017 by Admin

By default, Windows 10 will automatically collect diagnostic and usage Data by using the built-in Telemetry feature. According to Microsoft, it helps to improve the quality of Windows. If you’re worry about this automatic data collection for privacy concern, here are simple ways to restrict / disable Telemetry from collecting diagnostic and usage data in Windows 10.

Method 1: Change Diagnostic and Usage Data Settings from Settings

  1. Press the WIN + I keys together to open the Settings app. Click Privacy.

  2. Under the Feedback and diagnostics section, you can select how much data you send to Microsoft. By default, it’s set to Full, which sends pretty much everything. If you choose Basic, Windows 10 will send the minimum amount of data to Microsoft’s servers.

Method 2: Change Diagnostic and Usage Data Settings from Group Policy

  1. Open the Local Group Policy Editor. Browse to the following location:
    Computer Configuration -> Administrative Templates -> Windows Components -> Data Collection and Preview Builds

    Next, double-click on the policy “Allow Telemetry” appearing on the right pane.

  2. Select the Enabled checkbox. Under the Options section, you can choose the data collection level: Security, Basic, Enhanced, Full.

    Note that the Security option only takes effect for Windows 10 Enterprise edition. If you’re running Windows 10 Home/Pro, Basic is the lowest telemetry level you can choose.

  3. Click OK to save your change. Once you apply this policy, the option to change diagnostic and usage data in Settings app becomes grayed out.

Method 3: Prevent Windows 10 from collecting Diagnostic and Usage Data

If you want to completely stop the Windows 10 telemetry from sending out any data to Microsoft, you can disable the “Connected User Experiences and Telemetry” service. Follow these steps:

  1. Press the WIN + R keys together to open the Run dialog. Type services.msc and press Enter.

  2. When the Services window opens, locate the service “Connected User Experiences and Telemetry” in the right pane, and then double-click it.

  3. Select Disabled from the “Startup type” drop-down box, and click the Stop button to stop the running service. Click OK to save your changes.

How to Turn On / Off Developer Mode in Windows 10

October 18th, 2017 by Admin

By default, Windows 10 allows you to only get and run certified apps from Windows Store. Developer mode makes it possible for developers to test their own apps before submitting them to the Store. In this tutorial we’ll show you 2 simple ways to turn on / off developer mode in Windows 10.

Method 1: Turn On / Off Developer Mode Using Settings App

  1. Open the Settings app and select Update & Security.

  2. Click the For developers tab in the left pane. On the right pane, you can choose “Windows Store apps”, “Sideload apps” or “Developer mode”.

    • Windows Store apps – Only allow you to install apps from the Windows Store.
    • Sideload apps – Allow you to install apps from outside the Windows Store, as long as they’re signed with a valid certificate.
    • Developer mode – Allow you to install apps from outside of the Windows Store, even if they’re not signed.
  3. If you’ve chosen the developer mode, it will alert you that you might be putting yourself at risk by enabling the developer mode. Click Yes to proceed.

  4. This change takes effect immediately without a restart.

Method 2: Turn On / Off Developer Mode Using Registry Editor

  1. Open the Registry Editor and navigate to the following key:
    HKEY_LOCAL_MACHINE\SOFTWARE\Microsoft\Windows\CurrentVersion\AppModelUnlock
  2. Right-click the empty space on the right pane, and create two DWORD (32-bit) values: AllowAllTrustedApps, AllowDevelopmentWithoutDevLicense. Set the associated value data depend on your choice.

    • Windows Store apps – AllowAllTrustedApps = 0, AllowDevelopmentWithoutDevLicense = 0
    • Sideload apps – AllowAllTrustedApps = 1, AllowDevelopmentWithoutDevLicense = 0
    • Developer mode – AllowAllTrustedApps = 1, AllowDevelopmentWithoutDevLicense = 1
  3. When it’s done, close Registry Editor and restart your computer.

How to Recover or Change HomeGroup Password in Windows 10

October 17th, 2017 by Admin

Forgot or misplaced your HomeGroup password? If your computer is already part of a HomeGroup, you can view or reset the password without using third-party software. In this tutorial we’ll walk you through how to recover or change HomeGroup password in Windows 10.

Part 1: Recover HomeGroup Password in Windows 10

  1. Open File Explorer (previously known as Windows Explorer). Right-click the Homegroup shortcut in the left navigation pane, and then select “View the HomeGroup password” from the pop-up menu.

  2. The HomeGroup password is now shown in a yellow box. You can either write it down or print it by clicking the “Print this page” button at the bottom.

Part 2: Change HomeGroup Password in Windows 10

  1. Open File Explorer. Right-click the Homegroup shortcut in the left navigation pane, and then select “Change HomeGroup settings” from the pop-up menu.

  2. Under the “Other Homegroup actions” section, click the “Change the password” link.

  3. When the “Change Your Homegroup Password” wizard opens, choose the “Change the password” option.

  4. Windows will generate a random password automatically, but you can type your own password. When it’s done, click Next to continue.

  5. Now your HomeGroup password was successfully changed. Now you can write down it and close the wizard.

    That’s it!