Posts Tagged ‘windows 10 developer mode’

How to Turn On / Off Developer Mode in Windows 10

October 18th, 2017 by Admin

By default, Windows 10 allows you to only get and run certified apps from Windows Store. Developer mode makes it possible for developers to test their own apps before submitting them to the Store. In this tutorial we’ll show you 2 simple ways to turn on / off developer mode in Windows 10.

Method 1: Turn On / Off Developer Mode Using Settings App

  1. Open the Settings app and select Update & Security.

  2. Click the For developers tab in the left pane. On the right pane, you can choose “Windows Store apps”, “Sideload apps” or “Developer mode”.

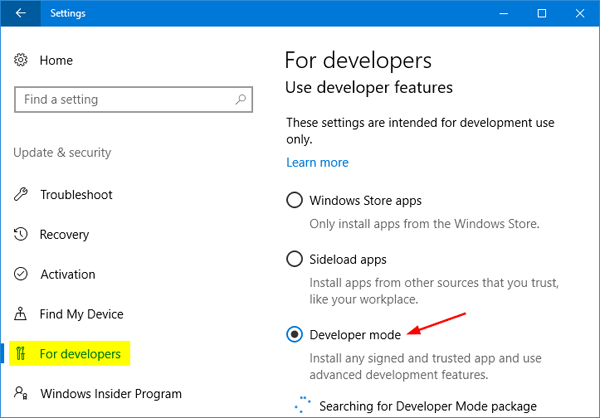
    • Windows Store apps – Only allow you to install apps from the Windows Store.
    • Sideload apps – Allow you to install apps from outside the Windows Store, as long as they’re signed with a valid certificate.
    • Developer mode – Allow you to install apps from outside of the Windows Store, even if they’re not signed.
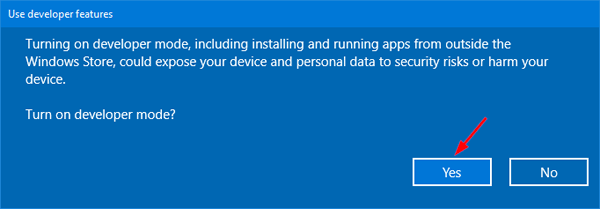
  3. If you’ve chosen the developer mode, it will alert you that you might be putting yourself at risk by enabling the developer mode. Click Yes to proceed.

  4. This change takes effect immediately without a restart.

Method 2: Turn On / Off Developer Mode Using Registry Editor

  1. Open the Registry Editor and navigate to the following key:
    HKEY_LOCAL_MACHINE\SOFTWARE\Microsoft\Windows\CurrentVersion\AppModelUnlock
  2. Right-click the empty space on the right pane, and create two DWORD (32-bit) values: AllowAllTrustedApps, AllowDevelopmentWithoutDevLicense. Set the associated value data depend on your choice.

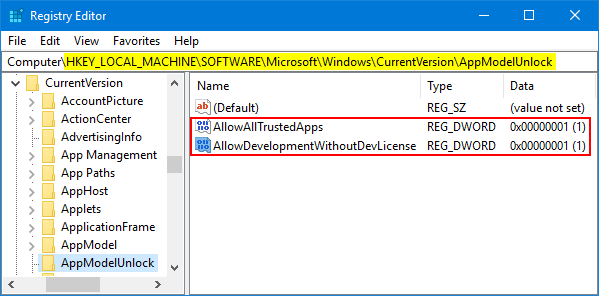
    • Windows Store apps – AllowAllTrustedApps = 0, AllowDevelopmentWithoutDevLicense = 0
    • Sideload apps – AllowAllTrustedApps = 1, AllowDevelopmentWithoutDevLicense = 0
    • Developer mode – AllowAllTrustedApps = 1, AllowDevelopmentWithoutDevLicense = 1
  3. When it’s done, close Registry Editor and restart your computer.

How to Install Linux Bash in Windows 10

July 13th, 2017 by Admin

Starting from Anniversary Update, Windows 10 includes a subsystem to run Linux Bash shell directly. As developers we can all get excited about Bash on Windows, because we can now use GNU command line tools like awk, sed, grep, vi, etc. However, Bash is not enabled by default, and we have to turn it on before using Bash in Windows 10. Let’s walk you through how to install Linux Bash in your Windows 10 computer.

Updated: Starting with Windows 10 Fall Creators Update, you no longer have to enable Developer Mode in the Settings app to use this feature.

Step 1: Enable Developer Mode

Press the Windows + I hotkey to open the Settings app. Head over to Update & security > For developers, and then select Developer mode.

windows-10-developer-mode

If developer mode is turned off on your computer, the Windows Subsystem for Linux will be disabled as well, which preventing you from accessing to the Linux Bash shell.

Step 2: Enable Windows Subsystem for Linux

Open the Control Panel. Select Large icons under the View by option, and then click Programs and Features.

programs-and-features

Next click Turn Windows features on or off link in the left sidebar.

turn-windows-features-on-or-off

A new window will open. Check the “Windows Subsystem for Linux” option and click OK.

windows-subsystem-for-linux

Once that’s done, you’ll be required to restart your machine.

Step 3: Install Bash in Windows 10

When rebooting is complete, you need to install Bash itself. To do that, type bash in the Cortana Search box on your taskbar, and then click its icon.

search-bash

When you’re asked if you want to install Bash, just type y and press Enter. Windows 10 will download Bash from Windows Store and install it on your computer.

install-bash-on-windows-10

After Bash is installed, you’ll be prompted to create a user account and password that you’ll use in the Bash Shell. This account doesn’t have to be the same as your Windows account.

Once you’re done, you can now open the Start Menu and search for Bash again. You’ll find a “Bash on Ubuntu on Windows” shortcut that launches the shell. That’s it!