Archive for April, 2023

How to Hide Time and Date from the Taskbar in Windows 11

April 25th, 2023 by Admin

Is it possible to hide the clock on the lower right-hand side of the taskbar? If you’re running Windows 10 or earlier versions, just press the WIN + R keys to open the Run dialog box, type explorer shell:::{05d7b0f4-2121-4eff-bf6b-ed3f69b894d9}\SystemIcons and press Enter, you can then turn off the Clock system icon easily. However, this method doesn’t work with Windows 11. In this tutorial we’ll show you a different way to hide time and date from the taskbar in Windows 11.

How to Hide Time and Date from the Taskbar in Windows 11

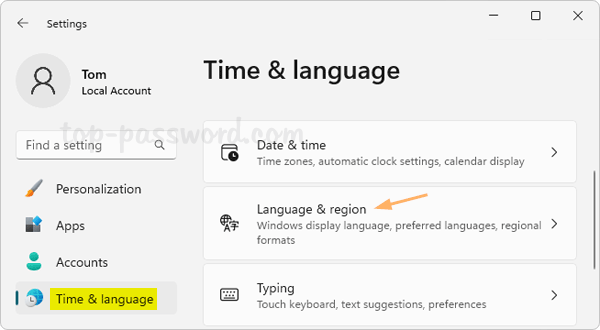
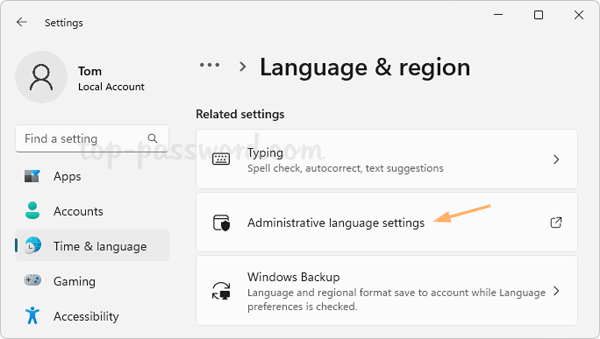
  1. Press the Windows key + I on your keyboard to access the Settings app. Select Time & language in the left sidebar, and then click Language & region on the right.

  2. Scroll down to the “Related settings” section, click the “Administrative language settings” option.

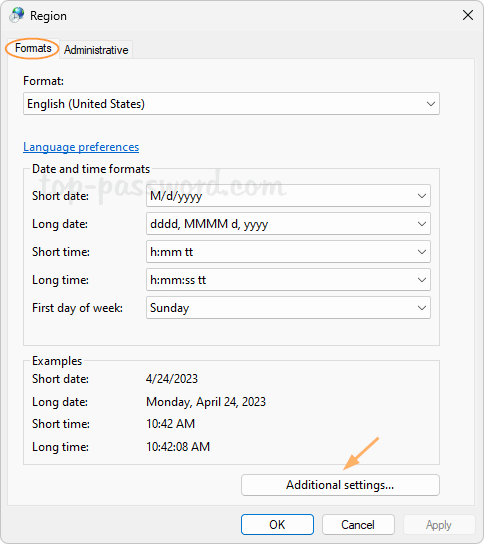
  3. Switch to the Formats tab, click the “Additional settings” in the bottom-right corner to open the Customize Format dialog.

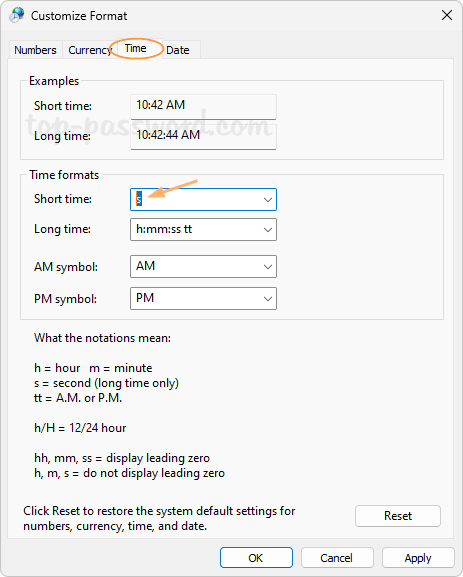
  4. Select the Time tab at the top, and then type s in the “Short time” field. Click Apply and it will hide the clock from Windows taskbar.

  5. Switch to the Date tab. Type ddd in the “Short date” field.

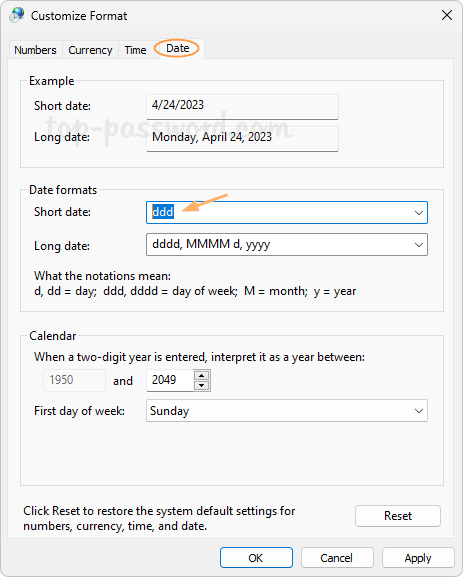
    Click Apply and it will hide the date from your taskbar. The “ddd” indicates the day of week, so the weekday will be shown on your system tray.

Whenever you need to bring the time and date back to the taskbar, just follow the above instructions to open the Customize Format dialog, then select either Time or Date tab, click the Reset button and you’re good to go.

How to Add Additional Clocks to Windows 11 Taskbar

April 24th, 2023 by Admin

Is it possible to display multiple clocks/times on the taskbar in Windows 11? If you need to keep track of the time in different time zones or work with overseas colleagues, it’s necessary to show extra time zone clocks in the system tray. In this tutorial we’ll walk you through the steps to add additional clocks to the taskbar in Windows 11.

How to Add Additional Clocks to Windows 11 Taskbar

  1. Right-click the date and time on the taskbar, and then choose “Adjust date and time” from the pop-up menu.

  2. When the Date & time settings page opens, scroll to find the “Related links” section. Click the “Additional clocks” option.

  3. Check the first “Show this clock” checkbox, select a time zone and add a descriptive name for the clock. If you want to add another clock, just check the second “Show this clock” checkbox and repeat the same steps.

  4. Click Apply and then OK. When you hover over the local clock on the taskbar, your additional clocks will pop up. If you click the date and time on the taskbar, the additional clocks you added will appear in the calendar flyout.

That’s it.

How to Enable or Disable AutoSwitch for Wi-Fi Network in Windows 11

April 21st, 2023 by Admin

Is there a way to stop Windows 11 from searching for other Wi-Fi networks while connected? When the AutoSwitch feature is turned on, Windows will automatically disconnect from the current Wi-Fi and switch to more preferred network if possible. In this tutorial we’ll show you 2 methods to enable or disable AutoSwitch for Wi-Fi network in Windows 11.

Method 1: Enable or Disable AutoSwitch for Wi-Fi Network via Network Connections

  1. Press the Windows key + R on your keyboard to open the Run box. Type ncpa.cpl and click OK to bring up the Network Connections dialog.

  2. Right-click the Wi-Fi adapter and choose Status from the pop-up menu.

  3. Click the “Wireless Properties” button.

  4. Select the Connection tab. Check the box “Look for other wireless networks while connected to this network” to enable AutoSwitch, or uncheck it to turn off AutoSwitch.

  5. Click OK to save your change.

Method 2: Enable or Disable AutoSwitch for Wi-Fi Network via Command Line

  1. Right-click the Start button on the taskbar and select Terminal (Admin) from the list that appears.

  2. When it opens a Command Prompt window or a PowerShell console, run the command netsh wlan show profiles to display all saved wireless network profiles. You need to note down the name of the Wi-Fi profile you want to enable/disable the Auto Switch feature for.

  3. To turn on the AutoSwitch feature, run the following command. Remember to replace profile_name with the actual profile name you noted in the above step.
    netsh wlan set profileparameter name="profile_name" autoswitch=Yes

    If you want to disable automatic network switching, execute this command instead, and the system will not automatically switch to other Wi-Fi networks.
    netsh wlan set profileparameter name="profile_name" autoswitch=No

That’s it!

2 Methods to Add or Remove Default Desktop Icons in Windows 11

April 17th, 2023 by Admin

Desktop only shows the Recycle Bin icon, even when right-clicking the desktop and seeing that the View -> Show desktop icons menu is checked? How can I get the “This PC” icon to show on the desktop? In this tutorial we’ll show you 2 simple methods to add or remove default desktop icons in Windows 11.

Method 1: Add or Remove Default Desktop Icons via Settings App

  1. Right-click an empty space on your desktop, and choose Personalize from the pop-up menu.

  2. When the Settings app opens to the Personalization page, click Themes on the right pane.

  3. Under the “Related settings” section, click the “Desktop icon settings” option.

  4. When the “Desktop Icon Settings” window appears, you can tick the checkbox next to each of the default icons you want to add to your desktop, and untick the checkbox to hide & remove a default desktop icon.

  5. Click OK to save your changes.

Method 2: Add or Remove Default Desktop Icons via Run Command Box

  1. Hold down the Windows Key and press R on your keyboard to bring up the Run box. Type the following command and hit Enter.

    desk.cpl ,5

  2. This will open the “Desktop Icon Settings” dialog immediately, where you can choose the classic icons you want to display or hide on the desktop. These available icons are Computer, User’s Files, Network, Recycle Bin and Control Panel. For example, if you deselect the checkbox next to “Computer”, it will remove the “This PC” icon from your desktop.

  3. Once done, click OK and you can see if the legacy desktop icons appear or disappear as you expected.

That’s it!

How to Enable and Use Desktop Stickers in Windows 11

April 14th, 2023 by Admin

If you’ve upgraded to Windows 11 build 22621, you can turn on the hidden feature “Desktop Stickers”, which allows you to personalize your desktop by adding funny stickers. In this tutorial we’ll walk you through the steps to enable and use desktop stickers in Windows 11.

Part 1: Enable the Desktop Stickers feature in Windows 11

  1. Open Registry Editor and browse to: HKEY_LOCAL_MACHINE\SOFTWARE\Microsoft\PolicyManager\current\device. In the left side pane, right-click the device key and choose New -> Key.

  2. Name the new key as Stickers, and then select it. In the right pane, right-click the empty space and select New -> DWORD (32-bit) Value.

  3. Name the DOWRD as EnableStickers, and then double-click it and set the value data to 1.

  4. Close Registry Editor. You need to log off or reboot before the desktop stickers feature is activated. Whenever you need to disable the desktop sticker, just change the value data of EnableStickers to 0.

Part 2: Use Desktop Stickers in Windows 11

  1. Before getting started, open the Settings app and go to: Personalization -> Background, make sure the “Personalize your background” drop-down list is set to “Picture“.

    Note: The desktop stickers aren’t available for Sideshow, Solid color and Windows spotlight.

  2. Right-click the blank area on your desktop, and choose “Add or edit stickers” from the context menu.

  3. In the pop-up window, you will be presented with a list of stickers. Clicking a sticker will add it to your desktop.

  4. You can resize or move the stickers you’ve added to any location on your desktop. To save your changes, click the X button at the top to exit the sticker editor.

  5. The stickers will look as if they are part of the desktop wallpaper, and you’re unable to move or resize them until you open the sticker editor interface.

That’s it!

3 Steps to Install Windows Sandbox on Windows 11

April 13th, 2023 by Admin

How can I enable Windows Sandbox using Command Prompt? Need to set up a Sandbox environment for testing an unknown software? Windows Sandbox is an optional feature that allows you to run a lightweight virtual machine, so you can run potentially dangerous programs without letting them harm your system.

You can turn on Windows Sandbox using Control Panel. In this tutorial we’ll show you an easier way to install Windows Sandbox in Windows 11, by using PowerShell or Command Prompt.

How to Install Windows Sandbox on Windows 11

  1. Right-click the Start button on the taskbar, and choose Terminal (Admin) from the menu that appears.

  2. When Windows Terminal opens a PowerShell window, type the following command and press Enter.
    Enable-WindowsOptionalFeature -Online -FeatureName "Containers-DisposableClientVM" -All

    If Windows Terminal opens a Command Prompt window, run this command instead:
    dism /online /Enable-Feature /FeatureName:"Containers-DisposableClientVM" -All

  3. When prompted to restart your PC, type Y to proceed. After installing Windows Sandbox, you can use the Start menu to find the Windows Sandbox and run it with admin rights.

    If you need to uninstall Windows Sandbox later, run the following command in an elevated Windows PowerShell window:
    Disable-WindowsOptionalFeature -Online -FeatureName "Containers-DisposableClientVM"

    or execute this command in elevated Command Prompt to disable & uninstall Windows Sandbox:
    dism /online /Disable-Feature /FeatureName:"Containers-DisposableClientVM"

That’s it!

How to Enable and Use Snap Layouts in Windows 11

April 12th, 2023 by Admin

Is there an easy way to arrange all open windows on the screen without overlapping? If you need to work with multiple apps and see all windows side by side, the Snap feature can improve your productivity by splitting up your screen with multiple windows, without using Alt-Tab to switch between apps. In this tutorial we will walk you through the steps to enable the Snap windows feature and use snap layouts in Windows 11.

Part 1: Enable the Snap Windows Feature in Windows 11

  1. Open the Settings app by pressing the keyboard shortcut Windows + I, and then select the System category and click the Multitasking option.

  2. Turn on the Snap windows toggle, and click the arrow icon on the right side to expand the settings. Make sure you check at least the following options:
    • When I snap a window, suggest what I can snap next to it.
    • Show snap layouts when I hover over a window’s maximize button.
    • Show snap layouts when I drag a window to the top of my screen.

  3. Once you’ve finished the above steps, you can proceed to use snap layouts to arrange multiple windows on a single screen efficiently.

Part 2: Use Snap Layouts in Windows 11

  1. Hover the mouse over the maximize button of an app window, and you’ll see four predefined layouts. If you need to arrange only two open windows, the first two layouts are good choices. In my example, I have three windows open, so I’ll use the third layout. Hover over the zone of your desired layout to place the current active window.

  2. All your other apps will appear as thumbnails in the second zone of the chosen layout. Simply click an app thumbnail, and it will be resized and snap into this zone.

  3. Use the same method to place other apps in the other zones of the layout.

  4. Now your screen shows the different programs you’re using, and you can work with multiple windows at the same time. However, if a window can’t resize into a zone of your snap layout, it may cause overlapping.

That’s it!

2 Methods to Turn off Show Desktop Button in Windows 11

April 11th, 2023 by Admin

Is there a way to disable desktop peek in Windows 11? When you hover on the far right end of Windows taskbar, a thin vertical line will appear and you can click the “Show desktop” button to minimize all your active windows. If you rarely use it to peek at the desktop, you can remove it from the taskbar. In this tutorial we’ll show you 2 methods to turn off Show Desktop button in Windows 11.

Method 1: Turn off Show Desktop Button in Windows 11 via Settings App

  1. Right-click on the empty portion of the taskbar, and then select “Taskbar settings” from the pop-up menu.

  2. The Settings app will launch and take you to the taskbar settings page. Click the “Taskbar behaviors” section.

  3. Simply uncheck the “Select the far corner of the taskbar to show the desktop” option, it will turn off the Show Desktop button immediately.

Method 2: Turn off Show Desktop Button in Windows 11 via Registry Editor

  1. Open Registry Editor and navigate to the location: HKEY_CURRENT_USER\Software\Microsoft\Windows\CurrentVersion\Explorer\Advanced. Double-click the DWORD TaskbarSd on the right pane.

  2. In order to disable the desktop peek feature, change its valued data from 1 to 0, and click OK.

  3. Close Registry Editor. This change will take effect immediately and you’ll find that the Show Desktop button is missing from taskbar.

That’s it!

How to Change Printer Port to Fix Printing Issues in Windows 11

April 7th, 2023 by Admin

Printer connected but not printing? My HP printer used to work without any problems but now it will only print to file? These printing issues usually happen when an improper port is assigned to your printer. To fix such problems, you may need to change the printer port. In this tutorial we’ll walk you through the steps to change printer port in Windows 11.

How to Change Printer Port to Fix Printing Issues in Windows 11

  1. Press the Windows + I keys to launch the Settings app. Head to the Bluetooth & devices category, then click “Printers & scanners” on the right pane.

  2. Select the printer which you would like to change the port for.

  3. Under the “Printer settings” section, click the “Printer properties” option.

  4. When the printer properties dialog box opens, select the General tab and click the “Change Properties” button in the bottom left corner.

  5. Go to the Ports tab and you can see which port is currently associated with your printer. The nul: port is generally used for testing, while the local port is mainly for virtual printers, such as XPS. I recommend you assign a standard TCP/IP port to your physical printer.

    If the existing TCP/IP port points to a wrong IP address, just delete that port and then create a new TCP/IP port with the proper IP address, and assign it to your printer.

  6. After selecting the new port, click Apply and then OK. Hopefully your printer will work without printing issues.

That’s it!

Easy Ways to Delete Unused Printer Ports in Windows 11

April 6th, 2023 by Admin

How can I delete unwanted TCP/IP printer ports? If you keep changing printers, the inactive ports associated with your old printers are left behind and your system can become sluggish or even hang. In this tutorial we’ll show you 2 simple ways to delete unused or inactive printer ports in Windows 11.

Notes: The LPT, COM, Local and USB ports cannot be deleted. You can use the following methods to delete TCP/IP port and WSD ports with ease.

Method 1: Delete Unused Printer Ports Using Settings App

  1. Open the Settings app (Win + I), select the “Bluetooth & devices” category and then click “Printers & scanners” on the right side of the window.

  2. Scroll down to the “Related settings” section, click the “Printer server properties” option.

  3. Go to the Ports tab, select the port which you want to delete from the list, and then click the “Delete Port” button.

  4. Click OK to confirm. After deleting, you can assign the freed port to another device in future.

Method 2: Delete Unused Printer Ports Using Windows PowerShell

  1. Right-click the Start button on the taskbar, and select “Terminal (Admin)” from the pop up menu.

  2. When it opens a PowerShell window, type Get-PrinterPort and press Enter. It will display a list of printer ports that are installed on your computer. You need to write down the name of unused or old printer port.

  3. To delete a printer port, execute the following command. Replace “your_port_name” with the actual name of the printer port you want to delete.
    Remove-PrinterPort -Name "your_port_name"

  4. It will quickly free up the old port which is occupied by your printer.

That’s it!