Archive for October, 2016

How to Disable Any Shortcut Keys in Windows 10 / 8 /7

October 31st, 2016 by Admin

Is there a way to disable certain keyboard shortcuts in Windows? Sometimes or even frequently you might press a hotkey accidentally that can disrupt your productivity. In this tutorial we’ll show you how to use the freeware AutoHotkey to disable any certain global hotkeys (keyboard shortcuts) in Windows 10 / 8 / 7.

How to Disable Any Shortcut Keys in Windows 10 / 8 /7?

In this example, we’ll demonstrate how to disable the [Windows] + [+] hotkey in Windows 10. Just make a few changes with the AutoHotkey script and you can disable other keyboard shortcuts as well.

  1. AutoHotkey is a free, open-source automation and scripting tool for Windows platform. Go to AutoHotkey’s website and download the installer.
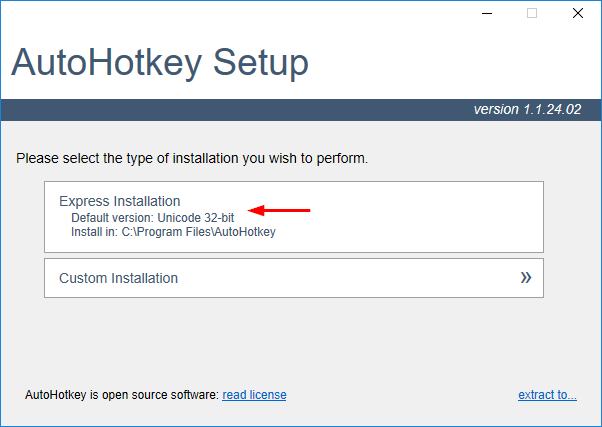
  2. After the download is complete, double-click the installer. When you’re asked to choose the installation type, select Express Installation.
    autohotkey-install-type

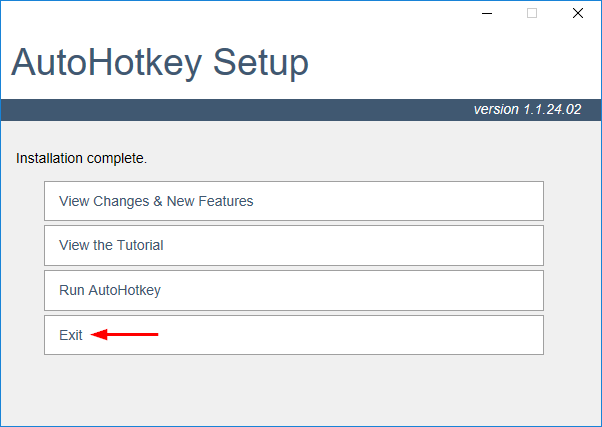
  3. When the installation is complete, click Exit. Now it’s time to create your first script.
    complete-install-autohotkey

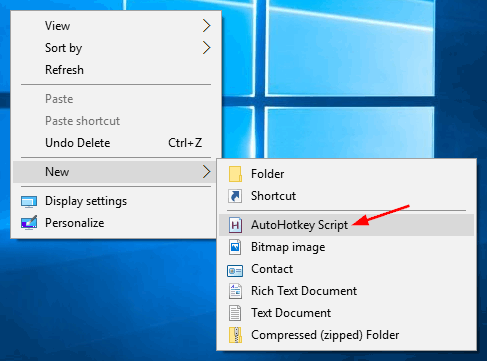
  4. Right-click any empty space on your desktop (or any directory), and then select New -> AutoHotkey Script from the context menu.
    new-autohotkey-script

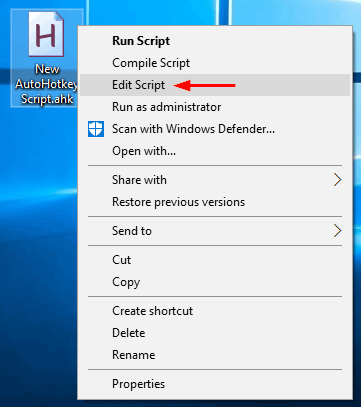
  5. Name the script file whatever you like, then open it up with your favorite text editor or NotePad.
    edit-autohotkey-script

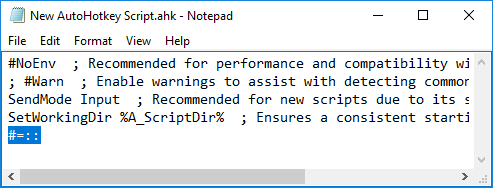
  6. Place your cursor at the end of the last sentence and press Enter. Copy and paste the following line which tells AutoHotkey to disable the [Windows] + [=] / [+] shortcut key.
    #=::Return
    disable-windows-plus-hotkey

    In this case, the # symbol represents the Windows key. Here’s an example script to disable Alt + Tab, Windows + Tab, Left/Right Windows key:

    ; Disable Alt+Tab
    !Tab::Return

    ; Disable Windows Key + Tab
    #Tab::Return

    ; Disable Left Windows Key
    LWin::Return

    ; Disable Right Windows Key
    RWin::Return

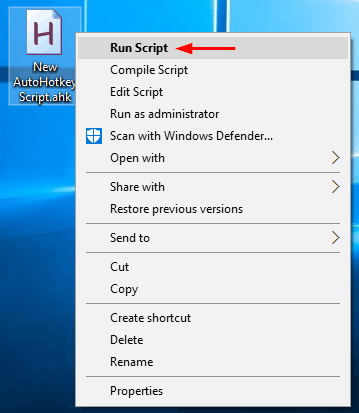
  7. Save the script file. Right-click on it and select Run Script. Now press the [Windows] + [+] keyboard shortcut and you’ll find nothing happen. This way allows you to temporarily disable your desire shortcut keys by running the script manually.
    run-autohotkey-script

If you want to permanently disable the shortcut key, you can create a scheduled task to run your AutoHotkey script when your PC starts up.

3 Ways to Turn Off / Disable Magnifier in Windows 10

October 31st, 2016 by Admin

Accidentally activate the Magnifier that disrupts your work? Look for a way to prevent the Magnifier from starting up automatically at every startup?

windows-magnifier

When you press the (Win & +, Win & ) keyboard shortcuts, it will open the Magnifier immediately and you then have to press the Win & ESC keys to close it. In this tutorial we’ll show you 3 ways to turn off or disable Magnifier permanently in Windows 10.

Method 1: Stop Magnifier Loading Up When Windows 10 Starts

If the Magnifier starts up automatically every time you turn on the computer, you can turn off Magnifier from Control Panel and get it to stop loading up at the boot time.

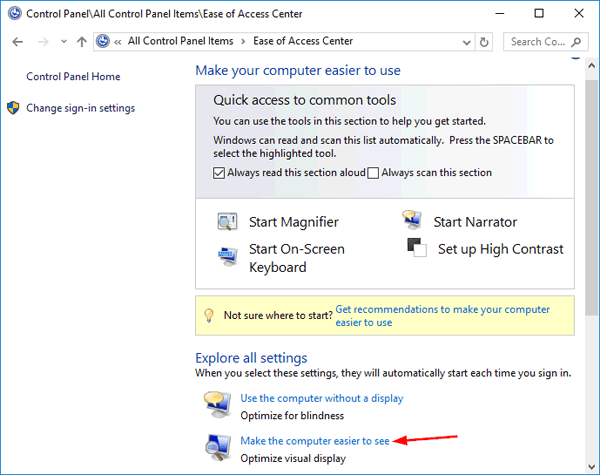
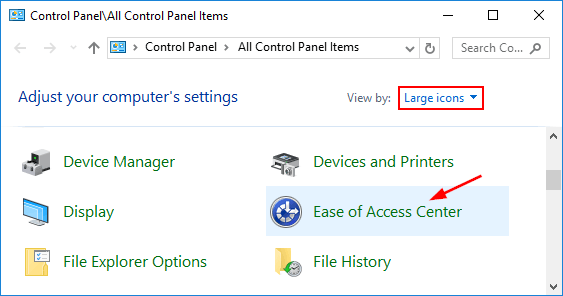
  1. Open the Control Panel in Windows 10, select Large icons or Small icons from the View by menu. Click Ease of Access Center.

    ease-of-access-center

  2. In the “Explorer all settings” section, click the “Make the computer easier to see” link.

    make-pc-easier-to-see

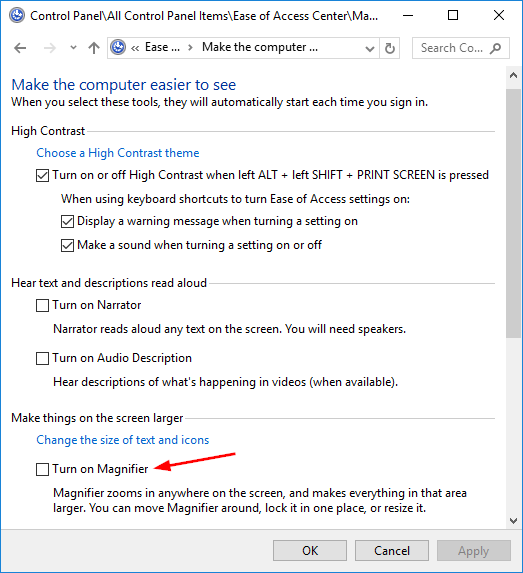
  3. Scroll down until you find a section that says “Make things on the screen larger”. Uncheck the box next to “Turn on Magnifier” and click OK.

    turn-off-magnifier

Method 2: Disable Windows 10 Magnifier Permanently

Even if you’ve turned off Magnifier at startup, the Magnifier can also be activated if you press the (Win & +, Win & ) keyboard shortcuts mistakenly. Then you can consider disabling Windows 10 Magnifier permanently. Here’s how:

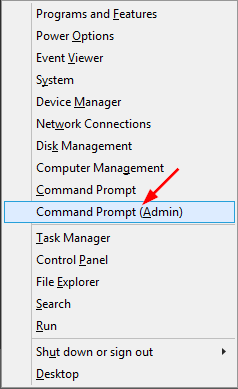
  1. Open the Command Prompt in Administrator mode. This can be done in Windows 10 by pressing the Win + X keys and selecting “Command Prompt (Admin)“.

    winx

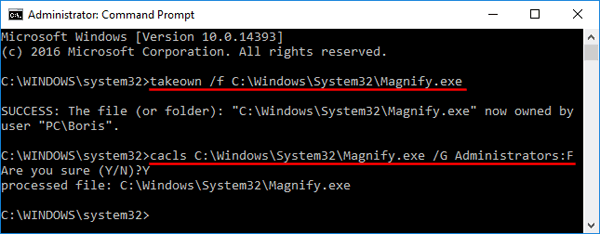
  2. Run the following two commands to change the ownership of the Magnify.exe app and grant full permissions to Administrators. Without this step you’re unable to rename or make any change to the Magnify.exe file.
    takeown /f C:\Windows\System32\Magnify.exe
    cacls C:\Windows\System32\Magnify.exe /G administrators:F

    change-magnify-ownership

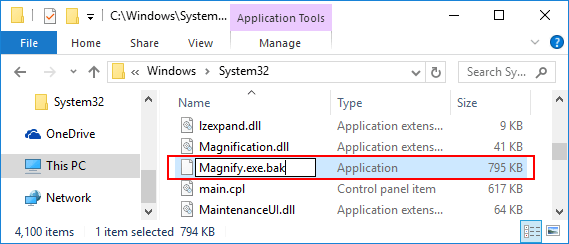
  3. Open your File Explorer and go to your system directory: C:\Windows\System32. locate the Magnify.exe file. Right-click on it and rename the filename to Magnify.exe.bak.

    rename-magnify

  4. Now when you press the (Win & +/) shortcut keys, the Magnifier application will not start any longer.

Method 3: Disable Keyboard Shortcut for Activating Magnifier

AutoHotkey is a free macro-creation and automation-oriented scripting utility for Windows. Just create a simple script and you can disable the keyboard shortcut (Win & +) which can activate Magnifier accidentally. To get started, please check out the next post: How to Disable Any Shortcut Keys in Windows 10 / 8 /7

6 Ways to Open On-Screen Keyboard in Windows 10

October 28th, 2016 by Admin

On-Screen Keyboard is a virtual keyboard that can be used in place of a physical keyboard. You can use your mouse or other pointing device to type the keys. In this tutorial we’ll show you 6 ways to turn on / open On-Screen Keyboard in Windows 10.

on-screen-keyboard

Method 1: Open On-Screen Keyboard from Control Panel

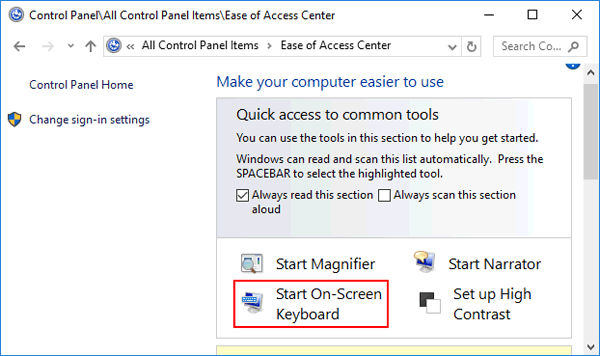
Open the Control Panel and select either Large icons or Small icons in the View by menu. Click Ease of Access Center.

ease-of-access-center

Click Start On-Screen Keyboard.

start-on-screen-keyboard

Method 2: Open On-Screen Keyboard from Run or Command Prompt

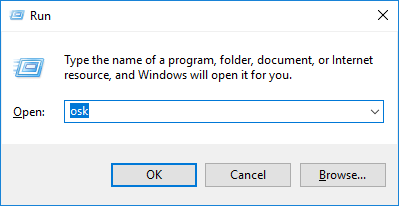
Press the Windows key + R to open the Run box, or open the Command Prompt. Type osk and hit Enter. This will open the On-Screen Keyboard immediately.

run-osk

Method 3: Open On-Screen Keyboard from PC Settings

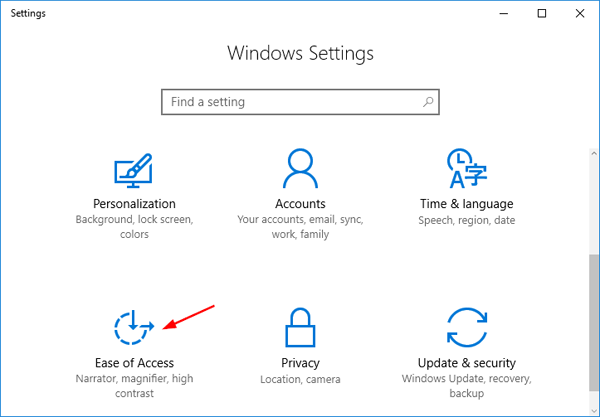
Press the Windows key + I to open the PC Settings app. Click Ease of Access.
ease-of-access-settings

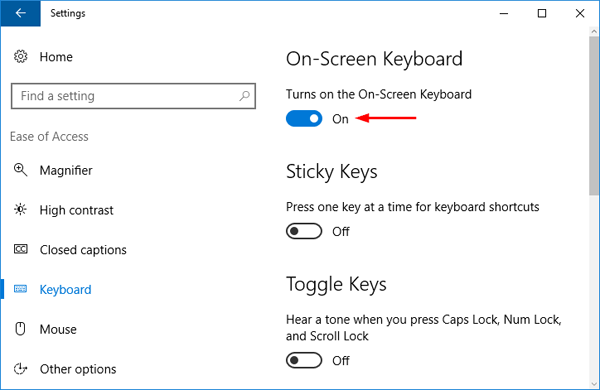
In the left sidebar, select the Keyboard option. Under On-Screen Keyboard on the right side, move the slider to the right to turn it on. This will launch On-Screen Keyboard immediately. After closing it, the slider will be automatically put back to Off.

turn-on-onscreen-keyboard

Method 4: Open On-Screen Keyboard via Cortana Search

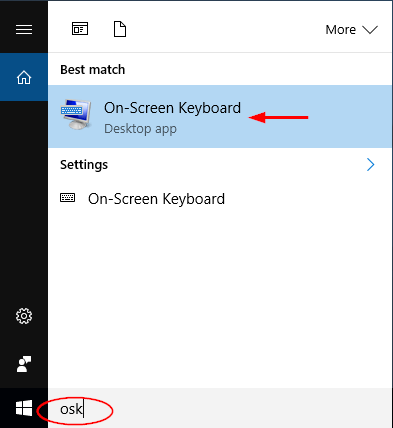
Click the Cortana Search box on the taskbar, type osk and then click the “On-Screen Keyboard” desktop app to launch it.

search-on-screen-keyboard

Method 5: Open On-Screen Keyboard from Start Menu

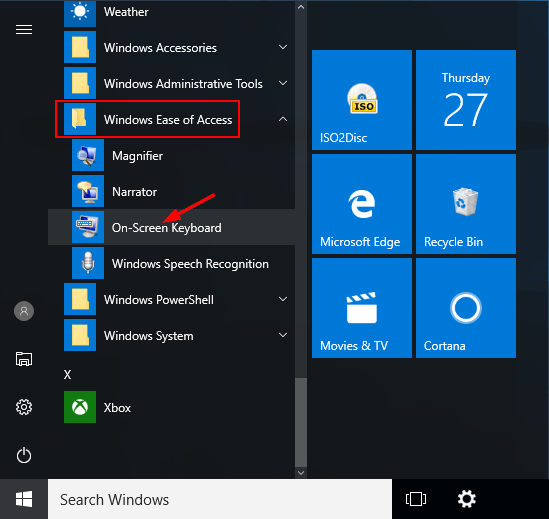
Click the Start button. From the Start Menu, expand the Windows Ease of Access folder and you can access On-Screen Keyboard.

on-screen-keyboard-in-start-menu

Method 6: Open On-Screen Keyboard from Login Screen

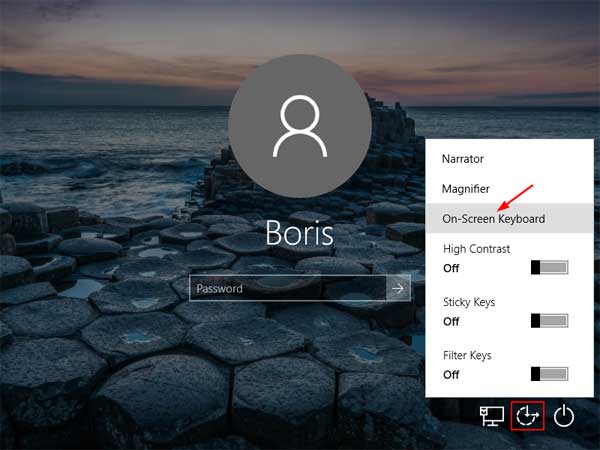
At Windows 10 login screen, click the Ease of Access icon at the bottom-left corner. From the popup menu, you can select On-Screen Keyboard, and then use it to type your Windows password.

on-screen-keyboard-at-login

Quick Ways to Open Snipping Tool in Windows 10

October 27th, 2016 by Admin

Snipping Tool is a built-in screen grabbing software available in all versions of Windows, which makes it easy to capture snapshot. In this article we’ll show you 4 quick ways to open Snipping Tool in Windows 10.

Method 1: Open Snipping Tool from Start Menu

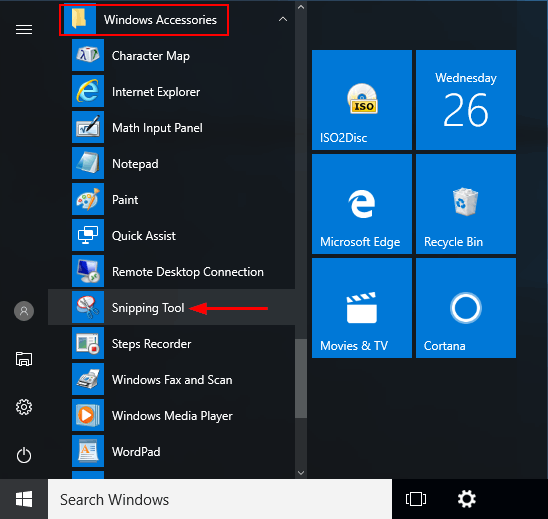
To launch the Snipping Tool in Windows 10, click the Start button. From the Start Menu, expand Windows Accessories and click the Snipping Tool shortcut.

snipping-tool-in-start-menu

Method 2: Open Snipping Tool from Run or Command Prompt

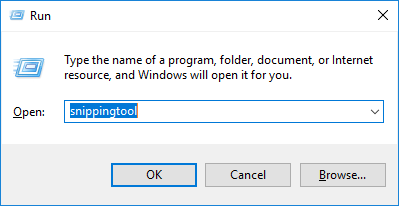
Press the Windows key + R keyboard shortcut, then type snippingtool in the Run box and press Enter.

run-snipping-tool

You can also launch the Snipping Tool from Command Prompt. Just type snippingtool at the Command Prompt and press Enter.

snipping-tool-using-cmd

Method 3: Open Snipping Tool via Cortana Search

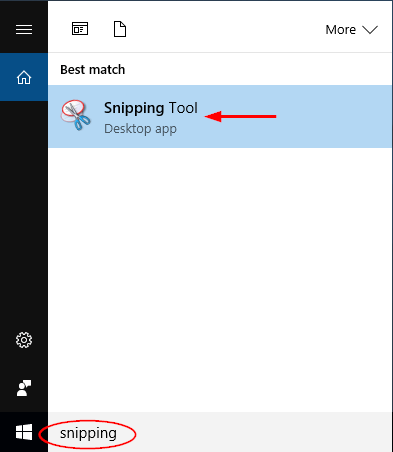
Just click the Search or Cortana icon in the Windows 10 taskbar and type “snipping“, You’ll see the Snipping Tool shortcut appear at the top of the list.

search-snipping-tool

Click the shortcut and Snipping Tool will open immediately.

Method 4: Create a Keyboard Shortcut for Snipping Tool

If you need to use the Snipping Tool regularly, you can create a keyboard shortcut that lets you open Snipping Tool by pressing a hotkey. Here’s how:

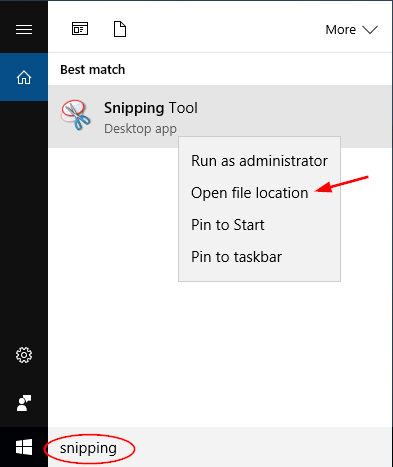
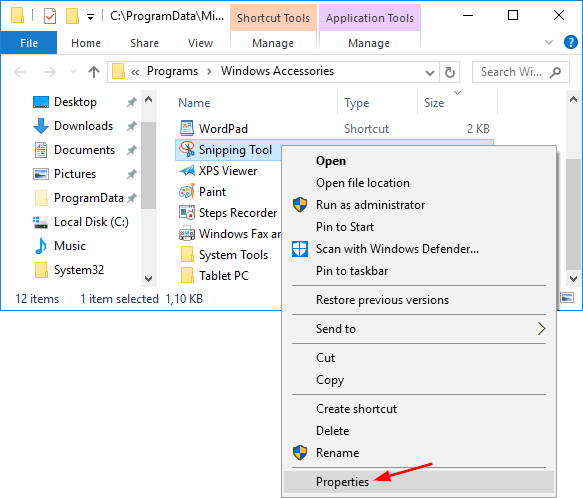
  1. Click the Search or Cortana icon in the Windows 10 taskbar and type “snipping“. Right-click the Snipping Tool shortcut from the result, and select “Open file location“.

    snipping-tool-location

  2. Windows Explorer will open the Snipping Tool shortcut in the Program/Accessories folder. Right-click on Snipping Tool and select Properties from the context menu.

    snipping-tool-shortcut

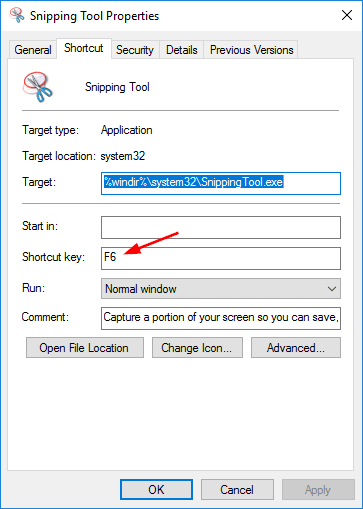
  3. Under Shortcut tab, click the Shortcut key text box, and then enter a keyboard shortcut that you would like to use to launch Snipping Tool. For example, if you want to use Ctrl + F12 keyboard shortcut, just hold down the Ctrl key and press F12.

    snipping-tool-keyboard-shortcut

Prevent Windows 10 Users from Changing or Adding Password in PC Settings

October 26th, 2016 by Admin

How to stop a user from changing their password? Look for a way to disable admin’s ability to change password? In this tutorial we’ll show you how to prevent both administrators and standard users from changing or adding Windows 10 password in PC Settings.

Note: Users can still open an elevated Command Prompt to change Windows password. To prevent changing a password from Command Prompt, you have to disable Command Prompt completely.

How to Prevent Windows 10 Users from Changing or Adding Password in PC Settings?

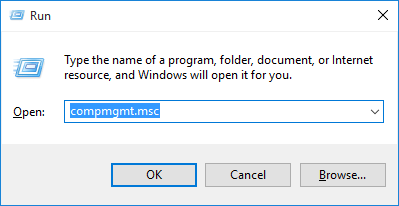
  1. To get started, you need to open up the Computer Management console. This can be done by pressing the Windows key + R and type compmgmt.msc in the Run box.

    compmgmt

  2. Expand the Local Users and Groups category in the left pane. Click on the Users folder and you will see a list of Windows accounts on your computer in the right pane.
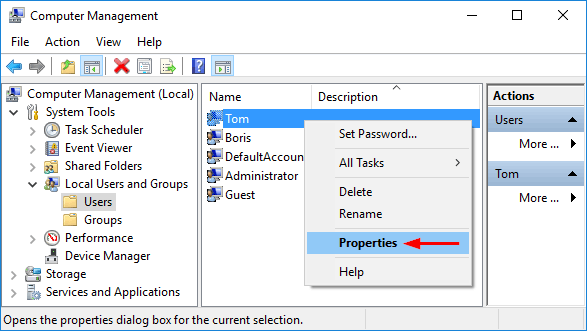
  3. Right-click on the account that you wish to deny permission to change their password, and select Properties from the drop-down menu.

    account-properties

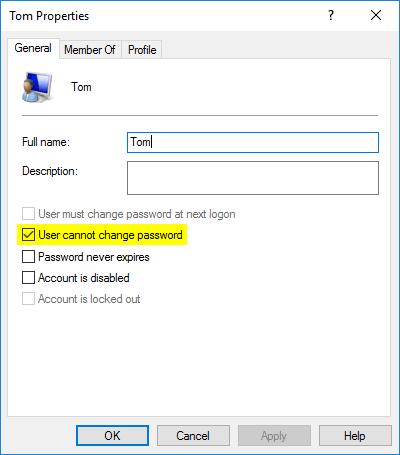
  4. Uncheck the checkbox labeled User cannot change password. Click Apply and then OK.

    user-cannot-change-password

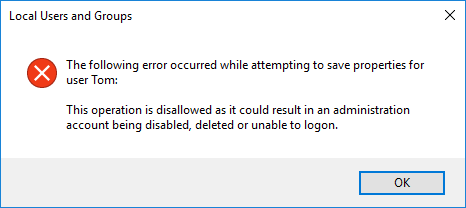
    If your selected user is an administrator, you’ll received the error message “This operation is disallowed as it could result in an administration account being disabled, deleted or unable to logon.

    disallow-saving-account-properties

    To get around this issue, you can change that administrator account to a standard/limited user, then follow the steps above to apply the “User cannot change password” option. When it’s done, change the account back to administrator.

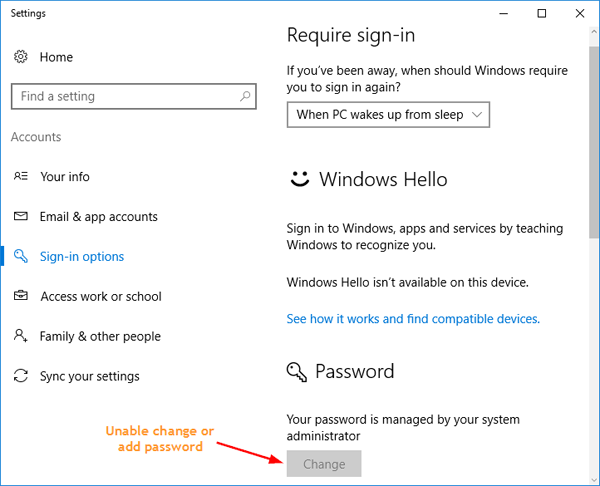
  5. Now log off and log on to your selected account, open the PC Settings, select Accounts -> Sign-in options and you’ll find the option of changing or adding password is greyed out.

    prevent-users-change-password

How to Change Number Format in Windows 10

October 25th, 2016 by Admin

In some situation, comma is used instead of a dot to separate the fractional part of decimal numbers. This might cause some issues with certain software. How can you change the decimal separator from a comma to a dot in numbers? In this tutorial we’ll show you how to change / customize the number format in Windows 10.

decimal-symbol-use-comma

How to Change Number Format in Windows 10?

  1. Open the Control Panel in Large or Small icons view. Click on Region.

    region

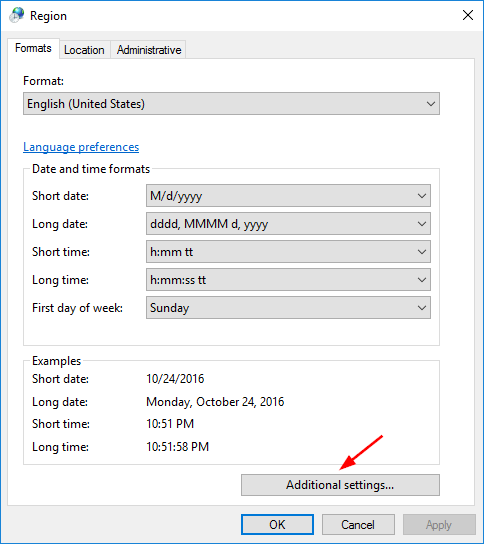
  2. When the Region window opens, click on the Additional settings button.

    advanced-region-settings

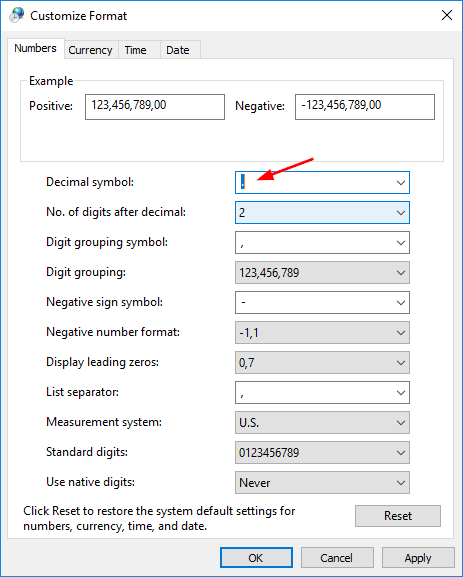
  3. The Customize Format window opens. In the Numbers tab, you can customize how numbers are displayed by Windows. For example, change decimal symbol from , (comma) to . (dot).

    customize-number-format

  4. If you’ve messed up the number format, just click the Reset button on the bottom-right of the window. It will restore your number format to default.

How to Disable or Turn Off Notification Sounds in Windows 10

October 25th, 2016 by Admin

Keep hearing the annoying notification sound? Windows 10 notification sounds might drive you crazy. In this tutorial we’ll show you 2 simple ways to disable or turn off notification sounds in Windows 10.

Method 1: Turn Off Windows 10 Notification Sounds from Settings App

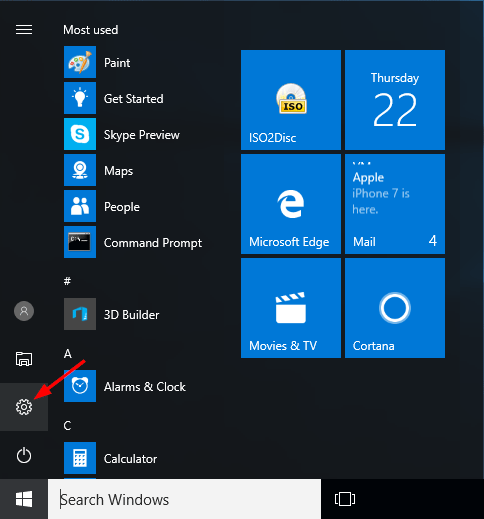
  1. Click the Start button and then click the Settings icon, or press Windows key + I to open the Settings app.

  2. On the main settings screen, click System.

    system-settings

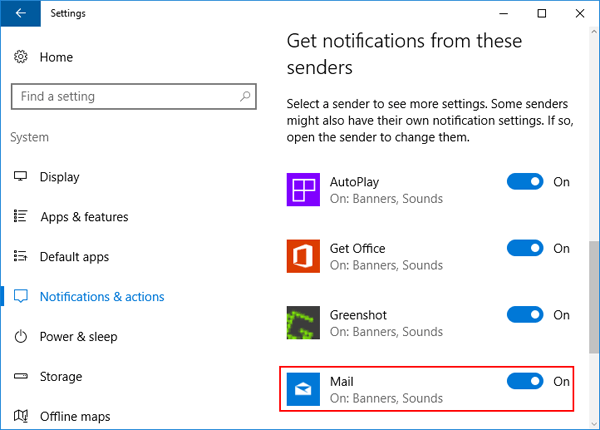
  3. On the left side of the window, click on Notifications & actions. Then, on the right side, scroll down to the “Get notifications from these senders” section, and click on the app that you want to block from playing notification sound.

    notifications-actions

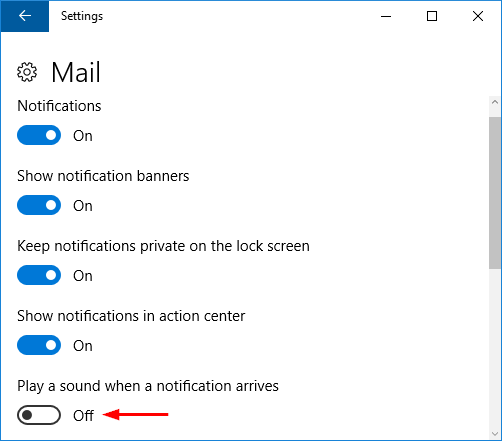
  4. Turn off the option named “Play a sound when a notification arrives“. Repeat these steps and you can disable notification sounds from other apps.

    not-play-sound-for-notification

Method 2: Turn Off Windows 10 Notification Sounds from Control Panel

  1. Open the Control Panel in Large or Small icons view. Click the Sound option.

    control-panel

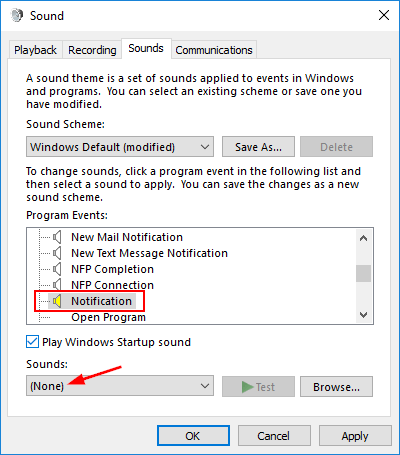
  2. When the Sound Settings dialog opens, click the Sounds tab.
  3. Select the Notification option under the Program Events section. Click the Sounds drop-down list at the bottom and select None. Click OK to save your change.

    sound-settings

  4. Now your Windows 10 system will still be able to receive all the notifications, but it won’t play sounds any longer.

How to Set Up An Alarm in Windows 10

October 24th, 2016 by Admin

It’s most common to use alarm in mobile phone to get up in the morning. Now Windows 10 also comes with the Alarm & Clock feature, and we can use alarm in the PC to notify ourselves of the task we need to do. In this tutorial we’ll show you how to set up an alarm in Windows 10.

How to Set Up An Alarm in Windows 10?

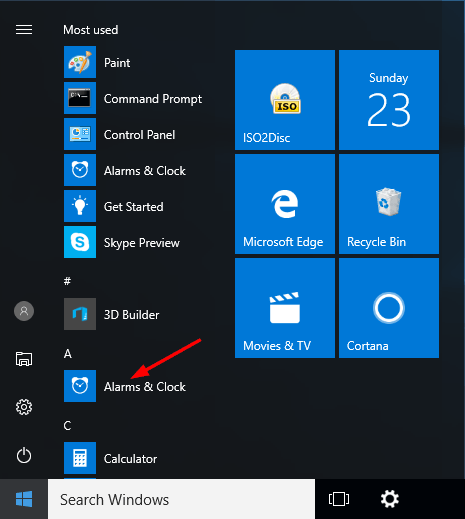
  1. Click the Start button. When the Start Menu appears, scroll to the A letter and select Alarm & Clock.

    alarm-and-clock

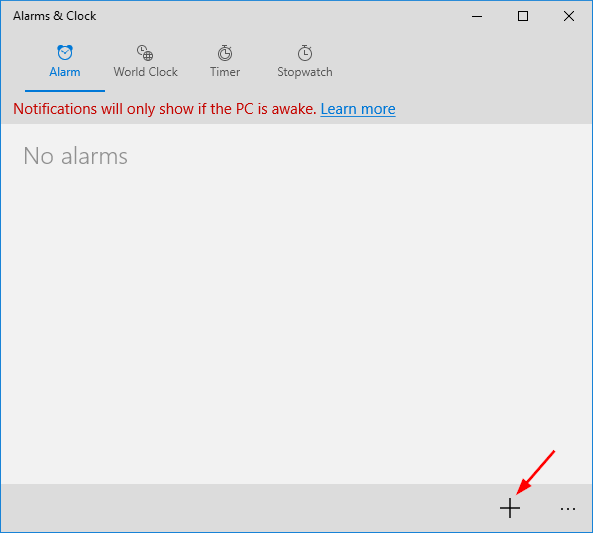
  2. To set an alarm in Windows 10, you can either edit any existing alarm or create a new one by clicking the plus sign + in the bottom-right corner.

    add-alarm

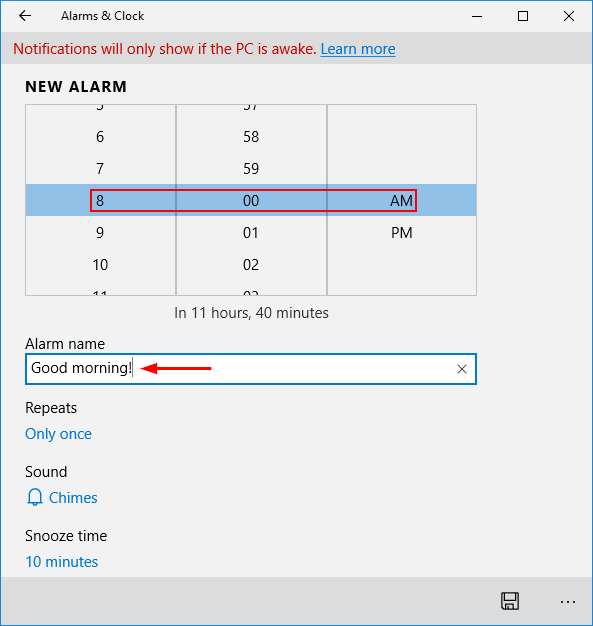
  3. The first thing you can do is set the alarm time, by selecting the hour and minute you want it triggered. Next give your new alarm a name.

    set-alarm-time

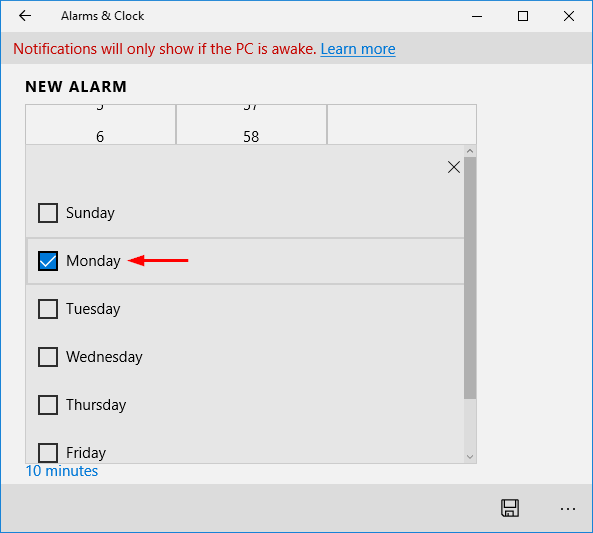
  4. By default, the alarm is set to sound only once. You can set the alarm to sound in certain weekdays by clicking Repeats.

    set-alarm-repeats

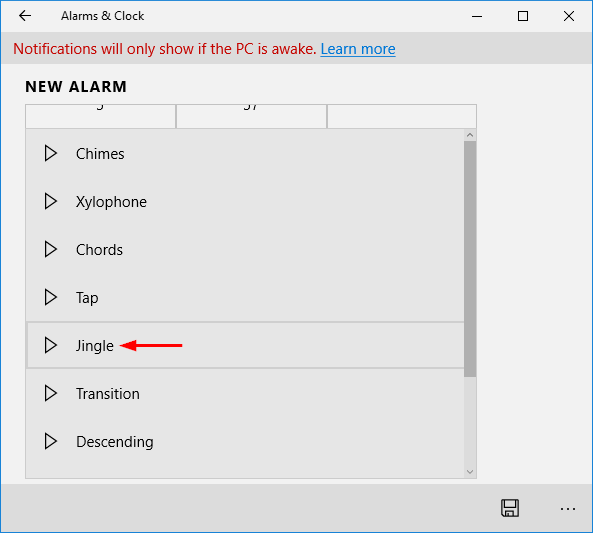
  5. Click Sound to choose the alarm sound you want to hear.

    choose-alarm-sound

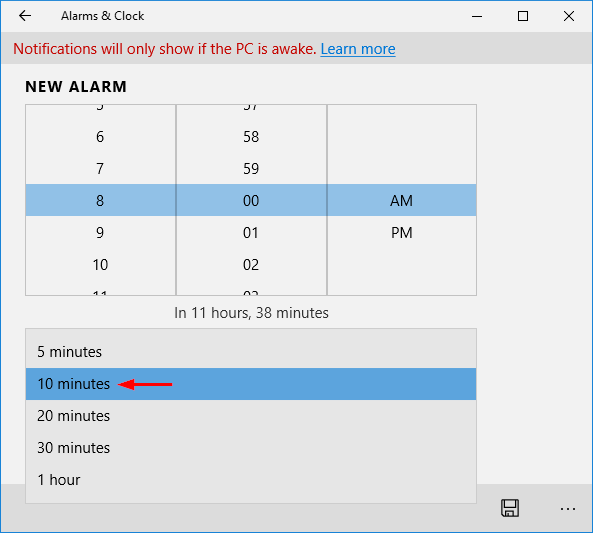
  6. Finally, set the Snooze time span by picking up the needed time from its list.

    alarm-snooze-time

  7. When you’ve finished setting everything, click the Save button on the right lower corner of the screen.
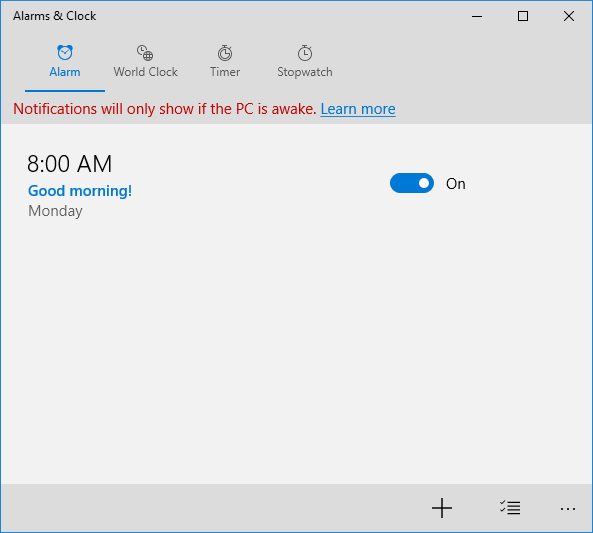
  8. Now, your alarm is set. If you want to turn off the alarm, just set the switch to Off.

    windows-10-alarm

How to Disable & Clear Location History in Windows 10

October 24th, 2016 by Admin

Windows 10 enables location tracking by default, Cortana and other apps can use the geographic location of your computer to provide more accurate results for things like maps and web searches. But users concerned about privacy might want to turn off location tracking permanently. In this tutorial we’ll show you how to turn on/off location tracking, and clear location history in Windows 10.

How to Disable & Clear Location History in Windows 10?

  1. Open Settings app by clicking its icon in Start menu or pressing Windows logo + I keyboard shortcut.

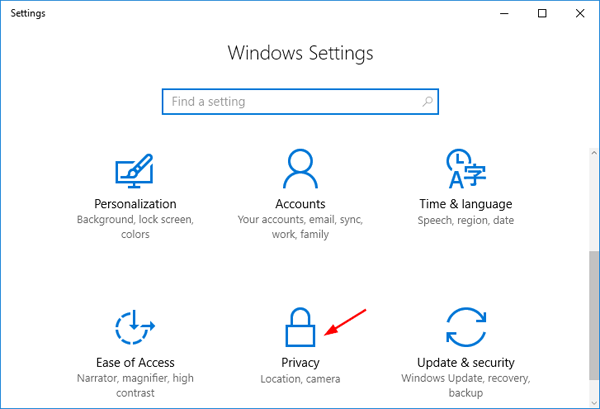
  2. Click on Privacy.

    privacy-settings

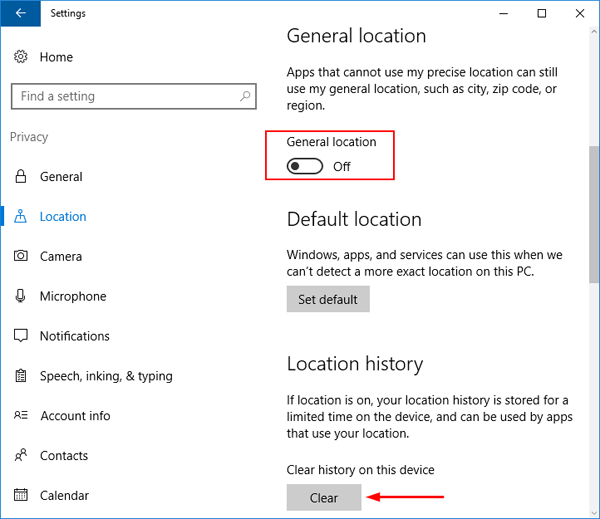
  3. Select Location from the list on the left side. Scroll down to the Location history section, click the Clear button under Clear history on this device.

    clear-location-history

  4. Windows 10 can find your general location using IP address. In order to disable general location, switch the “General location” switch to Off.
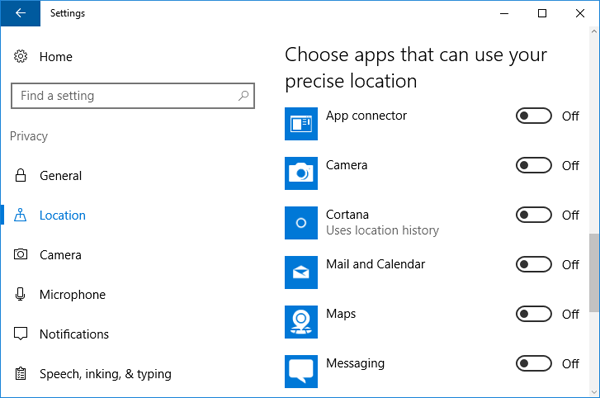
  5. Windows 10 can also determine the precise location using your router details. Scroll down to the bottom, you can choose whether apps can access your precise location.

    disable-precise-location