Archive for October, 2020

How to Change Function Keys Behavior on Your Windows Laptop

October 28th, 2020 by Admin

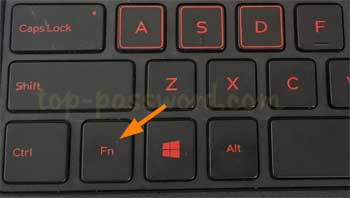
F2 key doesn’t rename file in Windows 10? Function keys for brightness control (F11, F12) do not work any longer? Most laptops have a Fn key on the keyboard which can change the behavior of function keys (F1 – F12). On my laptop, the default function of F2 is to rename files, while pressing Fn + F2 will lower volume. If I accidentally activate the Action Keys (Hotkeys) mode, then F2 will lower volume and I have to press Fn + F2 for renaming files.

If function keys or the Fn key don’t work as expected, then you need to disable or enable Action Keys (Hotkeys) mode on your Windows 10 / 8 / 7 laptop.

Method 1: Disable or Enable Action Keys Mode from UEFI/BIOS

  1. Turn on your computer, immediately and repeatedly press a specific key (F2, F12, DEL, F10, ESC, etc.) to enter into the BIOS Setup. If you’re running Windows 10/8, you can access BIOS from Command Prompt, the Settings app or Windows sign-in screen.
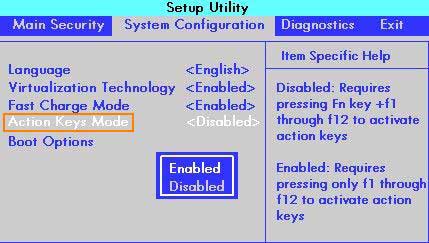
  2. Once inside the BIOS/UEFI Setup, navigate to the Configuration Tab (Advanced tab or System Configuration tab) and look for an option called “Hotkey Mode” or “Action Keys Mode“, set it to Disabled or Enabled.

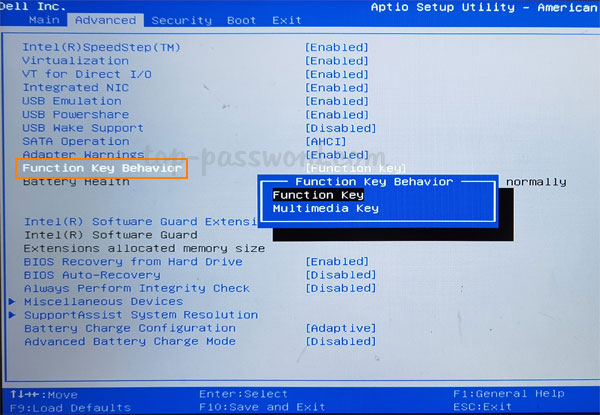
    On modern DELL laptops, select “Function Key Behavior” and press Enter to choose one of the following options:

    • Function Key – Disable Action Keys mode. Requires pressing Fn key to perform the actions printed on the function keys.
    • Multimedia Key – Enable Action Keys mode. Does not require pressing Fn key to perform the actions printed on the function keys.

  3. Now the behavior of the Fn key has been changed. Save and Exit the BIOS/UEFI Setup.

Method 2: Disable or Enable Action Keys Mode Using Fn Lock Key

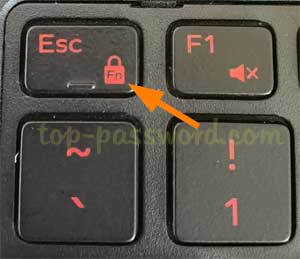
The Fn Lock key is usually indicated by a lock icon with “Fn” printed on it. If your keyboard has a Fn Lock key, just hold down the Fn key and then press the Fn Lock key simultaneously, it will enable Action Keys mode. Pressing the Fn key and Fn Lock key again will disable Action Keys mode.

On some DELL or Lenovo laptops, the Fn Lock key is the Esc key. Pressing Fn + Esc can enable or disable the Action Keys mode with ease.

Conclusion

When Action Keys mode is enabled, function keys will work as multimedia keys by default. So you can press a single function key (F1 – F12) to mute/unmute the audio, adjust the volume or project to a screen, without having to hold down the Fn key. If you am very used to using the F2 key to rename files, just disable Action Keys mode and you’re good to go.

How to Open File Explorer from Command Prompt in Windows 10

October 26th, 2020 by Admin

How do I open a File Explorer window in a given directory from cmd.exe? Previously we’ve covered many ways to open File Explorer in Windows 10, but here I’ll show you how to open File Explorer in a specific folder using Command Prompt.

Method 1: Using the Start Command Line to Open File Explorer

Open the Command Prompt window, type the following command and press Enter. This will launch File Explorer and open the current folder location that you were in at the Command Prompt.
start .

To open a specific folder, simply run the command below. The folder path must be double quoted even if it doesn’t contain spaces. The first quoted argument will be interpreted as the window tile, and we can leave it empty.
start "" "your_folder_path"

Method 2: Using the Explorer Command Line to Open File Explorer

Open the Command Prompt window, type explorer and hit Enter. It will open File Explorer to Quick access or This PC depending on your Folder Options setting.

If you want to open File Explorer in a specific folder, then type the following command. Make sure the folder path is enclosed in double quotes if it contains spaces.
explorer "your_folder_path"

The above commands also work at Windows PowerShell console.

How to Protect Outlook .OST File from Unauthorized Access

October 23rd, 2020 by Admin

How can I set a password for my .OST file in Outlook 2013? It’s super simple to password protect a .PST file, but Outlook doesn’t offer built-in encryption for OST file. If you need to prevent other users from accessing the email messages stored in an .OST file, you can protect Outlook .OST file using third-party software – Protect My Folders.

Part 1: Find the location of OST file

Before getting started, you need to find the location of OST file in Outlook application. Follow these steps:

  1. Open the Control Panel in Large icon view, and click on the Mail option.

  2. When the Mail Setup window appears, click on the the Data Files button.

  3. The Account Settings dialog should list .pst or .ost files for all your email accounts in Outlook. Choose the .ost file you want to protect, and then click on the “Open File Location” button.

  4. File Explorer will open the folder that contains the specified outlook .ost file.

Part 2: Protect Outlook OST File from Unauthorized Access

  1. Download and install the Protect My Folders application on your computer. The first time you launch the program, it will prompt you to set up a master password in order to manage protected folders / files.

  2. Just drag your desired .ost file from File Explorer and drop it to the Protect My Folders app, it will be hidden and locked down.

  3. Nobody can access, copy, or delete a secured .ost file. If you launch Outlook application, you’ll get the error that says the ost file can’t be opened.

  4. Whenever you need to access the secured .ost file, just launch Protect My Folders and enter the master password. Select your .ost file and click on “Unlock“. You can then start Outlook application and access anything stored in that .ost file.

That’s it!

How to Disable Bing Web Results in Windows 10 Search Box

October 16th, 2020 by Admin

When you type anything in the search box on Windows 10 taskbar, it will display web results from Bing search if there are no local results.

If you just want to perform a local search only, here are 2 simple ways to disable Bing web results in Windows 10 Search box.

Method 1: Disable Bing Web Results in Windows 10 Search Box via Group Policy

  1. Open Local Group Policy Editor and navigate to: User Configuration -> Administrative Templates -> Windows Components -> File Explorer. Locate the policy called “Turn off display of recent search entries in the File Explorer search box” and double-click it.

  2. Select the Enabled option and click OK.

  3. Close Local Group Policy Editor and restart your computer to apply the new policy. Now you’ve successfully disabled the Bing integration in Windows 10 Search box.

Method 2: Disable Bing Web Results in Windows 10 Search Box via Registry Editor

If Local Group Policy Editor is not available in your PC, the following registry tweak will do the same effect.

  1. Open Registry Editor and browse to: HKEY_CURRENT_USER\SOFTWARE\Policies \Microsoft\Windows. In the left pane, right-click on the Windows key and select New -> Key, and name that Explorer.

    If the Explorer key already exists, just skip this step.

  2. Select the newly-created Explorer key. Right-click empty place in the right pane and then select New -> DWORD (32-bit) Value.

  3. Name the value DisableSearchBoxSuggestions. Then, double-click on it and set its value data to 1.

  4. Close Registry Editor and reboot Windows 10. When you use the Windows 10 search box, Bing web results are not included and it now only shows you local results.

3 Ways to Mute or Turn off Microphone in Windows 10

October 6th, 2020 by Admin

Is there a way to mute the microphone but keep the speaker on? Clicking the Volume icon in the system tray can mute the speaker easily, but there is no such straightforward way to mute the microphone. In this tutorial we’ll show you 3 methods to mute or turn off microphone in Windows 10.

Method 1: Mute or Turn off Microphone from System Tray

Right-click the Volume icon in the taskbar notification area and select “Open Sound settings“.

This will launch the Settings app and open the Sound page. On the right side, scroll down to the Input section and click on the “Manage sound devices” link.

Under the Input devices section, select your microphone and click on Disable.

Method 2: Mute or Turn off Microphone via Settings App

Press the WIN + I keyboard shortcut to open the Settings app. Click on the Privacy category.

Select Microphone in left-hand side. On the right, click on the Change button under “Allow access to the microphone on this device”.

In the popup window, toggle the setting to Off. This will disable access to your microphone in Windows 10.

Method 3: Mute or Turn off Microphone via Command Prompt or Third-Party App

There is a portable freeware called SoundVolumeView which lets you mute or unmute any sound device from Command Prompt and GUI. After downloading SoundVolumeView, unzip it and launch the .exe file. It will list all sound devices available on your computer. To mute your microphone, just select the microphone device and click the Mute icon in the toolbar.

If you want to mute the microphone from the Command Prompt, type the following command and hit Enter.
{path to SoundVolumeView.exe} /Mute "Microphone"

You can also create a desktop shortcut along with custom keyboard shortcut to run this command, which will make muting the microphone much easier.