Archive for February, 2020

3 Ways to Remove Windows 10 Computer from Domain

February 27th, 2020 by Admin

How do I remove a computer from a domain that no longer exists? Or unjoin and rejoin the domain without resetting user profile? In this tutorial we’ll show you 3 methods to remove Windows 10 computer from domain. Before getting started, you need to log on to Windows 10 with local administrator account instead of domain account. If you couldn’t remember the password, PCUnlocker can be of help.

Method 1: Remove Windows 10 Computer from Domain Using System Properties

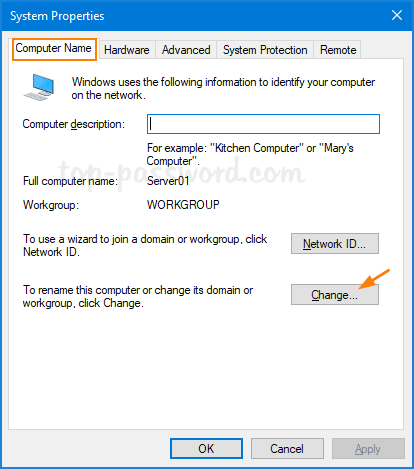
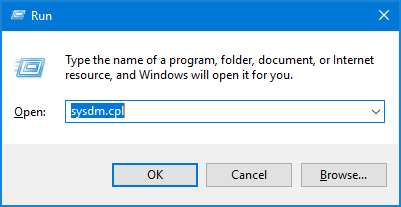
  1. Press the Windows key + R on the keyboard, then type sysdm.cpl in the Run box and press Enter.

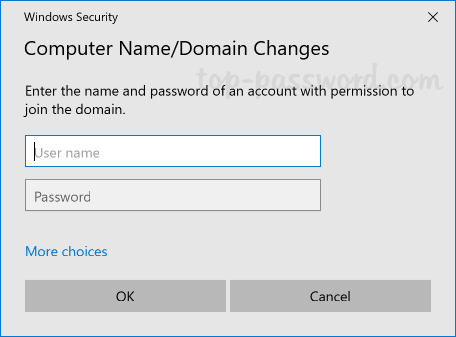
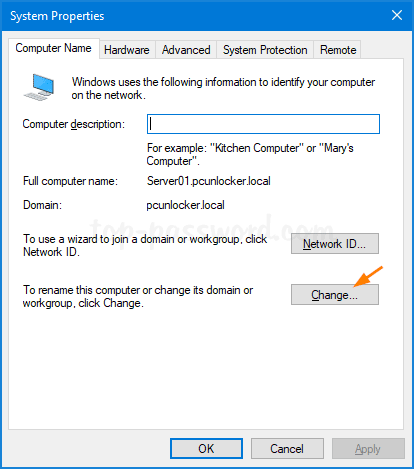
  2. When the System Properties window opens, click on the Change button at the bottom of the “Computer Name” tab.

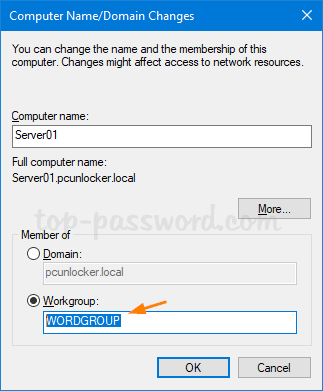
  3. Select the Workgroup radio button, enter a workgroup name you want to be a member of after unjoining the domain. Click OK.

  4. Click OK when prompted.

    You will be asked to restart the computer so that changes can be applied.

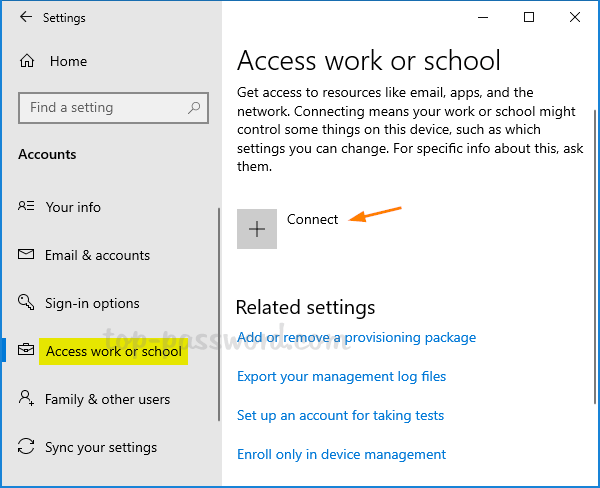
Method 2: Remove Windows 10 Computer from Domain Using Settings App

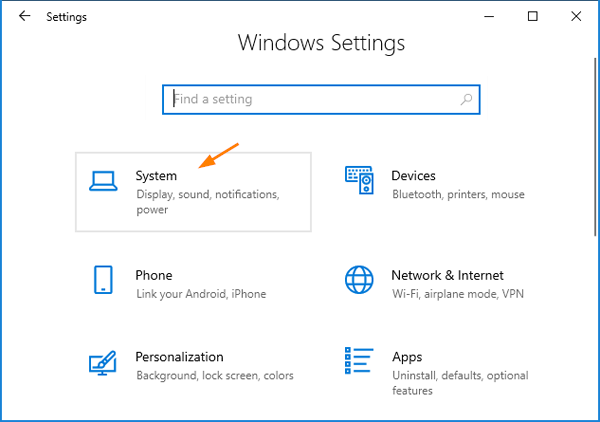
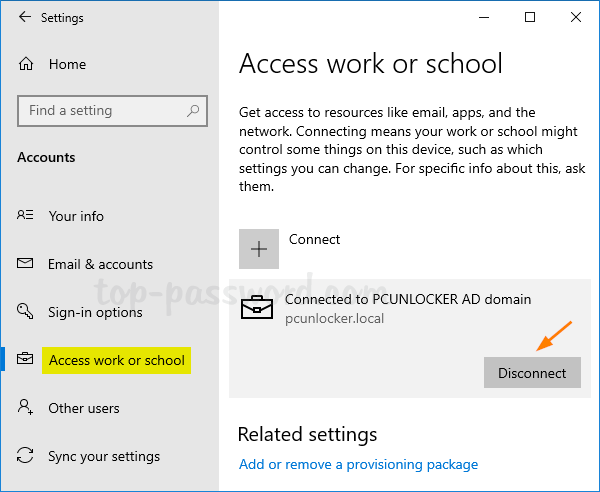
  1. Open the Settings app and navigate to Accounts -> Access work or school. On the right pane, click the icon labeled Connected to (your domain) AD domain, and then click Disconnect.

  2. Click on Yes to confirm.

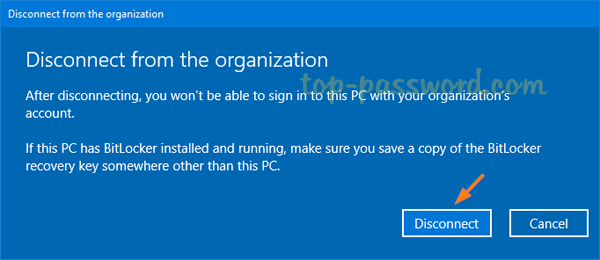
  3. When the “Disconnect from the organization” prompt appears, click on Disconnect.

  4. Once restarted, you Windows 10 computer has been unjoined from active directory domain.

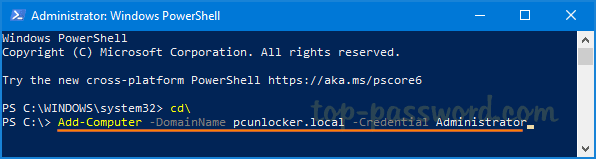
Method 3: Remove Windows 10 Computer from Domain Using PowerShell

  1. Open the Windows PowerShell with admin rights, type the following command to unjoin the domain.
    Remove-Computer -UnjoinDomaincredential Domain_Name\Administrator -PassThru -Verbose -Restart -Force

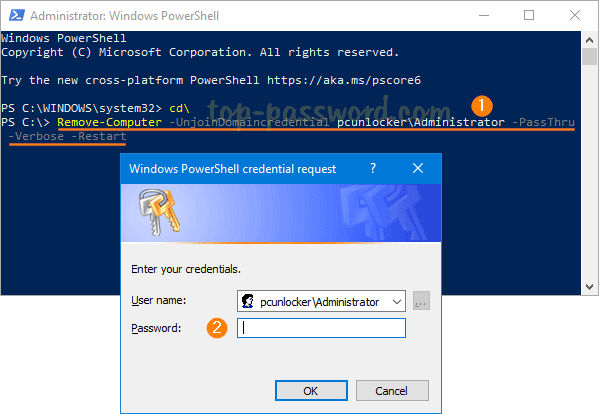
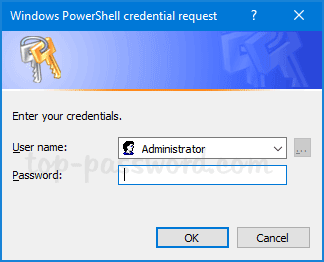
    Enter the domain administrator password when prompted, and click OK.

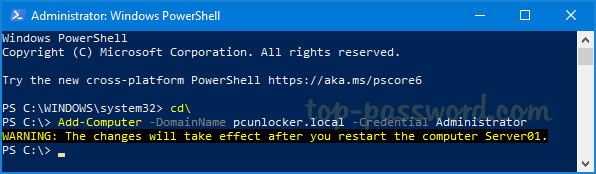
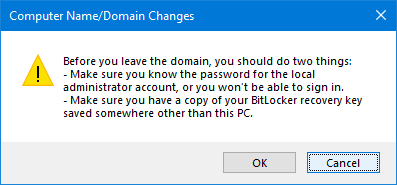
  2. You’ll see a warning: After you leave the domain you will need to know the password of the local administrator account to log onto this computer. Type Y to continue.

  3. Restart your computer to complete this unjoin operation.

3 Ways to Add Windows 10 to Active Directory Domain

February 21st, 2020 by Admin

How can I join a Windows 10 Pro computer to a domain? Before getting started, you need to change the DNS settings or add a new entry to the Windows Hosts file so your PC can communication with domain controller. Afterwards, you can add Windows 10 to Active Directory domain using any of the following methods. Note that only Windows 10 Pro, Enterprise or Education edition can join a domain.

Method 1: Add Windows 10 to Domain from System Properties

  1. Press the Windows key + R to open the Run command box. Type sysdm.cpl and hit Enter to launch System Properties.

  2. Under the Computer Name tab, click on the Change… button.

  3. Select Domain, type the domain name of the AD server you want to join and click OK.

  4. Type the credentials of a domain user and click OK.

  5. Finally restart your computer and you can then sign in to Windows 10 with your domain account.

Method 2: Add Windows 10 to Domain from Settings App

  1. Press the Windows key + I to open the Settings app. Navigate to Accounts -> Access work or school, and then click Connect on the right side.

  2. In the popup window, click on the “Join this device to a local Active Directory domain” option.

  3. Type the Active Directory domain name and click Next.

  4. Enter the user name and password for your domain account, and click OK.

  5. Select your Account type to continue. You’ll need to restart to complete the process of joining Windows 10 to Active Directory domain.

Method 3: Add Windows 10 to Domain Using PowerShell

  1. Open PowerShell with administrator rights and type the following command:
    Add-Computer -DomainName "Domain Name" -Credential "Domain Username"

  2. Once pressing Enter, you will be prompted to enter your domain user password.

  3. A warning will be displayed in yellow like the one below. You need to reboot to finish the task.

That’s it!

2 Ways to Turn on / off Clipboard Sync on Windows 10

February 16th, 2020 by Admin

Starting with Windows 10 October 2018, the new clipboard can sync text/image that you copy across devices through the cloud. Whenever you copy some text, the clipboard sends it to Microsoft’s cloud for synchronization, so you can access it from another computer that you are signed in to with the same Microsoft account. By default, Clipboard sync is turned off. In this tutorial we’ll show you 2 methods to enable or disable the clipboard sync feature on Windows 10.

Method 1: Turn on / off Clipboard Sync Using Settings App

  1. Press Windows + I keyboard shortcut to open Settings, and then click on System.

  2. Choose Clipboard from the left pane. On the right, turn on the toggle button under Sync across devices to enable clipboard sync.

    To prevent syncing potentially sensitive data, you’d better turn this feature off.

  3. Once you’ve completed the steps, Windows 10 will know whether or not to sync clipboard history depending upon your settings.

Method 2: Turn on / off Clipboard Sync Using Registry Editor

  1. Open Registry Editor and navigate to HKEY_LOCAL_MACHINE\SOFTWARE\Policies\Microsoft\Windows\System. On the right pane, right-click on the blank area and select New -> DWORD (32-bit) Value.

  2. Name the value AllowCrossDeviceClipboard. Double-click it and set the value to 1 for turning on the clipboard sync feature.

    If you need to disable clipboard sync, just change its value to 0.

  3. Close the Registry Editor. The changes will take effect immediately.

Conclusion

If you’re using Windows 10 Professional or Enterprise, you can also turn off clipboard sync using group policy. Just open Local Group Policy Editor and browse to: Computer Configuration > Administrative Templates > System > OS Policies, set the “Allow Synchronization across Devices” policy to disabled. This will prevent users from turning on clipboard sync using the Settings app.

How to Show Windows 10 Version and Build Number on the Desktop

February 4th, 2020 by Admin

There are various ways to determine the build number of Windows 10 running on your computer, but none of them are more straightforward than displaying Windows 10 build information as watermark on the desktop. In this tutorial we’ll show you a hidden registry trick which can make Windows 10 show the edition and build number at the bottom right of your desktop.

How to Show Windows 10 Version and Build Number on the Desktop

Press the Windows key + R together to open the Run command, type regedit and hit Enter.

Once the Registry Editor is open, navigate to: HKEY_CURRENT_USER\Control Panel\Desktop. Double-click on the DWORD value PaintDesktopVersion in the right-hand pane.

Change the default value from 0 to 1 and click OK. Log off or restart your computer. After that, you will see the Windows version and build number being displayed at the bottom right of the screen just above the system tray.

That’s it!