Archive for August, 2020

How to Update Extensions (add-ons) for Microsoft Edge

August 31st, 2020 by Admin

Just like other web browsers, Microsoft Edge also supports extensions (add-ons) and you can install your favorite extensions directly from Microsoft Store. In this tutorial we’ll show you the easy way to update all existing extensions for Microsoft Edge at once.

How to Update Extensions (add-ons) for Microsoft Edge

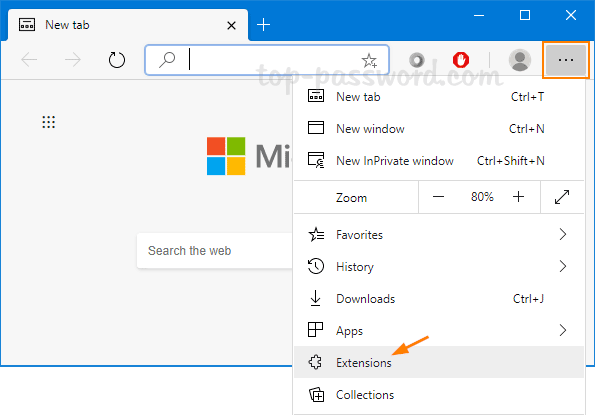
  1. Open Microsoft Edge. Click the More Options button (three dots) in upper right corner, and then select Extensions from the drop-down menu.
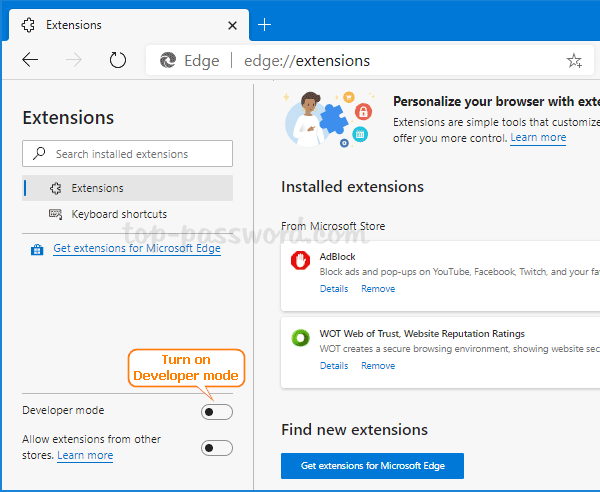
  2. Turn on the Developer mode option at the bottom of the left panel.
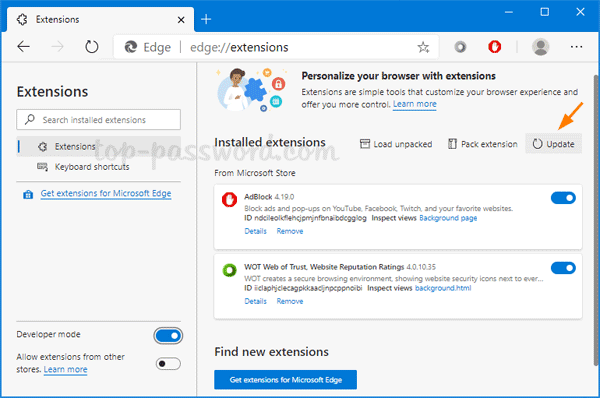
  3. After you toggle it on, you’ll see three buttons appear next to “Installed extensions”. Just click the Update button and Microsoft Edge will immediately check and install any updates available for all installed extensions.
  4. When it’s done, you’ll get a pop-up message saying “extensions updated”.

You can use the similar method to update extensions for Chrome or other Chromium-based browsers. I would expect Microsoft Edge to give me a notification when a new update is available.
3 Ways to Disable IPv6 in Windows 10 / 8 / 7

August 20th, 2020 by Admin

IPv6 causes connectivity issues? IPv6 is the latest version of the Internet Protocol, which is supposed to replace IPv4. However, most websites or softwares don’t work with IPv6 yet. It is common for IT administrators to disable IPv6 to fix some unknown, networking-related issue. In this tutorial we’ll show you 3 easy methods to disable IPv6 in Windows 10 / 8 / 7.

Method 1: Disable IPv6 in Network Adapter Properties

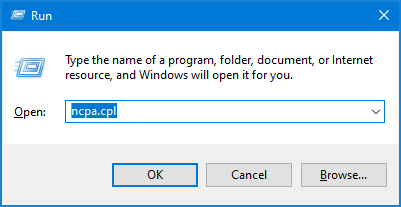
  1. Press the Windows logo key + R to open the Run dialog. Type ncpa.cpl and hit Enter.

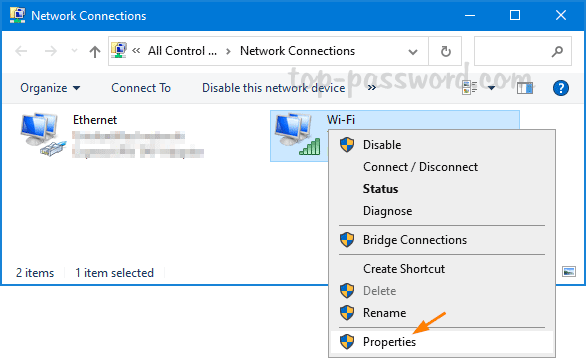
  2. It will open the Network Connections window. Right-click the network adapter you want to disable IPv6 on, and then select Properties.

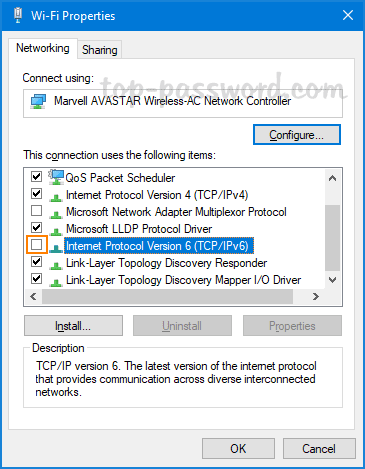
  3. In order to disable IPv6, uncheck the box next to Internet Protocol Version 6 (TCP/IPv6). Click OK.

  4. You can use the same method to disable IPv6 for other network adapters.

Method 2: Disable IPv6 Using PowerShell

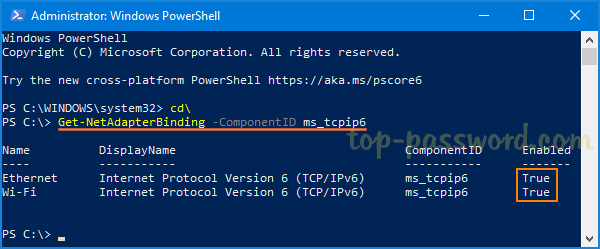
  1. First, you need to open Windows PowerShell as administrator. Next, run the following command to check the status of IPv6 for all network adapters available in your computer.

    Get-NetAdapterBinding -ComponentID ms_tcpip6

    In my example, “Wi-Fi” is the name of the network adapter I want to disable IPv6 on.

  2. To disable IPv6 on a specific network adapter only, type the following command. Replace “Wi-Fi” with the name of your network adapter card.
    Disable-NetAdapterBinding -Name "Wi-Fi" -ComponentID ms_tcpip6

    You can use the wildcard * to disable IPv6 on all network adapters, instead of disabling them one by one.
    Disable-NetAdapterBinding -Name "*" -ComponentID ms_tcpip6

  3. Whenever you need to enable IPv6 again, just run this command:
    Enable-NetAdapterBinding -name * -ComponentID ms_tcpip6

Method 3: Disable IPv6 Using Command Prompt

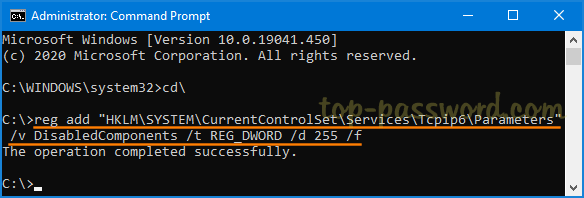
  1. Open the Command Prompt as administrator, and execute this command to disable IPv6 completely:
    reg add "HKLM\SYSTEM\CurrentControlSet\Services\Tcpip6\Parameters" /v DisabledComponents /t REG_DWORD /d 255 /f

  2. Restart the computer for changes to take effect. To verify if IPv6 is disabled, run ipconfig /all and see if the interface shows IPv6 address.

    To revert and enable IPv6, you can delete DisabledComponents registry key with this command:
    reg delete "HKLM\SYSTEM\CurrentControlSet\Services\Tcpip6\Parameters" /v DisabledComponents /f

That’s all there is to it.

How to Enable the new Start Menu in Windows 10 version 2004

August 12th, 2020 by Admin

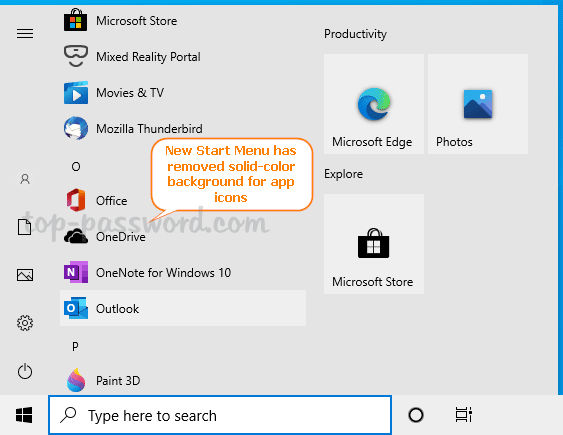
Microsoft has redesigned the Start Menu for Windows 10 and the new look Start Menu is expected to arrive in the the upcoming version – November 2020 update. The new Start Menu removes the ugly square backgrounds for app icons and the tiles are now also partially transparent. In this tutorial we’ll walk you through the steps to enable the new Start Menu in Windows 10 version 2004.

How to Enable the new Start Menu in Windows 10 version 2004

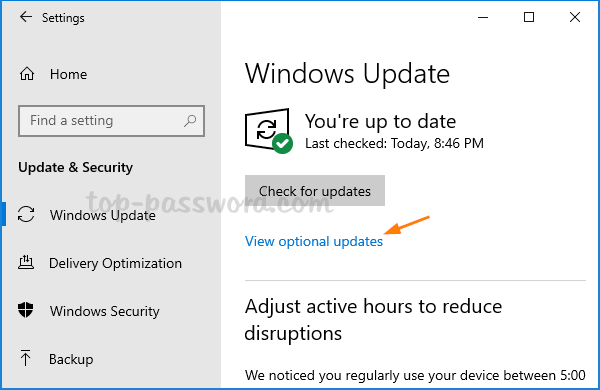
  1. Open up the Settings app and navigate to Update & Security – > Windows Update. Click on the “View optional updates” link. If this link is missing, click on the “Check for updates” button first.

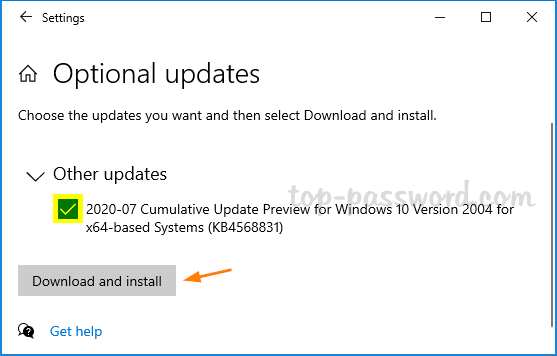
  2. Expand the “Other updates” category. Check the “2020-07 Cumulative Update Preview for Windows 10 version 2004 for x64-based systems (KB4568831)” option and then click on Download and install.

  3. Once the update is installed, reboot your computer. Next, open NotePad, copy the following lines into it, save the file with .reg extension.
    Windows Registry Editor Version 5.00
    [HKEY_LOCAL_MACHINE\SYSTEM\CurrentControlSet\Control\FeatureManagement\Overrides\0\2093230218]
    "EnabledState"=dword:00000002
    "EnabledStateOptions"=dword:00000000
  4. Double-click the saved .reg file to import the settings into Windows Registry. Restart your system again and you’ll see the new Start Menu, which removes the the solid-color backplates behind the logos in the app list of the Start Menu.

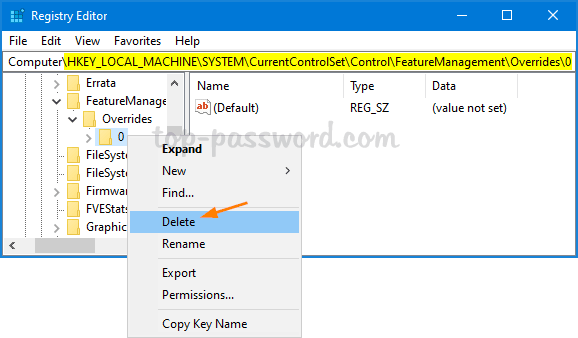
If you need to disable the new Start Menu later, just open Registry Editor and browse to HKEY_LOCAL_MACHINE\SYSTEM\CurrentControlSet\Control\FeatureManagement\Overrides. Right-click on the 0 subkey and select Delete.

Reboot and the old Start Menu will come back!

How to Change Default Font Size for Chrome Browser

August 9th, 2020 by Admin

The size of text in Chrome is too small or too large? Improper font size can make the text on the web pages hard to read. In this tutorial we’ll show you 2 easy methods to change default font size for Chrome browser.

Method 1: Change Font Size for Chrome Using Zoom Mode

Zoom mode allows you to quickly change the size for both text and images of any web site. You can set different zoom levels for each website. Here’s how:

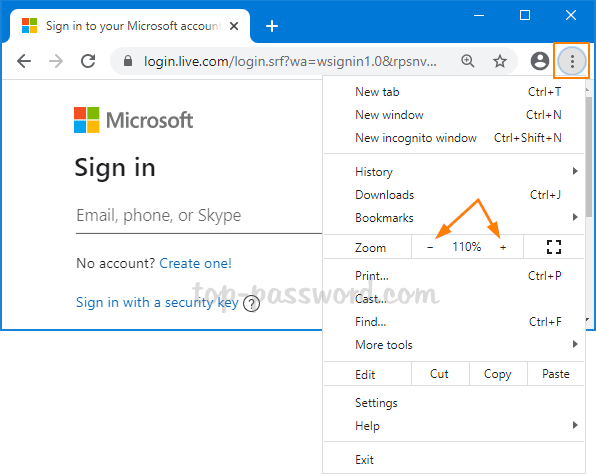
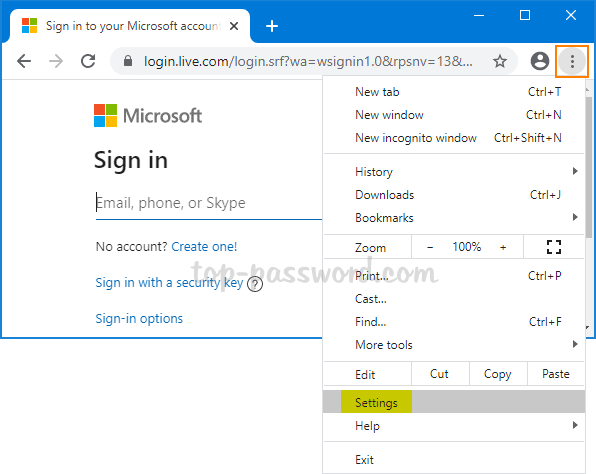
  1. Open the Chrome browser and go to the web page for which you want to change the font size. Click on the Menu button (three vertical dots) to the right of the URL bar.
  2. In the menu that pops up, look for the “Zoom” option. The default value of Zoom is 100%. You can click + to make everything on that page bigger, or click to make things smaller.

Method 2: Change Default Font Size for Chrome via Settings

This method lets you change Chrome’s default text size for every website at once, but it won’t affect the size of images. Here’s how:

  1. Open Google Chrome on your PC, click on the Menu button (three vertical dots) on the top-right corner and then select Settings.

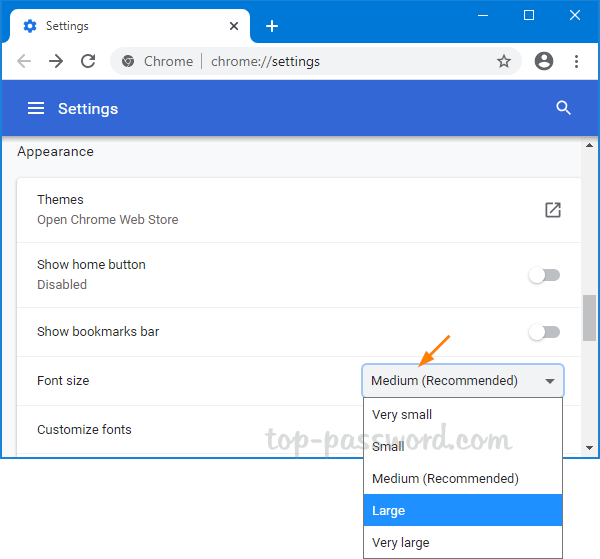
  2. Scroll down to the Appearance section. Click the Font Size drop-down list and you can choose the new font size for web pages: Very large, Large, Medium, Small or Very small.

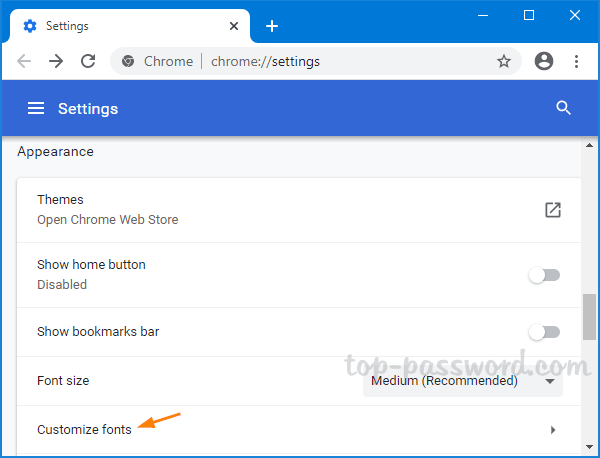
  3. If you still can’t get the fonts to the proper size, just click on Customize fonts.

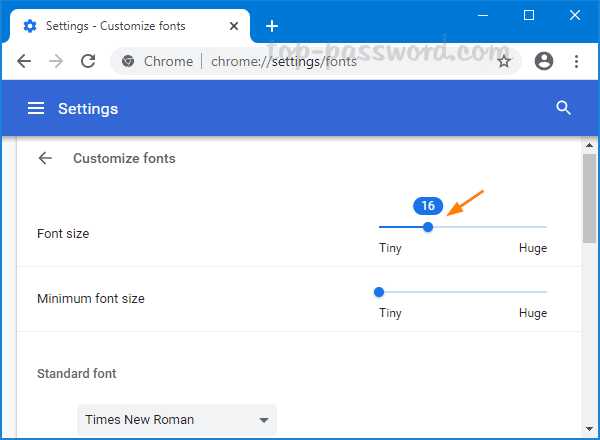
    You can move the slider to change the default font size to any value between 9 and 72.

That’s all there is to it!

3 Ways to Quickly Clear All Event Logs in Windows 10

August 4th, 2020 by Admin

Event Viewer is a built-in Windows application that lets you view all the important events that occur on your PC. Sometimes, you may need to delete old event logs at once if nothing has gone wrong. In this tutorial we’ll show you 3 ways to quickly clear all event logs in Windows 10 Event Viewer.

Method 1: Clear Windows Event Logs Using Event Viewer

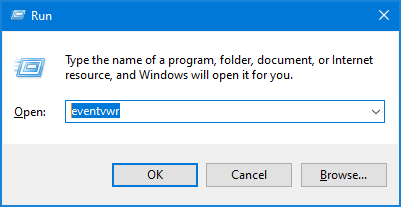
Press the Windows + R keys to open the Run dialog, type eventvwr.msc and click OK to open Event Viewer.

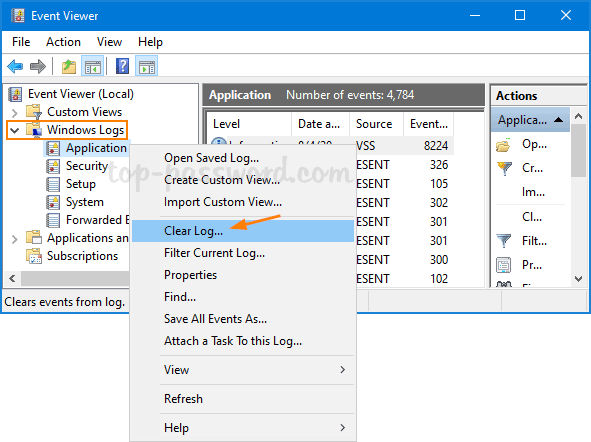
On the left sidebar of Event Viewer, expand “Windows Logs” and right-click one of the events categories, then select Clear Log from the menu that comes up.

Click either the “Save and Clear” or the Clear button to confirm.

The event logs will be cleared immediately.

Method 2: Clear Windows Event Logs Using Command Prompt

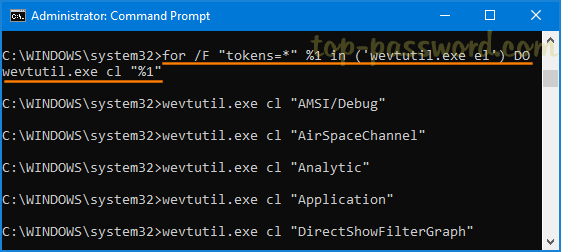
Open an elevated Command Prompt window. Copy and paste the following command into the Command Prompt, and then hit Enter.
for /F "tokens=*" %1 in ('wevtutil.exe el') DO wevtutil.exe cl "%1"

This will delete all types of Windows event logs at once.

Method 3: Clear Windows Event Logs Using PowerShell

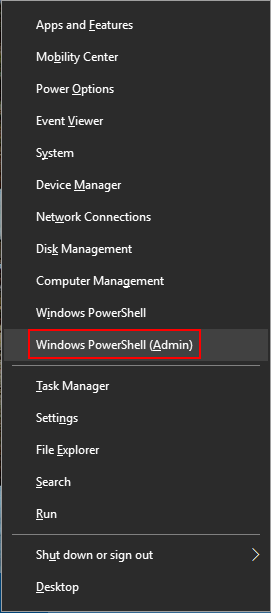
Press the Windows logo key + X to open the Quick Link menu, and then click on “Windows PowerShell (Admin)“.

To clear all event logs in Windows 10, just enter the below command and press Enter.
Get-EventLog -LogName * | ForEach { Clear-EventLog $_.Log }

That’s it!