Archive for August, 2018

Excel 2016: How to Hide Data or Text in a Cell

August 27th, 2018 by Admin

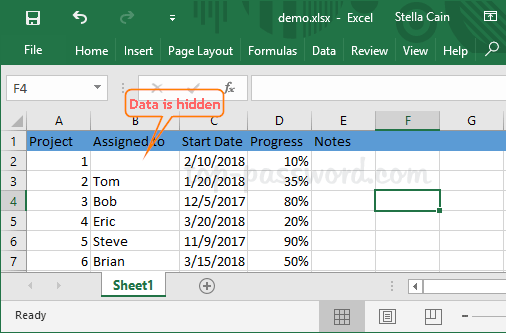
How can I hide the data in an individual cell I want to keep private? Hiding the confidential content of a cell is a useful trick most Excel users probably don’t know. In this tutorial we’ll walk you through the procedure to hide data or text in a cell in Excel 2016.

How to Hide Data or Text in an Excel Cell?

  1. Open your Excel spreadsheet in Excel 2016.
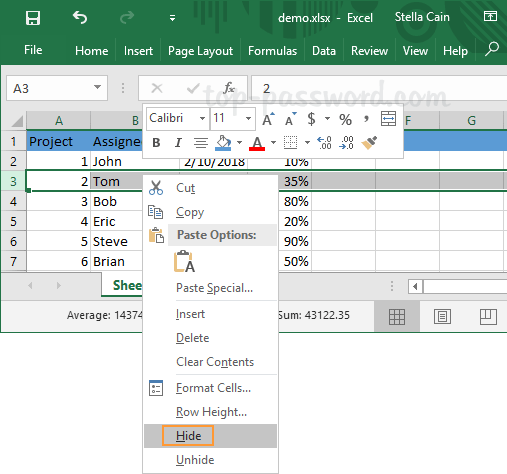
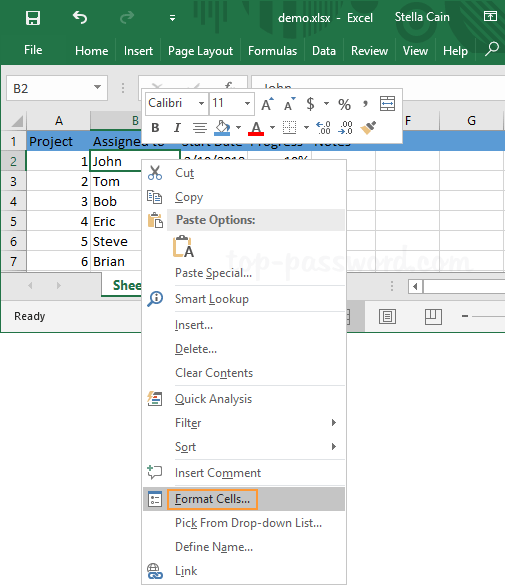
  2. Select the cells that contain sensitive data you want to hide. Right-click to choose “Format Cells” option from the drop-down menu.

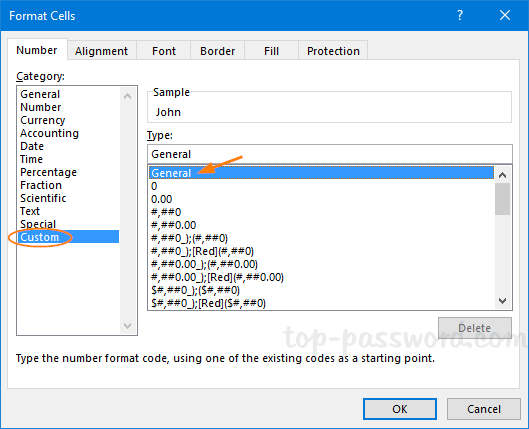
  3. On the Number tab, choose the Custom category and enter three semicolons (;;;) without the parentheses into the Type box.

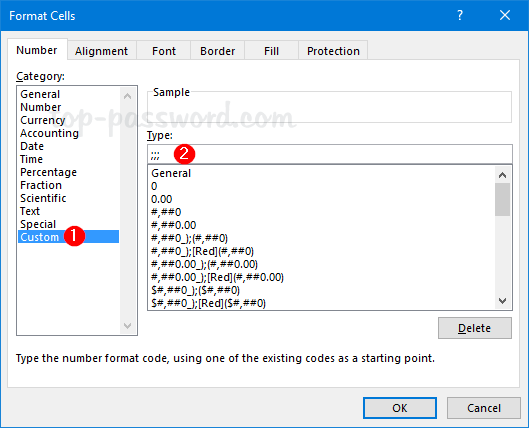
  4. Click OK and now the data in your selected cells is hidden.

This method only hides the cell contents from being seen. The contents are still there and accessible for formulas, charts as such. If you want to display the hidden cell values, right-click the cells and select “Format Cells“. But this time choose “General” as the format of the cells.

Now, the hidden text in your cells will be visible again.

How to Hide / Unhide Entire Row or Column in Excel 2016

August 26th, 2018 by Admin

How can I hide a full column in Excel worksheet without deleting it? If you don’t want others to see a specific row or avoid printing a certain column, you can hide the entire row or column in Excel 2016.

Part 1: Hide a Whole Row or Column in Excel 2016

  1. Open the spreadsheet in Excel 2016.
  2. Select the whole row you want to hide by clicking the row number. If you wish to hide an entire column, click the column letter to select it.
  3. Right-click the selected row or column, and then click the Hide option.

  4. The selected row or column will be hidden from view straight away. But you’ll see double lines at column or row headers, which indicates a column or row is hidden.

Part 2: Unhide a Whole Row or Column in Excel 2016

To unhide a row, just select the row above and the row below the hidden row. Since row 3 is hidden, we want to select rows 2 to 4. Then, right-click on the selection and click Unhide from the popup menu.

To unhide a column, select the columns before and after the hidden columns. Right-click the selected column headers and pick Unhide.

Part 3: Quickly Unhide All Hidden Rows or Columns

If you want to unhide all rows or columns on a sheet, make sure the whole worksheet is selected.

Then press Ctrl + Shift + 9 keyboard combination to unhide all rows, or press Ctrl + Shift + 0 to show all hidden columns.

How to Remove License / Product Key for Office 2019 / 2016 / 2013

August 24th, 2018 by Admin

How to update / replace Office license key before the expiration date? Is there a way to change the product key without reinstalling Office suite? Do you have an old PC you want to sell, but also want to transfer your Office license to your new PC? In this tutorial we’ll show you an easy way to remove the existing product key registered with your Microsoft Office 2019 / 2016 / 2013 application.

Part 1: Check the Office License Status

To get started, open the Command Prompt as administrator. Navigate to the Microsoft Office program folder using the cd command. The subfolder varies depending on your Office version:

  • Office 2016 / 2019: C:\Program Files\Microsoft Office\Office16 or C:\Program Files (x86)\Microsoft Office\Office16
  • Office 2013: C:\Program Files\Microsoft Office\Office15 or C:\Program Files (x86)\Microsoft Office\Office15

Now you can check the license status by running the script called ospp.vbs, which is located in your Office program folder.
cscript ospp.vbs /dstatus

You’ll see some license details such as the license type (a retail copy, a volume licensed copy, or Office subscriptions copy) and the last 5 characters of the product key.

Part 2: Remove Existing Office Product Key

To remove your Office product key, you need to use the /unpkeyswitch, along with the last 5 characters of the product key.
cscript ospp.vbs /unpkey:{last five characters of product key}

You will be told that your Office product key has been uninstalled. Now, Open any Office application like Word and it’ll ask you to enter new product key.

That’s it!

How to Delete Custom or Built-in Power Plan in Windows

August 23rd, 2018 by Admin

How do I delete a power plan that I no longer need? Windows allows you to use the built-in power plans (Balanced, Power Saver, and High Performance) or create a new power plan from scratch. This tutorial will show you 2 methods to delete custom or built-in power plan in Windows 11 / 10 / 8 / 7.

Method 1: Delete Custom Power Plan Using Control Panel

  1. Press the Windows and R keys together to open the Run dialog box. Type powercfg.cpl and press Enter to access one of the Control Panel applets – Power Options.

  2. To delete a custom power plan, you first have to choose another power plan as the active one. Then click on the link “Change plan settings” next to the custom power plan you want to delete.

  3. In the next window, click on Delete this plan link at the bottom.

  4. Click OK to confirm the operation.

  5. After deleting the power plan, it will disappear from the Power Options window.

Method 2: Delete Custom or Built-in Power Plan Using Command Prompt

In addition to deleting custom power plan, this method also allows you to delete built-in power plans in Windows 10 / 8 / 7. Follow these steps:

  1. Open the Command Prompt as administrator. Run the powercfg /list command and it will list all existing power plans in your system along with their GUIDs.

    If the power plan you want to delete is active, then you have to set another plan as active by running this command:
    powercfg -setactive GUID

  2. Now, you can delete the desired power plan using the following command.
    powercfg -delete GUID

  3. When it’s done, the selected power plan is deleted and you cannot use it anymore.

How to Create a Power Plan in Windows 11 / 10 / 8 / 7

August 22nd, 2018 by Admin

A power plan lets you customize how long it takes your computer to turn off monitor / hard drive, or go into sleep after your computer is idle. In this tutorial we’ll walk you through the steps to create a power plan in Windows 11 / 10 / 8 / 7 to customize how your computer uses power.

How to Create a Power Plan in Windows 11 / 10 / 8 / 7?

  1. Press the Windows key + R to bring up the Run dialog, type powercfg.cpl and press Enter to open the Power Options window.

  2. Click the “Create a power plan” link in the left navigational menu.

  3. Select an existing power plan as the base for your new plan, type in a plan name you want and click Next.

  4. Choose how long before your monitor turns off and how long before your computer goes to sleep. You can either set a certain amount of time, or set it to never. Finally click on Create.

  5. When you come back to the Power Options window, you can see that new power plan is automatically set as active.

That’s it!

How to Prevent Users from Removing Printers in Windows 10 / 8 / 7

August 21st, 2018 by Admin

Is there a way to block users from deleting the printers in a public computer? This tutorial will show you how to use group policy or registry trick to prevent users from removing local and network printers in Windows 10 / 8 / 7.

Method 1: Use GPO to Prevent Users from Removing Printers

  1. Press the Windows key + R to launch the Run dialog box, type in gpedit.msc and press Enter. This will open the Local Group Policy Editor.

  2. Navigate to User Configuration –> Administrative Templates –> Control Panel –> Printers, and then double-click “Prevent deletion of printers” from the right pane.

  3. Select Enabled and click OK.

  4. If a user tries to delete any printers from your computer, a message will appear saying “This operation has been cancelled due to restrictions in effect on this computer. Please contact your system administrator“.

Method 2: Use Registry Editor to Prevent Users from Removing Printers

If you have the standard or home edition of Windows, you can modify the registry instead to prevent the deletion of existing printers on your computer.

  1. Press the Windows key + R to launch the Run dialog box, type in regedit and press Enter. This will open the Registry Editor.

  2. Go to the following registry location:
    HKEY_CURRENT_USER\Software\Microsoft\Windows\CurrentVersion\Policies\Explorer

    Double-click the DWORD entry “NoDeletePrinter” from the right panel, change the Value Data field to 1, then click OK.

  3. Now close the Registry Editor and reboot your computer. If you don’t want to prevent users from deleting printers any longer, just change the NoDeletePrinter value to 0 and you’re done!

How to Crack Passowrd-Protected ZIPX Archive with GPU

August 15th, 2018 by Admin

Forgot the password to your encrypted zipx file? How can I break the zipx password and recover its contents? If you can’t find any passwords or hints as to what it could be, a password cracker program can be of help – Password Recovery Bundle. This program lets you quickly recover ZIPX password with GPU acceleration. Here we’ll walk you through the steps to crack password-protected ZIPX archive with brute-force search.

How to Crack Passowrd-Protected ZIPX Archive with GPU?

If your computer has a dedicated graphic card (such as an NVIDIA or AMD GPU), then Password Recovery Bundle will automatically combine the power of GPU to accelerate the password cracking.

  1. When you open up Password Recovery Bundle, click on the “Recover From File” button and select “ZIP Password” from the drop-down list.

  2. This will open the browser dialog box. Locate your password-protected zipx file and click on Open.

  3. The next window will prompt you to select the password search method: brute-force attack, mask attack or dictionary attack.

  4. If you’ve chosen brute-force attack, enter the minimum and maximum length of the password, as you remember, so that it will search the password only within that range.

  5. Once you click Next, the program will try every possible password. Assuming the character set consists of all lowercase and uppercase letters and digits, and it should be able to find a 4-character password in minutes.

  6. After successfully cracking your forgotten password, you can use it to unpack all encrypted files in the ZIPX archive. That’s it!

Rotate Your Screen in Windows – Fix Screen Sideways or Upside Down

August 11th, 2018 by Admin

How can I change the screen orientation back to normal when it appears sideways or upside down? Is there a keyboard shortcut to turn Windows 10 screen 90 degrees or 180 degrees? In this tutorial we’ll show you 3 simple ways to rotate your computer’s screen in Windows 10 / 8 / 7.

Method 1: Rotate Your Screen in Windows with Keyboard Shortcut

While hold down the Ctrl and Alt keys, pressing the Left, Right, or Down arrow key could rotate the screen a different direction. To restore the screen back to its normal upright rotation, just press Ctrl + Alt + the Up arrow.

Method 2: Rotate Your Screen via Windows Display Settings

Right-click on the desktop and choose “Display settings“. If you’re running Windows 7, select the “Screen Resolution” option instead.

Click the Orientation drop-down menu, and then choose your preferred screen orientation — Landscape, Portrait, Landscape (flipped), or Portrait (flipped).

A confirmation message will let you decide whether to use the changed orientation or revert back to the current one.

Method 3: Rotate Your Screen in Windows with Intel / AMD Graphics

If your computer comes with have Intel graphics cards, right-click on your desktop and select Graphic Option, then navigate to Rotation and you can change the rotation of the display by 90, 180, and 270 degrees. Note: the “Rotate to 0 degrees” option will get your screen orientation back to normal.

If you have an AMD graphics card, right-click on the desktop and select “Catalyst Control Center“. You can also find the similar option to rotate the display on your PC or laptop. That’s it!

Change Priority of Wired / Wireless Network Adapter in Windows 10 / 8 / 7

August 9th, 2018 by Admin

When your computer comes with more than one network adapter (such as Ethernet and Wi-Fi), Windows will use priorities to decide which adapter to use. If both Ethernet and Wi-Fi are connected at the same time, we should give priority to LAN over WI-FI as the wired connection is faster. In this tutorial we’ll show you the simple way to change priority of wired / wireless network adapter in Windows 10 / 8 / 7.

Method 1: Change Network Adapter Priority in the Adapter and Binding tab

If you’re running Windows 8 / 7, you can adjust the priority of wired / wireless network adapter from the “Adapter and Binding” tab. Follow these steps:

  1. Press the Windows key + R to open the Run command, type ncpa.cpl and hit Enter to open the Network Connections window.
  2. You should see a list of network adapters. Press the Alt button (if the menu bar is not already visible) and click on the Advanced menu, and then choose Advanced Settings.

  3. Click the Adapters and Bindings tab. Under Connections, you’ll notice that “Local Area Connection 2” has the highest priority. You can use the up or down arrow button on the right side to change the priority.

  4. Click OK. Traffic will go over the network adapter with the highest priority first (when connected) when all adapters are connected.

However, the “Adapter and Binding” tab was already removed in Windows 10, and you have to use PowerShell cmdlet to change the network adapter priority.

Method 2: Change Network Adapter Priority Using Windows PowerShell

By default, Windows uses the interface metric to determine which network adapter has the highest priority. Adapters with a lower metric number are prioritized over adapters that have a higher number. Here’s how to change network adapter priority using Windows PowerShell:

  1. Open Windows PowerShell as administrator. Type the following command and press Enter.
    Get-NetIPInterface

    The ifIndex column lists a unique number of each adapter, while the InterfaceMetric column lists the priority of the adapter. As you can see from the screenshot above, Wi-Fi has a higher connection priority over Ethernet.

  2. Now, you can use the following command to modify the priority for Ethernet.
    Set-NetIPInterface -InterfaceIndex "ifIndex" -InterfaceMetric "InterfaceMetric"

    In my example, I want to assign higher priority to Ethernet over Wi-Fi, so set its metric to a number smaller than 10 (Wi-Fi’s metric number).

  3. Close the elevated PowerShell window and you’re done!