When your computer comes with more than one network adapter (such as Ethernet and Wi-Fi), Windows will use priorities to decide which adapter to use. If both Ethernet and Wi-Fi are connected at the same time, we should give priority to LAN over WI-FI as the wired connection is faster. In this tutorial we’ll show you the simple way to change priority of wired / wireless network adapter in Windows 10 / 8 / 7.
Method 1: Change Network Adapter Priority in the Adapter and Binding tab
If you’re running Windows 8 / 7, you can adjust the priority of wired / wireless network adapter from the “Adapter and Binding” tab. Follow these steps:
- Press the Windows key + R to open the Run command, type ncpa.cpl and hit Enter to open the Network Connections window.
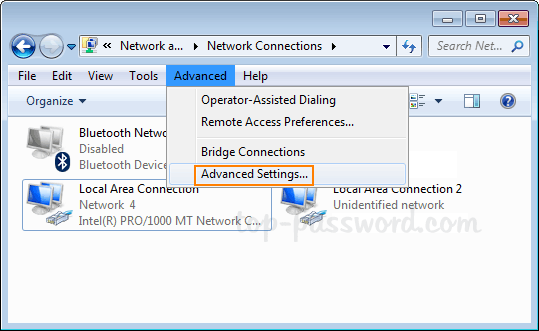
- You should see a list of network adapters. Press the Alt button (if the menu bar is not already visible) and click on the Advanced menu, and then choose Advanced Settings.
- Click the Adapters and Bindings tab. Under Connections, you’ll notice that “Local Area Connection 2” has the highest priority. You can use the up or down arrow button on the right side to change the priority.
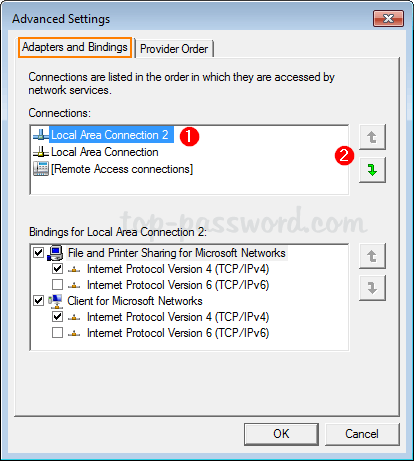
- Click OK. Traffic will go over the network adapter with the highest priority first (when connected) when all adapters are connected.
However, the “Adapter and Binding” tab was already removed in Windows 10, and you have to use PowerShell cmdlet to change the network adapter priority.
Method 2: Change Network Adapter Priority Using Windows PowerShell
By default, Windows uses the interface metric to determine which network adapter has the highest priority. Adapters with a lower metric number are prioritized over adapters that have a higher number. Here’s how to change network adapter priority using Windows PowerShell:
- Open Windows PowerShell as administrator. Type the following command and press Enter.
Get-NetIPInterface
The ifIndex column lists a unique number of each adapter, while the InterfaceMetric column lists the priority of the adapter. As you can see from the screenshot above, Wi-Fi has a higher connection priority over Ethernet.
- Now, you can use the following command to modify the priority for Ethernet.
Set-NetIPInterface -InterfaceIndex "ifIndex" -InterfaceMetric "InterfaceMetric"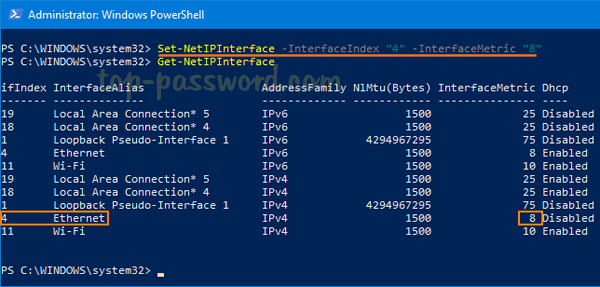
In my example, I want to assign higher priority to Ethernet over Wi-Fi, so set its metric to a number smaller than 10 (Wi-Fi’s metric number).
- Close the elevated PowerShell window and you’re done!