Archive for June, 2016

Remove PST File Password with Freeware pst19upg

June 30th, 2016 by Admin

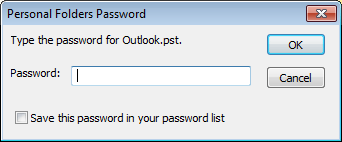
How to remove forgotten password from Outlook PST file? If you do not remember the password to your PST file, you lose access to mail messages in the file. In such situations, it is necessary to remove / unlock PST password.

pst-password

Many years ago, Microsoft released a free utility called pst19upg.exe which was originally designed to upgrade the PST format to version 19. One of the side effects is that it can strip out PST password. In this tutorial we’ll walk you the steps of removing PST file password using the freeware pst19upg.exe.

How to Remove PST File Password with Freeware pst19upg?

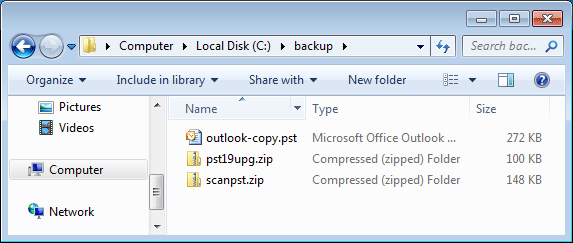
Before getting started, close your Outlook application and make a backup of your Outlook PST file in case the PST file gets damaged or corrupted. Assuming that you’re going to remove password for a PST file stored in the C:\backup directory. Follow these steps:

  1. Download these two utilities pst19upg.zip and scanpst.zip, save them to your local folder C:\backup and unzip. pst19upg.exe is the built-in tool available in Outlook 2003 or even older version, while you can access scanpst.exe from any Outlook version.

    pst19upg

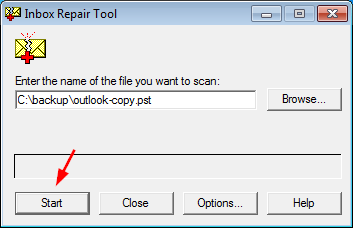
  2. Run the scanpst.exe tool. Click Browse to select your PST file and click Start.

    inbox-repair-tool

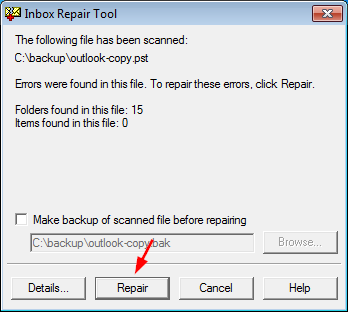
  3. After the scan is complete, a dialog reports the errors found. Click on Repair button to repair the PST file.

    repair-pst

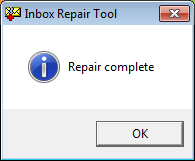
  4. When it’s done, the scanpst.exe utility will show a “Repair complete” message. Click OK.

    repair-complete

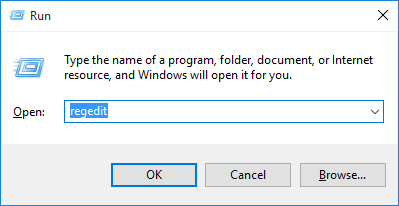
  5. Now open the Command Prompt by pressing Windows + R key combination and typing cmd. Type the following command and press Enter. This will convert your pst file to .psx format.
    C:\backup\pst19upg.exe -x C:\backup\outlook-copy.pst

    convert-pst-to-psx

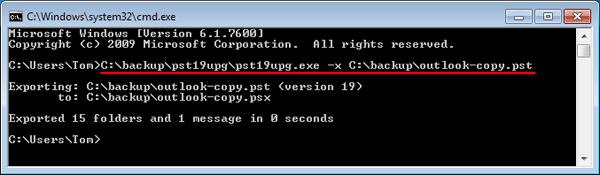
  6. When complete, type the following command and press Enter. This will create a password-free pst file from the psx file.
    C:\backup\pst19upg.exe -i C:\backup\outlook-copy.psx

    convert-psx-to-pst

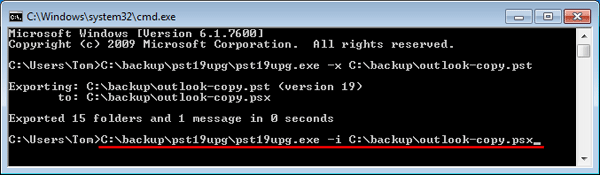
  7. Now you’ve successfully removed the PST password. Run the scanpst.exe file to repair the newly-created pst file. After that, copy this PST file to the original location and you can then open Outlook application without prompting you to enter PST password.

This pst19upg.exe tool will work only on MS Outlook 2003 and earlier versions and it can process ANSI formatted PST files only. If you need to remove the password of Unicode PST file, you have to use the third party software – Outlook Password Recovery, which supports all the Outlook versions.

5 Ways to Open Windows Defender in Windows 10

June 28th, 2016 by Admin

Windows Defender is a built-in antivirus program for Windows 10 that helps keep your computer safe from virus, spyware and other forms of malware. In this article we’ll show you 5 quick ways to open Windows Defender in Windows 10.

Method 1: Open Windows Defender Using Control Panel

Open the Control Panel and set the View by option to Small icons. Click Windows Defender to launch the application.

control-panel

Method 2: Open Windows Defender Using Cortana Search

Click the Cortana Search box on the taskbar, type defender and then click Windows Defender from the results window.

search-windows-defender

Method 3: Open Windows Defender from Start Menu

Click the Start button and select “All apps” at the bottom to see all apps and programs listed alphabetically. Look for the Windows System folder and expand it. From there you can access Windows Defender.

open-windows-defender-via-start

Method 4: Open Windows Defender Using Settings App

Press the Windows key + I to open the Settings app. Click Update & Security.

Click the Windows Security tab on the left side, then click the Open Windows Defender Security Center button from the right side.

Method 5: Open Windows Defender from Run or Command Prompt

Press the Windows key + R to open the Run box. Type the following command and press Enter.
"C:\Program Files\Windows Defender\MSASCui.exe"

run-windows-defender

Or type the above command at the Command Prompt and press Enter. This will also start Windows Defender.

How to Turn off Startup Sound in Windows 10

June 28th, 2016 by Admin

Every time you turn on your computer, Windows plays a welcome sound when the login screen loads up. If you feel the startup sound is boring or just annoying, you can turn it off easily. In this article we’ll show you how to turn off / disable the startup sound in Windows 10.

How to Turn off Startup Sound in Windows 10?

  1. Right-click any empty area of your desktop, and then click Personalize.

    personalize

  2. When the Settings app loads up, click the Themes tab on the left, and then click the Advanced sound settings link on the right side.

    advanced-sound-settings

  3. From the Sounds Settings window, click the Sounds tab, uncheck “Play Window Startup sound” as shown in the screenshot below and click OK.

    windows-startup-sound

If you want to access the Sounds Settings window directly, just press the Windows key + R and type mmsys.cpl in the Run box. To turn on the startup sound again, you can re-check the “Play Window Startup sound” option.mmsys

4 Ways to Start Internet Explorer in Windows 10

June 27th, 2016 by Admin

Despite Microsoft Edge becomes the new default browser in Windows 10, Microsoft has not removed Internet Explorer from the latest operating system. But you’ll find a bit difficult to locate and run Internet Explorer. In this article we’ll show you 4 ways to start Internet Explorer in Windows 10.

Method 1: Start Internet Explorer Using Cortana Search

Click into the Cortana Search box on the taskbar, type internet explorer and press Enter. You can access Internet Explorer from the search result.

open-ie-via-cortana

If you want to open Internet Explorer frequently, right-click on the Internet Explorer from the list and you can pin it to the taskbar or the Start screen.

pin-internet-explorer

Method 2: Start Internet Explorer from Start Menu

Click the Start button. When Start Menu appears, click All apps, then expand Windows Accessories and click Internet Explorer.

open-ie-via-start-menu

Method 3: Start Internet Explorer Using Run Box

Press the Windows key + R to open the Run box. Type iexplore and press Enter. This will open Internet Explorer quickly.

iexplore

Method 4: Start Internet Explorer from Microsoft Edge

Open Microsoft Edge and navigate to the desired webpage. Click the three dots button at the top-right corner of the Microsoft Edge window, and then select Open with Internet Explorer.

open-ie-from-edge

4 Ways to Open Microsoft Edge in Windows 10

June 27th, 2016 by Admin

Microsoft Edge is the new default web browser in Windows 10. It’s clean, fast, and more intuitive than Internet Explorer. In this article we’ll show you 4 ways to open Microsoft Edge in Windows 10.

Method 1: Open Microsoft Edge from Taskbar

By default, the Microsoft Edge shortcut is pinned to Windows taskbar. Just click the Microsoft Edge icon and you can launch Edge browser immediately.

open-edge-via-taskbar

Method 2: Open Microsoft Edge from Start Menu

Click on the Start button, then click the Microsoft Edge tile shown at the right panel of the Start Menu.

open-edge

If Microsoft Edge is not shown there, click the All apps entry on the left side of Start Menu. Scroll down to select Microsoft Edge.

open-edge-via-start-menu

Method 3: Open Microsoft Edge Using Cortana Search

Click the Cortana Search box on the Windows 10 taskbar. Type edge and you can access Microsoft Edge from the search results.

open-edge-via-cortana

Method 4 Open Microsoft Edge from Run or Command Prompt

Press the Windows key + R to open the Run box. Type microsoft-edge: and press Enter. This will launch Microsoft Edge instantly.

open-edge-via-run

If you’re at the Command Prompt or PowerShell, just type start microsoft-edge: and press Enter.

If you want to open URL in Microsoft Edge from Command Prompt, type the following command and press Enter:
start microsoft-edge:http://www.top-password.com

open-edge-via-cmd

This will automatically open Edge with your desired website.

Difference Between Sleep and Hibernate in Windows 10 / 8 / 7

June 24th, 2016 by Admin

It’s a good idea to put Windows in the energy-saving mode (Sleep or Hibernate) when you’re away from your computer. However, most of users don’t know the exact differences between Sleep mode and Hibernate mode. In this article we’ll try to explain the differences in detail.

hibernate-vs-sleep

Sleep:

Sleep mode (also known as Standby mode) is useful when you’re going to be away for a short period of time. It’s similar like pausing a DVD movie, all your running programs are suspended. The computer immediately stops most system operations and your open documents and applications are put in the RAM. Power is cut from all components apart from RAM: the display, the hard drive, and ports.

However, the power must NOT be cut off while your PC is in Sleep mode, and must be continue to supply to the computer. A power outage would cause all data that aren’t saved to hard disk to be lost.

When you wake the computer up, all processes and programs resume working within seconds. This is because your computer is still on and all your data is still kept in the computer’s memory.

Hibernate:

Hibernate mode will take everything you have running on RAM (including open documents and apps) and saves it to a special file (C:\hiberfil.sys) on your hard drive, and then turn off your computer completely. That means it consumes almost no power, but it takes a bit more time to wake up than Sleep mode.

When you wake your computer from hibernation, the system will load everything saved in the hiberfil.sys file and all programs you had open will reopen in the same state you left them.

Hibernation is ideal for users who would be away from the computer for an extended period, especially when you have to cut off the power to travel but want to continue working from where you left off, without having to open your programs and documents again.

The downside of Hibernate is that it will take up a huge amount of disk space because it saves the full memory of the RAM into hard drive, you can see a gigantic hiberfil.sys file sitting in the root of your system drive.

hiberfil_sys

Conclusion

Now you should have found out the main differences between Sleep mode and Hibernate mode. It’s up to you to decide which option is best for you to save power for your computer.

Add Missing Hibernate Option to Windows 10 Start Menu

June 24th, 2016 by Admin

In Windows 10, Hibernate mode is disabled by default. When you click the Start button, only Shut down, Restart and Sleep options are shown in the Power Options menu. In this tutorial we’ll show you 2 methods to add the missing Hibernate option to the Start Menu and Power User menu in Windows 10.

hibernate-in-power-options

Before getting started, make sure you have enabled Hibernate mode in Windows 10. If Hibernate mode is disabled, the following methods still couldn’t bring the Hibernate option back to the Start Menu.

Method 1: Add Hibernate Option to Start Menu from Control Panel

  1. Open the Control Panel in Large icons view. Click Power Options.

    control-panel

  2. Select “Choose what the power buttons do” from the left side of the window.

    power-options

  3. This will open the System Settings window, where many options are greyed out. You have to click “Change settings that are currently unavailable“.

    power-system-settings

  4. Scroll to the bottom of the window, until you find the Shutdown settings section. Now check the Hibernate checkbox and click Save changes.

    add-hibernate-to-power-options

  5. Now open the Start Menu and click Power, you can see the Hibernate option in the Power menu, next to Shut down, Sleep or Restart. You can also access the Hibernate option by pressing the Windows + X (or right click on the Start button) and selecting Shut down or sign out.

Method 2: Add Hibernate Option to Start Menu Using Group Policy

  1. Press the Windows logo key + R to open the Run box. Type gpedit.msc and press Enter.

    gpedit

  2. This will open the Local Group Policy Editor. Navigate to:
    Computer Configuration -> Administrative Templates -> Windows Components -> File Explorer
  3. Double-click on the “Show hibernate in the power options menu” policy on the right panel, and set it to Enabled.

    show-hibernate-in-power-options

  4. Close Group Policy Editor and you’ll see the Hibernate option back in the Power Options menu of Windows 10 Start Menu.

2 Options to Enable / Disable Hibernate in Windows 10

June 24th, 2016 by Admin

Hibernate is a way to power off your system with the full memory saved to a hibernation file named hiberfil.sys. When the PC is turned on again, the content of the hiberfil.sys file is restored into the RAM and this will resume everything (including your opened files and running programs) where you left off. This tutorial will demonstrate you how to enable or disable Hibernate in Windows 10.

Option 1: Enable / Disable Hibernate Using Command Prompt

Open an elevated Command Prompt by pressing Win + X and selecting Command Prompt (Admin) from the WinX menu.

winx-menu

Type the following command and press Enter. This will turn on the Hibernate feature and the system will create a hiberfil.sys file under the root path of your system partition.
powercfg -h on

turn-on-hibernate

If you want to disable Hibernate, just type this command and press Enter. The system will delete the hiberfil.sys file automatically.
powercfg -h off

turn-off-hibernate

Option 2: Enable / Disable Hibernate Using Registry Editor

Open the Registry Editor by pressing Win + R and typing regedit in the Run box.

regedit

In the left pane of Registry Editor, navigate to the following location:
HKEY_LOCAL_MACHINE\SYSTEM\CurrentControlSet\Control\Power

Double-click on the HibernateEnabled entry in the right pane and change its value. To turn on Hibernate, set the value to 1, or set it to 0 if you want to turn off Hibernate.

enable-hibernate

Close Registry Editor and restart the computer to apply the changes.

2 Ways to Turn On / Off Airplane Mode in Windows 10

June 23rd, 2016 by Admin

Airplane mode (also known as flight mode) allows you to turn off all wireless communications (Wi-Fi, Bluetooth, GPS) on your PC. During a flight, you’ll be requested to turn off your computer or switch to Airplane mode to prevent any any possible interference with the airplane’s communication and navigation systems. In this tutorial we’ll show you 2 simple ways to turn on or off Airplane mode in Windows 10.

Method 1: Turn on / off Airplane mode from Action Center

Press Windows + A on your keyboard, or click on the Action Center icon (square box with three lines) from the system tray.

action-center

Expand the Quick actions section. If the Airplane mode icon is darker than the other icons, airplane mode is disabled. Click on the Airplane mode button to turn it on or off.

Method 2: Turn on / oOff Airplane mode from the Settings app

Click the Start button and select Settings, or press Windows + I on your keyboard. Once the Settings app is launched, click on Network and Internet.

network-internet

Click on Airplane mode on the left side, and you can then turn on or off Airplane mode on the right side.

airplane-mode

Fix Windows 10 PIN Error: “Something went wrong. Try again later”

June 22nd, 2016 by Admin

When you try to change a PIN or add a PIN logon in Windows 10, you might get the error message “Something went wrong. Try again later.

something-went-wrong

By default, Windows 10 stores the PIN logon credentials in the directory C:\Windows\ServiceProfiles\LocalService\AppData\Local\Microsoft\NGC. If the NGC folder is corrupt, the system will refuse you to change PIN. While you’ll not be allowed to add/create a PIN when the NGC folder is missing.

To fix the error “Something went wrong. Try again later.” and get PIN logon back to work, you have to delete all the contents of the NGC folder. Follow these steps:

  1. Before getting started, you need to configure Windows to show hidden files as the AppData folder is hidden by default.
  2. Open File Explorer and browse to the directory: C:\Windows\ServiceProfiles\LocalService\AppData\Local\Microsoft\NGC. You will be denied permission to access this folder, so you need to take ownership of the NGC folder, and this can be done easily with the freeware TakeOwnershipPro

    take-ownership-NGC

  3. After taking ownership, delete all subfolders and files under the NGC folder. But do NOT delete the NGC folder itself.

    del-pin-logon-location

    Instead, if the NGC folder doesn’t exist, you need to create an empty folder and named it NGC.

  4. Now open the Windows 10 Settings app -> Accounts -> Sign-in options, your previous PIN logon should have been erased and you can create a new PIN, and then change PIN normally. Everything is working fine, consequently the error of “Something went wrong. Try again later.” would disappear as well.