Archive for June, 2016

VMware Fix: Windows cannot find the Microsoft Software License Terms

June 20th, 2016 by Admin

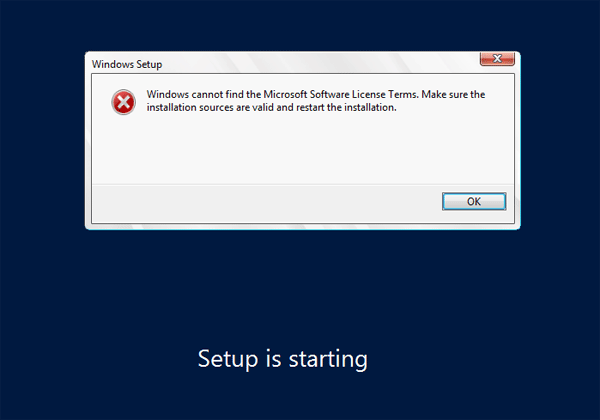
Today I am trying to set up a Windows Server 2012 virtual machine in VMware Workstation 12, but keep getting the error message “Windows cannot find the Microsoft Software License Terms. Make sure the installation sources are valid and restart the installation.

cannot-find-ms-license-term

Firstly I doubt if the Windows ISO file is corrupt and download it again from Microsoft’s website, but the problem still exists. So I think the problem lies in the VMware Workstation and eventually find a solution. Here’s how:

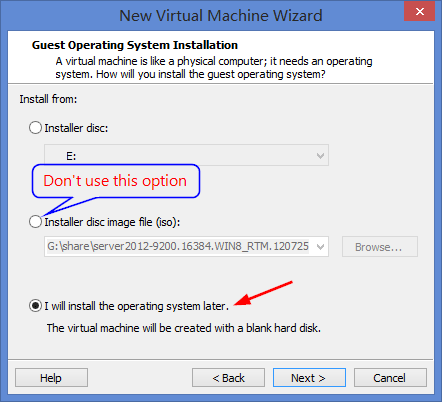
  1. During the setup of the New Virtual Machine Wizard, select “I will install the operating system later” instead of using the Installer disc image file.

    new-vm-wizard

  2. When completing the wizard, go to VM -> Settings -> CD/DVD -> Use ISO image file, and then choose Windows installation ISO file. Boot your virtual machine and you should be able to install Windows smoothly.

    windows-setup

This problem also happens with VMware Fusion, Hyper-V, Parallels, VirtualBox. If the solution above doesn’t work for you, please try to increase the RAM for your virtual machine. Good luck!

2 Ways to Stop Your System from Force Upgrading to Windows 10

June 17th, 2016 by Admin

In May of 2016, Microsoft began forcing a Windows 10 upgrade to all Windows 8/7 users who haven’t requested it – and who might not want it. If you have software or hardware that isn’t compatible with Windows 10, you might no want this forced upgrade. In this tutorial we’ll show you 2 simple ways to stop your computer from force upgrading to Windows 10.

Method 1: Block Windows 10 Upgrade Using Group Policy

  1. Open up Group Policy Editor by using the Windows + R key combination, entering gpedit.msc and hitting Enter.

    run-gpedit

  2. From the left pane of Local Group Policy Editor, navigate to:
    Computer Configuration -> Administrative Templates -> Windows Components -> Windows Update
  3. Double-click the “Turn off the upgrade to the latest version of Windows through Windows Update” policy on the right pane, Select Enabled and then click OK.

    turn-off-windows-upgrade

  4. Now you’ve disabled Windows 10 upgrade. Reboot your computer and you will not be pushed to download & install Windows 10 upgrade.

Method 2: Block Windows 10 Upgrade Using Registry Trick

If you’re unable to access the Group Policy Editor or the group policy for blocking Windows upgrade is missing, you can then use the following registry trick:

  1. Open up the Registry Editor by using the Windows + R key combination, entering regedit and hitting Enter.

    run-regedit

  2. In the left pane of Registry Editor, navigate to:
    HKEY_LOCAL_MACHINE\SOFTWARE\Policies\Microsoft\Windows\WindowsUpdate

    If you do not see the WindowsUpdate key, right-click the Windows key above it, point to New, and create a key named WindowsUpdate.

  3. Right-click in the right pane and create a new DWORD (32-bit) value named DisableOSUpgrade. Double-click the DisableOSUpgrade and enter a value of 1.

    DisableOSUpgrade

  4. Close the Registry Editor and restart your computer. So this is how you stop a forced Windows 10 upgrade.

2 Ways to Block Users from Deleting Browsing History in Internet Explorer

June 16th, 2016 by Admin

How to prevent others from deleting browsing history in your browser? There are situations where you need to share your computer with your friends or family members but you want to restrict them from deleting your saved logins and cookies. In this tutorial we’ll show you 2 simple ways to block users from deleting browsing history in Internet Explorer.

Method 1: Prevent Access to Delete Browsing History Using Group Policy

  1. Press the Windows key + R to open the Run box. Type gpedit.msc and press Enter.
  2. This should open the Local Group Policy Editor. Navigate to the following location:
    Computer Configuration\Administrative Templates\Windows Components\Internet Explorer\Delete Browsing History
  3. In the right pane, double-click on “Prevent access to Delete Browsing History” to open its settings box. Select Enabled and click Apply / OK.

    prevent-delete-browsing-history

  4. Reboot your computer. When you open the Internet Options of Internet Explorer, you’ll find the button for deleting browsing history is greyed out.

    unable-delete-ie-history

Method 2: Prevent Users from Deleting Browsing History Using Registry Editor

If Local Group Policy Editor is not accessible in your computer, you can also use the following registry trick to block users from deleting browsing history in Internet Explorer.

  1. Press the Windows key + R to open the Run box. Type regedit and press Enter.
  2. When you see the Registry Editor window, navigate to the following key:
    HKEY_LOCAL_MACHINE\Software\Policies\Microsoft\Internet Explorer\Control Panel

    If both the Internet Explorer key and the Control Panel key don’t exist, you need to create them firstly.

  3. Now in right side pane, right-click the empty space to create a new DWORD (32-bit) value named DisableDeleteBrowsingHistory and set its value to 1.

    disable-delete-browsing-history

  4. Close Registry Editor and re-open Internet Explorer. Now users will not be able to access the option for deleting browsing history in Internet Explorer. That’s it!

How to Delete Microsoft Edge & IE Browsing History in Windows 10

June 16th, 2016 by Admin

Edge is Microsoft’s new built-in browser that’s meant to replace Internet Explorer. But you can continue to use Internet Explorer which is still available in Windows 10. Like any other browser, Edge keeps track of websites you’ve visited in the past. In this tutorial we’ll show you how to delete browsing history from both Microsoft Edge and Internet Explorer in Windows 10.

Part 1: Delete Browsing History in Microsoft Edge

  1. After launching Edge browser, click the three dots icon on the upper-right corner. Select Settings from the drop-down menu.

    edge-settings

  2. With the settings open, click the Choose what to clear button under “Clear browsing data”.

    clear-edge-browsing-data

  3. There are some options that you want to delete or keep it like Cookies and saved website data, download history, form data, cached data, passwords, etc. But if you want to totally wipe it out, just select them all then click Clear.

    edge-browsing-history

Just remember, as soon as you start browsing the Web again, Edge will begin keeping your history once more, so you will have to keep clearing your history repeatedly. There is no option to configure Edge to automatically clear the browsing history upon exit.

Part 2: Delete Browsing History in Windows 10 Internet Explorer

In Windows 10, you can still access Internet Explorer by clicking the Cortana Search box on the taskbar, then typing Internet Explorer and pressing Enter. Here’s how to clear Internet Explorer browsing history in Windows 10:

  1. Launch Internet Explorer. Click on the gear wheel icon in the top right corner. Select Internet options from the drop-down menu.

    internet-options

  2. On the General tab, you can see the ‘Delete… ‘ button under the ‘Browsing history’ section. Click on Delete… button to continue. If you check the option “Deleting browsing history on exit“, the history data will be wiped out automatically when you exit Internet Explorer.

    delete-ie-browsing-history

  3. In the dialog that comes up, you can select which parts of the browsing history to delete. Click the Delete button and your browsing history will be cleared immediately.

    ie-browsing-history-options

How to Delete File Explorer Address Bar History in Windows 11 / 10 / 8 / 7

June 15th, 2016 by Admin

While typing a path in the address bar of File Explorer, Windows will display a history of all previous locations you’ve typed. You can also view the address bar history by clicking the down arrow icon placed on the right end of the address bar.

address-bar-history

In this tutorial we’ll show you 2 ways to delete File Explorer address bar history in Windows 11, 10, 8 and 7.

Method 1: Delete Address Bar History by Right-clicking Address Bar

After opening File Explorer (or Windows Explorer), right-click on the address bar and select the “Delete history” option.

delete-address-bar-history

This will clear all address bar history from File Explorer. Now, if you click the down arrow button in the address bar, you’ll see all history has been cleared.

address-bar-history-cleared

Method 2: Delete Address Bar History from Folder Options

From File Explorer (or Windows Explorer), select the View tab and then click on Options.

file-explorer-options

Once the Folder Options window has been opened, click the Clear button to delete all the File Explorer history. This action clears the File Explorer address bar history and the recent files and folders in quick access.

folder-options

How to Clear Search History in Windows 10 / 8 File Explorer

June 15th, 2016 by Admin

Just like earlier versions of Windows, Windows 10/8 File Explorer includes real-time search feature to let you search files and folders quickly. While typing your keyboard in the upper-right hand corner of File Explorer, it will display a history of your past searches in the list.

file-explorer-search-history

This tutorial will show you how to clear the search history typed in the search box of File Explorer in Windows 10 / 8.

Method 1: Clear Search History Directly from File Explorer

  1. Open File Explorer. Click in the search box in the upper-right hand corner of File Explorer.

    click-search-box

  2. The Search tab will appear then. In the Search tab, click on Recent searches, and then select Clear search history from the drop-down menu.

    clear-search-history

  3. Now you will not see the search history while typing in the search box of File Explorer. But the new keywords you typed later will also be saved and you might need to delete them again and again.

Method 2: Disable Search History Using Group Policy

If you want to disable the search history altogether, then you can do so by using the Local Group Policy Editor. Follow these steps:

  1. Press the Windows key + R to open the Run box. Type gpedit.msc and press Enter.
  2. When Local Group Policy Editor opens, navigate to:
    User Configuration > Administrative Templates > Windows Components > File Explorer
  3. From the right panel, double-click on “Turn off display of recent search entries in the File Explorer search box“, then change the setting to Enabled and click OK.

    not-display-search-history

  4. Now whenever you do a search in File Explorer it will not keep your search history.

8 Ways to Open Device Manager in Windows 10

June 13th, 2016 by Admin

Device Manager is the built-in tool in Windows that allows you to view and manage hardware, update device drivers and troubleshoot any problematic devices. In this article we’ll walk you through the different methods to open Device Manager in Windows 10.

Method 1: Open Device Manager from Computer Management

Open Computer Management by right-clicking This PC (or My Computer) shortcut on the desktop, and then select Manage.

device-manager

Expand System Tools in the left pane and you can then access Device Manager.

Method 2: Open Device Manager Using Run

The easiest way to open the Device Manager on earlier versions of Windows is by pressing Windows Key + R, typing devmgmt.msc in the Run box, and pressing Enter.

devmgmt

Method 3: Open Device Manager from WinX Menu

Press the Windows key + X to bring up the WinX menu (or right-click on the Start button). Select Device Manager from the menu.

open-device-manager-via-winx

Method 4: Open Device Manager Using Cortana Search

Click the Cortana search box on Windows 10 taskbar, type device manager and press Enter. (If you’re running Windows 7, type device manager in the Start menu Search box, and then press Enter.)

open-device-manager-via-cortana

Click Device Manager from the search results.

Method 5: Open Device Manager from Control Panel

Open Control Panel. Type device manager in the top-right search box and click Device Manager in the results.

control-panel

Method 6: Open Device Manager from Settings Charm

Press the Windows key + I to open the Settings charm in Windows 10 (In Windows 8/8.1, you can access the Settings charm by swiping in from the right edge of the screen).

open-device-manager-via-settings

Type device manager in the top-right search box and press Enter, and you can then access Device Manager from the search results.

Method 7: Open Device Manager Using Command Prompt

Open Command Prompt. Type devmgmt.msc and press Enter.

open-device-manager-via-cmd

The Device Manager will launch immediately.

Method 8: Create A Shortcut to Open Device Manager

If you need to access Device Manager frequently, you can create a shortcut on your desktop for quick access. Follow these steps:

  1. Right-click in the empty space of your desktop, select New -> Shortcut.

    create-desktop-shortcut

  2. Copy and paste devmgmt.msc in the location field and click Next.

    shortcut-for-devmgmt

  3. You will be asked to name the shortcut, just type Device Manager or anything you want and click on the Finish button.

    shortcut-name

9 Ways to Open Control Panel in Windows 10

June 12th, 2016 by Admin

Opening the Control Panel is exactly the same as it ever was in Windows 10, but there are many new ways you can do it. In this tutorial we’ll show you 9 ways to open Control Panel in Windows 10.

Method 1: Open Control Panel from Start Menu

Click the Start button to open the Start Menu, then click All Apps and scroll down to the Windows System folder. Click on it and there you will find the Control Panel shortcut.

start-menu

Method 2: Open Control Panel from WinX Menu

Press the Windows key + X (or right-click on the Start button) to open the WinX menu in the lower-right corner of the screen. From there you can select Control Panel.

open-control-panel-via-winx

Method 3: Open Control Panel Using Run

Press the Windows key + R to open the Run box. Type control panel and press Enter. This will open the Control Panel.

open-control-panel-via-run

Method 4: Open Control Panel Using Command Prompt

Open the Command Prompt. Type control panel and press Enter.

open-control-panel-via-cmd

The Control Panel is now started.

Method 5: Open Control Panel Using Cortana Search

Click in the Cortana search bar located near the Start button on the taskbar. Type control panel and press Enter.

open-control-panel-via-cortana

Click Control Panel from the search results.

Method 6: Open Control Panel Using Settings

Press the Windows key + I to open the Settings charm.

open-control-panel-via-settings

Click the search box in the upper right corner of the window, type control panel and press Enter. Next click Control Panel from the search results.

Method 7: Open Control Panel from Taskbar

Right-click the taskbar and go to Toolbars, then click Desktop.

right-click-taskbar

The Desktop toolbar is now added to the taskbar. Click on it and then select Control Panel from the list.

open-control-panel-via-taskbar

Method 8: Click Up Arrow in File Explorer

While in the File Explorer, keep clicking the Up arrow (up one folder button) until it’s greyed out, or keep pressing Alt+Up on your keyboard until you get to the Desktop folder.

file-explorer-desktop

From there you can click on Control Panel shortcut to access it.

Method 9: Click Drop-down Arrow in File Explorer

While in File Explorer, click on the first arrow on the left side in the address bar, then select Control Panel from the drop-down menu.

file-explorer-arrow

3 Ways to Disable Registry Editor in Windows 11, 10, 8 and 7

June 12th, 2016 by Admin

Making improper changes to the Registry can cause Windows to become unusable or unbootable. To prevent, restrict or block anyone from accessing Registry Editor in Windows 11, 10, 8 and 7, you can disable Registry Editor using group policy, registry trick or third-party software.

Method 1: Disable Registry Editor Using Group Policy

  1. Press the Windows key + R to bring up the Run box. Type gpedit.msc and press Enter.

    gpedit

  2. When Group Policy Editor opens, navigate to User Configuration > Administrative Templates > System. Double-click on Prevent access to registry editing tools on the right panel.

    prevent-access-to-regedit

  3. Select the radio button next to Enabled, click Apply and then OK, then close out of Group Policy Editor and reboot your computer.

    prevent-access-registry-edit

  4. When a user tries to access Registry Editor, they will get an error message saying “Registry editing has been disabled by your administrator“.

    registry-editing-disabled

This method will prevent all users from accessing Registry Editor, including yourself. To regain access to Registry Editor, you have to open Group Policy Editor again, and change the policy to Disabled or Not Configured.

Method 2: Disable Registry Editor Using Registry Trick

  1. Press the Windows key + R to bring up the Run box. Type regedit and press Enter.
  2. When Registry Editor opens, navigate to:
    HKEY_CURRENT_USER > SOFTWARE > Microsoft > Windows > CurrentVersion > Policies > System

    If the System key doesn’t exist, you need to create it.

  3. In the right pane, right-click on any empty space and select New > DWORD (32-bit) Value. Name it DisableRegistryTools and set its value to 1.

    disable-registry-tools

  4. When you try to access Registry Editor, you’ll also get the same error message “Registry editing has been disabled by your administrator“.

This method will prevent your current user from accessing Registry Editor. To regain access, you have to log on as another administrator account and delete the registry value DisableRegistryTools.

Method 3: Disable Registry Editor Using Third Party Software

Using Protect My Folders you can lock & protect Registry Editor with a password. Anyone can’t access Registry Editor without knowing your password.

  1. Download and install Protect My Folders program on your computer. The first time you launch this program it will prompt your to set a password. Don’t forgot it as you’ll need it next time you run it.
  2. When Protect My Folders starts, click on Add/Lock button.

    protect-my-folders

  3. The File/Folder selection dialog should open, choose the C:\Windows\regedit.exe file and click Add, next click OK.

    select-regedit

  4. Now you’ll see the regedit application is locked. Close Protect My Folders program.

    lock-registry-editor

  5. When you try to access Registry Editor, you’ll receive the following error message:

    cannot-find-regedit

This method will block all users from accessing Registry Editor. To regain access you have to relaunch Protect My Folders, enter your password and unlock the regedit.exe app.

3 Simple Ways to Find Windows 10 Product Key

June 8th, 2016 by Admin

Lost your Windows 10 product key? The product key is essential if you need to reinstall Windows or transfer and activate Windows to another PC. Let’s see how to easily find Windows 10 product key using PowerShell, Command Prompt or third party product key finder software.

Method 1: Find Windows 10 Product Key Using PowerShell

Open a PowerShell window with administrative privileges, type the following command and hit Enter:
$(Get-WmiObject -query 'select * from SoftwareLicensingService').OA3xOriginalProductKey

recover-cd-key-via-powershell

It will show you the product key of your Windows 10 OS. This method works on Windows 10 / 8.1 / 7 / Vista.

Method 2: Find Windows 10 Product Key Using Command Prompt

Launch an elevated Command Prompt. In Windows 10, just press the Windows key + X to open the WinX menu and select “Command Prompt (Admin)“.

winx-menu

Type the following command and hit Enter. It will display your Windows 10 license key immediately.
wmic path softwarelicensingservice get OA3xOriginalProductKey

Method 3: Find Windows 10 Product Key with Third Party Software

The methods above are quite simple but they might don’t work in some cases, then you can take use of third party software to recover your Windows product key. KeyFinder Plus is a reliable and comprehensive tool that allows you to reveal the product keys for Windows, Office, SQL Server, Adobe and other softwares you might have installed.

find-windows-product-key

After launching KeyFinder Plus, click on Start Recovery button and select “From current system“, it will display your Windows 10 retail/OEM license key stored in Windows registry or UEFI firmware.