Archive for April, 2018

How to Stop Laptop from Sleeping / Shutdown When Lid is Closed

April 25th, 2018 by Admin

how do I stop my Windows laptop from shutting down when I close the lid? By default, Windows will go into sleep mode when you close your laptop’s lid. If you want Windows to keep running even when your laptop’s lid is closed, here’s how to customize the default action to take when you close the lid.

How to Stop Laptop from Sleeping / Shutdown When Lid is Closed?

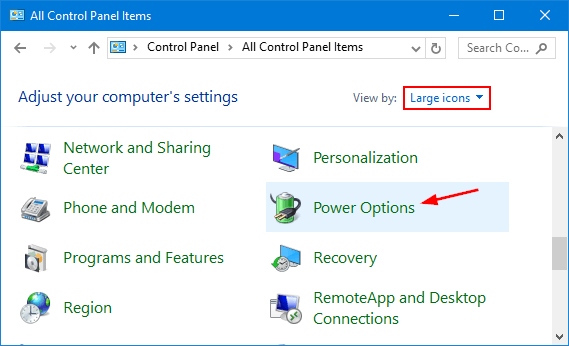
  1. Open the Control Panel in Large icons view. Click Power Options.

  2. Click the “Choose what closing the lid does” link in the left side panel.

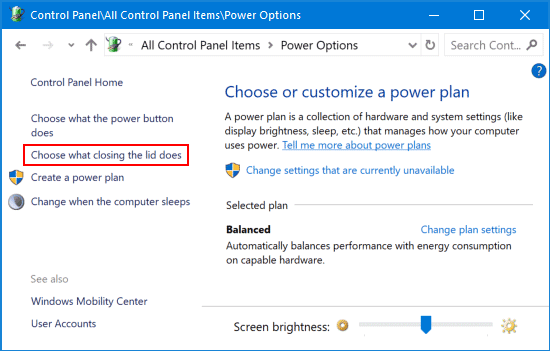
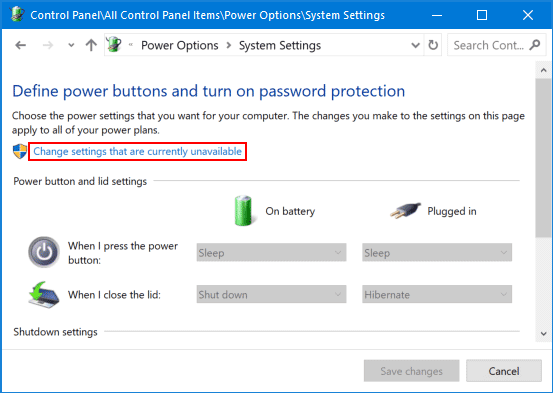
  3. If the options are grayed out, you have to click the “Change settings that are currently unavailable” link at the top.

  4. Open the drop-down list next to the “When I close the lid” option. Select “Do nothing” under both “On battery” and “Plugged in“.

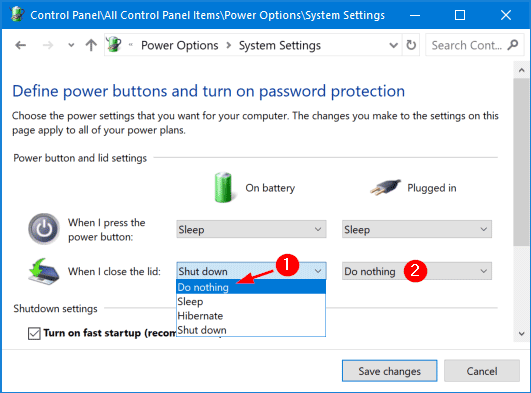
  5. Click Save changes. Now, when you close the laptop lid, Windows will still keep running, without losing any unsaved work or suspending your downloads.

5 Ways to Empty Recycle Bin in Windows 10

April 23rd, 2018 by Admin

How do I empty Recycle Bin from command line in Windows 10? When a file is deleted, the space used on the disk is not reclaimed until you empty the Recycle Bin. In this article we’ll show you 5 quick ways to empty Recycle Bin in Windows 10.

Method 1: Empty Recycle Bin in Windows 10 from Desktop Shortcut

Right-click the Recycle Bin icon on your desktop, and then select Empty Recycle Bin from the context menu.

A warning box will appear. Click Yes to permanently delete files.

Method 2: Empty Recycle Bin in Windows 10 from File Explorer

Double-click the Recycle Bin icon on the desktop, you will see a list of files you have deleted. Choose the Manage tab at the top and then click Empty Recycle Bin in the ribbon.

If you’re unable to see the Recycle Bin desktop icon, open File Explorer and type “Recycle Bin” in the address bar. Once hitting Enter you can access Recycle Bin immediately.

Method 3: Empty Recycle Bin in Windows 10 from Command Prompt

Open the Command Prompt as Administrator, then execute below command to empty Recycle Bin for specific drive(s):

rd /q /s c:\$Recycle.Bin
rd /q /s d:\$Recycle.Bin

Method 4: Empty Recycle Bin in Windows 10 from PowerShell

Open PowerShell. Run the following command and press Enter to empty Recycle Bin for all drives on your local computer:

Clear-RecycleBin -force -ErrorAction:Ignore

Method 5: Empty Recycle Bin in Windows 10 Using Disk Cleanup Utility

Open the Disk Cleanup utility. Just check the Recycle Bin box and leave all other settings unchecked, and then click OK.

Click on Delete Files to confirm if you want to empty the Recycle Bin for your selected drive.

That’s it!

How to Delete Files Directly without Sending to Recycle Bin in Windows 10

April 23rd, 2018 by Admin

Recycle Bin is a special directory that is used to store deleted files that are awaiting permanent deletion. By default, when you delete a folder or file, Windows just sends your folder/file into Recycle Bin in the event you need to recover it. To get rid of all your deleted files permanently, you have to empty the Recycle Bin. In this tutorial we’ll show you 2 simple ways to delete files directly without sending to Recycle Bin in Windows 10.

Method 1: Use Keyboard Shortcut to Delete Files without Sending to Recycle Bin

Just open Windows Explorer and select those folders/files that you want to delete, then press Shift + Delete keyboard combination. Your selected folders/files will be permanently deleted without going to Recycle Bin.

Method 2: Bypass Recycle Bin When Deleting Files in Windows 10

  1. Right-click on the Recycle Bin icon on the desktop, and select Properties from the context menu.

  2. Select the drive for which you want to modify the Recycle Bin properties, and check the option “Don’t move files to the Recycle Bin. Remove files immediately when deleted“.

    Make sure you also check the box “Display delete confirmation dialog“, so you’ll get a confirmation message even if you delete something accidentally.

  3. Repeat the above step for other drives for which you don’t want deleted files to go to the Recycle Bin. Note: if you just go through the above step for the drive C:\ only, the files deleted from D:\ will still be moved to Recycle Bin.
  4. That’s it. Now whenever you delete a file from any drive in Windows 10, the file will not go to Recycle Bin but immediately deleted permanently.

How to Restore All File Associations to Default in Windows 10

April 18th, 2018 by Admin

Windows 10 file extensions are messed up? Is there a simple way to reset all file associations to default? When double-clicking a text file, Windows will open it with Notepad because the file extension .txt is associated with Notepad by default. Installing a new text editor software can result in changes to the default file association. Since Windows 10 there is an easy way to restore all file associations to default.

How to Restore All File Associations to Default in Windows 10?

Press the Windows key + I shortcut to open the Settings app, and then click Apps.

Select the Default apps on the left, you’ll see all the default programs for opening your pictures, videos, webpage or checking out email message, etc. Scroll down a bit till you see the setting – Reset to Microsoft recommended defaults.

Click the Reset button and all your file associations will be restore to their original defaults immediately.

Automatically Disable Touchpad When Mouse is Connected in Windows 10

April 12th, 2018 by Admin

Despite touchpads have improved over the years and they support so many gestures, users still won’t like using the touchpad for gaming, and have to manually switch between the touchpad and traditional mouse. In this tutorial we’ll show you 2 ways to configure Windows 10 to automatically disable touchpad only when a USB mouse is connected.

Method 1: Automatically Disable Touchpad When Mouse is Connected Using Settings App

  1. Press the Windows key + I shortcut to open the Settings app. Click on Devices.

  2. Select the Touchpad tab. Simply uncheck the “Leave touchpad on when a mouse is connected” option on the right.

  3. Close the Settings app. Now, connecting a USB mouse to your PC will automatically disable the touchpad, while your touchpad will restore to work when the mouse is unplugged.

Method 2: Automatically Disable Precision Touchpad When Mouse is Connected Using Control Panel

If you don’t have a precision touchpad, you have to disable touchpad only when a USB mouse is connected using the Control Panel. Follow these steps:

  1. Open the Control Panel. Set the View by option to Large icons and then click on Mouse.
  2. When the Mouse settings window opens, go to the Device Settings tab, and check the “Disable internal pointing device when external USB pointing device is attached” option.
  3. Click Apply and then OK.

Hide or Show Language Bar / Input Indicator in Windows 10

April 10th, 2018 by Admin

Language bar missing from the taskbar after Windows 10 update? How can I remove Input Indicator icon from taskbar notification area? If you’ve added more than one language to Windows 10, you can switch between different input languages by clicking the language bar or input indicator on the system tray. In this tutorial we’ll show you how to hide or show language bar / input indicator in Windows 10.

Part 1: Hide or Show Input Indicator in Windows 10 Using Settings App

  1. Right-click empty space on Windows 10 taskbar and then select “Taskbar settings“.

  2. The appropriate page of the Settings app will be opened. Click the “Turn system icons on or off” link on the right.

  3. Toggle the setting for Input Indicator to On or Off. This will show or hide the input indicator accordingly.

  4. This change will take effect immediately. Here’s how the input indicator looks like on my system:

Part 2: Hide or Show Language Bar in Windows 10 Using Control Panel

  1. Open the Control Panel in Large icons view, and then click on the Language applet.

  2. In the left-pane, click the Advanced settings link.

  3. If you want to show language bar, check the “Use the desktop language bar when it’s available” option and then click Options.

    Make sure that both “Docked in the taskbar” and “Show text labels on the Language bar” are selected. Click OK and then click Save.

  4. If you want to hide or turn off the language bar, just uncheck the “Use the desktop language bar when it’s available” option and click Save.
  5. Here’s how the old language bar looks like:

    That’s it!

How to Create Keyboard Shortcuts for Any Windows Application

April 8th, 2018 by Admin

Is there a way to create your own keyboard shortcut to launch the apps you use most often? This feature is built into Windows for quite a long time, but many people don’t even know it existed. In this tutorial we’ll show you how to create custom keyboard shortcuts to launch any application in Windows 10 / 8 / 7, without using third-party programs.

How to Create Keyboard Shortcuts for Any Windows Application

  1. Right-click on the shortcut to the app you need a keyboard shortcut for, and then select Properties.

    If you can’t find a shortcut, right-click on the relevant executable file and choose New -> Shortcut.

  2. In the Properties window, go to the Shortcut tab. Click in the Shortcut key box and type a letter or number. This character is appended to Ctrl+Alt, so you’ll end up with something like Ctrl+Alt+F.

  3. Click OK to save your change. When asked for administrator permissions, click on Continue.

    You can then launch your application using the keyboard combination: CTRL + ALT + a letter / number. That’s it!

If you want to delete the keyboard shortcut later, just open the Properties window again and click in the Shortcut key box and press the Backspace key to delete the shortcut.

How to Convert Word Document Between .Doc and .Docx

April 4th, 2018 by Admin

How can I convert legacy .doc to the new .docx in Word 2016? DOC is compound binary file format used for Microsoft Word 97/2003 documents. Starting with Word 2007, Open XML file format (.DOCX) has become the new default save format. In this tutorial we’ll show you how to easily convert .doc to .docx, or convert .docx to .doc in Microsoft Word 2016.

Part 1: Convert .DOC to .DOCX in Word 2016

  1. When you open a .doc document in Word 2016, you will see “Compatibility Mode” in the title bar next to the filename. To convert it to .docx format, click the File menu.

  2. Go to the Info tab and then click the Convert button.

  3. An information box lets you know that it will be upgraded to the newest file format. Click OK.

  4. Click Save and your document will saved in .docx format.

Part 2: Convert .DOCX to .DOC in Word 2016

  1. Open your .docx document in Word 2016 and click the File menu.
  2. Switch to the Save As tab and click the Browse button to select your desired location.

  3. When the Save As dialog opens, click the “Save as type” drop-down list and select “Word 97-2003 Document (.doc)“.

    If you want to convert .doc back to .docx later, just select the “Word Document (*.docx)” from the “Save as type” list.

  4. Once you clicking Save, your document format will be converted to .doc quickly.

2 Ways to Change Touchpad Sensitivity in Windows 10

April 3rd, 2018 by Admin

“The touchpad on my laptop is way too sensitive. When I am typing, my thumbs hover over that pad, and frequently trigger it even though I don’t touch it. Is there any way to make the touchpad less sensitive?”

Touchpad is too sensitive? Is there a registry trick to adjust the touchpad sensitivity in Windows 10? In this tutorial we’ll show you 2 simple ways to change touchpad sensitivity in Windows 10.

Method 1: Change Touchpad Sensitivity in Windows 10 from Settings App

  1. Press the Windows key + I together to open Settings app and go to Devices.

  2. Select the Touchpad tab. On the right-side pane, you can click the Touchpad sensitivity drop-down box to adjust the sensitivity level of your touchpad.

    After trying the various levels: Low sensitivity, Medium Sensitivity, High Sensitivity or Most Sensitive, you should know which level is appropriate.

Method 2: Change Touchpad Sensitivity in Windows 10 via Registry Editor

  1. Press the Windows key + I together to open the Run box. Type regedit and hit Enter.

  2. When the Registry Editor is launched, navigate to the following key:
    HKEY_CURRENT_USER\Software\Microsoft\Windows\CurrentVersion\PrecisionTouchPad
  3. Double-click the AAPThreshold value on the right-side pane, and change its value accordingly, depending on what sensitivity level you want to set:

    • Most Sensitive: 0
    • High Sensitivity: 1
    • Medium Sensitivity: 2
    • Low sensitivity: 3
  4. Close the Registry Editor. Log off or restart your computer for the changes to take effect.

Recover Password to Open PDF Document via GPU Acceleration

April 2nd, 2018 by Admin

“I accidentally set a password on a PDF file and don’t remember it, How do I recover password to open PDF file?”

It’s very simple to protect your PDF file with a document open password (also known as ‘user password’). When others try to open the PDF in Adobe Acrobat, they’ll be prompted to enter the password before viewing the document.

However, it can be quite frustrating if you lost the document open password to your PDF file. Luckily there is GPU-accelerated password cracking tool which can help you recover PDF password quickly and easily – PDF Password Recovery. The program supports PDF files with RC4/AES encryption (Acrobat 3.0 ~ 11.0 and Acrobat X-DC).

How to Recover Password to Open PDF Document via GPU Acceleration?

The PDF Password Recovery features a very simple installation wizard. After downloading, you will need to click and run the installer. Keep clicking on Next to finish the setup wizard.

Once the PDF Password Recovery is launched, go ahead and click on the browse button to select your password protected PDF file. Then choose the “Recover User Password” option and click Next.

With brute-force attack, it will try all possible characters until your password is found. Mask attack is more specific as the set of characters you try is reduced based on information you know. While dictionary attack is attempt to guess passwords by using well-known words or phrases.

If you’ve chosen brute-force attack, specify a minimum password length and define what characters have been used in the password. When clicking Next, the program will try different character combinations in quick succession to crack.

You’ll find that the password cracking is much faster as GPU has far more cores than CPU. When your PDF document open password is recovered, you can write it down or save it to a safe place.

That’s it!