Archive for February, 2017

2 Ways to Disable Cortana Web Search in Windows 10

February 27th, 2017 by Admin

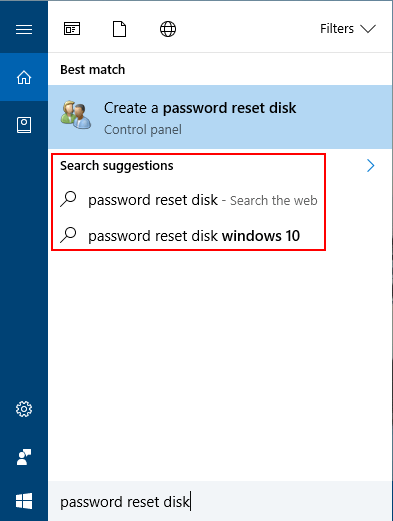
Can I disable Web search results but keep Cortana on Windows 10 Anniversary Update? Since Windows 10 Anniversary Update (build 1607) there is no longer option in Cortana to disable Web search. Luckily you can still disable Cortana Web search in Windows 10 using a registry hack or local group policy.

cortana-web-results

Method 1: Disable Cortana Web Search in Windows 10 Using Group Policy

  1. Press the Windows key + R to open the Run command box. Type gpedit.msc and press Enter.
  2. When the Local Group Policy Editor window opens, navigate to: Computer Configuration -> Administrative Templates -> Windows Components -> Search.

    dont-search-web-in-cortana

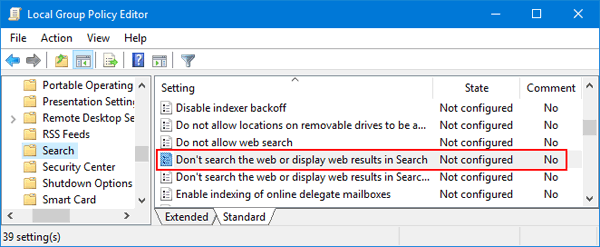
    Double-click on the policy named “Don’t search the web or display web results in Search” in the right pane.

  3. Select Enabled and click OK.

    disable-cortana-web-search

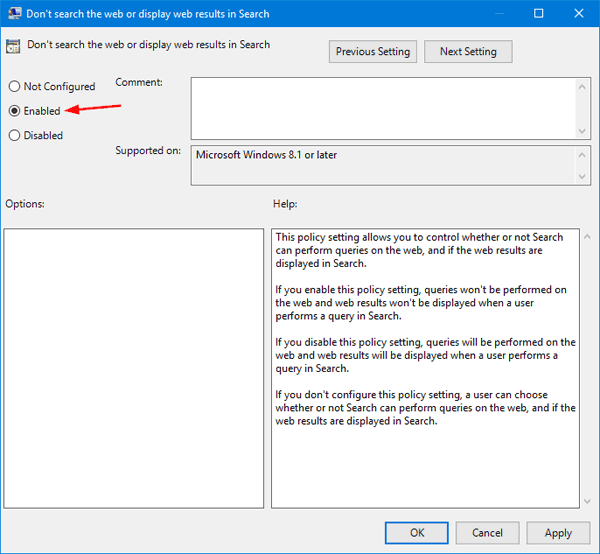
  4. Reboot your computer for the policy to take effect. Any searches you conduct in Cortana will now search only your local files and applications.

Note that this method does not apply to Windows 10 Home edition, because the Local Group Policy Editor is not available in Windows 10 Home.

Method 2: Disable Cortana Web Search in Windows 10 Using Registry Editor

  1. Press the Windows key + R to open the Run command box. Type regedit and press Enter.
  2. When Registry Editor opens, navigate to the following key:
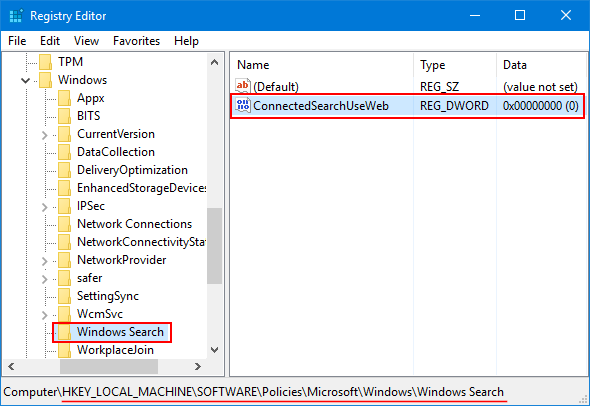
    HKEY_LOCAL_MACHINE\SOFTWARE\Policies\Microsoft\Windows\Windows Search

    If the Windows Search key doesn’t exist, you need to create it firstly.

  3. In the right pane, right-click on any empty space to create a new 32-bit DWORD value named ConnectedSearchUseWeb and leave its value data as 0.

    ConnectedSearchUseWeb

  4. When it’s done, close Registry Editor and restart your computer. Now you’ve turned off the Cortana Web search results in Windows 10.

How to Run DirectX Diagnostic Tool in Windows 10

February 27th, 2017 by Admin

How to check what version of DirectX your PC is using? If you are concerned with video game performance, or you are trying to fix some problems with any 3D application, you can run DirectX Diagnostic Tool to perform basic diagnostic tests. In this article we’ll show you 3 simple ways to run DirectX Diagnostic Tool in Windows 10.

Method 1: Run DirectX Diagnostic Tool in Windows 10 from Run

Press the Windows key + R to open the Run command box. Type dxdiag and press Enter.

run-dxdiag

This will open DirectX Diagnostic Tool immediately. The System tab lists the general information about your system and most importantly what version of DirectX you currently have installed. The Display tab shows information specific to your graphics adapter and monitor, and you can see which DirectX features are enabled.

DirectX-Diagnostic-Tool

Method 2: Run DirectX Diagnostic Tool in Windows 10 Using Cortana Search

You can also start DirectX Diagnostic Tool by typing dxdiag in Cortana’s search box on the taskbar, and then clicking the dxdiag search result.

search-dxdiag

Method 3: Run DirectX Diagnostic Tool in Windows 10 from Command Prompt

Open the Command Prompt in Windows 10, type dxdiag and press Enter. This will also launch DirectX Diagnostic Tool.

dxdiag-command-prompt

Turn on / off Press and Hold for Right-clicking in Windows 10

February 27th, 2017 by Admin

How can you make a right-click on a Windows 10 tablet without mouse? Just use your finger or touch pen to press and hold on the screen, it will bring up the right-click context menu. In this tutorial we’ll show you 2 ways to enable / disable the press and hold for right-clicking feature in Windows 10.

Method 1: Turn on / off Press and Hold for Right-clicking Using Control Panel

Open the Control Panel and set the View by option to Large icons. Click Pen and Touch.

pen-and-touch

The Pen and Touch dialog box will open. Select either Pen Options tab or Touch tab. Once the Press and hold option is highlighted in the list, click Settings.

  • Pen Options – Select this tab if you want to enable or disable “press and hold for right-clicking” on your touch pen.
  • Touch – You can also use your finger to press and hold on a touch screen. Choose this tab if you want to turn on or off right-click for a finger press and hold.

pen-options

In the Press and Hold Settings window, check or uncheck the “Enable press and hold for right-clicking” option, and click OK.

press-and-hold-for-right-click

Now you’ve enabled or disabled the press and hold for right-clicking feature in Windows 10.

Method 2: Turn on / off Press and Hold for Right-clicking Using Registry Editor

  1. Press the Windows key + R together to open the Run box. Type regedit and press Enter.

    regedit

  2. When the Registry Editor opens, navigate to the following location:
    HKEY_CURRENT_USER\Software\Microsoft\Wisp\Touch

    If you do not have this key, then just create it.

  3. Double-click the 32-bit DWORD value named TouchMode_hold on the right pane, and change its value data to turn on or off the “press and hold for right-clicking” feature for your touch screen. 1: turn on; 0: turn off.

    touchmode-hold

  4. Close Registry Editor and reboot your computer for the changes to take effect.

If you also want to turn on / off the press and hold for right-clicking feature for a touch pen, open Registry Editor and navigate to: HKEY_CURRENT_USER\Software\Microsoft\Wisp\Pen\SysEventParameters, and then change the HoldMode value (1: turn on; 3: turn off).

pen-holdmode

That’s it!

Tutorial: How to Turn on Mouse Keys in Windows 10

February 27th, 2017 by Admin

How to move the mouse cursor around if your mouse stops working? Mouse Keys is a useful feature available in all versions of Windows, which allows you to use the numeric keypad on your keyboard to move the mouse cursor.

8 = Move up
2 = Move down
4 = Move left
6 = Move right
7 = Move up and to the left
9 = Move up and to the right
1 = Move down and to the left
3 = Move down and to the right
/ = Select the left mouse button
– = Select the right mouse button
With the left button selected, press 5 to make a left-click
With the right button selected, press 5 to make a right-click
With the left button selected, press + to make a double-click

In this tutorial we’ll show you 2 methods to turn on Mouse Keys in Windows 10.

Method 1: Turn on Mouse Keys in Windows 10 from PC Settings

  1. Press the Windows + I keyboard shortcut to open the Settings app.
  2. Click Ease of Access.

    ease-of-access

  3. Select Mouse in the left side. Under the Mouse keys section, click the toggle corresponding to the “Use numeric keypad to move mouse around the screen” option to On.

    customize-mouse-keys

  4. You can now easily control the mouse cursor with the numeric keypad.

Method 2: Turn on Mouse Keys in Windows 10 from Control Panel

  1. Open the Control Panel and set the View by option to Large icons. Click Ease of Access Center.

    ease-of-access-center

  2. Under the “Explore all settings” section, click the “Make the mouse easier to use” link.

    make-mouse-easier-to-use

  3. Under the “Control the mouse with the keyboard” section, click on Set up Mouse Keys.

    set-up-mouse-keys

  4. Select the Turn on Mouse Keys check box, and customize all the options and settings.

    turn-on-mouse-keys

    • To use the keyboard shortcut to turn Mouse Keys on and off, tick the box next to ‘Turn on Mouse Keys with left ALT + left SHIFT + NUM LOCK‘.
    • In order to use the Ctrl (faster) and Shift (slower) keys to temporarily control the mouse pointer’s speed, tick the box next to “Hold down CTRL to speed up and SHIFT to slow down“.
    • By default, Mouse Keys will work only when NUM LOCK is On. You can change this to Off if you like.
  5. Click OK to save your changes.

2 Options to Insert a Check Box in Word 2016

February 22nd, 2017 by Admin

How can I add a clickable checkbox in Microsoft Word? Inserting a checkbox into a Word document is a common task when you create surveys or forms using Office Word. In this tutorial we’ll show you 2 simple ways to insert a check box in Word 2016.

insert-check-box-in-word

Method 1: Insert a Check Box in Word 2016 for Printing Only

  1. Select the list in your Word document. In the Home tab of Microsoft Word, under the Paragraph section, click the small down-arrow next to the Bullets button.

    define-new-bullet

    Then choose Define New Bullet from the drop-down list.

  2. In the resulting dialog box, click Symbol.

    word-symbol-bullet

  3. When you open the Symbol window, select Wingdings from the Font drop-down menu. Next you can select the check box that is either checked or unchecked, and insert it into your Word document.

    insert-symbol-into-word

Method 2: Insert Clickable Check Box in Word 2016

Microsoft Word also allows you to insert check boxes that are clickable. Checkbox once clicked is checked and on second click it gets unchecked. Here’s how to insert clickable check box into your Word document:

  1. In the Home tab of Microsoft Word, right-click on an empty spot on the ribbon and then choose Customize the Ribbon.

    customize-the-ribbon

  2. When the Word Options dialog opens, select the Customize Ribbon tab. Select Main Tabs from the Customize the Ribbon drop-down box. Check the Developer option in the list. Click OK.

    add-developer-to-ribbon

  3. Now you can see that Developer tab is added in Ribbon. In the Controls group of the Developer tab, you will see a small check box icon. Click it to insert a check box at your cursor’s location.

    insert-clickable-check-box-in-word

  4. Now that the check box has been inserted, you can click it once to toggle whether or not it’s checked.

How to View or Export Edge Saved Passwords in Windows 10

February 22nd, 2017 by Admin

How can I export / backup the passwords saved in Microsoft Edge? Many people save the passwords for different websites so that they don’t have to enter the passwords again and again, but what if you forgot the password?

microsoft-edge-saved-passwords

Microsoft Edge stores all passwords in Windows Vault (also known as Credential Manger). In Windows 10, you can easily find Windows Vault files by accessing the following locations:

  • C:\Users\user_profile_name\AppData\Local\Microsoft\Vault
  • C:\ProgramData\Microsoft\Vault
  • C:\Windows\system32\config\systemprofile\AppData\Local\Microsoft\Vault

All web credentials are stored in an encrypted form and Microsoft Edge doesn’t provide an option to view the saved passwords. In this tutorial we’ll show you a simple way to view & export Microsoft Edge saved passwords using a reliable tool – Password Recovery Bundle.

How to View or Export Edge Saved Passwords in Windows 10?

  1. To get started, click here to download Password Recovery Bundle. Once the download process is complete, double-click the setup file to install it on your Windows 10 computer.
  2. Run the Password Recovery Bundle program. Click the Start Recovery button, and then select “Internet Explorer (Edge) Password” option from the drop-down list.

    password-recovery-bundle

  3. It will decrypt the encrypted Vault files, and show you all saved passwords in both Microsoft Edge and Internet Explorer. Select all passwords and paste them into a text file for safe keeping.

    export-edge-saved-passwords

The most painful part of a computer crash is often the loss of data. It’s an important best practice to keep a backup of Edge saved passwords, especially if you use Microsoft Edge as your primary browser.

How to Change System Cooling Policy in Windows 10 / 8 / 7

February 17th, 2017 by Admin

System Cooling Policy allows you to specify the cooling mode you want to use for your Windows-based computer, for which you have two options: Active and Passive.

  • The Active setting increases fan speed before slowing the processor to main cooling. You’ll get the best performance by leaving the System Cooling Policy set to Active.
  • The Passive setting slows the processor before increasing fan speed. If the fan is always running and you would like to make it quieter, you can choose to opt for the passive mode.

In this tutorial we’ll show you how to change the system cooling policy in Windows 10, 8 and 7.

How to Change System Cooling Policy in Windows 10 / 8 / 7?

  1. Open the Control Panel in Large icons view. Click Power Options.

  2. In the right pane, for the power plan that you have selected to use, click Change plan settings.

    change-power-plan-settings

  3. Click Change advanced power settings.

    advanced-power-settings

  4. Click the link labeled Change settings that are currently unavailable.

    change-power-settings-unavailable

  5. In the Power Options dialog box, expand Processor power management and you’ll see the System cooling policy setting. Set the System cooling policy to Active or Passive, then click OK.

    system-cooling-policy

If the System Cooling Policy setting is not showing in the Power Options dialog box, you can restore it using a registry hack: Fix: System Cooling Policy Missing in Power Options.

Fix: System Cooling Policy Missing in Power Options

February 17th, 2017 by Admin

System Cooling Policy is missing in Windows? System Cooling Policy lets you change the cooling mode of your system. If you couldn’t see the System Cooling Policy option under the Power Options of Control Panel, you need to tweak the registry settings. In this article we’ll show you how to restore the missing System Cooling Policy option in Windows 10, 8 and 7.

Fix: System Cooling Policy Missing in Power Options

  1. Open Notepad. Copy and paste the code below into Notepad, then save it as a .reg file.

    Windows Registry Editor Version 5.00
    [HKEY_LOCAL_MACHINE\SYSTEM\CurrentControlSet\Control\Power\PowerSettings\54533251-82be-4824-96c1-47b60b740d00\94D3A615-A899-4AC5-AE2B-E4D8F634367F]
    "Attributes"=dword:00000002

  2. Double-click on the .reg file to import the settings into the registry. Click Yes when asked to confirm.

    import-reg-file

  3. Open the Control Panel and access the Power Options, you’ll see that the System Cooling Policy is shown under the.Processor power management node.

    system-cooling-policy

If you want to remove the System Cooling Policy option again, repeat the steps above to import the following registry settings.

Windows Registry Editor Version 5.00
[HKEY_LOCAL_MACHINE\SYSTEM\CurrentControlSet\Control\Power\PowerSettings\54533251-82be-4824-96c1-47b60b740d00\94D3A615-A899-4AC5-AE2B-E4D8F634367F]
"Attributes"=dword:00000001

That’s it!

2 Ways to Change System Locale in Windows 10

February 16th, 2017 by Admin

The system locale allows you to use the specified language for non-Unicode programs. If your Windows system uses a default en-US locale, the Japanese text in a game won’t display correctly. In this tutorial we’ll show you how to change system locale in Windows 10, using Control Panel or Command Prompt.

Note: You must log into Windows 10 as administrator to set a different system locale. Changing system locale doesn’t affect the language in menus & dialog boxes for Windows or other programs that do use Unicode.

Method 1: Change System Locale in Windows 10 Using Control Panel

  1. Open the Control Panel in Large icons view, click Region.

    region

  2. In the Region dialog that opens, select the Administrative tab and then click Change system locale.

    change-system-locale

  3. Select the desired language from the Current system locale drop-down list, and click OK.

    current-system-locale

  4. Restart your computer for the changes to take effect.

    restart-for-new-locale

Method 2: Change System Locale in Windows 10 Using Command Prompt

  1. Open Notepad (or any other text editor), then copy and paste the following text into it. Replace en-US with the language tag for your desired system locale. To see all supported language tags in Windows, please refer to this article.

    <gs:GlobalizationServices xmlns:gs="urn:longhornGlobalizationUnattend">
    <gs:UserList>
    <gs:User UserID="Current" CopySettingsToDefaultUserAcct="true" CopySettingsToSystemAcct="true"/>
    </gs:UserList>
    <!-- system locale --><gs:SystemLocale Name="en-US" />
    </gs:GlobalizationServices>

    system-locale-settings

  2. After editing, save the file as a .xml file. Let’s say D:\locale.xml.
  3. Open the Command Prompt in administrator mode. Copy and paste the following command line and press Enter.

    control.exe intl.cpl,, /f:"D:\locale.xml"

    change-system-locale-cmd

  4. Reboot your computer to apply the new system locale settings.