Archive for January, 2023

Fix: Missing Battery Time Remaining Estimation in Windows 11

January 16th, 2023 by Admin

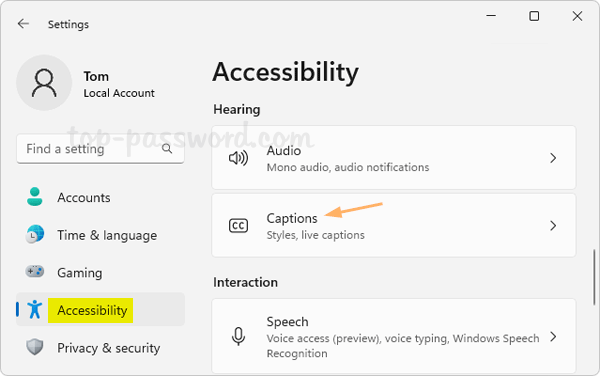
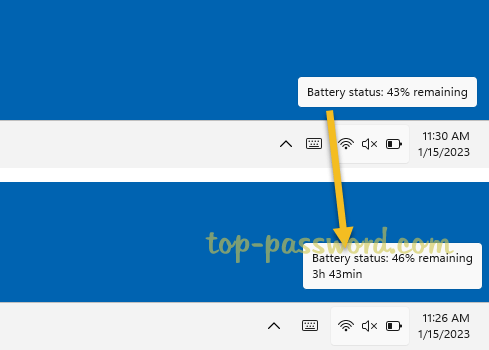
How do I enable battery time remaining on Windows 11 laptop? When you hover the mouse over the Power (battery) icon, you may only see a percentage of battery life remaining, but there is no estimated time remaining. In this tutorial we’ll show you how to fix the issue of missing battery time remaining estimation in Windows 11.

How to Enable Battery Time Remaining Estimation in Windows 11

  1. Open Registry Editor and navigate to the location: HKEY_LOCAL_MACHINE\SYSTEM\CurrentControlSet\Control\Power. On the right pane, locate and delete these entries if they exist: EnergyEstimationDisabled and UserBatteryDischargeEstimator.

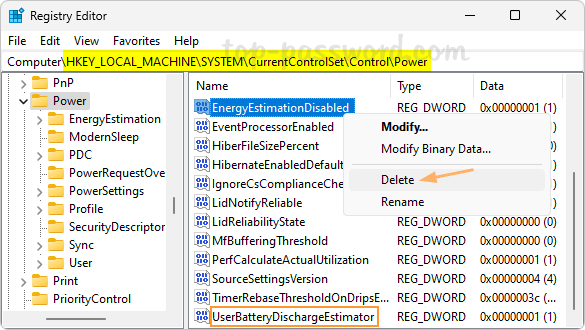
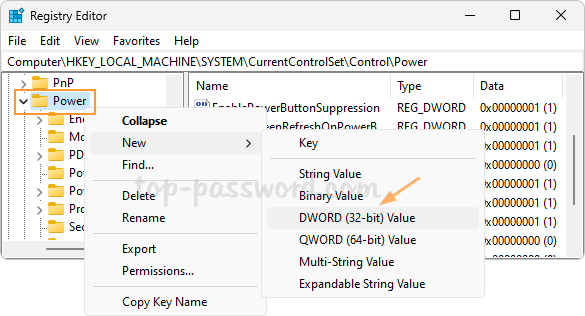
  2. In the left pane, right-click the Power key and choose New -> DWORD (32-bit) Value.

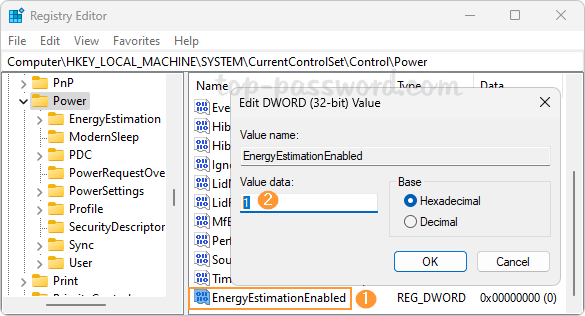
  3. Name the new entry EnergyEstimationEnabled and then double-click it to set the value data to 1, click OK.

  4. Close Registry Editor. Reboot Windows to apply the changes and unplug the power cable from your laptop or tablet. The next time you hover over the battery icon in the taskbar, it should show the battery estimated time remaining.

That’s it!

How to Backup or Transfer Wi-Fi Profiles and Passwords in Windows 11

January 15th, 2023 by Admin

Each time you connect to a new Wi-Fi network, Windows will create a wireless profile that contains the SSID, security key (password) and other related information. In this tutorial we’ll show you a simple way to backup or transfer Wi-Fi profiles and passwords, when you need to reinstall Windows 11 or import Wi-Fi profiles to another computer.

How to Backup or Transfer Wi-Fi Profiles and Passwords in Windows 11

  1. Right-click the Windows button in the taskbar and choose “Terminal (Admin)“.

  2. Type the following command and press Enter to export all wireless profiles on your system. Remember to replace “D:\wifi_backup” with an existing folder location where you want to store the backup.

    netsh wlan export profile key=clear folder="D:\wifi_backup"

  3. The above command will create a separate .XML file for each wireless profile. If you open any XML file using your Web browser, you can see that the Wi-Fi password is displayed in clear text within the keyMaterial tags.

  4. Now, you can transfer the profiles you’ve already backed up into USB or another computer. When you need to import a wireless profile, run this command.
    netsh wlan add profile filename="full_path_of_xml_file"

    Replace “full_path_of_xml_file” with the path of the XML file associated with the Wi-Fi network you want to restore.

  5. Use the same method to import every wireless profile you want to connect to. Once you complete the above steps, your computer should be able to connect to the Wi-Fi without asking for a password.

That’s it!

Fix: Widgets Automatically Opens on Hover in Windows 11

January 7th, 2023 by Admin

After upgrading to Windows 11, you should see the Widgets icon which appears in the left corner of your taskbar. When you hover the mouse cursor over it, the Widgets pane will open automatically. This could be quite annoying if you tend to accidentally hover over the Widgets icon. In this tutorial we’ll show you how to fix the problem that the Widgets board automatically opens on hover in Windows 11.

How to Disable Opening Widgets on Hover in Windows 11

  1. Click the Widgets button in the taskbar.

  2. When the Widgets board pops up, click on the profile icon present on the top right corner.

  3. Turn off the “Open Widgets board on hover” toggle switch to prevent accidentally opening Widgets by hovering over the weather icon in the taskbar.

  4. The next time you hover over the Widgets icon, the Widgets board should no longer pop up automatically. It will open only when you click it. However, if you don’t like the Widgets feature completely, you can remove the Widgets button from the taskbar.

That’s it!

2 Methods to Enable or Disable Live Captions in Windows 11

January 2nd, 2023 by Admin

How do I turn on or off closed captions? Live Captions is a new accessibility feature in Windows 11 which can provide automatic transcription for a movie or audio. This is really useful for people who are deaf or hard-of-hearing. In this tutorial we’ll show you 2 simple methods to enable or disable Live Captions in Windows 11.

Method 1: Enable or Disable Live Captions via Settings App

  1. Press the Windows key + I to launch the Settings app. Choose Accessibility on the left side, and then click Captions on the right pane.

  2. You will see the toggle switch for Live captions. When turning on Live Captions the first time, it will prompt you to download the live captions language files (about 98.3Mb).

  3. If you want to change the style of the captions, click the “Caption style” drop-down list and you can select “White on black”, “Yellow on blue”, “Small caps” or “Large text”.

  4. When Live Captions is turned on, it will automatically convert video/audio being played on your computer into easily readable text.

Method 2: Enable or Disable Live Captions via Action Center

  1. Press Windows key + A on your keyboard (or tap the WiFi or Volume buttons in the system tray) to open the Action Center pane. Next, click the Accessibility icon.

  2. In the next pane, you can click the toggle next to Live captions to enable or disable the Live captions feature.

That’s it!