Archive for the ‘Video Converter’ category

Easy Ways to Enable Telnet Client in Windows 11 / 10 / 8 / 7

September 29th, 2019 by Admin

Telnet is not recognized as an internal or external command on Windows 10? Starting with Windows 7, telnet is not enabled by default and you have to install it manually. In this tutorial we’ll show you 2 simple ways to enable telnet client in Windows 11 / 10 / 8 / 7.

Method 1: Enable Telnet Client Using Control Panel

  1. Open the Control Panel with Large icons view, and click on Programs and Features.
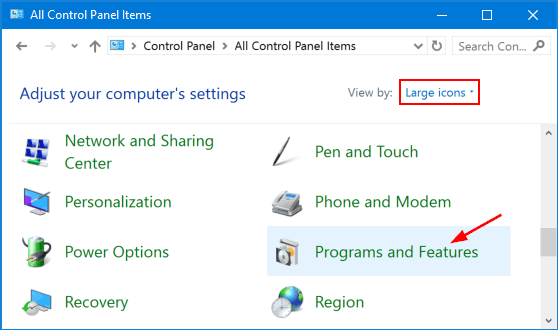
  2. Click the “Turn Windows features on or off” option in the left pane.

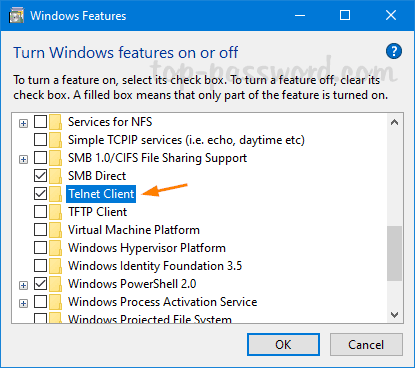
  3. In the Windows Features window, check the checkbox for Telnet Client and click OK.
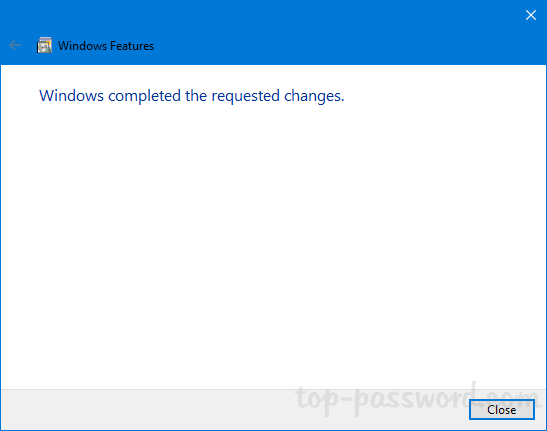
  4. When complete, you’ll see the “Windows completed the requested changes” message.
  5. Now, you can start using the telnet command from the Command Prompt or PowerShell.

Method 2: Enable Telnet Client Using PowerShell or Command Prompt

  1. Open Windows PowerShell (or Command Prompt) as administrator.
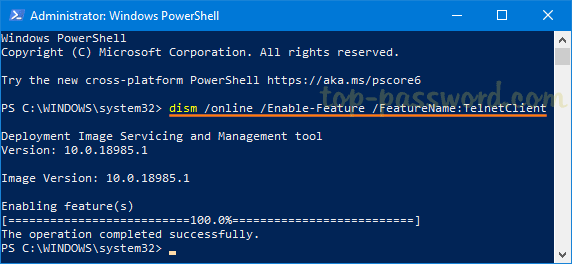
  2. Type the following command and hit Enter. It will take a while to install telnet on your computer.
    dism /online /Enable-Feature /FeatureName:TelnetClient
    Whenever you need to disable or uninstall telnet, run the below command:
    dism /online /Disable-Feature /FeatureName:TelnetClient

That’s it!
How to Remove “Open PowerShell window here” Context Menu in Windows 10

September 5th, 2018 by Admin

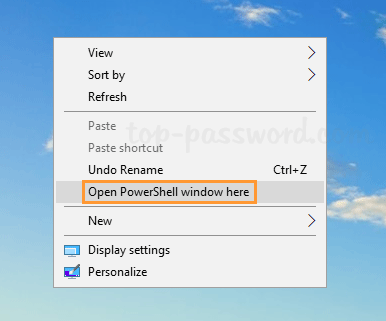
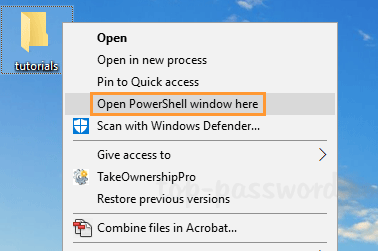
On Windows 10, you can access the “Open PowerShell window here” context menu by holding down the SHIFT key and then right-clicking a folder. This lets you quickly open PowerShell in the current folder without having to change the working directory.

If you’re a fan of using Command Prompt rather than Windows PowerShell, let’s see how to remove “Open PowerShell window here” context menu in Windows 10.

How to Remove “Open PowerShell window here” Context Menu in Windows 10

  1. Use the Windows key + R keyboard shortcut to open the Run command. Type regedit and hit Enter.

  2. Go to the following location in the Registry Editor window that appears:
    HKEY_CLASSES_ROOT\Directory\shell\Powershell

    By default, the “Powershell” key is protected and none of its values can be modified. You have to take ownership of this registry key and assign full permissions to your account.

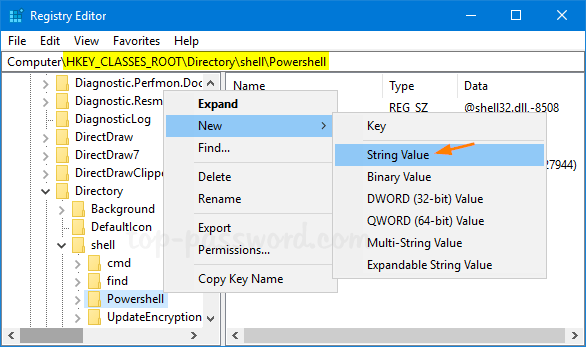
  3. Right-click the “Powershell” key in the left pane and then select New -> String Value.

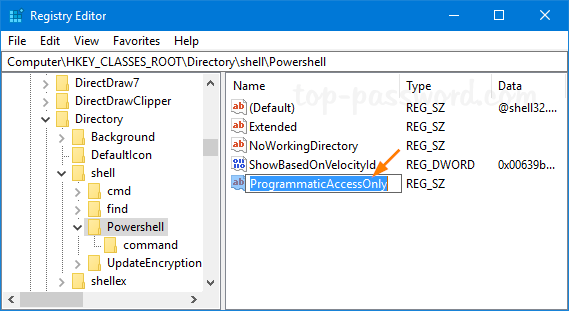
  4. Name the new string “ProgrammaticAccessOnly“, and leave its value data empty.

  5. Now you’ve successfully removed “Open PowerShell window here” in the context menu when you press SHIFT and then right-click any folder.

If you want to continue removing “Open PowerShell window here” from the right-click menu for Drives and Directory background, repeat the steps above for the following registry keys:

HKEY_CLASSES_ROOT\Directory\Background\shell\Powershell
HKEY_CLASSES_ROOT\Drive\Background\shell\Powershell

Whenever you need to restore the “Open PowerShell window here” context menu, just delete the ProgrammaticAccessOnly entry from the above registry locations and you’re done.

2 Ways to Change MAC Address on Windows 11 / 10 / 8 / 7

November 11th, 2017 by Admin

MAC address is used to identify a computer on a network, and every network card has a unique MAC address assigned during manufacturing. However, most network cards also allow you to set a custom MAC address from their device properties on Windows. This is useful when you want to test or bypass the MAC filtering settings on firewall or router. Here are 2 simple ways to change MAC address on Windows 11 / 10 / 8 / 7.

Method 1: Change MAC Address on Windows 11 / 10 / 8 / 7 from Device Manager

  1. To get started, you need to open Device Manager. Just press Windows key + R on your keyboard and then type devmgmt.msc in the Run dialog box. Hit Enter.

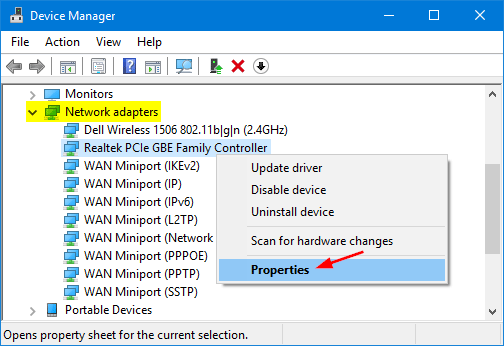
  2. Expand Network adapters, right-click your Ethernet or Wireless adapter and then select Properties.

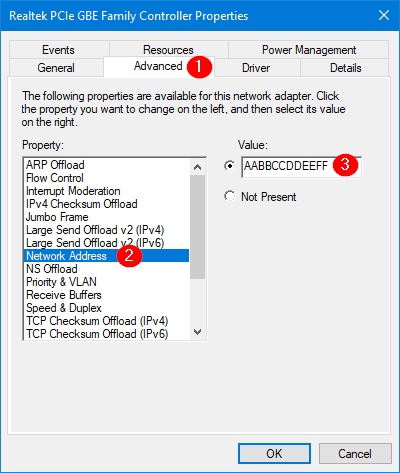
  3. Click the Advanced tab. Within the Property list, scroll down until you find the “Network Address” or “Locally Administered Address” property. Select the Value radio box and enter your new MAC address.

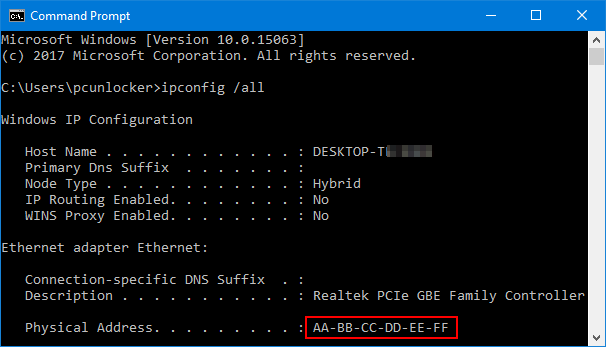
  4. Click OK to apply. To confirm your change, open the Command Prompt and type ipconfig /all and hit Enter. You should see the new MAC address show up in the line starting with “Physical Address“.

Method 2: Change MAC Address on Windows 11 / 10 / 8 / 7 from Registry Editor

  1. Open the Registry Editor and navigate to the following key:
    HKEY_LOCAL_MACHINE\SYSTEM\CurrentControlSet\Control\Class\{4D36E972-E325-11CE-BFC1-08002BE10318}
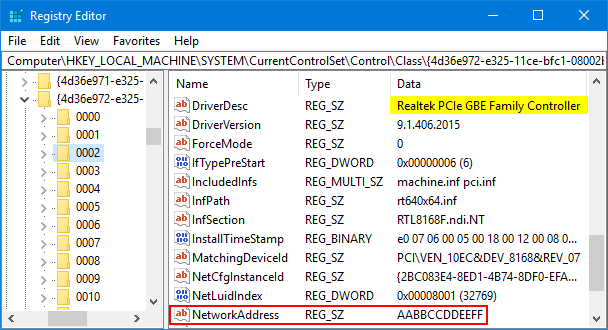
  2. You should see several subkeys with names such as 0000, 0001, etc. You have to click each subkey to check the DriverDesc value that matches with your network card. In my example, I got the key in 002.
  3. Look for the registry entry NetworkAddress in the right pane, and change the value as your new MAC Address. If that entry doesn’t exist, right-click blank area to create a String value with the name NetworkAddress.

  4. Close Registry Editor. Disable your network adapter and enable it again. The new Mac address will apply immediately.

That’s it!

Enable or Disable Folder Options in Windows 10 / 8 / 7

October 12th, 2017 by Admin

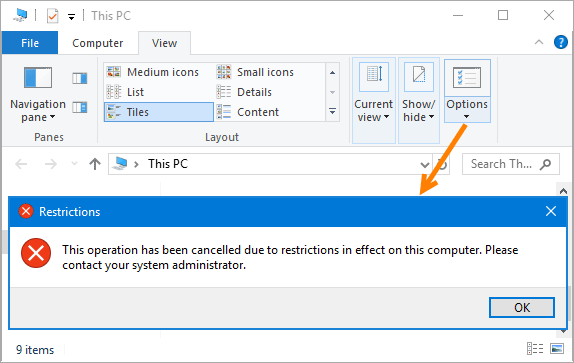
Folder Options is missing from Windows Explorer? How can I remove Folder Options from Control Panel? In this tutorial we’ll show you 2 easy ways to enable or disable Folder Options in Windows 10, 8 and 7.

Method 1: Enable / Disable Folder Options Using Group Policy

  1. Press WIN + R keys to bring up the Run dialog box. Type gpedit.msc and hit Enter.

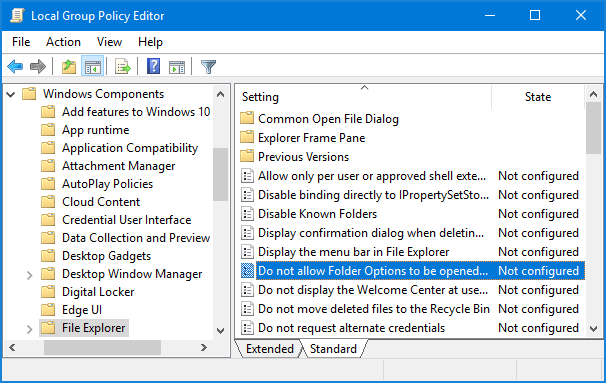
  2. In the Local Group Policy Editor window, navigate to:
    User Configuration > Administrative Templates > Windows Components > File Explorer

    If you’re running Windows 7/Vista/XP, browse to:
    User Configuration > Administrative Templates > Windows Components > Windows Explorer

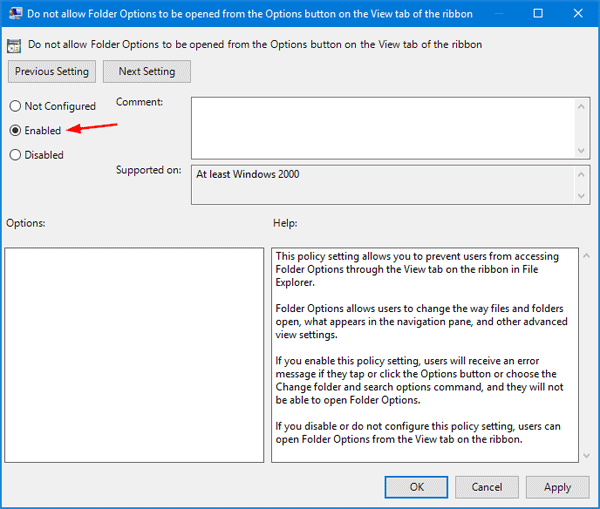
  3. Double-click on the policy”Do not allow Folder Options to be opened from the Options button on the View tab of the ribbon” on the right pane. For Windows 7/Vista/XP, this policy is called “Removes the Folder Options menu item from the Tools menu“.

  4. Set it to Enabled or Disabled, depend on if you want to disable or enable Folder Options in Windows Explorer.

  5. Click Apply and then OK. This policy setting will take effect without rebooting.

Method 2: Enable / Disable Folder Options Using Registry Editor

  1. Press WIN + R keys to bring up the Run dialog box. Type regedit and hit Enter.

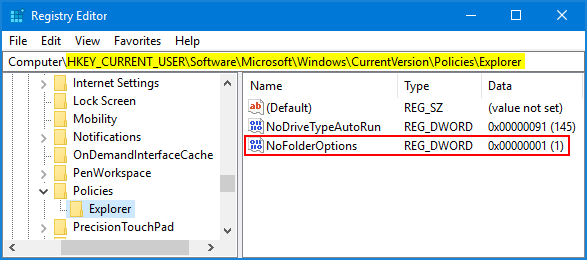
  2. When Registry Editor is launched, navigate to the key:
    HKEY_CURRENT_USER\Software\Microsoft\Windows\CurrentVersion\Policies\Explorer
  3. If you want to disable Folder Options in Windows, right-click an empty area on the right pane and create a new DWORD (32-bit) Value, named it as NoFolderOptions and set its value to 1.

    If you want to enable Folder Options, just delete the NoFolderOptions value.

  4. Exit the Registry Editor. Restart needed for your registry change to take effect.

How to Resize Video or Change Resolution in Windows

December 18th, 2014 by Admin

There are many situations where you might need to resize a video and change the screen resolution. It could be because the video screen size is too big to be uploaded to YouTube, or you need to enlarge a small video to fill up your large monitor. Sometimes resizing the video can also bring its actual file size down. This tutorial will guide you through the steps required to resize a video / movie.

How to Resize Video or Change Resolution in Windows?

Download and save the Video Converter Assist program to the desktop of your PC. After the download is complete, double-click on the setup file to install it.

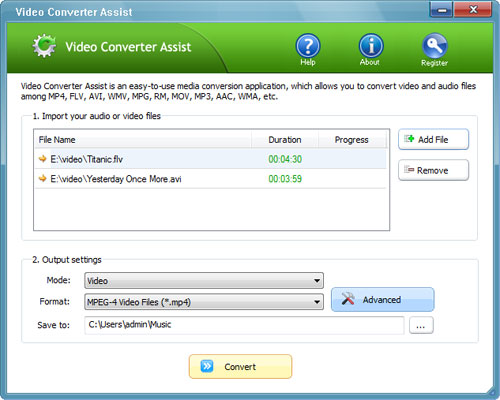
Open Video Converter Assist. Click on Add File button to import the video whose resolution you want to change. This program allows you to convert multiple video files all at once.

Now, under Mode, select Video from the drop-down list. Under Format, you can change the destination format from the list. Now go ahead and click on Advanced button.

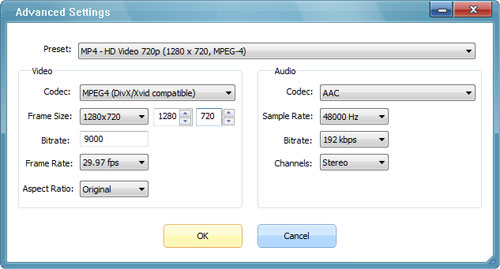
Next, the Advanced Settings window will open. From here you can customize the output video settings. Do not be intimidated by this screen if you’ve never heard of most of things listed. What you’re interested in is the Frame Size where you can change the width and height of your videos. Click OK to save your changes.

Under Save to, choose a folder to save the resized videos. Click on Convert to begin conversion. The process can take anywhere from a couple of minutes to.. quite a while, depending on the length and quality of the video and/or the speed of your PC.

Once the process has completed, give your resized video a watch. That’s it!

How to Extract Background Music from A Song or Movie

October 24th, 2014 by Admin

Is it possible to extract audio from a video file so that I can play music with MP3 player? Video Converter Assist is a handy utility that everyone needs nowadays which can extract audio, sound, or background music from home movies, YouTube videos, songs or any other video file. Here’s how.

How to Extract Background Music from A Song or Movie?

Click here to download the Video Converter Assist application. After the download is finished, run the setup file (about 8.2Mb) and follow the installation wizard to install it on your computer.

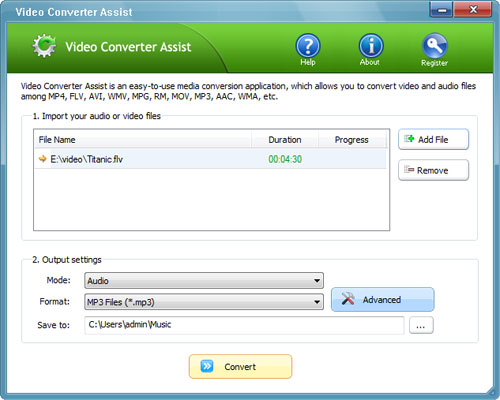
Launch the Video Converter Assist program. Click on Add File button and pick your video file which can be in AVI, FLV, MP4, MPG, WMV, MOV, SWF, RM format. It even supports more video formats than that, but those are the most common.

Set the mode as Audio, and then choose mp3, flac, wav, aac or mp2 as the output audio format. Click on the … button and choose the destination folder for storing your converted audio files.

Now, go ahead and click Convert and the extraction process will begin. The program is pretty fast, it took only one minute to extract audio from a 19 minute video clip. When extraction is over, you can see your audio file at the location specified! I checked the sound quality between the video and the audio file and they were exactly the same, so you’re not going to lose any quality in the extraction process. That’s it!

How to Convert Your Downloaded Videos to Play on Sony TV

September 6th, 2014 by Admin

Have you downloaded some favorite videos from YouTube and want to play them on your Sony TV? What format should I convert the videos to? Though Sony TV like Bravia enables us to enjoy video files from a USB flash drive, it only supports videos in MPEG-1 / MPEG-2. Here is a simple way to convert all your downloaded videos (*.mp4, *.flv, *wmv, etc.) to Sony TV supported format!

How to Convert Your Downloaded Videos to Play on Sony TV?

  1. Use a Windows PC to download the Video Converter Assist program. Double-clicked the downloaded setup file to install it.
  2. Launch the Video Converter Assist program. Click on Add File button to import your downloaded videos which you want to play on Sony TV.
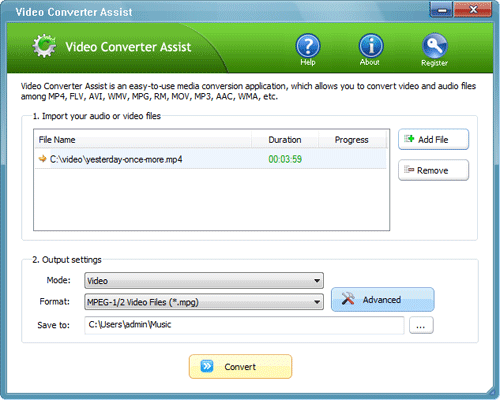
  3. Under the Output settings section, choose the Video mode and select the required video format: MPEG-1/2 Video Files (*.mpg). Click on Advanced button.

    convert-video-to-mpg

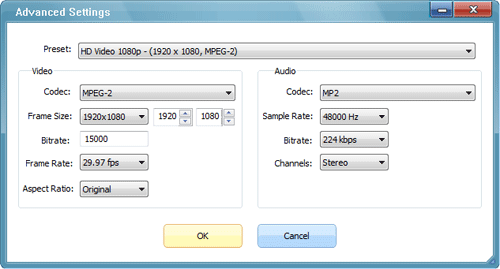
  4. In the popup dialog box choose one of the predefined presets from the drop-down list, and click OK. This predefined presets is designed to help you convert directly without going through the technicality of choosing and setting up video format.

    video-settings

  5. Click on the button to select a folder to save the converted video. Everything is done now! Just click the Convert button to begin converting your downloaded videos for playing on Sony TV. It will take a few minutes depending on the file size. Wait for the process to be done, and then you can copy the converted videos to a USB flash drive. Connect the USB drive to your Sony TV for enjoying your favorite videos.

How to Convert YouTube Video to Play on iPhone

December 27th, 2013 by Admin

YouTube has become a favored choice for many iPhone users to enjoy videos online. Have you downloaded lots of YouTube videos and want to watch them on your iPhone while on the move? However, the videos you’ve downloaded from YouTube are not in a supported format for your iPhone. This guide will show you how to convert YouTube video into iPhone supported format using Video Converter Assist, so you take your favorite clips with you wherever your iPhone goes.

How to Convert YouTube Video to Play on iPhone?

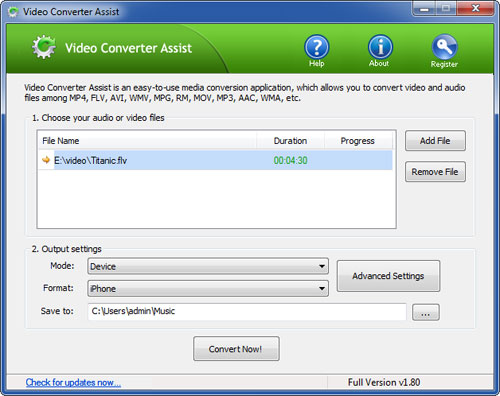
Launch the Video Converter Assist program. Click the Add File button to add your YouTube video files into the program. This program supports batch conversion and allows you to convert multiple video files at one time.

Choose the Device mode and then select iPhone option. If you want to play the videos on your iPad, then choose iPad option.

youtube-video-to-iphone

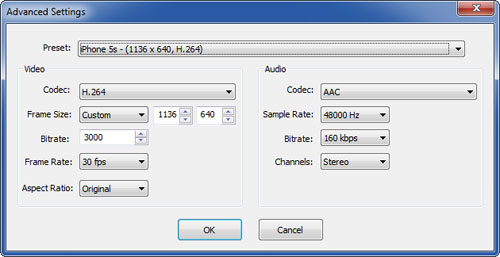
By default the program will use the recommended video settings for the conversion. But if you want to customize the video resolution, frame rate or bitrate, click on Advanced Settings button.

iphone-video-settings

Click the Convert Now! button to begin your conversion. After the video conversion is complete, you can go to the output folder to get the encoded videos which come in the H.264 MP4 format that Apple devices require. Now you can import the converted videos into iTunes to play on your iPhone or just store in iTunes library.

How to Import MTS Files to Adobe Premiere Pro for Editing

December 10th, 2013 by Admin

Can’t import .mts files from my Sony camera to Premiere Pro CS5 and I keep getting the error “The file has an unsupported compression type”. How can I open .mts files in Premiere CS?

If you try to import these MTS files to Adobe Premier Pro, you may run into incompatibility issue. This is because that your MTS files contain come codecs or the resolution is not recognizable by Adobe Premiere. So what to do? The easiest and quickest solution is using a video converter to turn it into a compatible format for Adobe Premier Pro.

To do this work, I strongly recommend Video Converter Assist, which renders native codecs ensuring the best results when using Adobe Premiere.

How to Convert MTS to Adobe Premiere Pro?

  1. Run the Video Converter Assist program and click the “Add File” button to import the MTS videos to be converted. The converter supports converting multiple files at a time.
  2. Select the “Video” mode, and then click “Format” drop-down bar to select a proper video format such as MPEG-1/2 Video Files (*.mpg), AVI or MOV. The best method to avoid any problems and save time is to convert MTS footage into a Premiere Pro most compatible format like MPEG-2.
  3. Click on “Convert Now!” button on bottom of the main windows and the conversion from MTS to Adobe Premiere Pro will begin immediately. When all conversions finished, you can run Premiere Pro and load the converted files to it. Then you would be able to edit MTS files in Adobe Premiere Pro with no obstacle.

How to Convert MTS / M2TS Video to MP4 Format with HD-Quality

December 6th, 2013 by Admin

M2TS and MTS are video formats for high-definition digital camera recorders or Advanced Video Codec High Definition (AVCHD). When get the AVCHD (.mts or .m2ts) video clips from your Sony, Panasonic AVCHD camcorders, you probably want to watch your MTS/M2TS videos on MP4 players like iPod or iPhone.

However, Most portable players can’t read this format directly. You can’t play it freely on your device unless you convert the video from MTS to a friendly format (such as MP4) first on your computer. In this article we’ll provide you with an easy way to convert MTS / M2TS video to MP4 format while keeping HD Quality.

How to Convert MTS / M2TS Video to MP4 Format with HD-Quality?

  1. Download and install Video Converter Assist on your computer, and double click its icon to launch it. It’s fully compatible with Windows 8/7/Vista/XP.
  2. Click on the “Add File” button to import your .mts or .m2ts videos files into the program. Video Converter Assist supports the conversion of batch files from MTS / M2TS to MP4 format. This means that you are allowed to import and convert numerous multimedia files one time for faster conversion.

  3. Select the “Video” mode and then choose the “MPEG-4 Files (*.mp4)” format. Click on the “Advanced Settings” button, you can simply choose the optimized presets or customize the output settings such as frame size, video codec, bitrate according to your needs. When it is done, click OK.

  4. Click on “Convert Now!” button to get started the MTS / M2TS to MP4 conversion. Once the conversion finished, click on “Open Folder” button to get the converted MP4 video files and transfer them to your iPod, iPhone, iPad, PSP, etc. Enjoy it!