Archive for December, 2021

Fix: Windows 11 Changes Screen Brightness Automatically

December 31st, 2021 by Admin

Windows 11 laptop changes brightness depending on the screen content? Screen begins to dim and brighten on its own based on the light of surrounding? To fix such problems, you need to turn off adaptive brightness and change Battery Saver setting in Windows 11.

Part 1: Turn off Adaptive Brightness

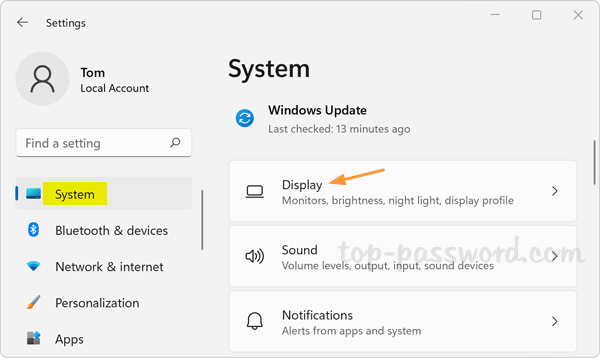
Press the Windows key + I together to open the Settings app. With the System category selected on the left, click on Display on the right.

Click the small arrow beside the “Brightness” slider to expand it.

Uncheck the “Change brightness automatically when lighting changes” box to prevent Windows 11 from automatically adjusting the screen brightness based on the light around you, or uncheck the “Help improve battery by optimizing the content shown and brightness” box if you don’t want your screen to change brightness based on content that’s displayed on your screen.

Can’t find such settings? You may need to disable adaptive brightness in BIOS Setup. For Dell Latitude 3520, enter BIOS and go to the Display tab, then disable the Ecopower option.

Part 2: Prevent Windows 11 from Decreasing Brightness While in Battery Saver

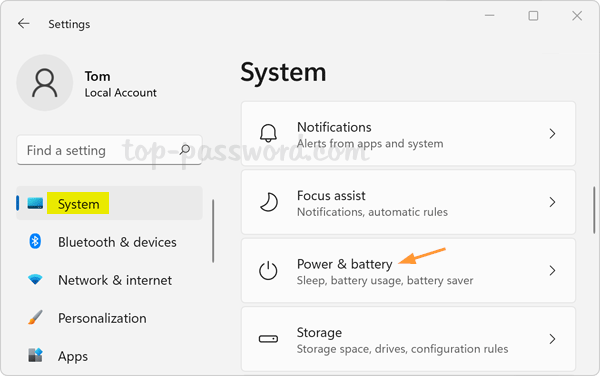
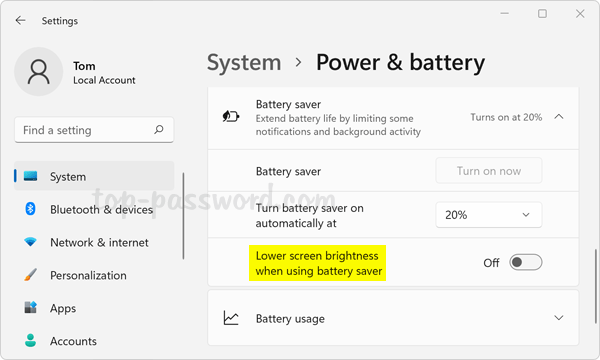
Press the Windows key + I together to launch the Settings app. With the System category selected on the left, click on Power & battery on the right.

Under the “Battery” section, Click the small arrow beside “Battery saver” to expand it.

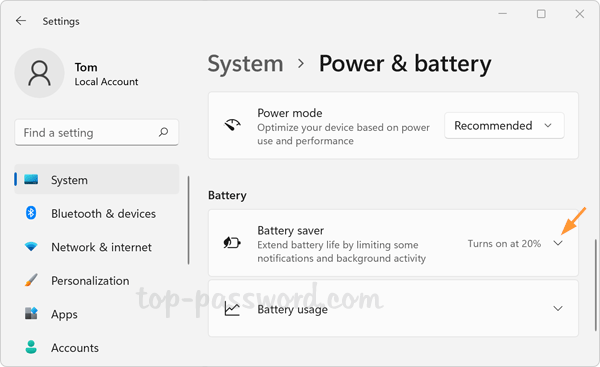
Turn off the option “Lower screen brightness while using battery saver“.

From now on, your computer will not automatically decrease the screen brightness while in battery saver.

5 Quick Ways to Open File Explorer in Windows 11

December 29th, 2021 by Admin

File Explorer should be one of your most frequently used programs in Windows. In this tutorial we’ll show you 5 quick ways to open File Explorer in Windows 11.

Method 1: Using Windows + E Keyboard Shortcut

Just press the Windows key and E key simultaneously, it will launch File Explorer immediately. This method also works with previous versions of Windows.

Method 2: Access from Quick Link Menu

Right-click the Start button on the taskbar (or press Windows + X keyboard shortcut), the Quick Link menu will appear with a few options. Select “File Explorer” from the list to open it.

Method 3: Pin File Explorer to Taskbar

In Windows 11, the File Explorer shortcut is pinned to the taskbar by default, you just need to click to open it.

If File Explorer has been removed from the taskbar, you can pin it to taskbar by following these steps:
Click the Search button on the taskbar, then type “explorer” and the File Explorer app will show up in the search results. Right-click it and select “Pin to taskbar“.

Method 4: Using the Run box, Command Prompt or PowerShell

Press the Windows key + R to launch the Run dialog box, type explorer and hit Enter to open File Explorer.

You can also execute the explorer command in the Windows Terminal (Command Prompt or Windows PowerShell) to start File Explorer. Or let File Explorer open to specific folder using this command:
explorer path_of_your_folder

Method 5: Add “This PC” icon on Desktop

If you could make Windows show “This PC” icon on your desktop, you can click it to open File Explorer with ease. Here’s how you can add “This PC” icon on the desktop:

  1. Right-click the blank area on your desktop and select Personalize.

  2. The Settings app will open to the Personalization page. Click the Themes category in the right pane.

  3. Under the Related Settings tab, click on “Desktop icon settings“.

  4. Check the box next to Computer and click on Apply.

    You should see the “This PC” icon show up on the desktop.

Create a Folder Starting with a Dot(.) in Windows 11 / 10 / 8 / 7

December 28th, 2021 by Admin

When you try to create a folder/file on Windows 7 that starts with a dot, like .htaccess, you may get the error message “You have to enter a filename“. To resolve this issue, you need to do it with Command Prompt. Since Windows 11, File Explorer allows to create and rename a folder whose name starts with a dot. In this tutorial we’ll walk you through the steps to create a folder starting with a dot(.) in Windows 11 / 10 / 8 / 7.

Part 1: Create a Folder Starting with Dot Using Command Prompt

Before getting started, open Command Prompt in the directory where you want to create a folder. You can then use the mkdir command to create a folder starting with a dot. For example, I can create a folder named .pcunlocker by executing this command:
mkdir .pcunlocker

or create an empty file named .tutorial.txt by running this command:
echo.>.tutorial.txt

This method works with all versions of Windows, including Windows 10 / 8 / 7.

Part 2: Create a Folder Starting with Dot Using File Explorer

If you’re using Windows 11, you can create a folder starting with dot without using Command Prompt. Just open File Explorer and browse to your target location, right-click the blank area and select New -> Folder, and then type in a new name that starts with a dot.

File Explorer also lets you rename any existing folder by adding a dot in the front of its name.

How to Prevent Dragging a Maximized Window in Windows 11 / 10

December 27th, 2021 by Admin

When you drag the title bar of a maximized window and then drop it to another location, the window will restore its original size. To prevent accidental drag and drop, you can disable dragging of a maximized window in Windows 11 / 10.

How to Prevent Dragging a Maximized Window in Windows 11 / 10

Open Registry Editor and navigate to the key: HKEY_CURRENT_USER\Control Panel\Desktop. Next, double-click the string value named DragFromMaximize on the right pane.

Change its value data from 1 to 0, and click OK.

Close Registry Editor. Restart your computer or log off your account to apply the change. You’ll find that you’re unable to drag maximized window any longer.

3 Methods to Set Default Printer in Windows 11

December 21st, 2021 by Admin

When you right-click a document in File Explorer and select Print, it may prompt you to choose a printer instead of printing immediately. This problem happens when you don’t have a default printer set up.

In this tutorial we’ll show you 3 methods to change or set default printer in Windows 11.

Method 1: Set Default Printer in Windows 11 via Control Panel

  1. Press the Windows key + R to bring up the Run dialog box. Type shell:PrintersFolder and click OK.

  2. You can then access the Printers folder from the Control Panel. Right-click on your desired printer and choose “Set as Default Printer” from the context menu.

  3. When done, you will see a green tick on your new default printer.

Method 2: Set Default Printer in Windows 11 via Settings App

  1. Press the Windows key + I to launch the Settings app, and then click on Bluetooth & devices category. On the right side, click on Printers & scanners.

  2. Click on a printer you want to set as the default printer.

  3. Just click the “Set as default” button at the top, and your selected printer will become the new default printer on your computer.

Method 3: Set Default Printer in Windows 11 via Command Prompt

  1. To get started, open Windows Terminal as admin. If Windows Terminal opens PowerShell by default, click the down-arrow button located in the title bar and select “Command Prompt“.

  2. Enter the following command into the Command Prompt window, and press Enter.
    wmic printer get name,default

    It will display a list of printers added to your computer. You can identify the current default printer which has TRUE showing in the “Default” column.

  3. To change or set a new default printer, run the following command. Remember to substitute printer_name with the actual name of your desired printer.
    wmic printer where name="printer_name" call setdefaultprinter

  4. Close Windows Terminal. Now you’ve successfully set a new default printer on Windows 11.

2 Methods to Disable Transparency Effects in Windows 11

December 10th, 2021 by Admin

In Windows 11, transparency effects are enabled by default, which add an acrylic blur effect to the Start Menu, taskbar, the login screen, the Settings app and other windows. If you prefer non-transparent and opaque GUI, you can use the following methods to disable transparency effects in Windows 11.

Method 1: Disable Transparency Effects in Windows 11 via Settings App

  1. Right-click the blank area on your desktop and then select Personalize from the context menu.

  2. When the Settings window opens, click Colors on the right-hand pane.

  3. You can turn off the toggle switch next to “Transparency effects” to disable transparency effects immediately.

Method 2: Disable Transparency Effects in Windows 11 via Registry Editor

  1. Open Registry Editor and navigate to: HKEY_CURRENT_USER\Software\Microsoft\Windows\CurrentVersion\Themes\Personalize. Locate and double-click the DWORD EnableTransparency on the right pane.

  2. Change its value data from 1 to 0 for disabling transparency effects in Windows 11, and click OK.

  3. Close Registry Editor and restart your computer to apply the changes.

How to Remove “Open in Windows Terminal” Context Menu in Windows 11

December 8th, 2021 by Admin

When you right-click the empty area in a folder, you’ll see the “Open in Windows Terminal” option. If you never use this option, you can get rid of it from the context menu. This tutorial will show you how to remove “Open in Windows Terminal” from the context menu in Windows 11 File Explorer.

How to Remove “Open in Windows Terminal” Context Menu in Windows 11

  1. Open Registry Editor and go to the location: HKEY_LOCAL_MACHINE\SOFTWARE\Microsoft\Windows\CurrentVersion\Shell Extensions. In the left pane, right-click “Shell Extensions” and select New -> Key.

  2. Name the newly created sub-key as Blocked, and then right-click it and select New -> String Value.

  3. In the right pane, rename the newly-created string as {9F156763-7844-4DC4-B2B1-901F640F5155}, and double-click to change its value data to WindowsTerminal. Click OK.

  4. Close Registry Editor. When you right-click the blank area of a folder or desktop, you’ll see that the “Open in Windows Terminal” option is already removed from the context menu.

Whenever you change your mind, you can restore the missing “Open in Windows Terminal” context menu by deleting the string {9F156763-7844-4DC4-B2B1-901F640F5155}.

3 Ways to Enable or Disable Compact View for Windows 11 File Explorer

December 3rd, 2021 by Admin

Starting with Windows 11, Compact View is disabled by default for all users, no matter if your computer has a touch device or not. This adds extra padding between files in File Explorer for easier touch input.

If you’re not using a touch screen device, you can view more files without scrolling after turning on Compact View.

In this tutorial we’ll show you 3 simple methods to enable or disable Compact View in File Explorer on Windows 11.

Method 1: Enable or Disable Compact View via File Explorer

After opening up File Explorer, click on the View icon from the ribbon menu at the top. You can then click the Compact view option to enable Compact View, or click it again to disable Compact View.

Method 2: Enable or Disable Compact View via Folder Options

Press the Windows key + R to launch the Run dialog box. Next, type control folders in the text field and click OK to open the Folder Options window.

Go to the View tab. Under Advanced settings, check the box next to “Decrease space between items (compact view)” to turn on Compact View, or uncheck it to turn off Compact View.

Click OK to save your change.

Method 3: Enable or Disable Compact View via Registry Editor

Open Registry Editor and browse to: HKEY_CURRENT_USER\Software\Microsoft\Windows\CurrentVersion\Explorer\Advanced. In the right pane, double-click on the 32-bit DWORD named UseCompactMode.

Change the Value data to 1 for enabling Compact View, or set it to 0 for disabling Compact View. Click OK.

Close Registry Editor and you can immediately see the changes of the padding between folders/files in File Explorer.

That’s it!