Archive for April, 2019

How to Find AD User Creation Date in Windows Server

April 29th, 2019 by Admin

How can I find out when a user account was created in Active Directory? Is there a way to list all AD users created in the last 30 days? It’s vitally important to monitor user account creations in order to reduce the risk of security breaches. In this tutorial we’ll show you different ways to find when a specific AD user was created, and list all recently created accounts in Active Directory.

Part 1: Find the Creation Date of Specific AD User

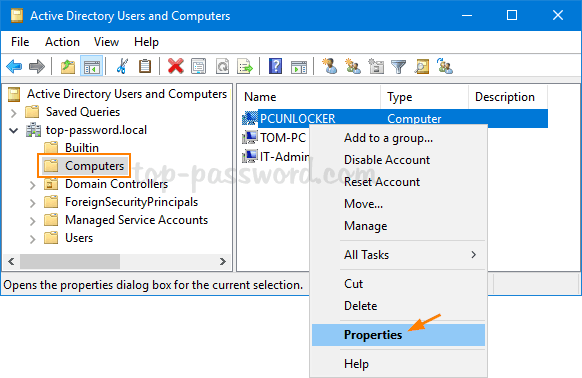
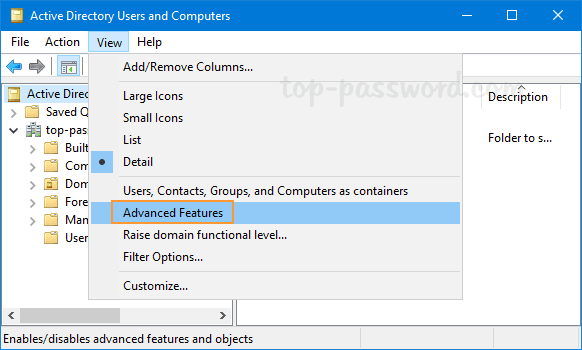
  1. In Active Directory Users and Computers snap-in, click on the View menu and select Advanced Features.

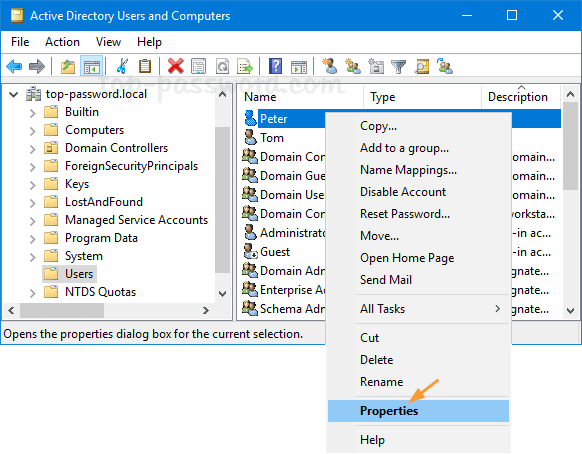
  2. Expand the domain and choose Users in the left-hand pane, you’ll see a list of AD users. Right-click on the account for which you want to find out the creation date, and select Properties.

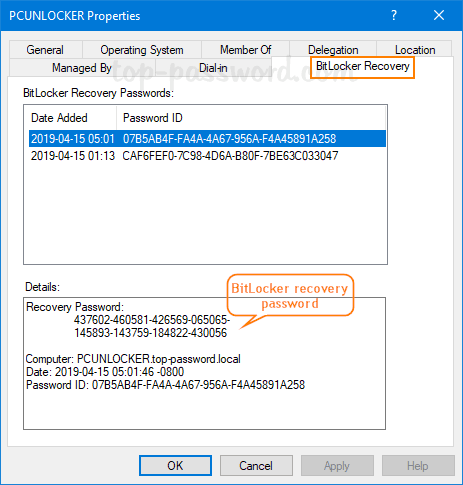
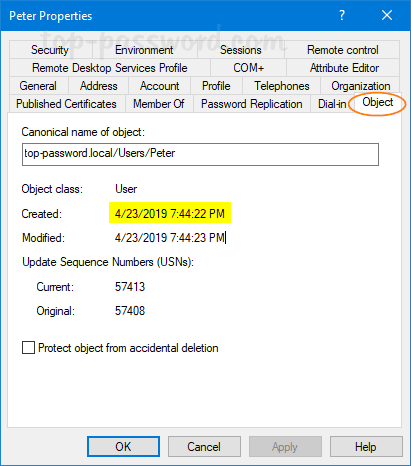
  3. Go to the Object tab and you can view the date and time when the account has been created.

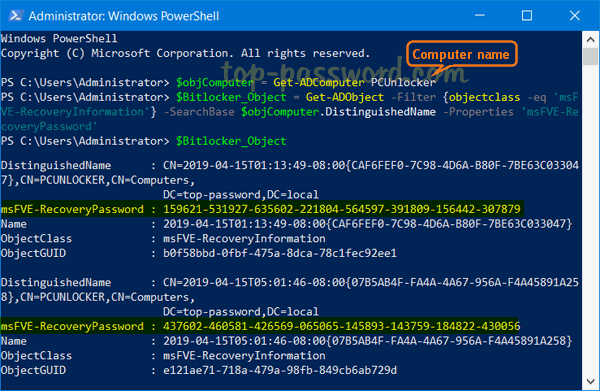
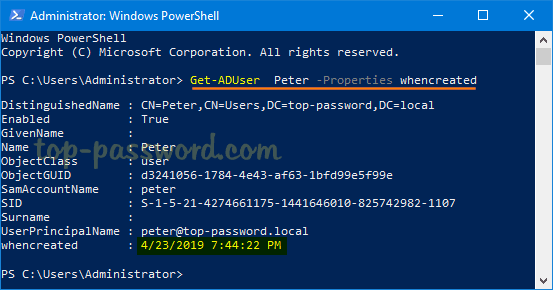
Additionally, you can also find out the user account creation date using PowerShell. Just type the following command and hit Enter.
Get-ADUser your_username -Properties whenCreated

Part 2: List All Recently Created Accounts in Active Directory

When you need to find a list of users created in Active Directory in the last 30 days, just open PowerShell with elevated privileges and execute the below commands:

$DateCutOff = (Get-Date).AddDays(-30)
Get-ADUser -Filter * -Properties whenCreated | where {$_.whenCreated -gt $DateCufOff} | FT Name, whenCreated

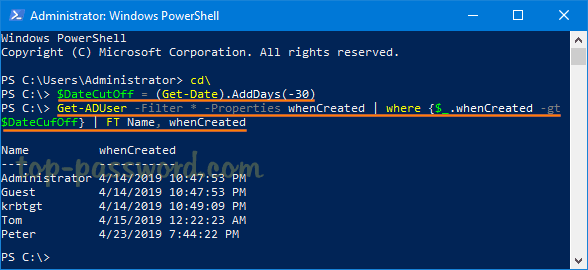
The first command uses the AddDays method to minus 30 days from the current date, while the second command pulls only accounts created after a certain date stored in $DateCutOff.

How to Enable Quick Removal Policy for USB Drives in Windows 10 / 8 / 7

April 28th, 2019 by Admin

Do you really need to safely eject a USB drive before pulling it out of your computer? Windows has two different policies you can select for each individual USB drive:

  • Quick removal – This will disable write caching on the USB device, and your data will be written to physical drive in real-time. So you will be able to disconnect your USB drive even without using the “Safely Remove Hardware” option.
  • Better performance – This will cache the write operations to optimize performance and your data will be written to physical drive at a later time. Before unplugging your USB drive, you have to click the “Safely Remove Hardware” icon appears in the system tray to tell Windows to write all the cached data to disk.

If you don’t bother with safely removing USB devices before unplugging them, follow this tutorial to enable Quick Removal policy for USB drives in Windows 10 / 8 / 7.

How to Change Removal Policy for USB Drives in Windows

  1. To get started, you need to open the Disk Management tool. If you’re running Windows 10, just hit the Windows key + X together and you can then select “Disk Management” from the menu.

  2. Find your USB drive in the lower section of the Disk Management window, right-click its name and choose Properties from the pop-up menu.

  3. Switch to the Policies tab and you can change the removal policy to Quick removal. Click OK to save your change. Note that This change only applies to this specific USB device.

  4. That’s it! Whenever the activity light on your USB drive is no longer blinking, you can directly remove the device without bothering to click the Safely Remove Hardware notification icon.

Updates: In earlier versions of Windows the default removal policy applied to USB drives was Better Performance. With the release of Windows 10 version 1809, Microsoft has changed its default policy to Quick Removal.

How to Change Local / Domain Admin Password Using Windows PowerShell

April 25th, 2019 by Admin

Need to write a PowerShell script for changing a local account’s password? We’ve covered various ways of resetting Windows password in the past, but this tutorial will teach you how to change the password of either local account or domain account using Windows PowerShell.

How to Change Local / Domain Admin Password Using PowerShell

  1. Open Windows PowerShell as Administrator.

  2. First, you have to convert your new password to encrypted string by running the following command. Be sure to replace P@ssw0rd with the new password you want to set for your account.

    $NewPassword = ConvertTo-SecureString "P@ssw0rd" -AsPlainText -Force

  3. Next, type the following command to change your local account password. Substitute Tom in the command below with the actual user name of the local account that you want to change the password of.
    Set-LocalUser -Name Tom -Password $NewPassword

    If you need to change domain user password, run the following command instead:
    Set-ADAccountPassword Tom -NewPassword $NewPassword –Reset

  4. After completing the above steps, reboot your computer and you can log in to your local / domain account with the new password.

How to Make Windows Clear Pagefile at Shutdown for Added Security

April 24th, 2019 by Admin

Pagefile is a hidden system file used by Windows to swap data back and forth between RAM and physical drive. When your RAM is insufficient to hold every running program, some of the program’s memory (including sensitive data and passwords) will be moved to the pagefile.

Pagefile is well protected while Windows is running, but the data within it persists after a shutdown. A malicious user who has physical access to your PC can extract sensitive data from the pagefile by booting a Live CD. To prevent such potential security risk, you can configure Windows to automatically clear the paging file on every shutdown.

Method 1: Make Windows Clear Pagefile at Shutdown Using GPO

  1. Press the Windows logo key and the R key simultaneously. Once the Run dialog box is opened, type secpol.msc into it and click OK.

  2. Navigate to Security Settings -> Local Policies -> Security Options. On the right pane, double-click on the “Shutdown: Clear virtual memory pagefile” policy.

  3. Select the Enabled radio option, and then click on Apply and then OK.

  4. Restart your computer to make sure the changes take effect.

Method 2: Make Windows Clear Pagefile at Shutdown Using Registry Editor

  1. Open the Registry Editor and browse to the following key:
    HKEY_LOCAL_MACHINE\SYSTEM\CurrentControlSet\Control\Session Manager\Memory Management

    Next, double-click on a 32-bit DWORD value named ClearPageFileAtShutdown in the right pane.

  2. Change the current default value from 0 to 1. Click OK to save the changes.

  3. Restart Windows to apply your changes. Whenever you shut down your PC, Windows will automatically clear the pagefile for added security.

3 Ways to Cancel Print Jobs in Windows 10

April 23rd, 2019 by Admin

Print jobs are stuck in queue and you need to clear the print spooler? How can I prevent further documents from being printed? In this tutorial we’ll show you 3 simple ways to cancel a stuck or accidental print job from the queue, saving you lots of time and paper.

Method 1: Cancel Print Jobs Using Control Panel

Open the “Devices and Printers” applet in the Control Panel. Right-click on the printer that is being used and select “See what’s printing” from the context menu.

This shows a list of print jobs that are in the queue. In order to cancel printing a document, just right-click it and select Cancel.

Method 2: Cancel Print Jobs Using the Settings App

Open the Settings app and click on Devices.

Go to the Printers & scanners tab. On the right side pane, select your printer and then click on the “Open queue” button appeared beneath the printer name.

Now, you can right-click on any print job and then click Cancel to clear it from the print queue.

Method 3: Cancel Print Jobs Using Command Prompt

Open the Command Prompt as Administrator. Run the following commands to delete all .shd and .spl files from C:\WINDOWS\system32\spool\PRINTERS and restart the Print Spooler service.

net stop spooler
del /F /S /Q %systemroot%\System32\spool\PRINTERS\*
net start spooler

The print queue on your Windows 10 PC should now be cleared. Of course, you can create a batch file to execute the above commands, so you can cancel all your print jobs with just a single mouse click!

Easy Ways to Find BitLocker Recovery Key from Active Directory

April 19th, 2019 by Admin

BitLocker is prompting for a recovery key and you lost it? Applying the GPO to store BitLocker recovery password in Active Directory is a good practice for companies when data security is a concern. In this tutorial we’ll show you different ways to find BitLocker recovery key/password from Active Directory or Azure AD.

Method 1: Find BitLocker Recovery Key in AD Using PowerShell

  1. Press the Windows key + X and then select “Windows PowerShell (Admin)” from the Power User Menu.

  2. Copy and paste the following script into the PowerShell console and hit Enter. Substitute “PCUnlocker” with the name of the computer you want to locate BitLocker recovery key for.

    $objComputer = Get-ADComputer PCUnlocker
    $Bitlocker_Object = Get-ADObject -Filter {objectclass -eq 'msFVE-RecoveryInformation'} -SearchBase $objComputer.DistinguishedName -Properties 'msFVE-RecoveryPassword'
    $Bitlocker_Object

  3. It will retrieve all details from the ‘msFVE-RecoveryInformation‘ objects attached to your target computer. The msFVE-RecoveryPassword item is the BitLocker recovery key you’re looking for.

Method 2: Using BitLocker Recovery Password Viewer Utility

If you’ve enabled the BitLocker Recovery Password Viewer feature in Active Directory, it’s pretty simple to retrieve BitLocker recovery key for any computer in AD. Follow these steps:

  1. After opening the Active Directory Users and Computers snap in, expand your domain and click the Computers container. Right-click on your target computer object and select Properties.

  2. Go to the Bitlocker Recovery tab, you can view all BitLocker recovery keys that were automatically backed up to AD.

If you know the first 8 digits of the Password ID, here’s how to search your BitLocker recovery keys:

  1. Right-click on your domain in the left pane of Active Directory Users and Computers snap in, and then select Find BitLocker recovery password.

  2. Enter the first 8 characters of Password ID and click on Search.

  3. It will locate the matching BitLocker recovery keys that are stored in your Active Directory.

Method 3: Locate BitLocker Recovery Key in Azure AD

Once the BitLocker recovery key is backed up to Azure AD, users can find their own keys in the Profile section after signing into https://account.activedirectory.windowsazure.com/profile/. Administrators can log in to https://account.activedirectory.windowsazure.com/n/#/devices, select the appropriate device, and click View Details to get the BitLocker recovery key.

Use GPO to Automatically Save BitLocker Recovery Key in Active Directory

April 17th, 2019 by Admin

As a system administrator, you may find it’s difficult to keep track of BitLocker recovery keys for all computers in company network, especially when number of machines is more than 100. In this tutorial we’ll show you how to set the group policy to automatically backup BitLocker recovery information to Active Directory, so you can centrally manage the recovery keys/passwords in one place.

How to Configure GPO to Automatically Save BitLocker Recovery Key to AD

  1. Click the Search icon in the taskbar and type “group policy“. You can then click Group Policy Management to launch it.

  2. Now in the left pane of Group Policy Management, right-click your AD domain and select “Create a GPO in this domain, and Link it here…” from the menu.

  3. In the New GPO dialog, give the GPO a name and click OK.

  4. Right-click the newly-created GPO in the left pane, and select Edit.

  5. Browse to Computer Configuration -> Policies -> Administrative Templates -> Windows Components -> BitLocker Drive Encryption, and then double-click the policy “Store BitLocker recovery information in Active Directory Domain Services“.

  6. Set the policy to Enabled. Make sure the “Require BitLocker backup to AD DS” option is checked, and select to store both recovery passwords and key packages.

  7. Next, expand BitLocker Drive Encryption in the left pane. You’ll see three nodes: Fixed Data Drives, Operating System Drives, Removable Data Drives. Just select Fixed Data Drives and double-click the policy “Choose how BitLocker-protected fixed drives can be recovered“.

  8. Set it to Enabled. Check the options “Save BitLocker recovery information to AD DS for fixed drives” and then click OK.

  9. Go to the “Operating System Drives” node and turn on the similar policy “Choose how BitLocker-protected operating system drives can be recovered“. Afterwards, go to the “Removable Data Drives” node and enable the policy “Choose how BitLocker-protected removable drives can be recovered“.
  10. When any client PC retrieves the policy changes, BitLocker recovery information will be automatically and silently backed up to AD DS when BitLocker is turned on for fixed drives, OS drives or removable drives.

Manually Backup BitLocker Password to AD with PowerShell

If you have enabled BitLocker prior to configuring the above GPO policy, you can use PowerShell cmdlets to manually upload the BitLocker recovery key to Active Directory. Follow these steps:

  1. When your BitLocker-protected drive is unlocked, open PowerShell as administrator and type this command:
    manage-bde -protectors -get D:

    What you need to take note of is the Numerical Password ID.

  2. Next, type the following command to backup your BitLocker recovery password to Active Directory. Remember you have to use the Numerical Password ID obtained on the previous step.
    manage-bde -protectors -adbackup D: -id {CAF6FEF0-7C98-4D6A-B80F-7BE63C033047}

  3. When that completes, you will receive the message “Recovery information was successfully backed up to Active Directory.

2 Methods to Install BitLocker Recovery Password Viewer for Active Directory

April 16th, 2019 by Admin

BitLocker Recovery Password Viewer tool is an optional feature included with Windows Server 2008 – 2019, which lets you store and view BitLocker recovery keys in AD for all client computers. By default, this feature is not installed and BitLocker Recovery tab in ADUC is missing. In this tutorial we’ll show you 2 methods to install BitLocker Recovery Password Viewer for Active Directory in Windows Server 2008/2012/2016/2019.

Method 1: Install BitLocker Recovery Password Viewer Using Server Manager

  1. Open Server Manager and click on “Add roles and features“.

  2. Click Next through the wizard until you get to the Server Roles page. Make sure “Active Directory Domain Services” is checked.

  3. In the Features page, check the “BitLocker Drive Encryption” feature.

    For Windows Server 2008, you need to expand Remote Server Administration Tools –> Feature Administration Tools and check the option for “BitLocker Drive Encryption Administration Utilities

  4. If you’re prompted to confirm adding features that are required for BitLocker Drive Encryption, click on Add Feature button.

  5. Once completing the wizard, take a look at the Computer Properties dialogue box in Active Directory Users And Computers, you’ll see the BitLocker Recovery tab.

Method 2: Install BitLocker Recovery Password Viewer Using PowerShell

If you need to install BitLocker Recovery Password Viewer on a server running Windows Server Core, try this method:

  1. Press the Windows key + X or right-click on the Start button to open the context menu, then select Windows PowerShell (Admin).

  2. Run the following command to add the optional “BitLocker Drive Encryption” feature:
    Install-WindowsFeature BitLocker -IncludeAllSubFeature -IncludeManagementTools

  3. When it’s done, you’ll be prompted to restart your server to finish the installation process.

3 Ways to Clear Clipboard History in Windows 10

April 12th, 2019 by Admin

When you use Ctrl + C to copy text, images or other information in Windows, your data will be stored in the clipboard temporarily so you can then paste it somewhere else. Clipboard works as a temporary repository for data during copy-and-paste operations. In this tutorial we’ll show you different ways to clear clipboard history in Windows 10.

Method 1: Add An Empty Item to Clipboard History

Press the Windows key + R to open the Run box, then type cmd /c “echo off | clip” and hit Enter.

This command will add an empty item to the clipboard history so you then can’t paste anything anywhere. This method could also be used to clear clipboard history in Windows 8, 7, Vista.

Method 2: Clear All Clipboard History Data from Settings App

Open the Settings app and navigate to System -> Clipboard. On the right pane, you can turn off the “Clipboard history” toggle switch to prevent Windows clipboard from saving multiple items. In this case, only the last item you copied into the clipboard will be saved.

When the “Clipboard history” feature is turned on, you can click the “Clear” button to manually clear all history items from the clipboard.

Method 3: Clear Specific Item in Clipboard History

Just press the Windows key + V in any application, a Clipboard panel will appear where you’ll see a list of items (such as text and images) that you have recently copied from different applications.

Click on the three dots icon on the upper-right part of the clipboard item you want to delete. When the pop-up menu appears, you can select Delete to clear it.

That’s it!

Windows 10: Hide or Unhide Folders / Files Using Command Prompt

April 11th, 2019 by Admin

Is there a way to hide important files to prevent accidental deletion? In this tutorial we’ll show you how to hide or unhide folders / files in Windows 10 using Command Prompt.

Hide Folders or Files

When you’re going to hide a specific folder or file, open up the Command Prompt and type:
attrib +h "your_folder_or_file"

This command will assign the “Hidden” attribute to your target folder or file, and make it disappear from the File Explorer view.

If you need to hide all files and subfolders in your target location (for exmaple, D:\demo), run this following command:
attrib +h "d:\demo\*" /s /d

List Hidden Files

If you need to list hidden files and folders while in Command Prompt, use the CD command to change your working directory and then type:

dir /a:h

This will show all hidden folders or files in that location.

Unhide Folders or Files

When you need to unhide a specific folder or file, execute this command:
attrib -s -h "your_hidden_folder_or_file"

In order to unhide all hidden files and subfolders under a location (e.g. D:\demo), type this command:
attrib -s -h "d:\demo\*" /s /d

That’s it! The built-in option to hide folders/files is pretty easy but it’s not secure because anyone can unhide them the easy way. If you need to hide sensitive files from prying eyes, it’s a good idea to use third-party softwares (for instance, Protect My Folders) to hide and lock your folders/files with a password.