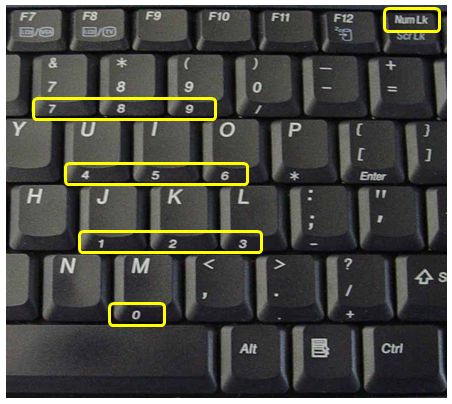
Due to their compact size, many laptops don’t include a dedicated numeric keypad on the right side of the keyboard like a desktop computer. To conserve space, the keys of numeric keypad are shared keys with a block of keys in the center of the keyboard.
To use the numeric keypad on a laptop, you need to enable the NumLock key on your keyboard. NumLock key is used to convert part of the main keyboard to act as a numeric keypad rather than letters. When enabled, NumLock lets you use the 7-8-9, u-i-o, j-k-l and m keys as a numeric keypad.
However, most people do not realize the NumLock key is on their laptop keyboard, and sometimes this will only cause confusion once it’s activated accidentally. For example, this may cause you to enter your password incorrectly at Windows login screen. So here I’m going to show you 3 methods to disable NumLock on a laptop keyboard.
Method 1: Disable NumLock with Fn key
Most laptops have a Fn key you can press in conjunction with other keys to turn off the NumLock feature. But the precise way to disable NumLock varies depending on your laptop model. The Number Lock indicator will light up when the NumLock is enabled and will be unlit whenever the NumLock is disabled. Here are the most common keyboard shortcuts to enable/disable NumLock:
Fn + F11 (Acer, Toshiba, Samsung)
Shift + Num Lock
Fn + Num Lock (Sony, Gateway)
Fn + F11 + Scroll lock
Fn + F8 (HP)
Ctrl + F11
Fn + Shift + Num Lock
Fn + F4 (Dell)
Fn + Nmlk (Lenovo, ASUS)
After pressing the keyboard shortcuts to enable the NumLock, press the shortcuts again and it will disable NumLock.
Method 2: Disable NumLock with a Registry Fix
The status of the NumLock key is specific for each user, and NumLock is disabled by default. If you want the NumLock key enabled for use before a user presses CTRL+ALT+DEL to log on, you must use Registry Editor to change the default behavior.
Here is a simple registry fix to disable the NumLock key at startup:
- Press Windows + R to bring up the Run box. Type regedit and press Enter to open the Windows Registry Editor.
- In the Registry Editor, open the following registry key.
HKEY_USER\.Default\Control Panel\Keyboard\ - Within the keyboard folder, you should have a string value named “InitialKeyboardIndicators” with a value of 0, 1, or 2. Change the value to 1, and you’re done. Below is the explanation of each of these values:
0 = Num Lock is turned OFF after the logon.
1 = Disable Num Lock.
2 = Numlock is turned ON after the logon.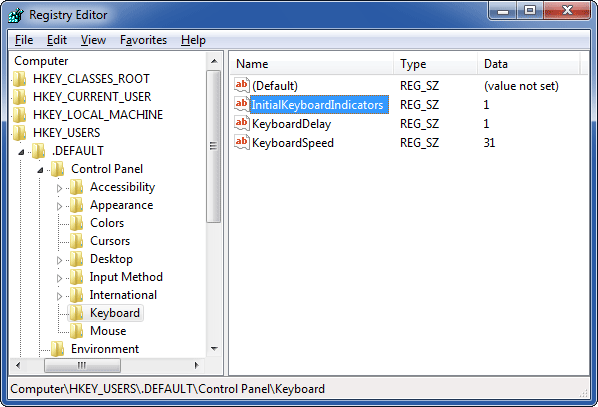
Method 3: Disable NumLock in the BIOS
In addition to the above methods, users can also change how their computer handles the NumLock when the computer first boots up through the BIOS.
- Turn on your computer, and as soon as you see the initial POST boot screen, press the designated key for entering the BIOS Setup.
- Locate the the “NumLock State,” “NumLock Key“, “Boot Up NumLock Status” or a similar option and change the value to Disabled or Off. In my example, there is a option labelled “NumLock Key” under the Boot tab, select it and press Enter to select Off.
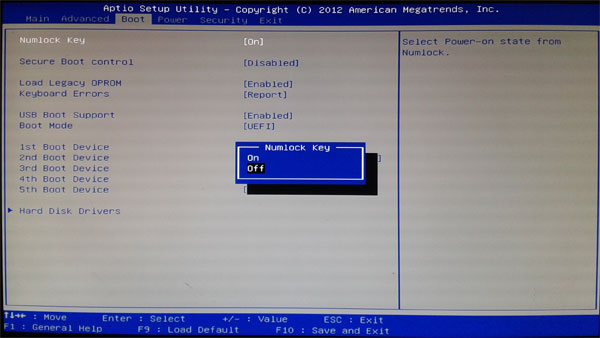
- Save your changes and exit the BIOS.