Archive for July, 2013

How to Restore Your Windows 8 Computer to Factory Settings without Logging in

July 19th, 2013 by Admin

There are many situations that we need to restore Windows 8 computer to factory settings. For example, the computer starts becoming laggy, the system doesn’t respond properly and experiences unexpected system crashes, or you need to remove your personal information in Windows 8 before selling or donating your PC.

In this tutorial we’ll show you how to restore your Windows 8 computer to factory settings without logging in. This is also useful in case you are unable to log on your computer for performing system restore, such as forgot Windows 8 password.

How to Restore Your Windows 8 Computer to Factory Settings without Logging in?

Before getting started, please make a backup of all important files on your computer. It’s also recommended to use Password Recovery Bundle to retrieve software license keys, recover passwords stored in your web browser or email client, and then backup them in a safe place. Now let’s walk you through the steps of restoring your Windows 8 computer to factory settings:

Turn on your computer and wait until it boots into the Windows 8 login screen. If the computer logs on to your user account automatically, you need to manually log off in order to bring up the login screen.

windows-8-login-screen

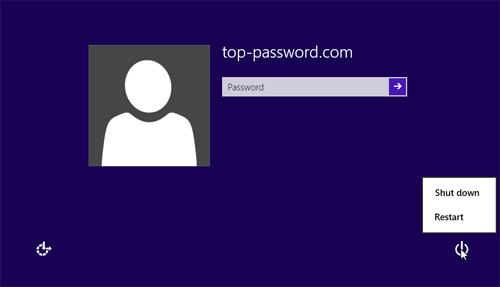
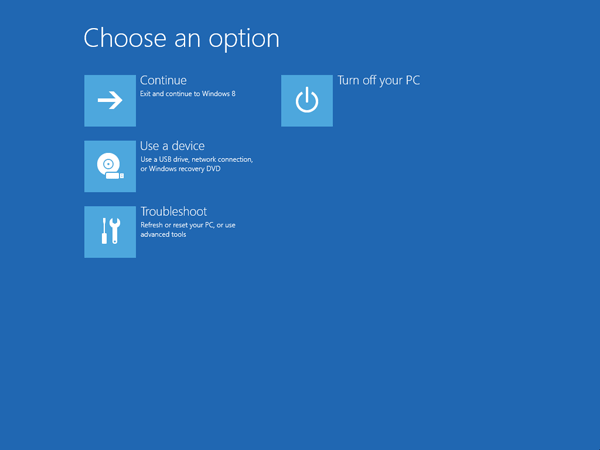
Hold down the SHIFT key and click on the Power icon visible on the bottom right of Windows 8 login screen, then click Restart option. In a moment you’ll see the recovery screen. click on the Troubleshoot option.

recovery-mode

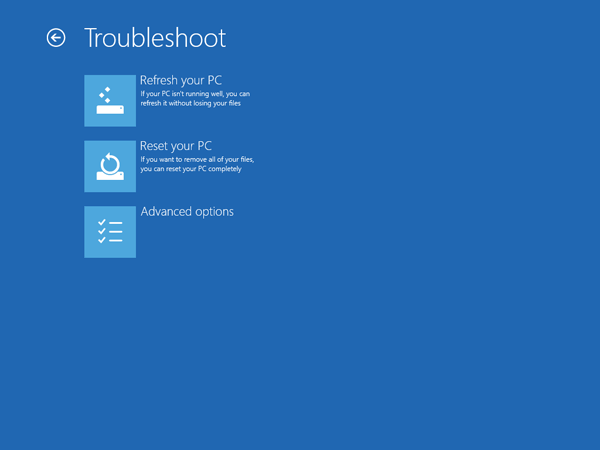
Now click on the Reset your PC option.

troubleshoot

Click Next. The system will reboot and begin preparing to reset your PC.  This will remove everything that you might have had – apps, personalization, files and all – and bringing your machine to a completely original factory state. This is more usable in scenarios where you either want to start a new re-installation, or when you’re selling your PC or laptop, for instance.

How to Boot Microsoft Surface Pro from USB Flash Drive

July 17th, 2013 by Admin

Occasionally, if you’re troubleshooting your Surface Pro tablet or resetting forgotten Windows 8 password, you’ll have to boot it from a USB flash drive. Here’s how you can boot your Microsoft Surface Pro tablet from a USB flash drive.

How to Boot Microsoft Surface Pro from USB Flash Drive?

  1. Shut down your Microsoft Surface Pro tablet.
  2. Plug in your USB flash drive.
  3. Press and hold the Volume down key on the left side of the Surface Pro and press the Power button once.
  4. If you do the combination correctly, the system will attempt to boot from the operating system which is installed on your USB flash drive.

Please note that Microsoft Surface Pro tablet runs with only UEFI native mode. It doesn’t support Legacy BIOS mode. So you can only install a 64-bit UEFI capable operating system on your USB flash drive. Additionally, UEFI can’t recognize NTFS device and you need to format your USB flash drive as FAT32, along with a GPT (GUID Partition Table) partition scheme instead of MBR partition scheme. You can make such a boot USB drive using ISO2Disc.

How to Recover Opera Mail Password Easily

July 16th, 2013 by Admin

My Gmail account is working fine with Opera Mail. But I forgot the email password as I haven’t used the web mail for a long time. How to extract the password saved in Opera mail client?

Have you lost or forgotten Opera Mail password? How to recover email account passwords from Opera mail client? With Opera Password Recovery program you can recover all types of saved passwords from Opera’s Wand password manager, including Opera mail passwords. Just a few simple steps you can retrieve lost Opera mail password immediately.

How to Recover Opera Mail Password Easily?

  1. Download and install Opera Password Recovery program.
  2. Launch the program and click on Start Recovery button.

  3. The program will automatically locate the Wand.dat (Opera’s built-in password manager) file. Decrypt and recover your Opera mail passwords, as well as passwords to web sites saved in Opera web browser.

Opera Password Recovery program supports all versions of Opera and Opera mail client. It could be useful when you forgot your Opera mail password or need to migrate email account passwords from Opera Mail to other email client.

How to Reset Windows 8 Password on HP ElitePad Tablet

July 15th, 2013 by Admin

Forgot Windows 8 password on your HP ElitePad tablet? Are you stuck at the login screen and can’t do anything to get into desktop? What can you do in such a situation? The easiest way is to restore your tablet to factory settings. But what if you have some very important files on the tablet? In this tutorial we’ll show you how to reset lost Windows 8 password on HP ElitePad tablet.

How to Reset Windows 8 Password on HP ElitePad Tablet?

Before we begin, take note you need to have a 2GB or larger USB drive (also known as USB flash/thumb drive). Once you have one, do the following:

  1. Download the zipped ISO image of PCUnlocker Enterprise (trial version) and save it on an alternate PC. After you’ve downloaded it, unzip the downloaded file which contains a bootable ISO image file: pcunlocker.iso.
  2. Insert a USB drive to the computer. Burn the ISO image file to your USB drive using ISO2Disc program. Because HP ElitePad tablet comes with 64-bit UEFI firmware, you need to check the GPT (required for UEFI boot) option.

  3. After your USB driver is burned successfully, plug it into your HP ElitePad tablet. Press and hold the volume down button and the power button simultaneously to turn on the tablet and display the Startup menu.
  4. Choose F9 Boot options and select the external USB flash drive as the boot device. Your Elitepad will start the WinPE operating system. After a while you’ll see the PCUnlocker program, which locates all your Windows 8 user accounts.
  5. Choose a user account and click on Reset Password button. The program will reset your forgotten Windows 8 password in no time. Restart the machine and remove the USB drive. You can then log into your Windows 8 ElitePad tablet without a password!

How to Reset Forgotten Password on ThinkPad Windows 8 Tablet

July 15th, 2013 by Admin

Did you lock yourself out of your ThinkPad 10 tablet? Forgot your Windows 8 or 8.1 user password? It’s clearly an issue all of us have experienced at some point in time with varying degrees of importance and frustration. In this article we’ll provide an easy way to reset forgotten password on ThinkPad Windows 8 tablet. This method works with ThinkPad 2 and ThinkPad 10 tablets.

First of all, you need to create a bootable PCUnlocker USB drive on another PC you have access to. Boot your ThinkPad tablet from the USB drive and it enables you to reset forgotten Windows 8 admin/user password easily. Here are step-by-step instructions.

Note: PCUnlocker Enterprise supports both 32-bit UEFI and 64-bit UEFI. If your tablet comes with Windows 8/8.1 32-bit preinstalled, make sure you use the 32-bit distribution of PCUnlocker Enterprise. Otherwise you need to use 64-bit distribution instead.

How to Reset Forgotten Password on ThinkPad Windows 8 Tablet?

  1. Download the zipped ISO image of PCUnlocker Enterprise program. After you’ve downloaded it, double-click the download file and your system will display all files inside the zip archive. Drag the pcunlocker.iso from there and save it on your desktop.
  2. Install ISO2Disc program and launch it. Click on Browse button to locate the ISO image you’ve downloaded, then choose the USB flash drive you’ve plugged in, select the GPT (required for UEFI boot) partition style. Click on Start Burn to create a bootable PCUnlocker USB drive.

  3. Plug the USB drive to your ThinkPad Windows 8 tablet PC. When you turn on the tablet, press the power button together with the volume up button at the same time to enter the ThinkPad Setup program.
  4. Once into the BIOS screen, select Startup. then Boot. Move your attached USB drive to the top of the bootable device list.

    thinkpad-tablet-bios

  5. Switch to the Security tab, disable the Secure Boot option. Press F10 to save your changes and then reboot.

    thinkpad-tablet-secure-boot

  6. After booting from USB drive, it will start the WinPE operating system inside the USB drive and eventually open up the PCUnlocker program. PCUnlocker automatically searches your Windows 8 installation and displays a list of Windows 8 user accounts on your ThinkPad tablet.

  7. Choose a user account and click on Reset Password button. The program will reset your forgotten Windows 8 password immediately. Restart the tablet and remove the USB drive. You can then log into your ThinkPad Windows 8 tablet without a password!

Forgot your ThinkPad Windows 8 tablet password? It’s so easy to reset it using PCUnlocker boot USB drive. No need to restore your ThinkPad tablet to factory settings.

How to Reset Lost Windows 8 Password on Acer Iconia Tablet

July 14th, 2013 by Admin

Forgot Windows 8 password of your Acer Iconia tablet? You can restore the tablet to factory settings but all stored contacts and any programs you’ve installed will be erased. Obviously, this is not what you’re looking for. In this tutorial we’ll show you how to reset lost Windows 8 password on Acer Iconia tablet without data loss. This method works with Acer Iconia W4/W3, W700, W510.

How to Reset Lost Windows 8 Password on Acer Iconia Tablet?

This method requires you to create a bootable PCUnlocker USB drive which contains Windows password resetting utility. Just boot your Acer Iconia tablet from the USB drive and you can reset lost Windows 8 password easily. Here are step-by-step instructions:

  1. Because Acer Iconia tablet uses 32-bit UEFI firmware, you need to download the Enterprise edition of PCUnlocker with 32-bit UEFI support. This can be done from any other PC (except the Acer Iconia tablet whose password you have forgotten).
  2. Unzip the downloaded file and you’ll get a bootable ISO image file: pcunlocker.iso. Simply burn it to a USB flash drive using ISO2Disc, but remember to choose the GPT partition style.

  3. Use a Micro USB to USB adapter to connect the USB flash drive to your Acer Iconia tablet. Shutdown your tablet. Hold down power button and then hold down volum up button (or press F2 key if external keyboard existed). When Acer screen appear release all buttons.
  4. When the UEFI Setup Utility appears, select the Boot tab in the left panel. Under the Boot priority order section, move USB HDD to the number one position using the provided instructions. Save your changes and exit BIOS.

    acer-iconia-uefi

  5. The computer will automatically boot into PCUnlocker program from the USB drive. By default, the program will search your Windows 8 registry files and display a list of local user accounts existing on your Acer Iconia tablet.

  6. Simply choose a user account and click on “Reset Password” button. The program will reset your lost Windows 8 password immediately.
  7. Unplug the USB drive from the tablet and restart the machine, you can then log back into Windows 8 system without a password.

Using this method you can reset lost Windows 8 password for both local user account or Microsoft account on Acer Iconia tablet. It can be a life saver in case you forgot the login password. No need to send your tablet to Acer for service.

How to Remove Lost Windows XP Administrator Password

July 14th, 2013 by Admin

I have lost the administrator password to my machine which is running Windows XP Pro. I have changed my password a few days ago but now I couldn’t remember the new password. Is there a way to reset or remove it without having to wipe and reload my computer?

If you happen to forget your Windows XP administrator password, or if someone changed it, and you think there is no chance of accessing your operating system, instead of reformatting your system and lose all your important files. Luckily there is a quick and effective way to remove lost Windows XP administrator password. As long as you have a PCUnlocker Live CD, you can boot your computer from the CD which provides you an easy way to reset Windows XP password instantly.

How to Remove Lost Windows XP Administrator Password?

  1. Download the zipped ISO image of PCUnlocker on an alternate PC you can log on to. Unzip the download file and you’ll see a bootable ISO image file: pcunlocker.iso, which need to be burned on to a CD (or USB flash drive) using ISO2Disc program.
  2. After you’ve created a PCUnlocker Live CD, connect it to your locked computer that you want to remove the lost Windows XP administrator password for. When the computer is booting, you will need to press the correct key to get into the Boot Menu. It is usually F12 or Del key. Once in the Boot Menu, select the CD/DVD-ROM Drive that you just created and press Enter.
  3. Now comes the easy part. Just sit back and wait for the computer to load the WinPE operating system which is installed on your Live CD. After about half a minute, you’ll see the PCUnlocker program which displays a list of local user accounts that are detected on your computer.
  4. Choose the administrator account and click on Reset Password button. The program will remove your lost Windows XP administrator password, and also tweak your account’s settings in case the administrator account is locked out, disabled or expired.
  5. Restart the computer and remove the Live CD. Now you can log back into your Windows XP administrator account with a blank/empty password.

PCUnlocker can be used as a safe and easy solution to remove existing Windows XP administrator password that has been forgotten, lost or simply do no have. Besides the abilities of resetting passwords, PCUnlocker can also unlock the administrator account that is locked out, disabled or expired.

How to Bypass Windows Local Administrator Password with A USB Drive

July 12th, 2013 by Admin

If you’re using a single administrator account, it’s surprisingly easy to lock yourself out of your own computer by losing your password. Luckily, its just as easy to get back in again without data loss – so long as you have a blank CD or a USB flash drive. Here’s how to bypass Windows local administrator password with a USB drive.

How to Bypass Windows Local Administrator Password with A USB Drive?

  1. Download the PCUnlocker program from http://www.top-password.com. The download file is a zipped ISO image file. Double-click the zip file and the system will display all the contents in a new window. Just drag the pcunlocker.iso file from that window to your desktop or another location you can find easily.
  2. Burn the ISO image to a USB flash drive using ISO2Disc program. The USB flash drive has to be at least 512 MB.
  3. Connect the USB flash drive to your locked computer that you want to bypass Windows local administrator password on. Turn on the computer and change the boot order in BIOS. Make sure the Removable Device is the first boot device.
  4. After booting from the USB flash drive, you’ll see the WinPE operating system start. Just about half a minute later, you’ll see the PCUnlocker program. It displays all your Windows local user accounts.
  5. Choose the local administrator account and click on “Reset Password” button. The program will quickly remove your forgotten Windows local administrator password, as well as unlocking your administrator account if it’s locked out, disabled or expired.
  6. Click on Restart. Unplug the USB flash drive from the computer. Now you can log back into your Windows local administrator account using a blank/empty password.

Forgot your Windows local administrator password? This tutorial allows you to bypass local administrator password on Windows 8, 7, Vista, XP and Windows Server 2012/2008/2003/2000. If you don’t have a USB drive or your computer doesn’t support USB booting, you can opt to burn PCUnlocker program to a blank CD and use it to bypass Windows local administrator password.

How to Unprotect A Password Protected Excel 2007 or Excel 2010 Worksheet

July 12th, 2013 by Admin

I have a large Excel worksheet that is password protected and I’ve forgotten the password. How can I unprotect the worksheet?

How to remove Excel worksheet protection when your password is lost or forgotten? If you need to modify a password protected Excel worksheet but lost the password, you’re required to unprotect the worksheet before editing it. Is there a way to remove Excel worksheet password without knowing the original password?

At this situation, the freeware Excel Password Remover comes in handy. It’s a Excel Add-In that is able to remove and unprotect the Excel workbooks and worksheets password. It can remove passwords of any length, also passwords containing special characters.

How to Unprotect A Password Protected Excel 2007 or Excel 2010 Worksheet?

  1. First of all, open your Excel worksheet with Microsoft Excel application.
  2. Download the Excel Password Remover program. After the download is complete, Unzip the download file and there are two files: password.xla and password_2007_2010.xlam. password.xla is designed to remove MS Excel 97/2000/XP/2003 passwords while password_2007_2010.xlam is for removing Excel 2007/2010 passwords.
  3. Double-click the password_2007_2010.xlam file. The Excel application will ask if you want to enable or disable Macros. After you click on Enable Macros, you will get a pop-up saying the Excel Password Remover program is loaded.
  4. Now click on the Straxx menu, you’ll see three options: Unprotect sheet, Unprotect workbook and Unprotect all. Simply click on Unprotect sheet, you’ll get a message saying your worksheet password removed in less than one minute.

    remove-excel-password

  5. Save your worksheet and exit Microsoft Excel application. Next time when you open the Excel worksheet, you are able to edit it without limitations. Done!

Updated: We’ve recently developed a professional password cracking software which lets you quickly recover Excel password with GPU acceleration technology. You can check it via this page.