Archive for June, 2014

2 Options to Reset Windows 8 Tablet to Factory Settings

June 6th, 2014 by Admin

If your Windows 8 tablet has been infected by a virus or has become slow to the point of being unusable, resetting the tablet to factory settings may be the best and quickest solution. Luckily, Windows 8 has built-in tool to reset your tablet to its original state. In this article I’ll show you 2 options to reset Windows 8 tablet to factory settings.

WARNING: All your documents, pictures, settings, accounts and any other data on your Windows 8 tablet will be deleted while performing factory reset.

Method 1: Reset from within Windows:

  1. Swipe in from the right edge of the screen, tap Settings. If you’re using a mouse, point to the upper-right corner of the screen, move the mouse pointer down, click Settings.
  2. Tap or click Change PC settings.
  3. Tap or click Update and recovery, and then tap or click Recovery.reset-windows-8
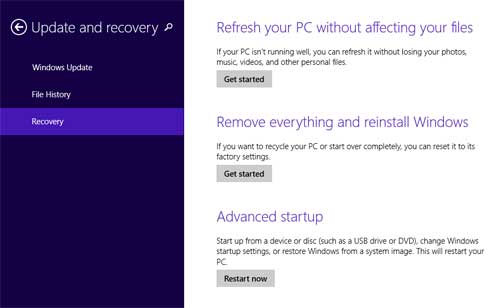
  4. Under Remove everything and reinstall Windows, tap or click Get started.

Method 2: Reset from Windows 8 Login Screen

If you’ve lost your password, you may not have to reset your tablet. See unlock Windows 8 password before performing these reset steps:

  1. From the Windows sign-in screen, tap or click the Power icon in the lower right corner of the sign-in screen.
  2. Press and hold the Shift key. (If you’re using the on-screen keyboard, tap or click the Shift key.)
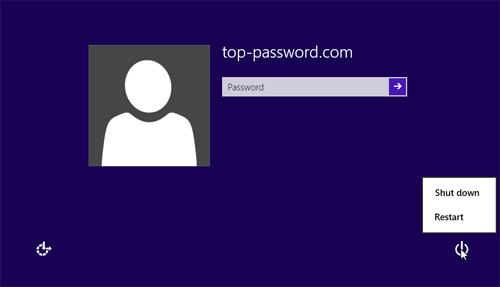
  3. While the Shift key is still pressed, tap or click Restart. After the tablet restarts, the Choose an option screen will display.
  4. Tap or click Troubleshoot.
  5. Tap or click Reset your PC.

If you don’t have a keyboard connected to Windows 8 tablet, you’ll need to use the on-screen keyboard to do these reset steps. From the Windows 8 sign-in screen, tap or click the Ease of access icon in the lower-left corner of the screen, and then tap or click On-Screen Keyboard.

How to Unlock ASUS VivoBook Windows 8 Password

June 4th, 2014 by Admin

Forgot Windows 8 password to your ASUS VivoBook? How to bypass Windows login password without resetting your laptop to factory settings? ASUS VivoBook comes with UEFI which will prevent you from booting any boot media without UEFI bootloader. In this article I’ll show you how to enable Legacy/CSM boot support in ASUS VivoBook and then unlock your forgotten Windows 8 password with a USB drive.

How to Unlock ASUS VivoBook Windows 8 Password?

First of all, you need to make a USB boot media using an alternate PC. Download the PCUnlocker program and save it to your desktop. The downloaded file is a self-extracting .zip file which contains a WinPE ISO image (pcunlocker.iso). Extract the ISO image and burn it to a USB flash drive using ISO2Disc or Rufus program.

Plug the USB boot media in your ASUS VivoBook. Power on the machine and press F2 key to enter the BIOS Setup. To enable legacy/CSM boot support, enable “Launch CSM” under the Boot tab.

asus-bios

Switch to the Security tab and set “Secure Boot Control” to Disabled. Press F10 to save your changes and exit BIOS.

asus-secure-boot

When the laptop restarts, press ESC key to launch the boot menu. When you get the boot options, choose the USB drive as we want to reset Windows 8 password offline. After a while, the PCUnlocker program will launch and it displays all your Windows 8 user accounts.

Choose a user account and click on “Reset Password” button, it will unlock / reset your forgotten password instantly. Last but not least, disconnect your USB drive and restart your computer. Enter into the BIOS setup again and disable the “Launch CSM” option which you enabled in the step above. You can then sign into Windows 8 without a password! This is how can you unlock ASUS VivoBook easily!

How to Install Windows 8 with UEFI in VMware Workstation

June 4th, 2014 by Admin

UEFI was introduced with Windows 8 as a replacement to the BIOS system. In order to benefit from the new UEFI features, here I’ll show you how to install Windows 8 with UEFI in VMware Workstation.

Requirements:

  • UEFI requires 64-bit versions of Windows operating systems, so you need to prepare a Windows 8 64-bit ISO image.
  • VMware Workstation 8, 9 or 10.

Install Windows 8 with UEFI in VMware Workstation

  1. Start VMware Workstation. Choose File > New > Virtual Machine to begin creating a new virtual machine.
  2. Follow the step-by-step wizard to configure your virtual machine.
  3. Before starting your virtual machine, open the .VMX file of your virtual machine in Notepad and add the following line to it:
    firmware="efi"

    vmware-efi-support

  4. Save the .VMX file. Now start your virtual machine and boot it from Windows 8 64-bit ISO image.
  5. Follow the on-screen instructions to install Windows 8.

After Windows 8 installation is complete, you’ll find the virtual hard drive is partitioned with GPT instead of MBR partition table. You’re also unable to boot a UEFI-based virtual machine from a 32-bit Windows 8 ISO image.