Archive for December, 2017

4 Ways to Open Indexing Options in Windows 10

December 5th, 2017 by Admin

Windows 10 uses the index to make searching your files faster. If you want to customize which file types are indexed or change what locations you want indexed, you have to access the Indexing Options. In this tutorial we’ll show you 4 ways to open Indexing Options in Windows 10.

Method 1: Open Indexing Options via Cortana Search

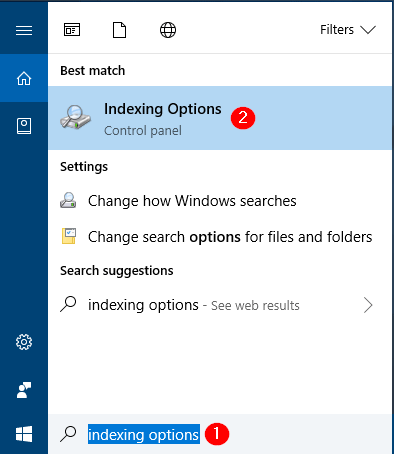
Type indexing options in the Cortana Search box on Windows 10 taskbar. When the results appear, click the Indexing Options item and you’ll see the Indexing Options dialog box.

Method 2: Open Indexing Options via Control Panel

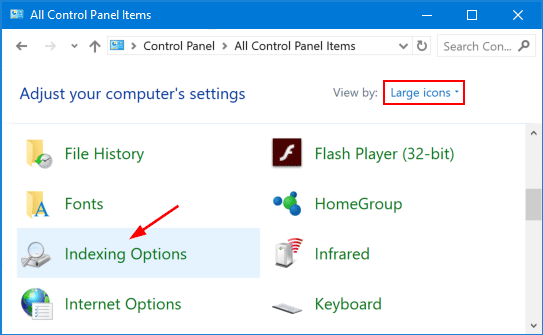
Open the Control Panel and change it to Large icons view, and then click Indexing Options to launch it.

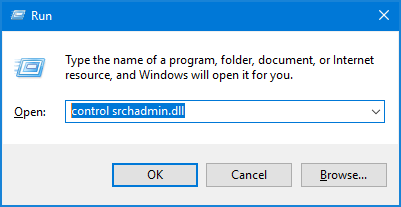
Method 3: Open Indexing Options via Run or Command Prompt

Open the Command Prompt, or press the Win + R keys to open the Run box. Type one of the following commands and press Enter.

control.exe srchadmin.dll
rundll32.exe shell32.dll,Control_RunDLL srchadmin.dll
control /name Microsoft.IndexingOptions

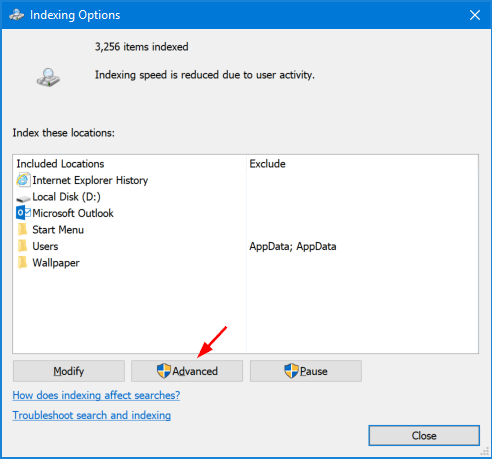
This will bring up the Indexing Options dialog box immediately.

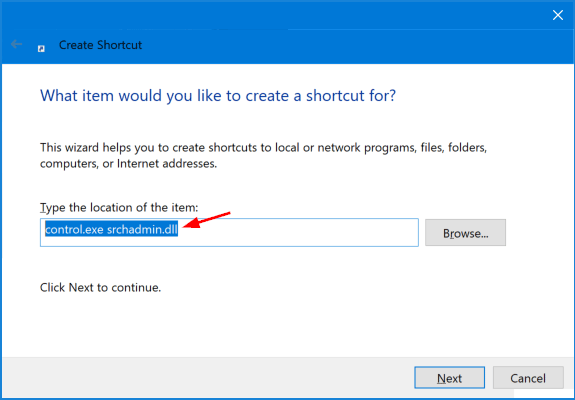
Method 4: Create Indexing Options Shortcut

If you need to change the Windows index settings frequently, you can create a desktop shortcut to open Indexing Options in Windows 10. Here’s how:

  1. Right-click any empty space on your Windows 10 desktop and then select New -> Shortcut.

  2. When the Create Shortcut wizard opens, type control.exe srchadmin.dll in the location box and click Next.

  3. On the next screen give the new shortcut a name, and click Finish.
  4. By default, the Indexing Options shortcut uses the same icon as Control Panel, and you can give it a proper icon.

The Easy Way to Install OpenSSH in Windows 10

December 4th, 2017 by Admin

Since the release of Fall Creators Update (officially version 1709), Windows 10 comes with a number of optional features including OpenSSH Client / OpenSSH Server. In this tutorial we’ll show you how to install / uninstall OpenSSH from the Settings app in Windows 10.

Part 1: Install OpenSSH as an Optional Feature in Windows 10

Press the Windows key + I shortcut to open the Settings app, and then click the Apps category.

When the Apps & features page appears, click the “Manage optional features” option in the right pane.

This will launch Manage optional features page displaying a list of various installed features. Now we want to install OpenSSH, so click the “Add a feature” button.

Browse through the list of features and look for the OpenSSH Client or OpenSSH Server feature. After selecting OpenSSH Client or OpenSSH Server, you can click the Install button.

Now, head back to the Manage optional features page and you can see the progress of installing OpenSSH.

Once OpenSSH was installed, you can use the SSH command from PowerShell or the Command Prompt

Part 2: Uninstall OpenSSH from Windows 10

If you want to uninstall OpenSSH later, just follow the above steps and head over to the Manage optional features page. Click the OpenSSH Client or OpenSSH Server feature you wish to remove, an Uninstall button will appear and you can click on it.

That’s it!

How to Enable Windows Mobility Center on Desktop PC

December 1st, 2017 by Admin

Windows Mobility Center is a Control Panel item that lets you change laptop-related settings all in one place, from volume, screen brightness, power options to Wi‐Fi and Bluetooth settings. However, Windows Mobility Center is available only on laptops/tablets, and it is disabled on desktop computers by default.

In this tutorial we’ll show you how to enable Windows Mobility Center on Windows 10 / 8 / 7 desktop computers.

How to Enable Windows Mobility Center on Desktop PC?

Open the Command Prompt as administrator. Type the following two commands and press Enter.
reg add HKEY_CURRENT_USER\Software\Microsoft\MobilePC\AdaptableSettings /v SkipBatteryCheck /t REG_DWORD /d 1 /f
reg add HKEY_CURRENT_USER\Software\Microsoft\MobilePC\MobilityCenter /v RunOnDesktop /t REG_DWORD /d 1 /f

Now, you can access the Windows Mobility Center on your desktop computer. To do this, press the Windows + R hotkey on your keyboard and type mblctr in the Run dialog box.

If you want to disable Windows Mobility Center on your desktop PC again, just open the elevated Command Prompt and run the following commands to restore your registry changes.

reg delete HKEY_CURRENT_USER\Software\Microsoft\MobilePC\AdaptableSettings /v SkipBatteryCheck /f
reg delete HKEY_CURRENT_USER\Software\Microsoft\MobilePC\MobilityCenter /v RunOnDesktop /f

That’s it!