Archive for July, 2018

How to Change Product Key for SQL Server 2017 / 2016 / 2014 Installation

July 16th, 2018 by Admin

Do you want to change SQL Server license key on production server? How to upgrade your SQL Server evaluation edition to the Standard or Enterprise edition? In this tutorial we’ll walk you through the steps to change product key for any existing SQL Server 2017 / 2016 / 2014 installation, without having to reinstall.

How to Change Product Key for SQL Server Instance?

  1. Click the Start button, and then navigate to the “SQL Server [version]” folder. Expand it and you can launch the SQL Server Installation Center.

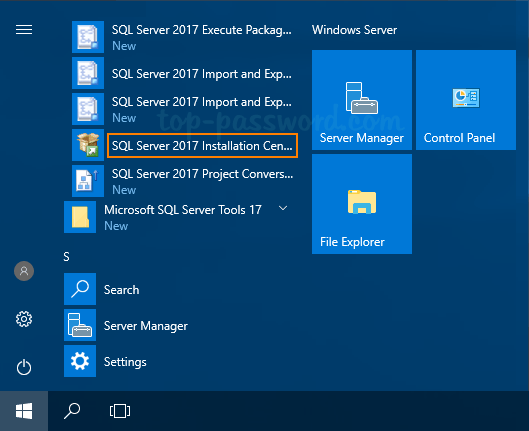
    Another way of opening SQL Server Installation Center is to run setup.exe from SQL Server installation media.

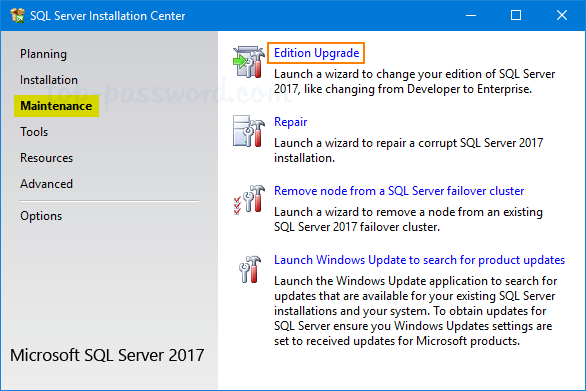
  2. Under the Maintenance tab, click on Edition Upgrade as shown below.

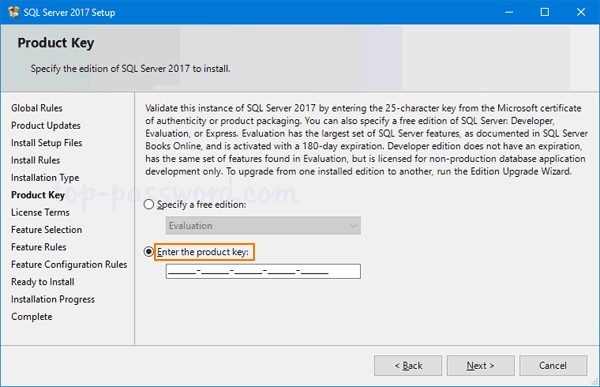
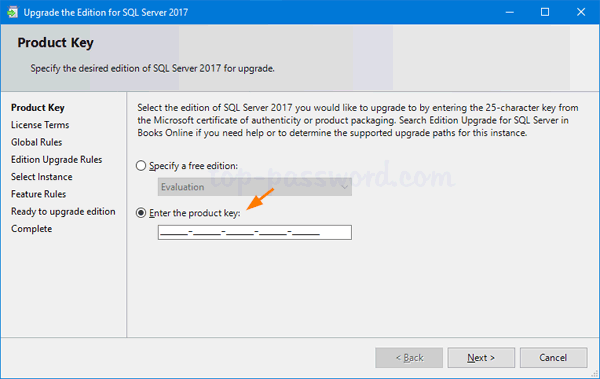
  3. Enter the new product key and click Next.

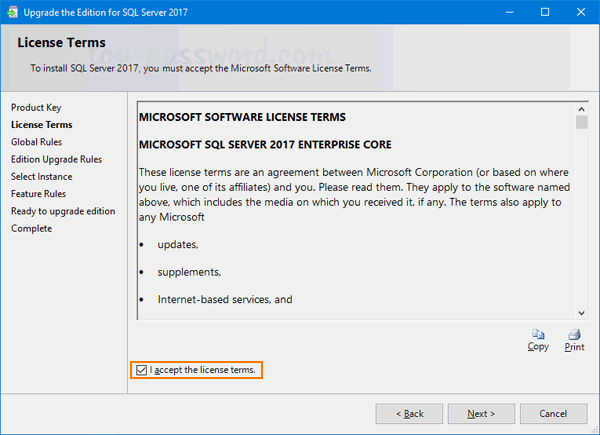
  4. Accept the license term and click Next to proceed.

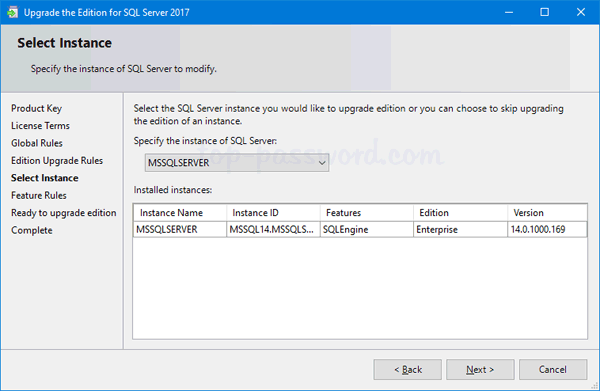
  5. Select the existing SQL Server instance for which you are going to change product key.

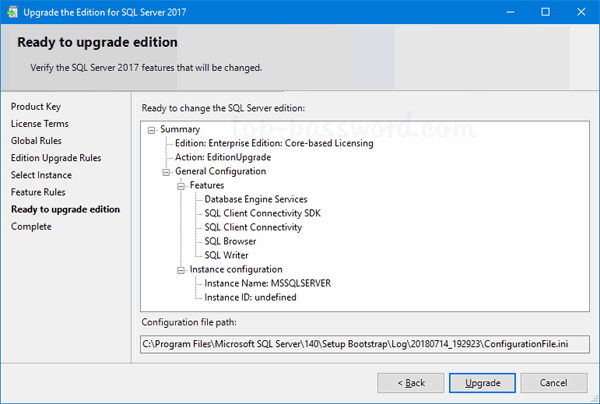
  6. After checking all rules for edition upgrade, review the summary information and click Upgrade to begin the upgrading process.

  7. The upgrade process will be done in a minute or two.

    Now you’ve successfully changed the product key for the SQL Server instance running on your machine.

3 Ways to Check Which Version or Edition of SQL Server is Running

July 15th, 2018 by Admin

In this tutorial we’ll show you 3 ways to check if a SQL Server instance is licensed and determine which version or edition of SQL Server is installed on your computer.

Method 1: Check SQL Server Version Using T-SQL

  1. Open a Command Prompt. Connect to your SQL Server instance by executing this command:
    SQLCMD -S server_name\instance_name

    Where server_name is your server name and instance_name is the SQL instance name. If you’re trying to connect to the default instance, just type SQLCMD.

  2. Next, run the following T-SQL query:
    select @@version
    go

    This will display the version and license type of your connected SQL Server instance. If you have multiple instances, use the same method to check each instance.

Method 2: Check SQL Server Version Using SQL Server Installation Center

  1. Click the Start button, then expand the SQL Server folder and launch SQL Server Installation Center.

  2. Select Tools in the left-hand navigation area of SQL Server Installation Center. On the right side, choose Installed SQL Server features discovery report.

  3. It will create a report of the installed SQL Server instances, and you can open it with your Web browser. With this report you can determine your SQL Server version and edition, service pack level and license type.

Method 3: Check SQL Server Version Using SQL Server Management Studio

  1. Open up SQL Server Management Studio and connect to your SQL Server database. Right-click the server in Object Explorer, and then click Properties.

  2. On the General page, look for the Product field, which will display the version of SQL Server that is running on your machine.

That’s it!

Find Lost Product Key from SQL Server 2017 / 2016 / 2014 Instance

July 14th, 2018 by Admin

Lost SQL Server 2016 product key from an installed instance? When you need to reinstall SQL Server or move the license to a new machine, you can use KeyFinder Plus to decrypt and locate SQL Server product key stored in the Windows registry. This tutorial will walk you through the steps to find SQL Server 2017 / 2016 / 2014 product key from an existing instance.

How to Find SQL Server Product Key from an Installed Instance?

  1. To begin with, download and install KeyFinder Plus on the server running a SQL Server instance.
  2. The program comes with a neat and pretty simple interface. Just click on the Start Recovery button and you’ll see a list of options for recovering product keys from local machine, unbotable system or network PC.

  3. Once you have chosen the first option, it will quickly find out product keys for all editions of SQL Server, Windows, Office and other softwares installed on your local computer.

    If you want to write down or print out the product keys so you can access them later, click on the Save To File button.

  4. We’d recommend saving to the desktop for easy access.

    Afterwards, you can open that file with your preferred text editor and print it out.

Finding lost SQL Server product key is as simple as that!

Forgot Linux Bash Password in Windows 10? How Can I Reset?

July 12th, 2018 by Admin

How can I reset the Bash password of Ubuntu Linux shell in Windows 10? When you install Ubuntu Bash shell on your Windows 10 PC, Windows will prompt you to create a UNIX user account. If you’ve forgotten the password, this tutorial can help you reset it easily.

How to Reset Linux Bash Shell Password in Windows 10?

  1. To get started, open a regular Command Prompt (or PowerShell). Just type cmd in Cortana search box on the taskbar, and you can then click “Command Prompt” from the result.

  2. Next, run the following command to set “root” as the default user for Linux Bash shell.
    ubuntu config --default-user root

    If you’re running Windows 10 Creators update or earlier, you can change the default Bash user to “root” by running this command:
    lxrun /setdefaultuser root

  3. The next time you open the Linux Bash shell, it will log you as root without asking a password. You can use the passwd command to set up a new password for any UNIX user account.
    passwd user_name

  4. The last step is to reset your default user back to your normal Linux account. Type this in the Command Prompt:
    ubuntu config --default-user user_name

    or execute this command:
    lxrun.exe /setdefaultuser user_name

    That’s it!

Server 2016: Your current security settings do not allow this file to be downloaded

July 10th, 2018 by Admin

When you try to download any program from trusted sources, Internet Explorer might still give you a security alert saying “Your current security settings do not allow this file to be downloaded“, even if you’re logged into Windows Server 2016 as administrator.

The problem is caused by Microsoft tightening up security since Windows Server 2008, and file downloads are disabled by default. In this tutorial we’ll show you how to fix the “Your current security settings do not allow this file to be downloaded” error in Windows Server 2016.

How to Fix “Your current security settings do not allow this file to be downloaded”?

  1. To get started, you need to access the Internet Options. After Internet Explorer is launched, click the gear icon on the top right corner, and then select “Internet options” in the drop-down menu.

  2. Go to Security tab. Select the Internet zone and click the Custom level button.

  3. In the Security Settings window, scroll down to the Downloads section and enable File download. Click OK.

  4. Click Yes to confirm you want to make the change for the Internet Zone.

  5. Restart Internet Explorer and you should be able to download programs without getting the above security alert any longer. That’s all there is to it.

2 Ways to Enable Remote Assistance in Windows 10 / 8 / 7

July 5th, 2018 by Admin

How do I enable Remote Assistance from the command line? Windows Remote Assistance allows someone else to temporarily take control of your PC over the Internet in order to fix a problem for you. This tutorial will show you how to enable Remote Assistance and allow it through firewall in Windows 10 / 8 / 7.

Method 1: Enable Remote Assistance in System Properties

  1. Right-click on the “This PC” ( or “My Computer”) icon on your desktop and then click Properties.

  2. On the left side of the System window, click Remote settings.

  3. In the “System Properties” window, go to the Remote tab and make sure the “Allow Remote Assistance connections to this computer” check box is checked. Next, click Advanced.

  4. If you clear the “Allow this computer to be controlled remotely” checkbox, the helpers can see your screen, but not take control of your PC.

  5. Click OK to save your changes.

Method 2: Enable Remote Assistance Using Registry Editor or Command Line

  1. Open the Registry Editor and browse to the following registry key:
    HKEY_LOCAL_MACHINE\SYSTEM\CurrentControlSet\Control\Remote Assistance
  2. In order to enable Remote Assistance, double-click the DWORD entry fAllowToGetHelp in the right pane, and set its value data to 1. If you want to disable Remote Assistance, just change it to 0.
  3. Next, double-click the DWORD entry fAllowFullControl and set its value to 1 if you want to allow the person offering the assistance to take full control of this PC.

  4. When you’re done, close Registry Editor.

If you want to make the same registry changes with Command Prompt, just run the following commands to enable Windows Remote Assistance:

reg add "HKLM\System\CurrentControlSet\Control\Remote Assistance" /v fAllowToGetHelp /t REG_DWORD /d 1 /f
reg add "HKLM\System\CurrentControlSet\Control\Remote Assistance" /v fAllowFullControl /t REG_DWORD /d 1 /f

Allow Remote Assistance Through Firewall

What port should I open to allow Windows Remote Assistance? Enabling Remote Assistance using the above methods will not configure Windows Firewall with the appropriate ports to allow remote connections. In order to allow Remote Assistance through Windows Firewall, type the following into an elevated Command Prompt:

netsh advfirewall firewall set rule group="remote assistance" new enable=Yes

That’s it!

How to Open Remote Assistance in Windows 10 / 8 / 7

July 4th, 2018 by Admin

Windows Remote Assistance allows someone (or helper) you trust to take over your PC and provide remote technical support. It’s something similar to TeamViewer or UltraVNC. This tutorial will show you different ways to open Remote Assistance in Windows 10 / 8 / 7.

Method 1: Open Windows Remote Assistance from Run Command

Press the Windows key and the R key at the same time to open the Run command box, type in msra and hit Enter.

This should open up Windows Remote Assistance in no time.

Method 2: Open Windows Remote Assistance via Search

Just click the Start button and directly type “remote assistance“. The search box will show up and deliver the results. Click the option “Invite someone to connect to your PC and help you, or offer to help someone” to launch Windows Remote Assistance.

Method 3: Open Windows Remote Assistance from Control Panel
Open the Control Panel. Type “remote” into the Search box in the upper right corner of the window, and then click the link labelled “Invite someone to connect to your PC and help you, or offer to help someone else“.

Method 4: Create a Desktop Shortcut to Start Windows Remote Assistance

If you need to provide remote technical support to your customers frequently, it’s a good idea to create a desktop shortcut to start Windows Remote Assistance. Follow these steps:

  1. Right-click an empty area on your desktop, and select New -> Shortcut from the context menu.

  2. Type “%windir%\system32\msra.exe” into the location box, and click Next.

  3. Give the shortcut a name, and click Finish.

A new shortcut appears on your desktop. Double-click or tap it, and it will open the Windows Remote Assistance app immediately.

Easy Ways to Install Fonts on Windows 10

July 2nd, 2018 by Admin

How do I add a custom font to Windows 10? Windows comes with lots of fonts pre-installed, but many users might get tired of them and would like to install some stylish and elegant fonts on their computers. In this tutorial we’ll show you the easiest ways to install fonts on Windows 10.

Method 1: Install Fonts from Windows 10 Store

  1. Press the Windows + I keys together to access the Settings app, then click on Personalization.

  2. Choose the Fonts tab on the left side, and then click the “Get more fonts in Microsoft Store” link on the right side.

  3. The Microsoft Store app will list all free and paid fonts available to your computer. Just select the font you like and then click the Get button.

  4. It will download the font and automatically install it on your computer. After installing, you can use the font in your Office Word, Adobe Acrobat or Photoshop applications.

Method 2: Install Third-Party Fonts You’ve Downloaded

Most fonts are distributed inside of a zip archive. After you’ve downloaded it, follow the steps below to install it on your Windows 10 system:

  1. Right-click on the .zip archive of your preferred fonts in File Explorer, and then select Extract all from the context menu.

  2. After extraction, go to the extracted folder and you should see one or more font files with the extensions .ttf or .ttc. Simply right-click on them and select Install from the context menu.

    Another way of installing fonts is to drag and drop the .ttf or .ttc files into the system directory: C:\Windows\Fonts.

  3. Now, you can view the installed font in the Control Panel.

    That’s it!

How to View the Fonts Installed in Windows 10

July 2nd, 2018 by Admin

Where are fonts stored in windows 10? In this tutorial we’ll show you 3 quick ways to view all the fonts installed on your Windows 10 computer.

Method 1: View Installed Fonts Using Control Panel

Open the Control Panel and set it to Large icons. Click on Fonts.

You should see all the fonts installed in Windows 10. If you want to check if a specific font is installed or not, just type in its name in the search box to find it.

Method 2: View Installed Fonts from File Explorer

Press the Windows + R keys simultaneously to bring up the Run box. Type fonts and hit Enter.

It will open the folder C:\Windows\Fonts in File Explorer and you can view all fonts installed on your computer.

Method 3: View Installed Fonts from Settings App

Open the Settings app and click Personalization.

Select the Fonts tab in the left side, you’ll see a list of all the fonts installed on your PC.

Just choose a specific font and you can preview or delete it if you like.