Archive for the ‘Windows Vista’ category

PCUnlocker – Best Alternative to Password Reset Disk

June 16th, 2017 by Admin

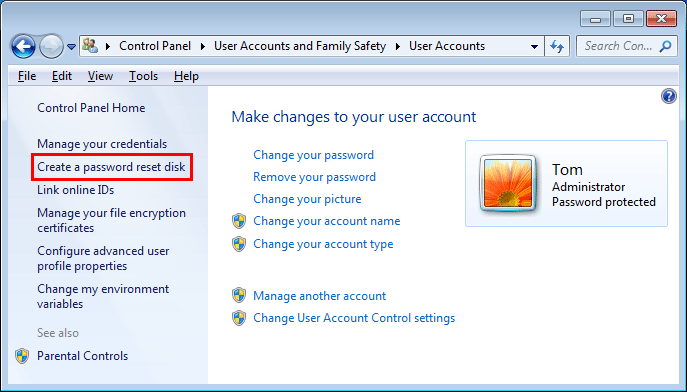
Password reset disk is a special disk that could be used to reset your Windows password if you forget it. Just go to Control Panel > User Accounts and Family Safety > User Accounts, you can click the “Create a password reset disk” link on the left pane to create such a disk.

create-password-reset-disk

A password reset disk contains a single file named userkey.psw, which is an encrypted backup version of your password. You can only make a password reset disk while you still know your password. The process of creating a password reset disk is just like writing down your password on a piece of paper. So, if you’ve already forgotten your password, it’s too late to create a password reset disk. Still have questions about password reset disk? Please check out this article: FAQs for Password Reset Disk in Windows.

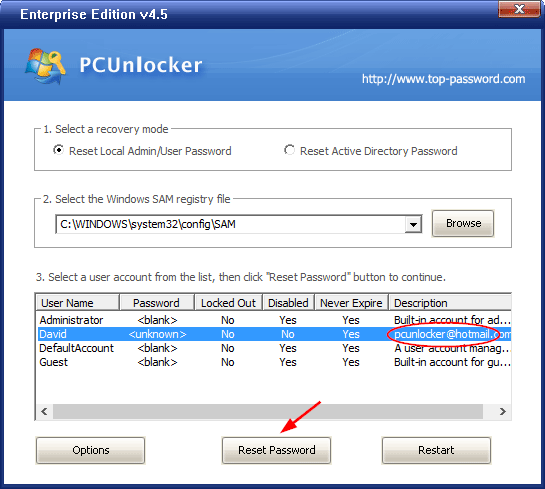
What to do if you forget Windows password but you don’t have a password reset disk? This happens so many times because we only aware that a password reset disk must be created before we forget the password. Fortunately, there are several good alternatives to password reset disk. PCUnlocker is the best alternative that could hep you reset forgotten Windows 10 / 8 / 7 / Vista / XP password instantly.

When you’re locked out of your own computer, just use an alternative PC to download PCUnlocker and create a bootable CD/USB drive. Next, boot your locked PC from CD/USB and it allows you to bypass & reset lost admin password easily.

Restore Missing “Extract All” Option to ZIP Right-Click Menu

January 17th, 2017 by Admin

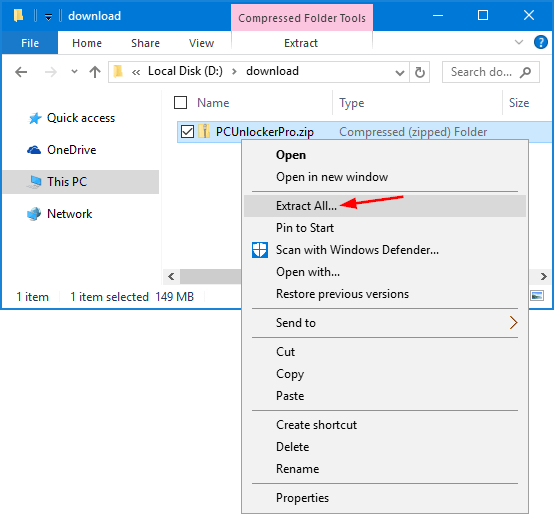
Windows has built-in native support for ZIP files. When you right-click on a .zip file in Windows Explorer, the “Extract All” option from context menu allows you to extract all contents of the zip file to a folder of your choice.

If the “Extract All” option is missing or overridden by third-party zip/unzip software, you can restore it with a registry hack in Windows 10 / 8 / 7 / Vista.

How to Restore Missing “Extract All” Option to ZIP Right-Click Menu?

This registry hack requires you to log into Windows as administrator. Follow these steps:

  1. Download this REG file (add_extract_all_context_menu.reg) and save it to a folder where you can find easily. Tips: the .reg file is actually a text file and you can view the content using NotePad.
  2. After the download is complete, double-click on the .REG file. Click Run if prompted by Security Warning.
  3. Registry Editor will confirm if you want to import the registry settings in your .reg file, click Yes.

    add-extract-all-context-menu

  4. Once it’s done, right-click on a .zip file and the “Extract All” option will show up in the Explorer’s right-click context menu.

If you want to remove the “Extract All” option from Explorer’s right-click menu, you can run this .reg file (remove_extract_all_context_menu.reg) instead. That’s all there is to it.

How to Show Previous Logon Activity on Windows Welcome Screen

January 5th, 2017 by Admin

How to view users logon activity in Windows? Do you need to know the time of the last login? In this tutorial we’ll show you how to deploy a GPO in Windows to display information about previous logons during user logon. This feature works on all computers running Windows 10/8/7, Windows Server2008 or later.

Method 1: Show Previous Logon Information with Group Policy Editor

  1. Press the Windows key + R to open the Run command box. Type gpedit.msc and press Enter.

    gpedit

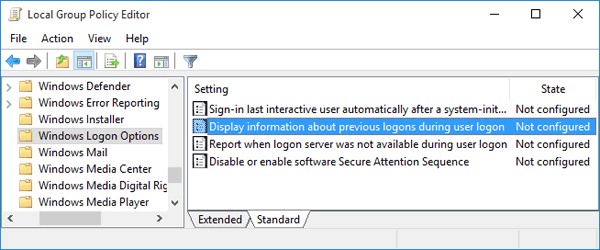
  2. In the Local Group Policy Editor, drill down to Computer Configuration > Administrative Templates > Windows Components > Windows Logon Options.

    windows-logon-options

    On the right panel, find the “Display information about previous logons during user logon” policy and double-click it.

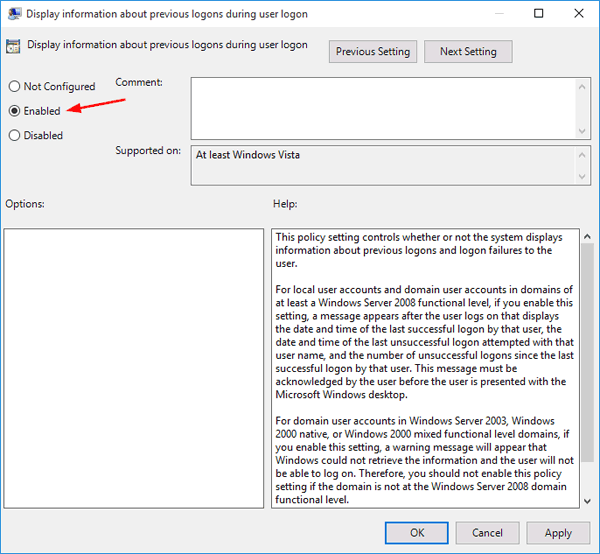
  3. Select the Enabled option. Click OK and restart your computer.
    display-previous-logon-in-windows

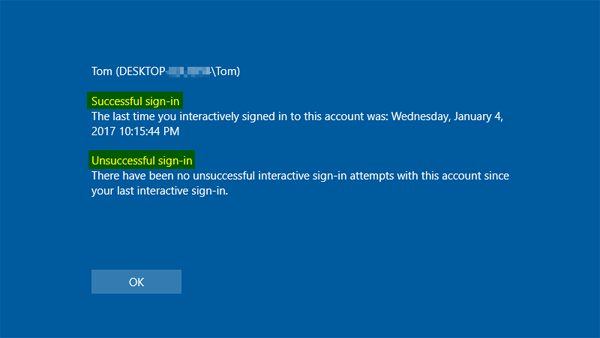
  4. The next time you log into Windows, after entering your password, you will see the following screen that shows you the time of last successful logon and unsuccessful logon attempts. Click OK and it takes you to the desktop.

    windows-previous-login-activity

Method 2: Show Previous Logon Information with Registry Hack

If you have a Windows Home edition, you need to use the following registry hack to enable the “Display information about previous logons during user logon” policy on your computer.

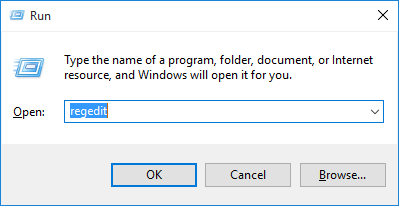
  1. Press the Windows key + R to open the Run box. Type regedit and press Enter.

    regedit-via-run

  2. When the Registry Editor opens, navigate to the following key:
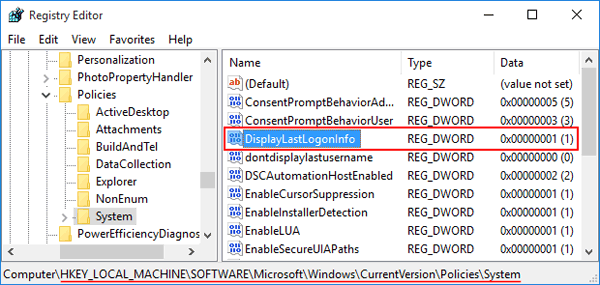
    HKEY_LOCAL_MACHINE\SOFTWARE\Microsoft\Windows\CurrentVersion\Policies\System
  3. Look for the REG_DWORD value DisplayLastLogonInfo in the right panel. If it doesn’t exist, right-click the empty space and choose New > DWORD (32-bit) Value. Name the new value DisplayLastLogonInfo.
  4. Double-click DisplayLastLogonInfo and then change the value from 0 to 1. Click OK. (If you don’t want Windows to show previous logon information after sign-in, just change the DisplayLastLogonInfo value back to 0)

    DisplayLastLogonInfo

  5. Close Registry Editor and restart your computer. The next time you log into your Windows account it will display last interactive logon information on the welcome screen.

Fix: “User must change password at next logon” option greyed out in Windows

December 29th, 2016 by Admin

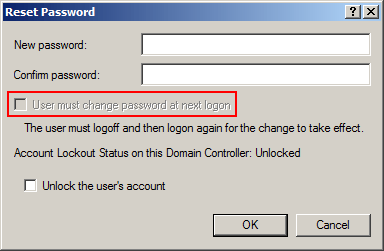
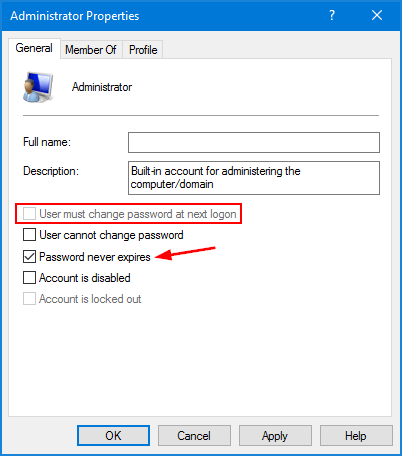
When you try to change or reset the password of a user account, you might find the checkbox “User must change password at next logon” is greyed out, so you can’t choose this option.

user-must-change-password-next-logon

In this tutorial we’ll show you how to enable the “User must change password at next logon” option that is greyed out for Windows local or domain user account.

For Windows Local Accounts:

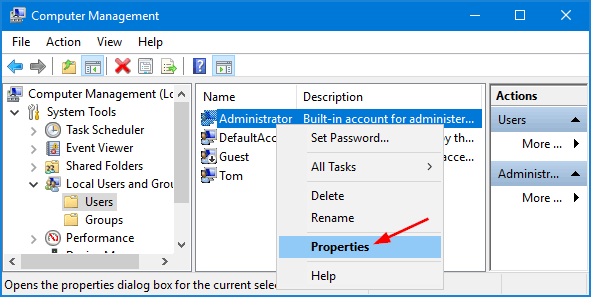
Open the Computer Management. Expand System Tools, then Local Users and Groups, then Users. Right-click on your local account and select Properties from the context menu.

local-account-properties

This will open the Properties dialog box. Uncheck the “Password never expires” box and you’ll then find the “User must change password at next logon” option is enabled. Click Apply and then OK.

windows-password-never-expires

For Active Directory User Accounts:

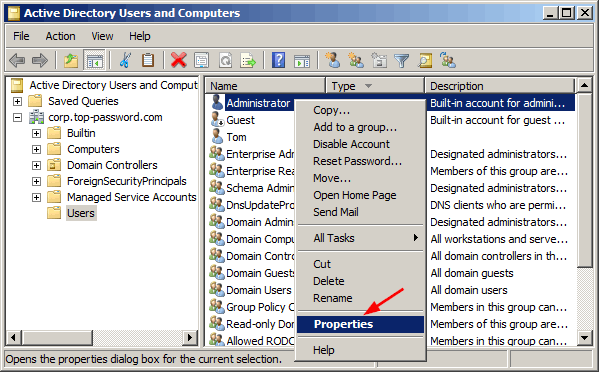
In Windows Server with Active Directory installed, open the Active Directory Users and Computers MMC snap-in (start->run->dsa.msc). Right-click on your domain user and select Properties.

domain-account-properties

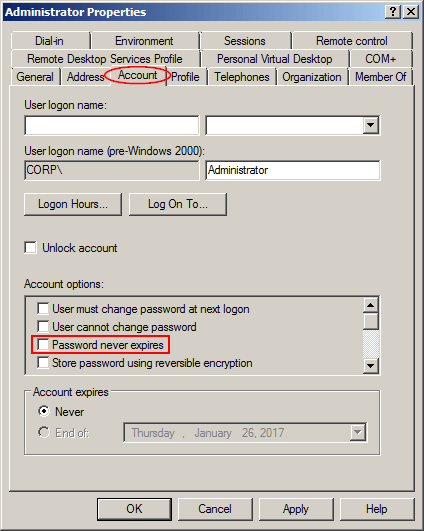
Click the Account tab. Under the Account options section, uncheck the “Password never expires” checkbox and click OK.

domain-password-never-expires

Now you should be able to reset the password and force the domain user to change it at next login.

SysKey: Lock & Unlock Windows PC with USB Drive

December 6th, 2016 by Admin

Is it possible to set up a USB Drive to log into Windows without installing any software on the PC? SysKey is a built-in Windows utility that allows you to set up a Startup Key/Password to protect the SAM (Security Accounts Management) database. You can store the Startup Key to USB drive. Whenever the computer boots up, you will have to insert the USB drive to login.

In this tutorial we’ll walk you through how to enable SysKey in Windows 10/8/7/Vista/XP, and use a USB drive as a key to lock & unlock your computer.

How to Lock & Unlock Windows PC Using SysKey?

Syskey (also known as SAM Lock Tool) was introduced since Windows NT. It’s so old that it only stores the Startup Key on the A: drive. So you need to assign the drive letter A: to your USB flash drive before following the steps below.

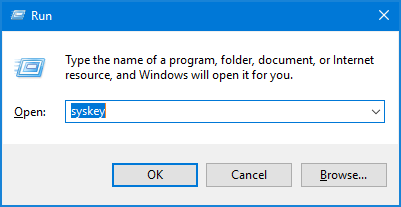
  1. Press the Windows key + R to open the Run box. Type syskey and press Enter.

    syskey

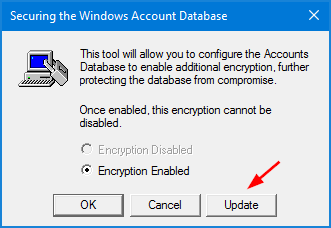
  2. Click the Update button.

    secure-windows-account-database

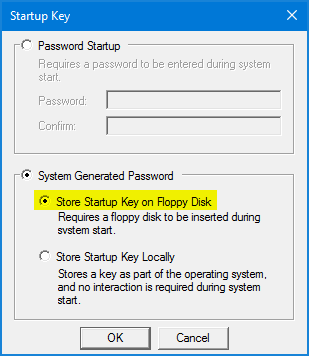
  3. Choose the System Generated Password option, and then select Store Startup Key on Floppy Disk and click OK.

    startup-key

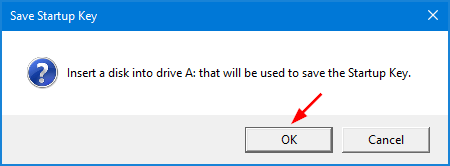
  4. You will be asked to insert a disk into drive A: to save the Startup Key. Make sure you change the drive letter of your USB drive to A: and click OK.

    save-startup-key-to-disk

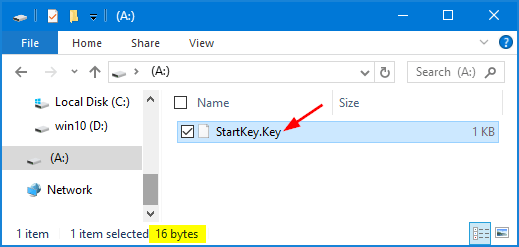
  5. After Windows writes the Startup Key into your USB drive, you’ll receive the message that the disk is now required to start up the system. Open your USB drive and you can see a single file named StartKey.Key, which is 16 bytes big.

    syskey-file

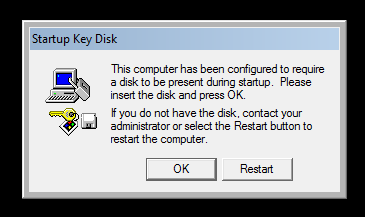
  6. Every time you computer boots up, you’ll be presented with the Startup Key Disk dialog which requires you to insert your USB drive. Without the USB drive, you’re unable to get past to access Windows login screen.

    startup-key-disk

Fix: Right-Click Context Menu Not Showing / Responding in Windows

November 16th, 2016 by Admin

Mouse right-click not working on your desktop or Windows Explorer? Whenever you try to right-click anything on the desktop or in Windows Explorer / Start Menu, you might see no response at all and the context menu won’t open. In this tutorial we’ll show you several methods to fix the problem of right-click context menu not showing / responding in Windows 10, 8 and 7.

Method 1: Enable Windows Explorer’s Context Menu Using Group Policy

There is a chance that your Windows Explorer’s context menu is disabled by group policy setting. Here’s how to tweak it:

  1. Press the Windows key + R to open the Run box. Type gpedit.msc and press Enter.

    gpedit

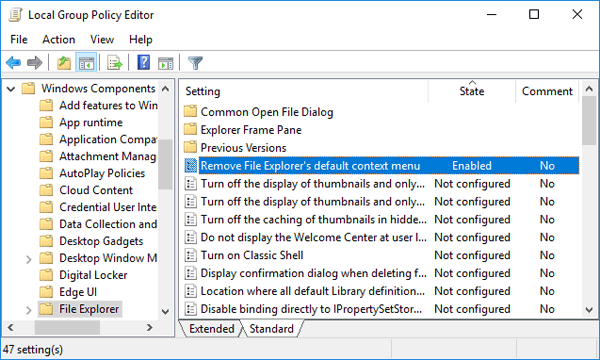
  2. In the Local Group Policy Editor window, navigate to: User Configuration -> Administrative Templates -> Windows Components, and then click on File Explorer (or Windows Explorer).
  3. On the right side of the window, scroll down until you see the setting “Remove Windows Explorer’s Default Context Menu“. Double-click on it to modify.

    explorer-context-menu-policy

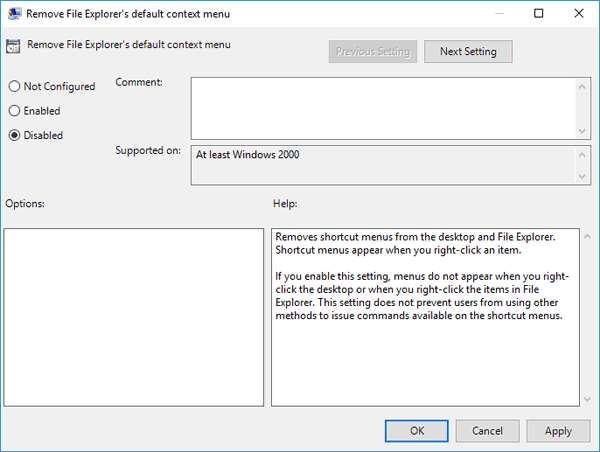
  4. Select either Not Configured or Disabled, and click OK. Reboot your computer and see if the right-click context menu now works.

    enable-explorer-context-menu

If you have no access to Local Group Policy Editor, please use this registry hack instead to enable Windows Explorer’s context menu:

  1. Press the Windows key + R to open the Run box. Type regedit and press Enter.

    regedit-via-run

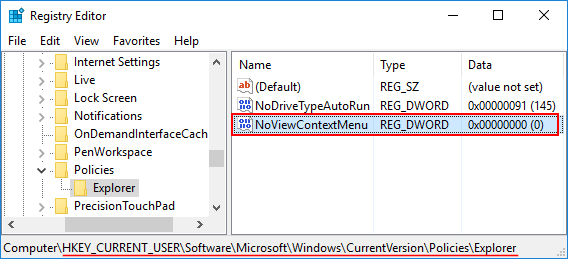
  2. In the left pane of Registry Editor, browse down to the following key:
    HKEY_CURRENT_USER\Software\Microsoft\Windows\CurrentVersion\Policies\Explorer
  3. Double-click the 32-bit DWORD value NoViewContextMenu on the right hand side, and set it to 0. (it will disable Windows Explorer’s context menu if you set NoViewContextMenu to 1)

    remove-explorer-context-menu

Method 2: Remove Third-Party Shell Extensions from Context Menu

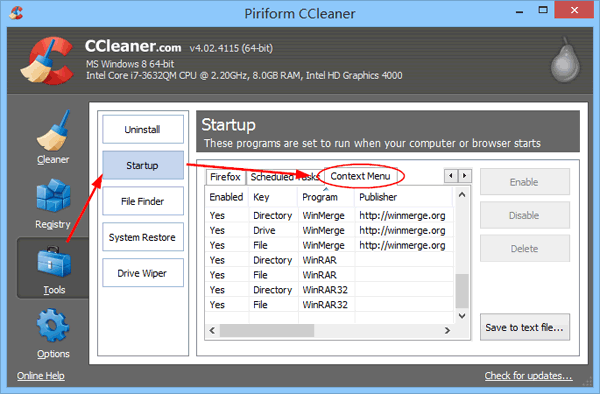
The right-click menu not showing issue might be caused by Shell Extensions. To fix it, try to disable all third-party shell extensions from the right-click context menu. This can be done using the software CCleaner.

ccleaner

Head over to the Piriform website and download the free version of CCleaner. After running CCleaner, click the Tools section in the left hand side. On the right hand side, click Startup and then click Context Menu. From there you can disable or delete any third-party shell extensions.

Method 3: System Restore

If you still couldn’t get the right-click context menu to work, restoring your system back to a previous working condition will be your good choice. To learn how to perform a system restore, please check out this article: Recover Unbootable Windows 10 or 8 with Restore Point.

How to Disable Any Shortcut Keys in Windows 10 / 8 /7

October 31st, 2016 by Admin

Is there a way to disable certain keyboard shortcuts in Windows? Sometimes or even frequently you might press a hotkey accidentally that can disrupt your productivity. In this tutorial we’ll show you how to use the freeware AutoHotkey to disable any certain global hotkeys (keyboard shortcuts) in Windows 10 / 8 / 7.

How to Disable Any Shortcut Keys in Windows 10 / 8 /7?

In this example, we’ll demonstrate how to disable the [Windows] + [+] hotkey in Windows 10. Just make a few changes with the AutoHotkey script and you can disable other keyboard shortcuts as well.

  1. AutoHotkey is a free, open-source automation and scripting tool for Windows platform. Go to AutoHotkey’s website and download the installer.
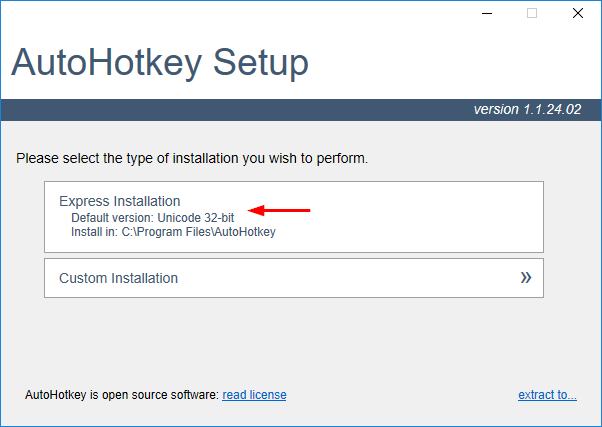
  2. After the download is complete, double-click the installer. When you’re asked to choose the installation type, select Express Installation.

    autohotkey-install-type

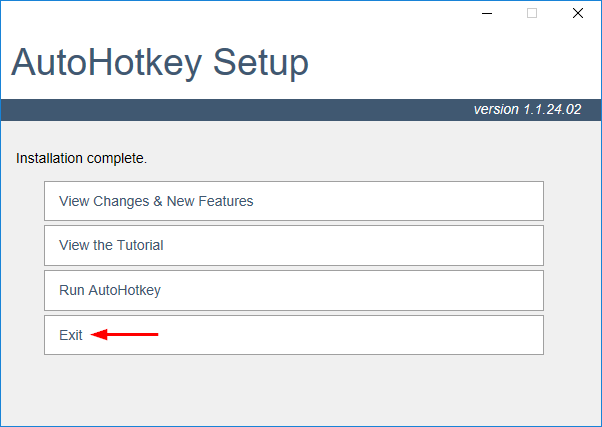
  3. When the installation is complete, click Exit. Now it’s time to create your first script.

    complete-install-autohotkey

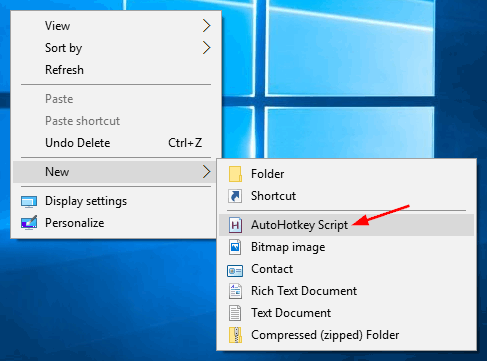
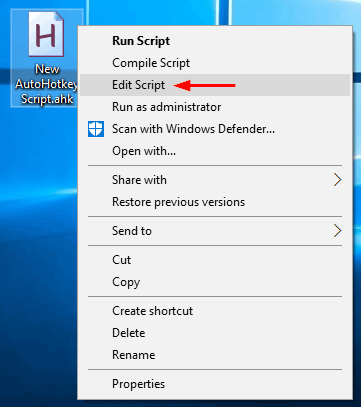
  4. Right-click any empty space on your desktop (or any directory), and then select New -> AutoHotkey Script from the context menu.

    new-autohotkey-script

  5. Name the script file whatever you like, then open it up with your favorite text editor or NotePad.

    edit-autohotkey-script

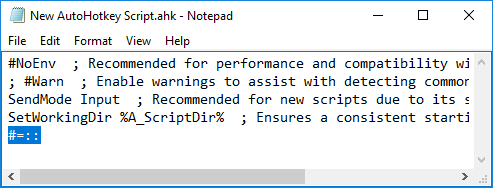
  6. Place your cursor at the end of the last sentence and press Enter. Copy and paste the following line which tells AutoHotkey to disable the [Windows] + [=] / [+] shortcut key.
    #=::Return

    disable-windows-plus-hotkey

    In this case, the # symbol represents the Windows key. Here’s an example script to disable Alt + Tab, Windows + Tab, Left/Right Windows key:

    ; Disable Alt+Tab
    !Tab::Return

    ; Disable Windows Key + Tab
    #Tab::Return

    ; Disable Left Windows Key
    LWin::Return

    ; Disable Right Windows Key
    RWin::Return

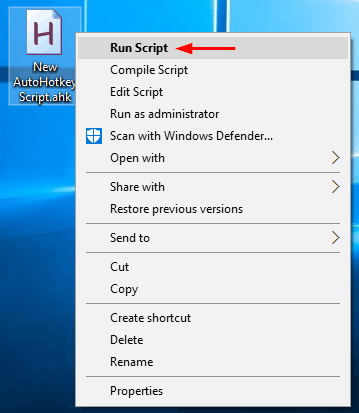
  7. Save the script file. Right-click on it and select Run Script. Now press the [Windows] + [+] keyboard shortcut and you’ll find nothing happen. This way allows you to temporarily disable your desire shortcut keys by running the script manually.

    run-autohotkey-script

If you want to permanently disable the shortcut key, you can create a scheduled task to run your AutoHotkey script when your PC starts up.

How to Export and Copy Local Group Policy Settings to Another PC

October 14th, 2016 by Admin

“I am editing local group policies here and would prefer not to edit each machine manually. How do I export the policy, and then import it to other machines? Please help!”

LGPO.exe (Local Group Policy Object Utility) is a small command-line utility released by Microsoft, which allows you to export and import local group policy easily. It’s really convenient if you want to make a backup of local group policy, or import it later on another computer.

This tutorial shows you how to use Microsoft’s command line tool LGPO to export / backup local group policy settings, and import them into another computer.

Download LGPO from Microsoft

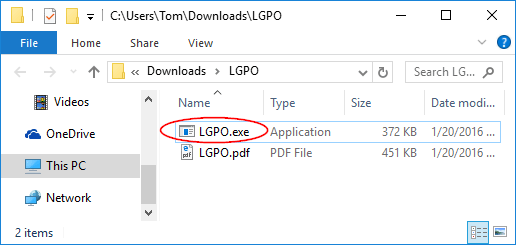
Download the LGPO zip archive from Microsoft’s website. Unpack it locally and copy the resulting LGPO.exe file to C:\Windows\System32. Afterwards you can open an elevated Command Prompt for running the LGPO command to automate the management of local group policy.

LGPO

Export Local Group Policy Settings

To create a backup for local policy policy settings on your local PC, run this command at Command Prompt:
LGPO.exe /b backup_path

backup-local-group-policy-via-cmd

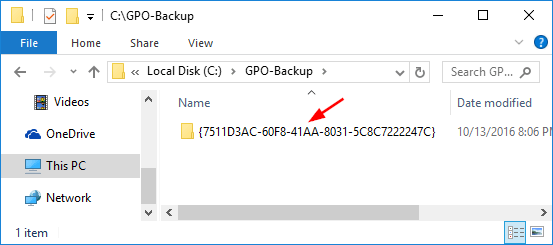
A new folder with GPO GUID appears in the target directory. It will contain all local policy settings for this computer. You can restore this backup to your local machine at any time you need it, or import it later into another computer.

group-policy-backup

Import GPO into Another PC

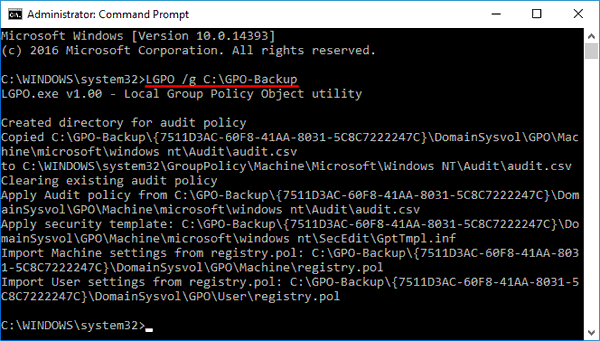
To restore Local Group Policy settings from the backup, import them by running the following command:
LGPO.exe /g backup_path

import-group-policy-via-cmd

Once imported, restart your computer for the local group policy settings to take effect.

Conclusion

This method can help you easily deploy local group policy settings to other computers. As we all know, the Local Group Policy Editor is not present in Windows Home edition so you’re unable to edit the group policy locally. The LGPO utility makes it possible to copy the group policy settings from Windows Pro/Enterprise to Windows Home.

How to Stop Check Disk (Chkdsk) From Running at Startup

September 18th, 2016 by Admin

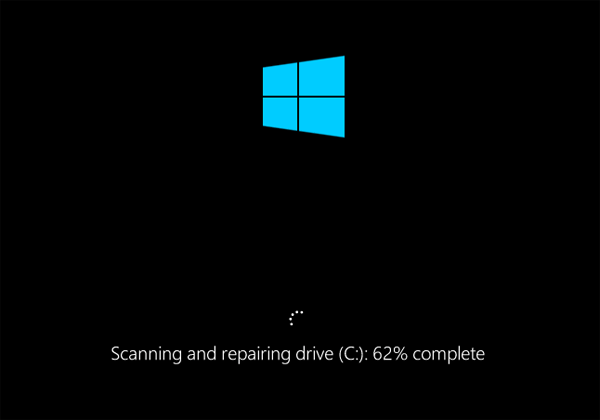
There are some situations where your PC needs to run a check disk at startup or reboot. For instance, if you run the chkdsk command on a system drive that is being used to run the Windows OS, it will schedule a disk check to run at the next reboot. Windows might also force an automatic disk check when your computer shuts down unexpectedly.

disk-checking-at-boot

Checking disk could be a really time-consuming task. If you don’t want Windows to take its time during the next reboot, here is how you can cancel or stop check disk (chkdsk) from running at Startup in Windows 10, 8, 7, Vista and XP.

Part 1: Check if a Manual/Automatic Disk Check is Scheduled

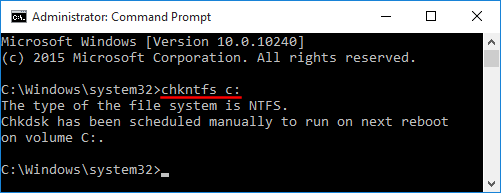
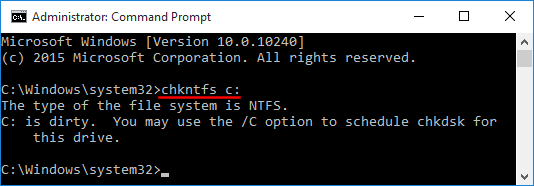
Open a Command Prompt as an administrator in Windows. Type in the following command and press Enter.
chkntfs C:

If there is a chkdsk task scheduled you will receive a response that is similar to “chkdsk has been scheduled manually to run on next reboot.

disk-check-schedule

If a dirty flag is set on your drive, the system will force an automatic disk check at the next reboot.

disk-dirty

Part 2: Stop Check Disk from Running at Startup

The methods of stopping check disk varies depend on how it is scheduled.

Option 1: Cancel the Automatic Disk Check

When the computer boots up with the dirty bit enabled on a drive, you will be asked to check the disk for consistency before Windows is loaded. But sometimes Windows might keep running check disk automatically on every reboot and this could be quite annoying. To stop the automatic disk check, you have to clear the dirty bit by following this tutorial: How to Manually Clear or Set Dirty Bit on Windows Volume

Option 2: Cancel the Scheduled Disk Check

It’s much easier to stop the scheduled disk check. You can cancel the scheduled disk check using either Command Prompt or Registry Editor.

Method 1: Using Command Prompt

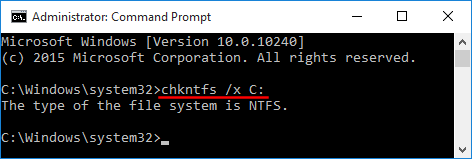
Open a Command Prompt as an administrator. If you want to disable a scheduled disk check on C: drive, type the following command and press Enter.
chkntfs /x C:

cancel-scheduled-diskcheck

Method 2: Using Registry Editor

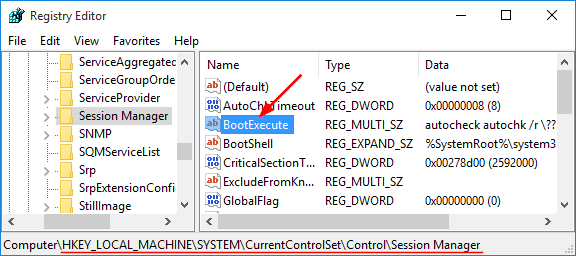
Open the Registry Editor. Navigate to the following keys:
HKEY_LOCAL_MACHINE\SYSTEM\CurrentControlSet\Control\Session Manager

Double-click on the Multi-String value “BootExecute” in the right pane.

boot-execute

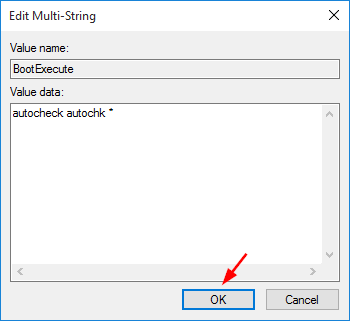
This will open the “Edit Multi-String” window. Click in the Value data box, and then delete all of the lines, except the last one.

cancel-disk-checking

When it’s done, click OK and close Registry Editor.