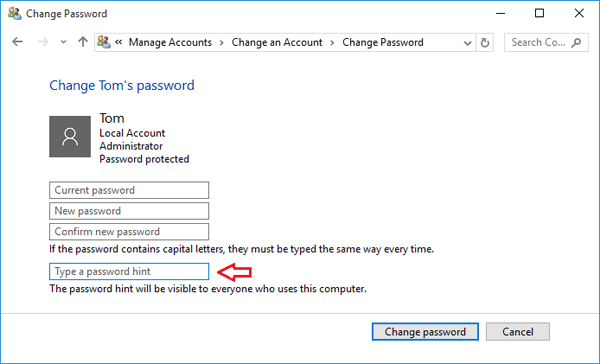
Unable to change Windows password and keep getting the error “The password you typed does not meet the password policy requirements“? How to make the system lock your account when a hacker tries to guess your password continuously? In this guide we’ll show you how to change the account lockout and password complexity requirement policy from Command Prompt, Local Security Policy Editor, or by exporting / importing your policy. These methods work on Windows 10, 8, 7, Vista and XP.
- Part 1: Local Security Policy
- Part 2: Change Password Complexity Requirement Policy
- Part 3: Change Account Lockout Policy
- Part 4: Change Local Security Policy by Exporting and Importing
Local Security Policy
Local Security Policy allows enforcing many system-wide, user and security-related settings, such as password policy, account lockout policy, audit policy and user rights.
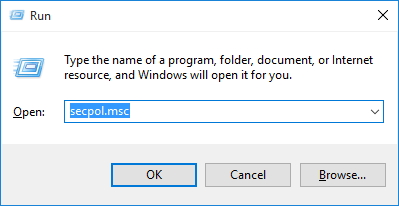
When you want change a security setting this is how you launch the Local Security Policy Editor:
- Press the Windows key + R to bring up the Run box.
- Type secpol.msc and hit Enter.
When the Local Security Policy Editor opens, you can navigate to the security policy you’re interested.
Note that the Local Security Policy Editor is not available on the Home edition of Windows. So if you’re running Windows 10/8/7/Vista/XP Home, you have to change the local security policy from Command Prompt.
Change Password Complexity Requirement Policy
In the left pane of Local Security Policy Editor, expand Account Policies and then click Password Policy. In the right pane you see a list of password policy settings. Double-click on the policy you want to modify, it will open the Properties box and you can change the setting to desired value.
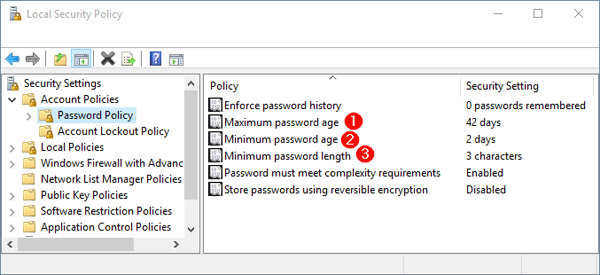
- Maximum password age
Set the maximum number of days that a password is valid. After this number of days, the password is expired and Windows will force you to change the password at the next logon. You can set the Maximum password age between 1 and 999, or set it to 0 so your password will never expire. - Minimum password age
This security setting determines the period of time (in days) that a password must be used before the user can change it. You can set a value between 1 and 998 days, or set it to 0 for allowing to change password anytime. This policy allows you to limit how frequently a user may change the password.
Note: The Minimum password age must be less than the Maximum password age, unless the Maximum password age is set to 0. - Minimum password length
Specify the least number of characters a password can have. You can set a value of between 1 and 14 characters, or set to 0 if you allow blank password. This policy can reject a user to set a short password that does not meet a minimum password length. For security reasons you’ll generally want passwords of at least six characters because long passwords are usually harder to crack than short ones. - Password must meet complexity requirements
If this policy is enabled, passwords must meet the following minimum requirements:- Be at least six characters long
- Contain a combination of at least three of the following characters: uppercase letters, lowercase letters, numbers, symbols (punctuation marks)
- Don’t contain the user’s user name or screen name
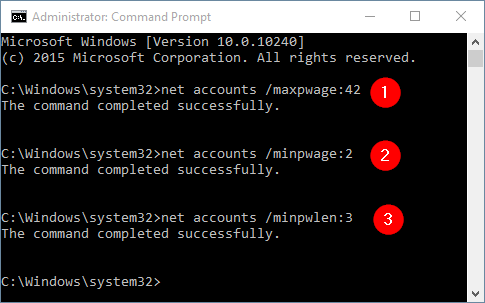
You can also change the password policy from an elevated Command Prompt. This is especially useful if you’re running Windows Home edition.
For example, if you want to change Maximum password age to 42 days, type the command:
net accounts /maxpwage:42
Set Minimum password age to 2 days, type:
net accounts /minpwage:2
Set Minimum password length to 3 characters, type:
net accounts /minpwlen:3
Change Account Lockout Policy
In the left pane of Local Security Policy Editor, expand Account Policies and then click Account Lockout Policy. In the right pane you see three policy settings. Double-click on the policy and you can change the setting to desired value.
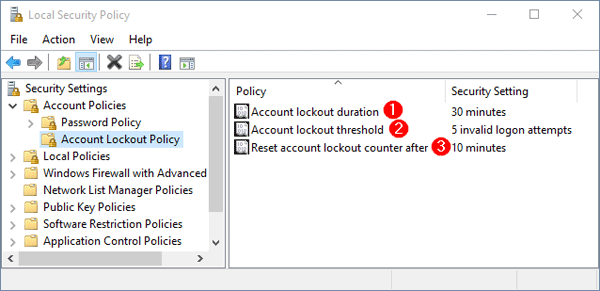
- Account lockout duration
Specify the number of minutes that a locked account remains inaccessible before it automatically becomes unlocked. You can set the account lockout duration between 1 and 99,999 minutes. If you set it to 0, then a locked out account will remain locked until an administrator manually unlocks that account. This policy has to set along with Account lockout threshold policy. - Account lockout threshold
Set the number of invalid logon attempts that are allowed before an account becomes locked out. The lockout threshold can be set to any value from 0 to 999. If the lockout threshold is set to zero, accounts will never be locked out due to invalid logon attempts. - Reset account lockout counter after
Specify the time (in minutes) that must elapse after a failed logon attempt before logon attempt counter is reset to 0. The available range is 1 minute to 99,999 minutes.Note: The Account lockout duration must be greater than or equal to the Reset account lockout counter after time.
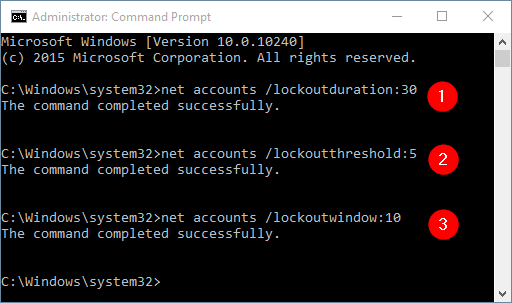
Here is how you can change the account lockout policy from an elevated Command Prompt.
For example, if you want to set Account lockout duration to 30 minutes, type:
net accounts /lockoutduration:30
Set Account lockout threshold to 5 bad logon attempts, type:
net accounts /lockoutthreshold:5
Set Reset account lockout counter after to 10 minutes, type:
net accounts /lockoutwindow:10
Change Local Security Policy by Exporting and Importing
How to copy local group policy objects from one machine to another? Is it possible to disable the “Password must meet complexity requirements” policy using Command Prompt? All these can be achieved by exporting & importing the local security policy. Here’s how:
- Open an elevated Command Prompt.
- Type the following command and press Enter. This will export all the settings of local security policy to a text file.
secedit.exe /export /cfg C:\secconfig.cfg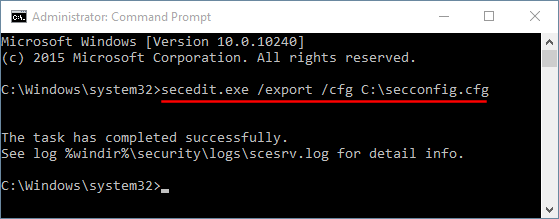
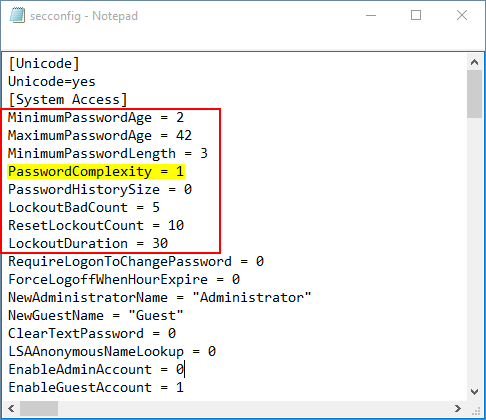
- Open the C:\secconfig.cfg file with NotePad and you can view and modify the policy for your own purpose. For example, if you want to disable the password complexity requirements policy, just set the value PasswordComplexity to 0 and save your changes.
- Type the following command to import the local security policy from the file C:\secconfig.cfg. Of course, you can move the secconfig.cfg file to another computer and then import the policy.
secedit.exe /configure /db %windir%\securitynew.sdb /cfg C:\secconfig.cfg /areas SECURITYPOLICY - Restart your computer and the imported security policy will take effect.