There are some situations where your PC needs to run a check disk at startup or reboot. For instance, if you run the chkdsk command on a system drive that is being used to run the Windows OS, it will schedule a disk check to run at the next reboot. Windows might also force an automatic disk check when your computer shuts down unexpectedly.
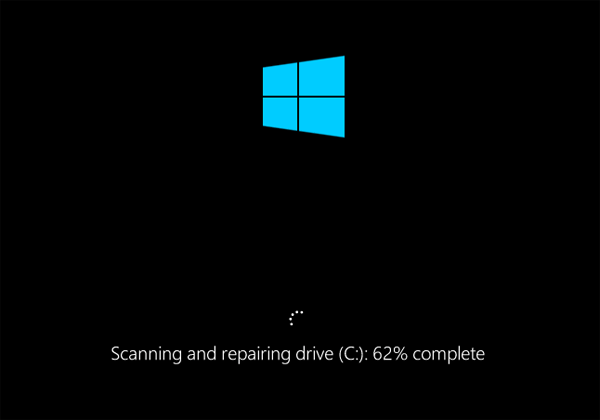
Checking disk could be a really time-consuming task. If you don’t want Windows to take its time during the next reboot, here is how you can cancel or stop check disk (chkdsk) from running at Startup in Windows 10, 8, 7, Vista and XP.
Part 1: Check if a Manual/Automatic Disk Check is Scheduled
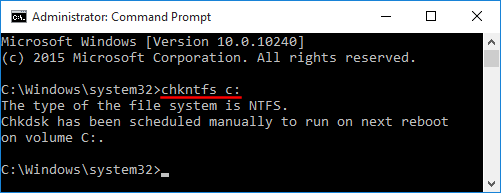
Open a Command Prompt as an administrator in Windows. Type in the following command and press Enter.
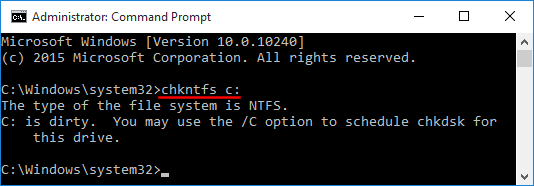
chkntfs C:
If there is a chkdsk task scheduled you will receive a response that is similar to “chkdsk has been scheduled manually to run on next reboot.”
If a dirty flag is set on your drive, the system will force an automatic disk check at the next reboot.
Part 2: Stop Check Disk from Running at Startup
The methods of stopping check disk varies depend on how it is scheduled.
Option 1: Cancel the Automatic Disk Check
When the computer boots up with the dirty bit enabled on a drive, you will be asked to check the disk for consistency before Windows is loaded. But sometimes Windows might keep running check disk automatically on every reboot and this could be quite annoying. To stop the automatic disk check, you have to clear the dirty bit by following this tutorial: How to Manually Clear or Set Dirty Bit on Windows Volume
Option 2: Cancel the Scheduled Disk Check
It’s much easier to stop the scheduled disk check. You can cancel the scheduled disk check using either Command Prompt or Registry Editor.
Method 1: Using Command Prompt
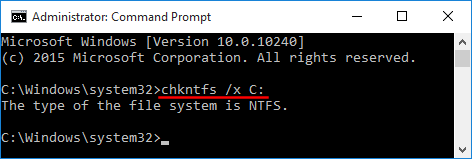
Open a Command Prompt as an administrator. If you want to disable a scheduled disk check on C: drive, type the following command and press Enter.
chkntfs /x C:
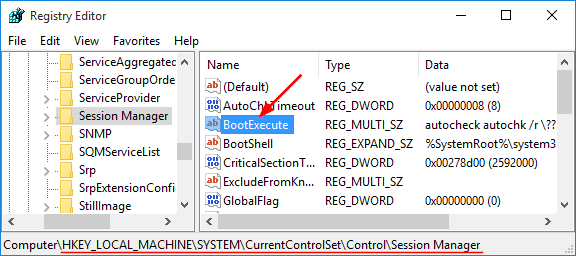
Method 2: Using Registry Editor
Open the Registry Editor. Navigate to the following keys:
HKEY_LOCAL_MACHINE\SYSTEM\CurrentControlSet\Control\Session Manager
Double-click on the Multi-String value “BootExecute” in the right pane.
This will open the “Edit Multi-String” window. Click in the Value data box, and then delete all of the lines, except the last one.

When it’s done, click OK and close Registry Editor.