My screen keeps rotating automatically and it’s really annoying? If your tablet or laptop is equipped with gyroscope sensors, Windows 10 will automatically rotate the desktop to landscape or portrait mode automatically depending on the physical orientation of the screen. To lock the screen into your preferred orientation, here are 3 ways to disable screen auto-rotation in Windows 10.
Method 1: Disable Screen Auto-Rotation Using Action Center
To get started, you need to open the Action Center by either clicking the Action Center icon from the lower-right corner of the taskbar or pressing the Windows key + A shortcut.
![]()
When the Action Center pane appears, you can click the Rotation lock icon to lock your screen into its current orientation. Now your device won’t automatically rotate the screen any longer.
Method 2: Disable Screen Auto-Rotation Using Settings App
Press the Windows key + I to open the Settings app, navigate to System -> Display.
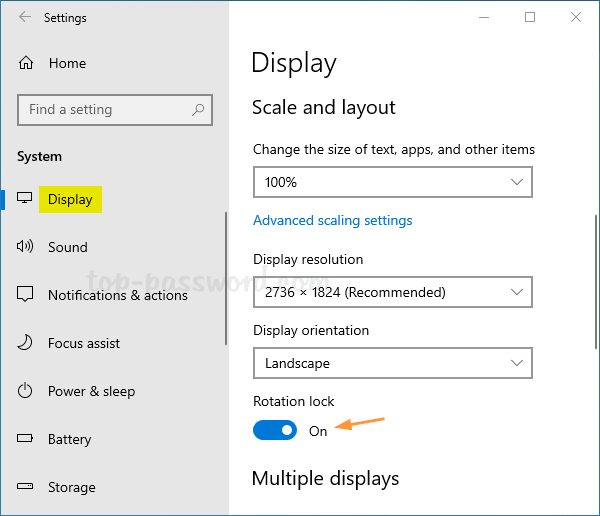
On the right pane, scroll down to find the option named “Rotation lock“. Just toggle it to On to disable screen auto-rotation. If you don’t see the option, it’s possible that your device doesn’t support the screen rotate feature at all.
Method 3: Disable Screen Auto-Rotation Using Registry Editor
Open Registry Editor and browse to the following key:
HKEY_LOCAL_MACHINE\SOFTWARE\Microsoft\Windows\CurrentVersion\AutoRotation
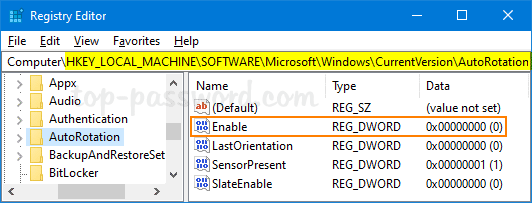
Look for the DWORD Enable in the right pane, then double-click it and set the value to 0. This will disable screen auto-rotation and prevent the screen from rotating automatically.
Close Registry Editor and reboot Windows 10 to apply your changes. If you need to enable screen auto-rotation again, just change the value of Enable to 1 and you’re done.