Is there a way to record more than 2 hours with the Game Bar? Game Bar is a built-in system component which allows you to capture videos while playing games. You can press the Windows logo key + Alt + R together to start (or stop) recording of your game. By default, you can record up to 2 hours and recordings will automatically turn off after 2 hours. In this tutorial we’ll show you 2 ways to change the max recording length for Game Bar in Windows 11.
Method 1: Change Max Recording Length for Game Bar via Settings App
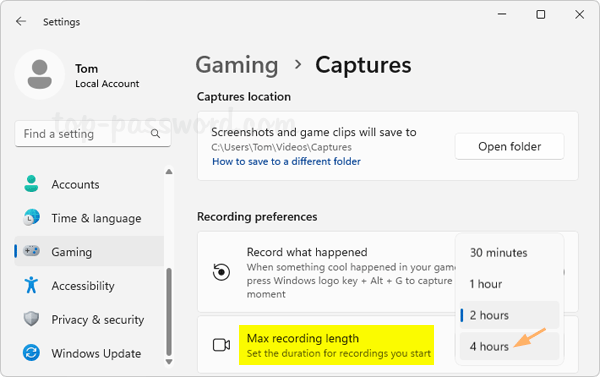
- Press the Windows logo key + I together to bring up the Settings app. Choose Gaming on the left-navigation menu and then click Captures on the right pane.
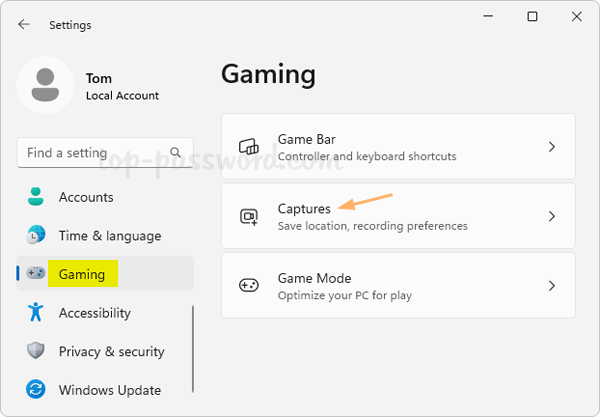
- Under the “Recording preferences” section, click the drop-down list next to “Max recording length” and you can select 30 minutes, 1 hour, 2 hours or 4 hours for your own purpose.
Notes: The built-in Game Bar has a maximum recording length of 4 hours. If you need to record for longer duration, try using third-party screen recording software without time limit.
Method 2: Change Max Recording Length for Game Bar via Registry Editor
- Open Registry Editor and browse to the location:
HKEY_CURRENT_USER\Software\Microsoft\Windows\CurrentVersion\GameDVR, and then double-click the QWORD MaximumRecordLength on the right pane. If it doesn’t exist, you need to create it manually.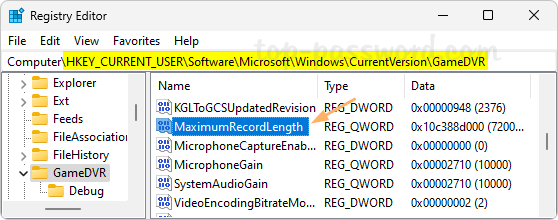
- In the “Edit QWORD (64-bit) Value” box, select the Decimal option firstly, and then type one of the following values in the Value data field, and click OK. For instance, if you desired maximum recording length is 4 hours, then input 144000000000 instead.
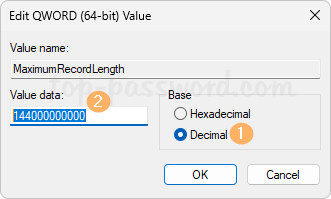
- 4 hours: 144000000000
- 2 hours: 72000000000
- 1 hours: 36000000000
- 30 minutes: 18000000000
- Close Registry Editor.
That’s it.