Archive for the ‘Others’ category

Create UEFI or Legacy Bootable USB Drive for Windows 10 Setup

January 14th, 2016 by Admin

New Windows 10 computers use UEFI firmware instead of the traditional BIOS. As you probably noticed when using a MBR-partitioned Windows installation USB drive on a new Windows 10 PC, UEFI will not recognize it as a boot media. UEFI-based computer can only boot from GPT-partitioned USB drive. Luckily, for backward compatibility most of the UEFI systems can also be configured to disable UEFI secure boot and instead revert to legacy BIOS boot mode. In this tutorial we’ll explain how you can easily create a UEFI or legacy bootable USB drive for Windows 10 Setup.

Requirements:

  • A USB drive (a microSD, SD card or memory stick) with the minimum capacity 4 GB
  • USB creation tool ISO2Disc
  • Windows 10 ISO image, which can be downloaded from Microsoft’s website using its Media Creation Tool

How to Create UEFI or Legacy Bootable USB Drive for Windows 10 Setup

If you have the Windows 10 ISO image on your PC, you can choose to make a Windows 10 bootable USB drive with UEFI or legacy bootloader. 64-bit UEFI PC can only boot 64-bit version of Windows 10, while 32-bit UEFI PC can boot 32-bit OS only. So if you want to install Windows 10 with UEFI mode, you have to download a correct version of Windows 10 ISO image.

Before get started, make sure you backup all important files stored in your USB drive. The process of creating a bootable USB drive will erase all data and re-partition your USB drive.

  1. Insert the USB drive into the USB port of your computer.
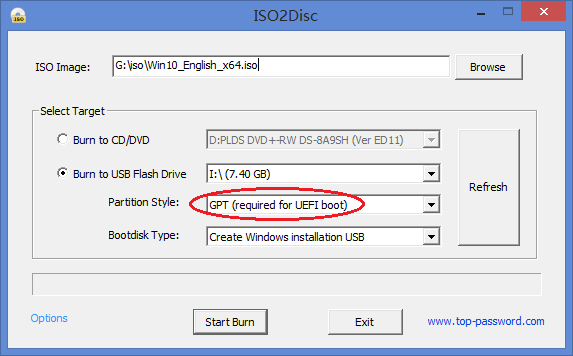
  2. Launch the ISO2Disc program. Click on Browse to select the Windows 10 ISO file.
  3. Now you have two options: make a bootable CD or USB drive. We’re explaining how to create a Windows 10 USB installer, so click on “Burn to USB Flash Drive” and select the drive letter of your USB disk from the list.
  4. Choose the partition style that is suitable for your target computer. If you want to install Windows 10 in UEFI mode on UEFI-based PC, choose the “GPT (required for UEFI boot)” option.

    iso2disc-uefi

    Otherwise choose “MBR (for legacy BIOS / CSM boot)” for BIOS-based PC, or UEFI computer running in legacy BIOS/CSM mode.

    iso2disc-legacy

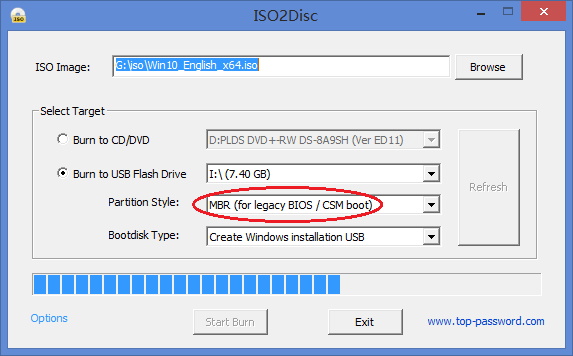
  5. Click on Start Burn. It will now create a Windows 10 USB installer. After creating, you’ll find out that a UEFI bootable USB drive was formatted as FAT32 because NTFS is not supported for external boot media under UEFI.

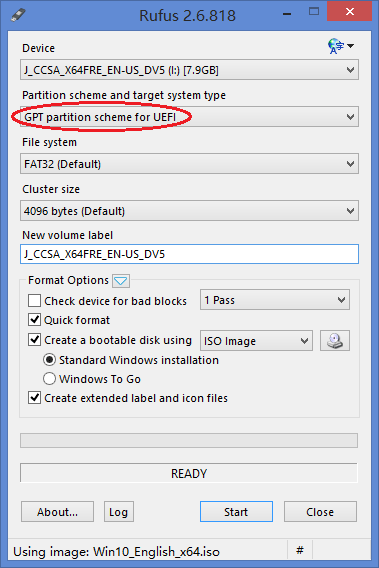
Of course, there are also some other USB creation tools available on the net, such as Rufus. It also allows you to create UEFI or legacy bootable USB installation drive from Windows 10 ISO image.

rufus-uefi

How to Get Microsoft Edge Not to Save / Remember Passwords

January 13th, 2016 by Admin

Like its predecessor Internet Explorer, the all-new Microsoft Edge browser in Windows 10 also allows users to save web credentials (including website URLs, logins and passwords). The problem is that Microsoft Edge doesn’t have an option to set a master password to prevent others from easily seeing the stored passwords.

For security reasons, you might want to stop Microsoft Edge from prompting you to save website passwords. In this tutorial we’ll show you how to get Microsoft Edge not to save / remember your passwords in Windows 10.

How to Disable Password Saving Feature in Microsoft Edge?

Open Microsoft Edge browser. Click on “More actions” button (This is a button with three dots … at right side on address bar).

microsoft-edge

Click on Settings from the drop-down menu.

edge-settings

Scroll down to click on View advanced settings button.

edge-advanced-settings

Under the Privacy and services section, move the “Offer to save passwords” switch to the left to disable the password saving feature. Turn off “Save form entries” if you’re worried someone else will use Edge and get information you’ve typed into forms.

disable-edge-saving-password

That’s all. Now Microsoft Edge will no longer prompt you to save passwords.

How to Reset Linx 7 / 8 / 10 Tablet Password with A Bootable USB Drive

January 12th, 2016 by Admin

Forgot Windows user password for your Linx 1010 tablet? Linx is one of the cheapest Windows tablet we’ve seen yet, and it can boot in UEFI mode only. You might have no luck getting the tablet to load some traditional password resetting Live CDs, because it doesn’t support legacy BIOS boot. In this article we’ll explain how to reset Linx 7 /8 / 10 tablet password by booting from a UEFI compatible USB drive.

Part 1: Create A UEFI Compatible USB Drive

Before resetting Linx password, you need to create a UEFI compatible bootdisk (a USB flash drive or USB memory stick) from another computer you have access to. Here’s how to make such a disk:

  1. Download the 32-bit version of PCUnlocker Enterprise (trial version) and save it to your local hard drive. Extract the downloaded .zip file and you’ll see two files: pcunlocker.iso and ReadMe.txt.
  2. Download and install the free LiveUSB creating tool ISO2Disc, which allows you to create a bootable USB drive directly from a CD image.
  3. Launch ISO2Disc, and click on Browse to select the pcunlocker.iso you just extracted. Click “Burn to USB Flash Drive” and select the drive letter for your attached USB stick.

  4. Set the partition scheme to “GPT (required for UEFI boot)” and click on Start Burn. The program will format / erase your USB drive with FAT32, create a GPT partition table and copy the contents of the ISO file to your USB drive.
  5. When the burning process is complete, you can take the USB drive to reset your Linx tablet password.

Part 2: Boot Linx Tablet from USB

As the Linx tablet doesn’t come with a full-size USB port, you need to connect your created USB drive with a USB OTG adapter. You will have to access the BIOS (UEFI) Setup and modify the boot sequence. Here are 3 ways to access the BIOS Setup:

  • Press and hold the F7, DEL or ESC key while powering on the Linx tablet, if you have a physical keyboard.
  • Hold down the Power button and Volume+ at the same time. This will load up a screen with various options.
  • Access the BIOS from Windows 10/8 login screen: Hold down the SHIFT key and click on the Power icon on the screen, then choose Restart option. Next click Troubleshoot -> Advanced Options -> UEFI Firmware Settings -> Restart.

After getting into BIOS Configuration Utility, use the arrow keys on your keyboard to select the Boot tab. Under Boot options priority, set your USB drive as the first boot media. Save your changes and the next time your tablet will boot from USB drive instead of hard drive.

Part 3: Reset Windows User Password

After booting from USB, the touch screen might not work and you have to operate with a USB keyboard or mouse. Here’s how to reset your lost user password:

  1. Once booted to the PCUnlocker program, you’ll see a list of local accounts for your Windows installation. If you use a Microsoft account login, there should be a local account that is linked to your Microsoft account, with your email address displayed under the “Description” column.

  2. Select a local account and click on “Reset Password” button, it will remove your password in no time. If your selected account is associated with your Windows Live email, the program will also switch your Microsoft account to local account.
  3. When it’s done, reboot your tablet and disconnect the USB drive. You can then log back into your Linx tablet without a password!

How to Hide, Disable or Uninstall Cortana in Windows 10

January 4th, 2016 by Admin

Just like Apple’s Siri, Cortana is Microsoft’s digital assistant integrated in Windows 10. Cortana is capable of composing emails, setting reminders, finding apps & files on your computer and performing web searches. After installing or upgrading to Windows 10, you’ll find that Cortana appears as a search bar in the taskbar that says “Ask me anything”.

cortana

But not all Windows 10 users will take kindly to Cortana. In this article we’ll show you how to hide, disable Cortana or even completely uninstall it in Windows 10.

Update: If you’re running Windows 10 version 2004 or newer, Cortana could be uninstalled or reinstalled with the new method.

Part 1: Hide Cortana

In Windows 10, Cortana is shown as a search box in the taskbar, right beside the Start button. If you want to hide Cortana, right-click on search box/icon in the taskbar, select Cortana and then Hidden.

hide-cortana

Cortana will now remain inactive and immediately disappear from the taskbar.

Part 2: Disable Cortana

Here’s how to disable Cortana in Windows 10:

  1. Click on the search box/icon on the taskbar to open Cortana.
  2. Click on the Notebook button in the left-hand menu. From there, click Settings.

    settings

  3. In Settings, the first option “Cortana can give you suggestions, ideas, reminders alerts and more” is a simple slide bar. Slide it to off to disable Cortana. Once disabled, Cortana will revert to the traditional Windows search feature.

    disable-cortana

  4. To clear everything Cortana knows about you, click the link “Manage what Cortana knows about me in the cloud“.
  5. Microsoft Edge should open and take you to the Bing Settings page. Click the Clear buttons in the “Clear personal info” and “Other Cortana data and personalized speech, inking and typing” sections.

    clear-cortana-data

    This will clear your personal info from Microsoft’s cloud servers.

Part 3: Uninstall Cortana

In Windows 10, there is no option to uninstall Cortana. If you want to completely uninstall / remove Cortana from Windows 10, you can use the uninstall script provided by WinAero. Here’s how:

  1. Download the Uninstall Cortana ZIP file (provided by WinAero).
  2. Extract all files from the ZIP archive you downloaded to your desktop.
  3. Right-click the Uninstall Cortana.cmd file and select Run as Administrator.

    uninstall-cortana

  4. It will begin uninstalling Cortana.

    remove-cortana-package

    When it’s done, restart your computer. Cortana will no longer work, respond, or collect information. After uninstalling, it’s good to hide the Cortana button/icon to reclaim wasted space on your taskbar.

2 Options to Delete $WINDOWS.~BT Folder After Windows 10 Update

December 25th, 2015 by Admin

There is a folder named $WINDOWS.~BT on the root of my C:\ drive. It is a hidden folder and is 2 GB in size. What is its purpose? Is it safe to delete it?

The $WINDOWS.~BT folder is a temporary folder created by Windows Update, which contains update logs and files downloaded by the Windows update process. By default, the $WINDOWS.~BT folder is hidden. It exists at the root of your system drive. To see it, enable viewing hidden folders in Windows 10.

$windows-bt

The $WINDOWS.~BT folder can be safely deleted. However, you can’t delete that folder the normal way. In this article we’ll show you 2 ways to delete the $WINDOWS.~BT folder to reclaim your hard disk space.

Option 1: Delete $WINDOWS.~BT Folder Using TakeOwnershipPro

  1. Download and install the freeware TakeOwnershipPro on your computer. After installing, it will add the take ownership shortcut to right-click context menu.
  2. Browse to the root path of your system drive. Right-click on the $WINDOWS.~BT folder and select TakeOwnershipPro. This will grant you full permissions to access the $WINDOWS.~BT folder.

    take-ownership

  3. Now you can delete the $WINDOWS.~BT folder the normal way.

Option 2: Delete $WINDOWS.~BT Folder Using Disk Cleanup

  1. To clean the $WINDOWS.~BT Folder folder, open This PC, right-click your local C: drive and then select Properties from the context menu.

    disk-properties

  2. Click on Disk Cleanup.

    disk-cleanup

  3. Next click on Clean up system files. It will perform a scan of your computer’s hard drives to determine what files can be cleaned up and how much storage space they use.

    clean-up-system-files

  4. When it is finished scanning the Disk Cleanup program will open again, but this time with some extra options that you can select as shown in the image below. To delete the $WINDOWS.~BT folder you have to check the option labeled “Temporary Windows installation files” or “Previous Windows installation(s)“.

    windows-install-temp-files

  5. Click OK and the Disk Cleanup wizard will clean out everything in the $Windows.~BT folder. If there is a lot of data to delete, please be patient while they are removed from your hard drive.

2 Options to Change / Customize Date & Time Format in Windows 10

December 18th, 2015 by Admin

Have you inherited a computer with the date in the wrong format? How can I change the date & time format displayed in Windows 10 taskbar? Depending on your personal needs, you may wish that Windows displays the full date instead of the short date format. In this tutorial we’ll show you 2 methods to change date & time format in Windows 10, customize the format to match your specific needs.

Method 1: Change Date and Time Format Through PC Settings

  1. To get started, right-click the bottom-right corner of the screen where the time and date are displayed in the system tray. After that select Adjust date/time.
  2. adjust-date-time

  3. It will open the PC Settings charm that displays the pre-defined date/time formats.

    change-data-time-formats

    Click the drop-down button and select the date/time format you want. If your format is not included in the drop-down list, you have to use the method below to customize the date/time format through Control Panel.

Method 2: Change Date and Time Format Through Control Panel

  1. Press the Windows key + X and you’ll be presented within the Quick Access window. Click Control Panel.
  2. When the Control Panel opens, set the View by option to Large icon. Click Date and Time.

    control-panel

  3. The Date and Time box should open. Click on the “Change date and time…” button.

    date-and-time

  4. After the Date and Time settings window opens, click on the “Change calendar settings” link.

    date-and-time-settings

  5. Now you can see the pre-defined date formats. Click the drop-down button and check whether the format you wish to change is available or not. If it is not included in the drop down list, you can customize the format by entering required date format (for example, DD-MM-YYYY). Make sure that you are entering in a right format with proper notations. You can find the meaning of notations below the date format. Click on Apply and save your settings.

    customize-format

  6. Now you can see the date/time on your taskbar at the bottom-right corner in your own desired format.