Author Archive

Fix “Password doesn’t work after upgrading to Windows 10”

December 14th, 2015 by Admin

I just recently upgraded from Windows 7 to Windows 10 today, everything was working fine until I restarted my Laptop. It kept coming up with “Incorrect Password”. I can remember the password but the system refuses to log me in. Please help!

Just upgrade to Windows 10 and the original password doesn’t work? Many users complain about this issue and there are various reasons why Windows 10 doesn’t accept their passwords. In this tutorial we’ll run through the 5 steps you should take to successfully troubleshoot the “password not working” issue.

Step 1: View the Actual Password You Typed

After typing your password in Windows 10 login screen, you’ll see a small eye icon on the right side of the password box. Press and hold the eye icon and it allows you to reveal the text you’ve just typed. If the password appears as expected and the system still says it’s incorrect, it’s likely that you’ve forgotten your password.

view-windows-password

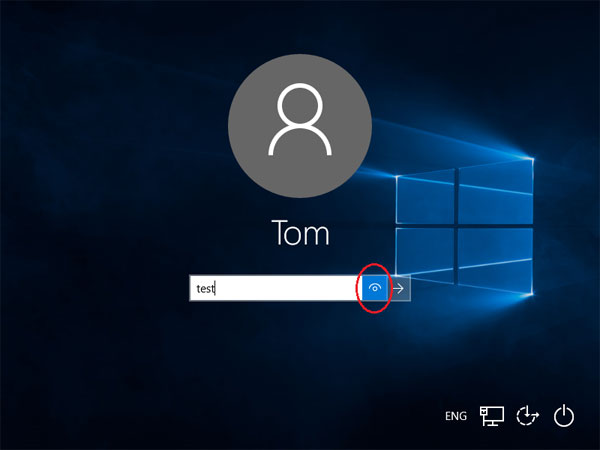
If the revealed password is not the same as what want to type, or the eye icon is missing from the password box, go to the next steps for troubleshooting your password problem.

Step 2: Switch Keyboard Layout Input

A wrong keyboard layout can result in an inability to type the characters needed for your password. If you’ve set up multiple keyboard layouts with your system, then be sure to select the correct keyboard layout for typing the password. At the lower-right corner of Windows 10 logon screen, there is a language button (e.g., ENG). click there, and you will be allowed to change to the keyboard of your choice. Your password should now be accepted.

keyboard-layout-for-login

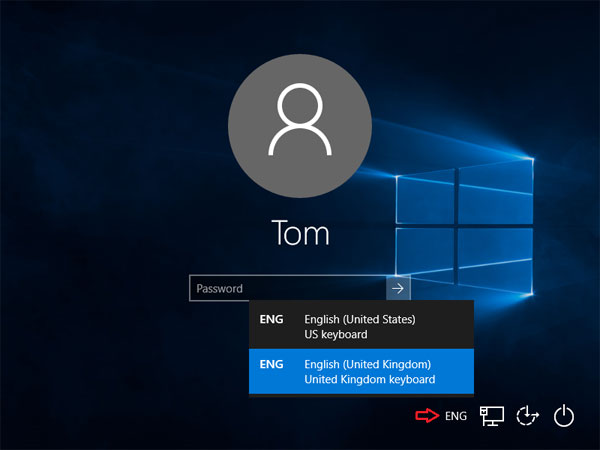
If there is just a single but incorrect keyboard layout for the login screen, there is no option to switch. In some cases, the layouts used will simply rearrange some characters so you will have to use alternative keys to type the password, by using the on-screen keyboard.

Step 3: Using On-Screen Keyboard

If you find yourself in a situation where your physical keyboard doesn’t work at all, or a wrong keyboard layout is used, then you can type the password using On-Screen Keyboard.

on-screen-keyboard

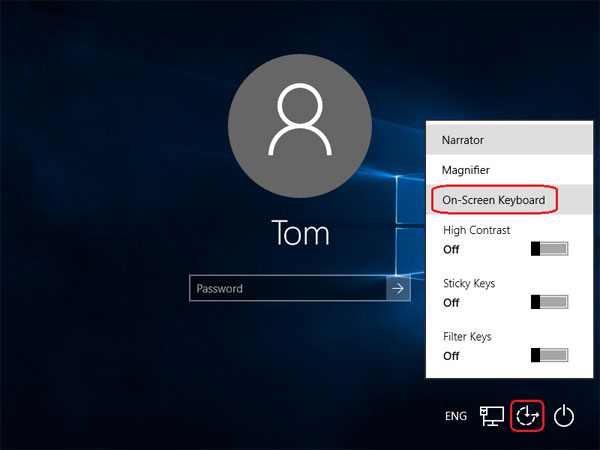
Click the Ease of Access icon in the lower-right corner of Windows 10 logon screen, and then select On-Screen Keyboard. It will display a virtual keyboard with all the standard keys. You can then type the password by clicking keys with your mouse.

Step 4: Reset Windows 10 Password

If Windows 10 still refuses you to login, you can try the PCUnlocker Live CD which can unlock, bypass and remove lost Windows 10 passwords for both local account and Microsoft account.

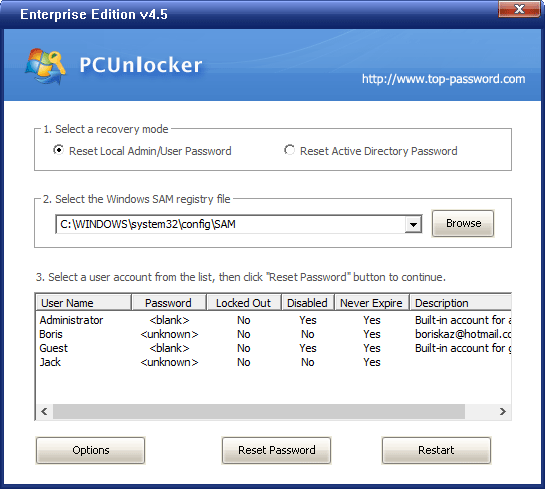
Just boot your problematic computer from PCUnlocker Live CD and it allows you to remove the password of any Windows users. After resetting the password, reboot your computer and you can log in to Windows 10 without typing a password!

Step 5: Reinstall or Revert Your System Back to What It Was

As a last resort, you can always just reinstall the OS and do the whole thing over again. Another option is refresh or reset your Windows 10 computer to factory default or revert back to former OS.

How to Restore Local Security Policy to Default in Windows 10, 8, 7, Vista and XP

December 14th, 2015 by Admin

Did you mess with the local security policy? Or a certain program changed the security policy that caused some strange issues? Luckily there is a simple way to reset / restore your local security policy settings to default in Windows 10, 8, 7, Vista and XP, if you mess up.

How to Restore Local Security Policy to Default in Windows 10, 8, 7, Vista and XP?

This method uses the default security configuration templates to reset the local policies (including account lockout and password complexity requirements policy). Here’s how to reset local security policy settings to their default values:

  1. Open an elevated Command Prompt. In Windows 10 and 8, press the Windows + X key combinations to open the Quick Access menu and choose Command Prompt (Admin). In Windows 7 or Vista, click the Start menu, then select All Programs -> Accessories, right-click on Command Prompt and select “Run as administrator”.
  2. Now copy and paste the following command into the Command Prompt. Hit Enter.
    secedit /configure /cfg %windir%\inf\defltbase.inf /db defltbase.sdb /verbose

    If you are running Windows XP and need to reset the security settings to their default values, use this command instead:
    secedit /configure /cfg %windir%\repair\secsetup.inf /db secsetup.sdb /verbose

    reset-local-security-policy

  3. This will take a few minutes to reset all the policies back to the Windows defaults. you’ll have to restart the computer to see the changes.

How to Turn on / off Adaptive Brightness in Windows 10 / 8

December 8th, 2015 by Admin

Adaptive brightness is a new feature in Windows 8 / 10 that uses an ambient light sensor to automatically adjust your screen’s brightness to your surroundings. When you have mostly dark stuff on screen (like a text editor with dark background), the screen will dim automatically. While on a white background it will brighten. These changes happen automatically after a few seconds, and they can also sometimes manifest as noticeable flickering.

If the brightness switching is driving you crazy, you can disable this feature so your screen will stay at the brightness level you want. In this post we’ll show you how to turn on / off adaptive brightness in Windows 10 and 8.

Updated: For the latest build of Windows 10, open the Settings app and navigate to System -> Display, you can check or uncheck the “Change brightness automatically when lighting changes” option to enable or disable adaptive brightness.

How to Turn on / off Adaptive Brightness in Windows 10 / 8?

  1. Press the Windows logo key + X to open the Quick Access menu. Click Control Panel.
  2. When Control Panel is open, set the View by option to Large icons. Click Power Options.

    control-panel

  3. Find your currently selected power plan and click on the associated “Change plan settings” link.

    power-options

  4. Now click on “Change advanced power settings“.

    edit-power-plan

  5. Scroll down to Display –> Enable adaptive brightness, and change the settings there to Off or On.

    adaptive-brightness

    If you set it to off, your screen will maintain a constant brightness level. If you don’t see this setting, it means that your computer doesn’t come with light sensors.

How to Clear or Hide Recent Files in Windows 10 Explorer

December 6th, 2015 by Admin

When you open the File Explorer in Windows 10, you’ll see a list of recently used folders/files. This feature is useful for you to quickly access your frequently opened folders/files, but it also exposes your recent activities to others when you are on a shared computer or a public computer.

quick-access

In this tutorial we’ll show you how to clear or hide the recent files in Windows 10 File Explorer.

Option 1: Remove/Clear Recent Files from Windows 10 Explorer

By default, Windows 10 keeps track of recently opened documents and files generally. Here is a simple way to permanently remove / clear recent folders/files from Windows 10 Explorer:

  1. Open File Explorer. It includes two sections: Frequent folders and Recent files.
  2. Right-click on the recent folder or file you want to delete, and select Remove from Quick access.

    remove-from-quick-access

Option 2: Hide Recent Files from Windows 10 Explorer

This method allows you to hide all recent folders/files from appearing in Quick Access of Windows 10 File Explorer. Here’s how:

  1. In File Explorer, go to the View ribbon section and click the Options button.

    file-explorer

  2. Once you’re in the Folder Options window, click General tab.
  3. Under Privacy at the bottom of the window, uncheck “Show recently used files in Quick access” and “Show recently used folders in Quick access“.

    folder-options

  4. Click Apply and OK. The recent files and frequent folders will immediately disappear from File Explorer.

Note that re-check the option “Show recently used files in Quick access” and it will also make your recent files appear in File Explorer again.

How to Install SQL Server 2016 CTP 3.0 on Windows Server 2012 R2

November 26th, 2015 by Admin

SQL Server 2016 Community Technology Preview 3.0 (CTP 3.0) was released to the public on 28th October, and I downloaded a fresh copy to start trying it out. In this article I’m going to explain, step-by-step, how to install SQL Server 2016 CTP 3.0 instance on a Windows Server 2012 R2 system.

Preparing for installation

Before beginning, you should check the minimum hardware and software requirements before you install SQL Server 2016. both .NET framework 3.5 and Windows 8.1 Update (KB2919355) are required to be installed. Check out the following articles on how to install .NET framework 3.5 and KB2919355 on Windows Server 2012 R2:

Install .NET Framework 3.5 on Windows Server 2012 with / without CD
Fix: Windows 8.1 Update (KB2919355) is not applicable to your computer

How to Install SQL Server 2016

SQL Server 2016 CTP 3.0 is free for trial and you need to sign-in to download it from Microsoft’s web site. The ISO file I’ve downloaded is SQLServer2016CTP3.0-x64-ENU.iso that takes around 2.58 GB of space on disk. Once downloaded, you can burn the ISO image to a DVD for making a installation media. Here’s how to install SQL Server 2016 on Windows Server 2012 R2:

  1. Insert the SQL Server 2016 installation DVD. From the root folder, double-click Setup.exe and you’ll be greeted with SQL Server Installation Center. To perform a new stand-alone installation, click New SQL Server stand-alone installation or add features to an existing installation.

    sql-server-installation

  2. Enter the product key and click Next. As the final version of SQL Server 2016 is not released yet, so just select evaluation edition.

    sql-product-key

  3. In the License Terms window, tick the box I accept the license terms and then click Next to continue.

    accept-license-terms

  4. A new option appears here to use Microsoft updates if you would like to. I keep it unchecked as I would patch SQL Server manually at the right time, after testing.

    use-microsoft-update

  5. Run the setup rules checks. I have a warning to tell me that the firewall is on and just ignore it if you haven’t configured Windows firewall to block SQL Server access.

    sql-install-rules

  6. On the Setup Role page, choose SQL Server Feature Installation and click Next.

    sql-server-feature-install

  7. Select the required SQL features and click Next. Make sure that Database Engine Services is checked. I have also chosen to install the Management Tools – Basic so I can use Management Studio to manage SQL Server.

    feature-selections

  8. At this step another check will run, this time to identify problems that might block the setup, based on your choices of the last step. Just wait for its completion and click Next.

    sql-server-feature-rules

  9. This step lets you decide if you want to go with Default Instance or a Named Instance. Be aware that you can only install one default instance but you can install multiple named instances on the same computer.

    configure-sql-server-instance

  10. On the Server Configuration screen, you can specify the service accounts and startup type, or simply leave it at the default configuration as you can change them after the installation.

    sql-service-accounts

  11. Now you need to choose the authentication mode of your SQL Server instance. For the purposes of this article, I will be choosing Mixed Mode Authentication. You will also need to specify the SQL Server administrators to be used; in this example I will use the current logged in user by clicking Add Current User button.

    sql-server-password

  12. This page shows a tree view of installation options that were specified during Setup. Review and click Install.

    ready-to-install-sql-server

  13. The installation will begin — wait for completion.

    sql-installation-progress

  14. Once the installation is complete, SQL Server 2016 Setup will confirm this showing which items of the install succeeded.

    sql-install-succeeded

Fix: Windows 8.1 Update (KB2919355) is not applicable to your computer

November 25th, 2015 by Admin

Unable to install Windows 8.1 Update (KB2919355) on your computer? Even if you’ve enabled automatic update in Windows, you might find out that KB2919355 doesn’t appear in the list of available updates. If you download KB2919355 directly from Microsoft’s online website and then install it manually, Windows Update Standalone Installer will fail with the error message “The update is not applicable to your computer“.

update-not-applicable

KB2919355 is essentially a service pack released for Windows 8.1 and Windows Server 2012 R2, but Microsoft has decided not to call it “service pack”. It is officially known as “Windows 8.1 Update”. In this article we’ll show you an effective way to install Windows 8.1 Update on Windows 8.1 and Windows Server 2012 without such a problem.

How to Install Windows 8.1 Update (KB2919355) Successfully?

  1. Press the Windows key + X to open up the Quick Access Menu. Next click Control Panel.
  2. Click the View by option at the top right of the Control Panel. Set it to Large icons. Click on Windows Update.

    control-panel

  3. Click the Change settings link on the left side of the Windows Update window.

    windows-update

  4. Under Important updates, check the “Check for updates but let me choose whether to download and install them” option from the drop-down menu. Click OK.

    windows-update-settings

  5. When come back to the Windows Update window, click on the Check for updates link in the left pane. The search may take some time, depending on how many updates are waiting.

    check-for-updates

  6. When the search is finished, click the link that says how many important updates are available.

    available-updates

  7. In the list of available updates, select the update KB2919355, then click Install and you’re done! However, if the update KB2919355 doesn’t appear in the list of available updates, check ALL important updates and click Install.

    install-windows-updates

  8. After installing all available important updates, open your Web browse to download the Windows 8.1 Update from Microsoft’s website:

    At the download page, select your language and then click the Download button.

  9. Windows 8.1 Update contains six separate files: clearcompressionflag.exe, KB2919355, KB2932046, KB2934018, KB2937592 and KB2938439. You just need to select the file contains KB2919355 and click Next to begin downloading.

    KB2919355

  10. Now double-click on the update KB2919355 you’ve downloaded and it should be able to be installed successfully.

    install-kb2919355

Install .NET Framework 3.5 on Windows Server 2012 with / without CD

November 24th, 2015 by Admin

Today, there are lots of applications available that require .NET framework installed to run, including SQL Server. When try to install .NET framework 3.5 on a computer running with Windows Server 2012 (R2) or 2008 (R2), you might receive one of the following error messages

“The request to add or remove features on the specified server failed. The source files could not be downloaded.”

“The source files could not be found. Use the “Source” option to specify the location of the files that are required to restore the feature.”

failed-install-net-framework

This problem happens because the computer cannot download the .NET framework from Windows Update, or you specify a wrong alternate source path. So here we’ll walk you through the steps of installing .NET framework 3.5 on Windows Server 2012 (R2) with / without a install CD.

How to Install .NET Framework 3.5 on Windows Server 2012 (R2)?

First of all, open the Server Manager in Windows Server 2012 (R2). Click Add roles and features.

server-manager

On the Before you begin page, click on Next.

add-roles-and-feature-wizard

On the Select installation type screen, select Role-based or feature-based installation and click Next.

installation-type

Select the local server you want to install .NET 3.5 framework onto and click Next

server-selection

On the Select server roles page, do not select any role and just click Next.

server-roles

On the Select features screen, check .NET Framework 3.5 features and click Next.

add-net-framework-feature

On the Confirm installation selections page, you will get a warning “Do you need to specify an alternate source path? One or more installation selections are missing source files on the destination server.

confirm-installation

Here you have two choices:

  • If your computer has Internet connection, just ignore this warning and click Install. The wizard will try to connect to Microsoft’s online server and download the missing files from Windows Update.
  • If your computer has no Internet connection, you have to specify the alternate source path. Click the Specify an alternative source patch link at the bottom of the above screenshot. Then enter path of the source files from Windows Server 2012 installation CD.

    alternate-source-path

    In my example, it’s D:\sources\sxs, where D: is drive letter of my installation media. Click OK and then click Install to begin installation.

Once .NET Framework 3.5 has been installed, the screen will tell you Installation succeeded.

installation-progress

Click Close to exit the wizard. That’s it!