Archive for the ‘Windows 7’ category

How to Prompt User to Change Windows Password Before Expiration

November 27th, 2017 by Admin

Before your Windows password expires, you may receive password expiration notification every time you log on to local account or domain user.
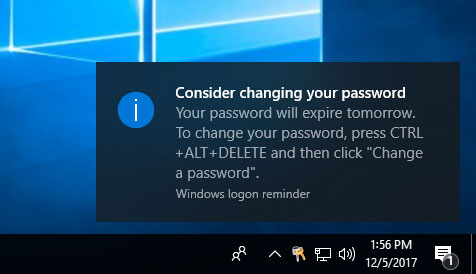
In this tutorial we’ll show you how to set the number of days prior to password expiration, during which to begin displaying password expiry notice to prompt user to change Windows password.

Tips: If you want to disable password expiry notice, you can set Windows password to never expire by following these tutorials:

Part 1: Prompt Local Users to Change Password Before Expiration

Here’s how you can prompt local users to change password before expiration in Windows 10, 8, 7, Vista and XP:

  1. Open the Local Group Policy Editor and navigate to: Computer Configuration\Windows Settings\Local Policies\Security Options.
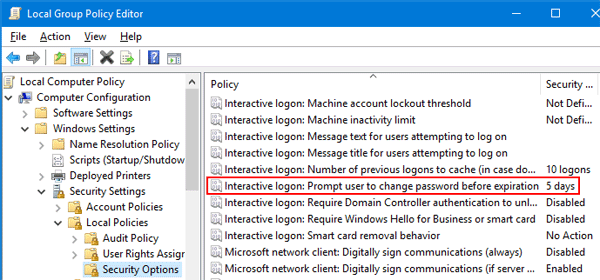
    Next, double-click the “Interactive Logon: Prompt user to change password before expiration” policy on the right pane.

  2. Enter the number of days prior to password expiration that you want to notify users, and click OK.
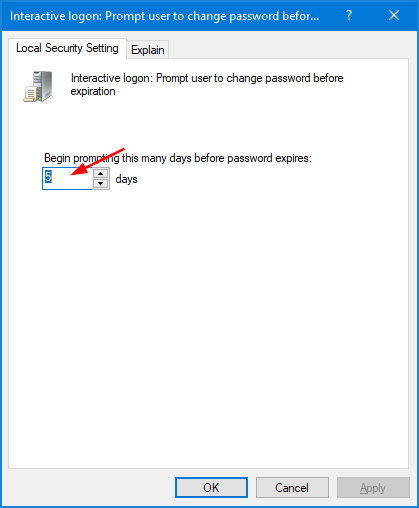
  3. Reboot your computer for the policy to take effect.

If you’re unable to access Local Group Policy Editor, use the following registry tweak to change password expiry notice period:

  1. Open Registry Editor and navigate to:
    HKEY_LOCAL_MACHINE\SOFTWARE\Microsoft\Windows NT\CurrentVersion\Winlogon.
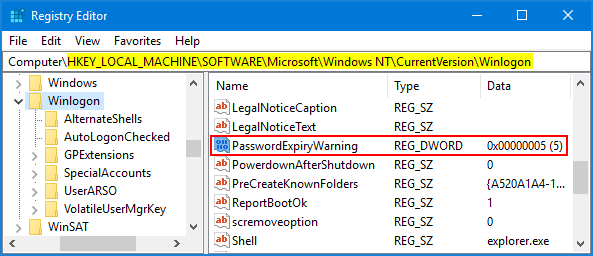
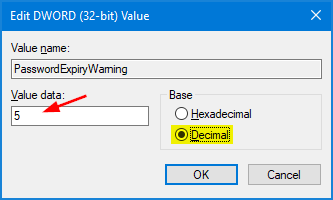
    Double-click the PasswordExpiryWarning value on the right pane.

  2. Click the Decimal radio button and enter the number of days before password expires that you want to notify users, and click OK.
  3. Close Registry Editor and reboot your computer.

Part 2: Prompt Domain Users to Change Password Before Expiration

If you’re running Windows Server 2016 / 2014 / 2012 / 2008 domain controller, use this method to prompt domain users to change password before expiration:

  1. Click the Start button, select Administrative Tools and then click Group Policy Management.
  2. In the console tree, expand the Forest -> Domains -> your domain. Right-click the domain policy you want to work with, and then select Edit.
  3. When the Group Policy Management Editor window appears, navigate to Computer Configuration\Policies\Windows Settings\Security Settings\Local Policies\Security Options.
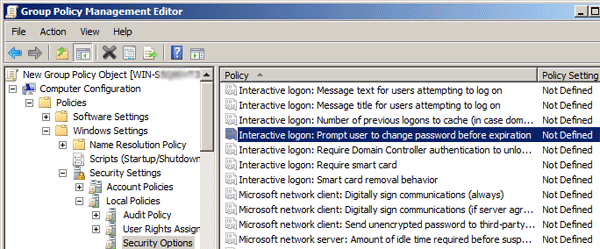
    Then double-click the “Interactive Logon: Prompt user to change password before expiration” setting in the right pane.

  4. In the Security Policy Setting tab, check the “Define this policy setting” option, and enter the number of days in advance users are warned that their passwords are about to expire.
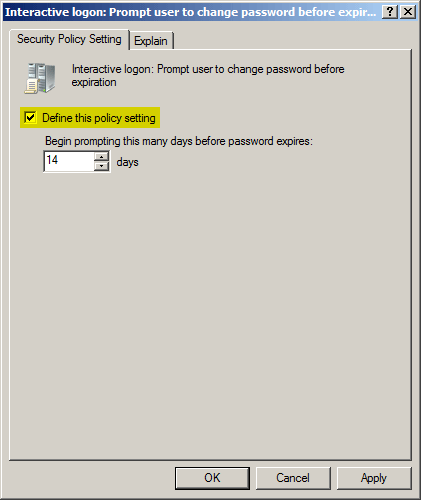
  5. Click Apply and then OK. Reboot your server.
How to Delete Wireless Network Profiles in Windows 11 / 10 / 8 / 7

November 21st, 2017 by Admin

How can I clear out all old Wi-Fi profiles on Windows 7? Look for a way to remove wireless networks that no longer worked because their passwords have been changed? In this tutorial we’ll show you different ways to delete wireless network profiles in Windows 11 / 10 / 8 / 7, using System Tray, Command Prompt or Registry Editor.

Method 1: Delete Wireless Network Profile Using System Tray

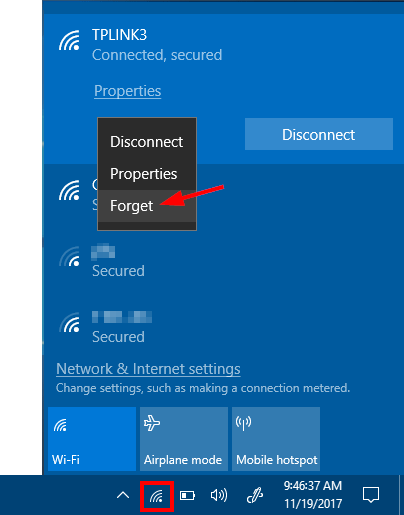
Click the wireless network icon in the system tray from the bottom-right corner, and you’ll see a list of wireless networks. Right-click on the network you want to delete, and then select Forget from the pop-up menu.

Now the system will forget the selected network, and it not be able to connect to that Wi-Fi network.

Method 2: Delete Wireless Network Profile Using Command Prompt

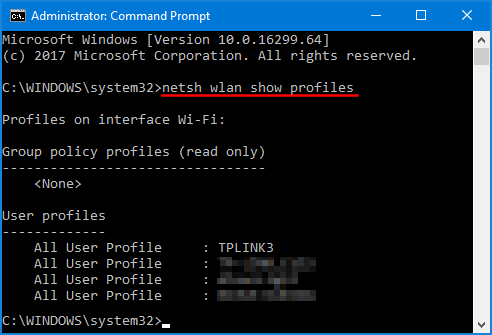
Open the Command Prompt as administrator and run the following command to get the list of all wireless network profiles stored on your local PC:
netsh wlan show profiles

Find the name of the wireless network profile you want to delete, then type the following command to remove it:
netsh wlan delete profile name="profile name"

If you want to remove all the wireless network profiles, simply type:
netsh wlan delete profile name=*

Method 3: Delete Wireless Network Profile Using Registry Editor

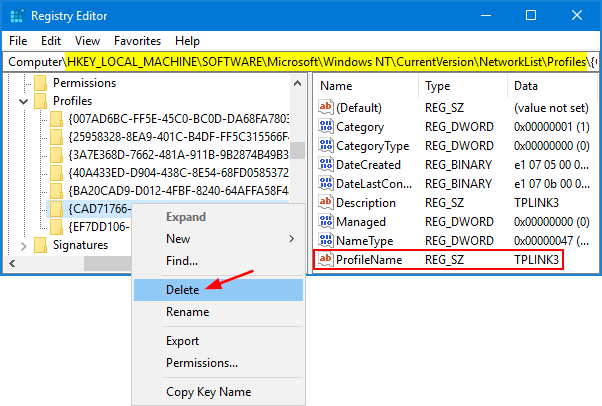
  1. Open the Registry Editor and navigate to the following key:
    HKEY_LOCAL_MACHINE\SOFTWARE\Microsoft\Windows NT\CurrentVersion\NetworkList\Profiles
  2. Click each subkey under Profiles, and check the ProfileName value on the right to see if that is the wireless network connection you want to remove. Once you find the subkey, right-click on it and select Delete.

  3. Now, your selected network profile is deleted successfully.

Fix: Windows Computer Won’t Wake Up from Sleep Mode

November 16th, 2017 by Admin

Computer won’t wake up from sleep mode? When your computer goes sleep, you’re supposed to wake it up by pressing a key or moving your mouse. However, there are many reasons that can cause Windows stuck in sleep mode, including improper BIOS / device / power settings. Here’s a step-by-step guide to help you troubleshoot the issue of computer not waking up from sleep mode in Windows 10, 8 and 7.

Step 1: Find Which Device can Wake up Your Computer

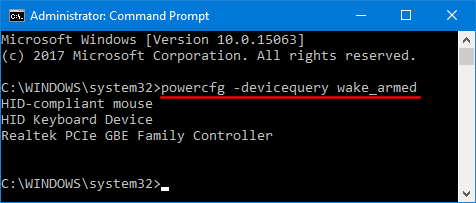
Can’t get your computer come out of sleep mode? To fix this problem, you have to find out which device can wake up your computer. Open the Command Prompt and run the following command:

powercfg -devicequery wake_armed

It will show you the list of devices that are configured to wake your computer up. If your keyboard or mouse is not listed, you need to enable the “Allow this device to wake the computer” setting in your computer. Follow these steps:

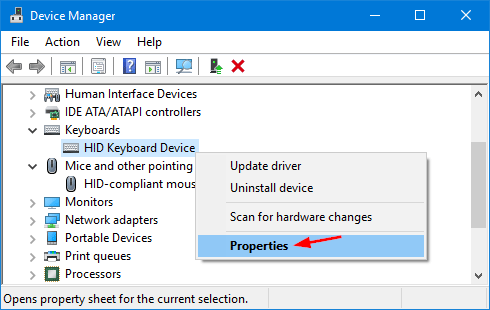
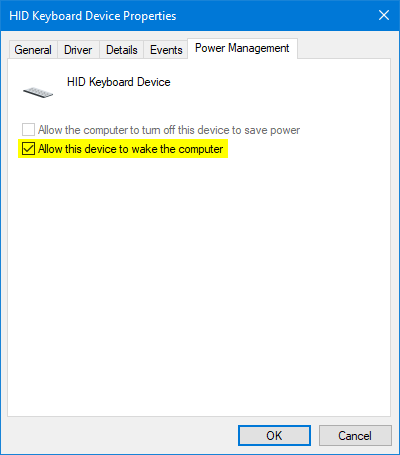
  1. Open the Device Manager. Expand the Keyboards category, then right-click on your keyboard device and choose Properties.

  2. Click the Power Management tab and check the Allow this device to wake the computer box. Click OK to save your change.

  3. Repeat the same steps above for your mouse, which can be found under the “Mice and Other Pointing Devices” category in the device list.

Step 2: Stop Windows from Powering Off USB Devices

Windows is set to shut down your USB devices in sleep mode to save power by default, sometimes it won’t be able to power it back up. So you should follow this tutorial to stop Windows from disabling power to USB ports when your computer is in sleep mode.

Step 3: Enable USB Wakeup in Your Computer’s BIOS

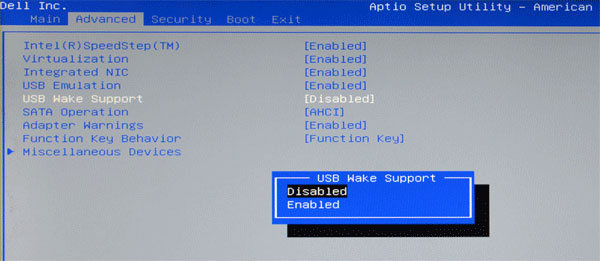
While turning on your computer, press a certain key (F2, DEL, F12, ESC, etc.) to access the BIOS Setup. Look around the BIOS settings and find the option like “USB Wake Up”, “Wake up by USB KB/Mouse”, “USB Wake Support”. Make sure it is enabled.

Conclusion

Once you complete the steps above, you should be able to bring your computer out of sleep mode using keyboard or mouse. If those still don’t help, try to restore the power plan to default settings in Windows, or update the BIOS of your computer.

2 Ways to Change MAC Address on Windows 11 / 10 / 8 / 7

November 11th, 2017 by Admin

MAC address is used to identify a computer on a network, and every network card has a unique MAC address assigned during manufacturing. However, most network cards also allow you to set a custom MAC address from their device properties on Windows. This is useful when you want to test or bypass the MAC filtering settings on firewall or router. Here are 2 simple ways to change MAC address on Windows 11 / 10 / 8 / 7.

Method 1: Change MAC Address on Windows 11 / 10 / 8 / 7 from Device Manager

  1. To get started, you need to open Device Manager. Just press Windows key + R on your keyboard and then type devmgmt.msc in the Run dialog box. Hit Enter.

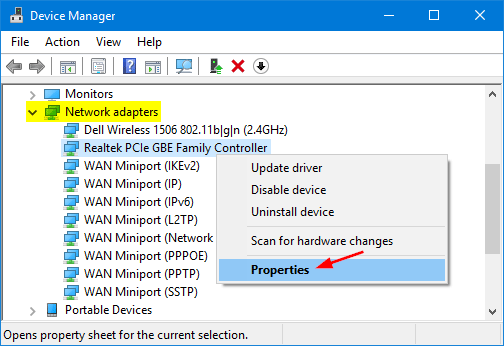
  2. Expand Network adapters, right-click your Ethernet or Wireless adapter and then select Properties.

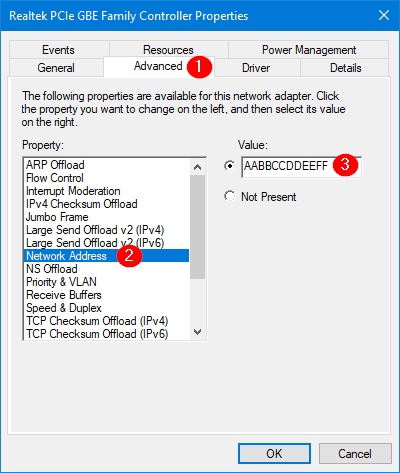
  3. Click the Advanced tab. Within the Property list, scroll down until you find the “Network Address” or “Locally Administered Address” property. Select the Value radio box and enter your new MAC address.

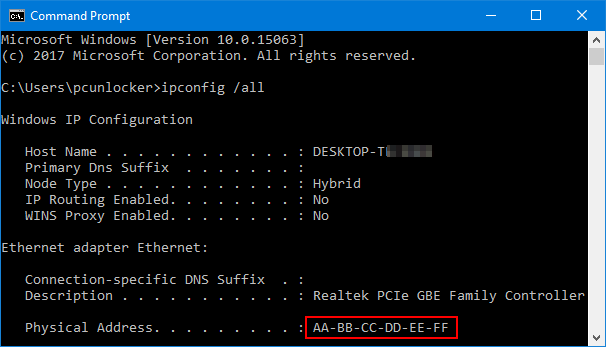
  4. Click OK to apply. To confirm your change, open the Command Prompt and type ipconfig /all and hit Enter. You should see the new MAC address show up in the line starting with “Physical Address“.

Method 2: Change MAC Address on Windows 11 / 10 / 8 / 7 from Registry Editor

  1. Open the Registry Editor and navigate to the following key:
    HKEY_LOCAL_MACHINE\SYSTEM\CurrentControlSet\Control\Class\{4D36E972-E325-11CE-BFC1-08002BE10318}
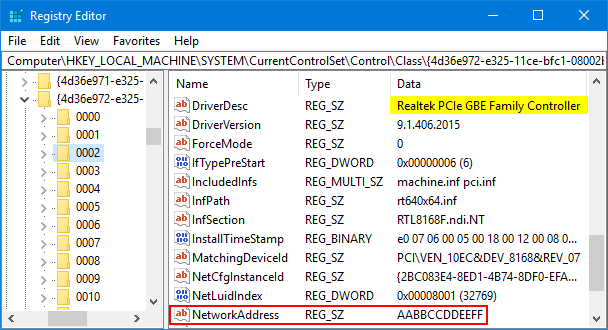
  2. You should see several subkeys with names such as 0000, 0001, etc. You have to click each subkey to check the DriverDesc value that matches with your network card. In my example, I got the key in 002.
  3. Look for the registry entry NetworkAddress in the right pane, and change the value as your new MAC Address. If that entry doesn’t exist, right-click blank area to create a String value with the name NetworkAddress.

  4. Close Registry Editor. Disable your network adapter and enable it again. The new Mac address will apply immediately.

That’s it!

Add Devices and Printers To My Computer in Windows 10 / 8 / 7

November 6th, 2017 by Admin

How can I find Devices and Printers in Windows 10? Devices and Printers lets you easily view and manage peripheral devices in one place, such as printers, webcams, external storage devices and monitors. In this tutorial we’ll show you how to add Devices and Printers to My Computer (or “This PC”) in Windows 10 / 8 / 7.

How to Add Devices and Printers To My Computer?

  1. Open the Command Prompt as administrator.
  2. Copy-paste the following command and press Enter.

    reg add HKEY_LOCAL_MACHINE\SOFTWARE\Microsoft\Windows\CurrentVersion\Explorer\MyComputer\NameSpace\{A8A91A66-3A7D-4424-8D24-04E180695C7A}

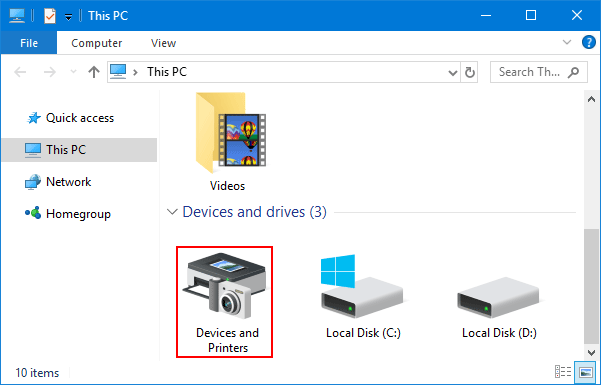
  3. Once pressing Enter, open the Windows Explorer again and you can see the “Devices and Printers” shortcut appear in My Computer (or “This PC”).

If you want to remove Devices and Printers from My Computer (or “This PC”) again, just copy-paste the following command instead:

reg delete HKEY_LOCAL_MACHINE\SOFTWARE\Microsoft\Windows\CurrentVersion\Explorer\MyComputer\NameSpace\{A8A91A66-3A7D-4424-8D24-04E180695C7A} /f

It’s that simple!

Print a List of Currently Running Processes in Windows 11 / 10 / 8 / 7

October 30th, 2017 by Admin

How can I list out all the running processes on a Windows machine? You can use Task Manager to view a list of processes running on your computer, but it doesn’t provide you an option to print or save the processes list. In this tutorial we’ll show you 2 simple ways to print a list of currently running processes in Windows 11 / 10 / 8 / 7.

Method 1: Print the List of Running Processes Using Command Prompt

  1. Open the Command Prompt.
  2. Run the following command and it will save the list of running processes in a file named processes.txt.

    tasklist > C:\processes.txt

  3. Open the output text file in NotePad which allows you to print the processes list.

Method 2: Print the List of Running Processes Using PowerShell

  1. Open the Windows PowerShell.
  2. In order to save the list of running processes in a file named processes.txt, on your C:\ drive, type the following command and press Enter.

    Get-Process | Out-File C:\processes.txt

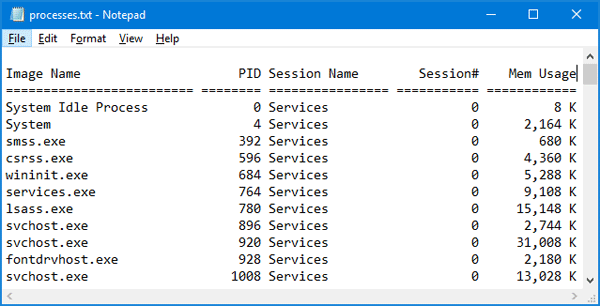
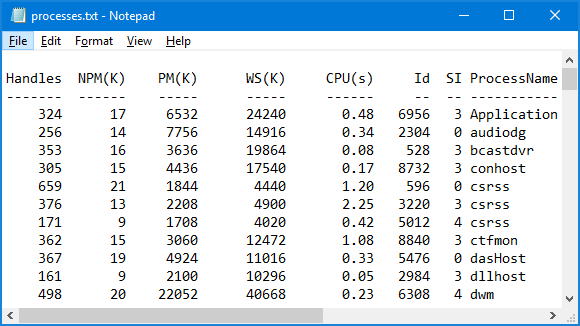
  3. The output text file is formatted as shown below.

Conclusion

Of course, you can also find other ways to print out the list of the processes that are running in Windows 11 / 10 / 8 / 7. For example, you can run the following command at Command Prompt:

wmic /output:C:\process.txt process

Or use the third-party freeware PsList that is developed by Sysinternals.

How to Change RDP Port for Windows Remote Desktop Connection

October 25th, 2017 by Admin

By default, Windows uses TCP/IP port 3389 for remote desktop connection. Since this port is well known and it could pose a security risk, you’d better change remote desktop RDP port for your Windows computer as an added security measure. The following method works with Windows 10, 8, 7 and Windows Server.
How to Change RDP Port for Windows Remote Desktop Connection?

  1. Press the Windows + R keys to open the Run command box. Type regedit and press Enter.

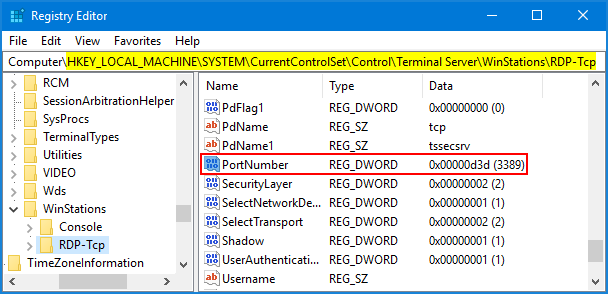
  2. On the left-side of Registry Editor, navigate to the following key:
    HKEY_LOCAL_MACHINE\System\CurrentControlSet\Control\TerminalServer\WinStations\RDP-Tcp\PortNumber

    Scroll down on the right until you see the PortNumber value, and then double-click it to modify.

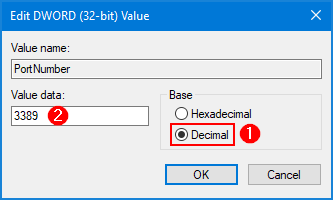
  3. Click Decimal, and type in the new port number that you want to use for remote desktop and click OK.

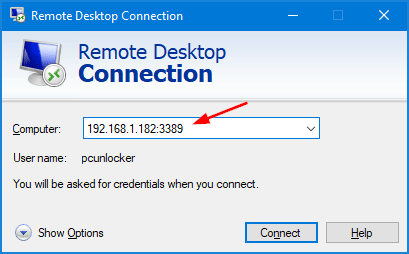
  4. Close the Registry Editor and reboot the computer. Note that the next time you connect to your PC with RDP you will need to add a colon followed by the port number to the IP address.
That’s it!

Disable / Enable Control Panel in Windows 10 / 8 / 7

October 23rd, 2017 by Admin

How to prevent others from accessing the Control Panel? Control Panel exposes lots of system settings to users that you may not want to mess up. In this tutorial we’ll show you 2 simple ways to disable or enable Control Panel in Windows 10 / 8 / 7.

Tips: The Settings app is supposed to replace the classic Control Panel in Windows 10. If you want to disable Settings, you can try this method: Hide Certain or All Settings Pages in Windows 10.

Method 1: Disable / Enable Control Panel Using Group Policy

  1. Use the Windows key + R keyboard shortcut to open the Run command. Type gpedit.msc and click OK to access Local Group Policy Editor.
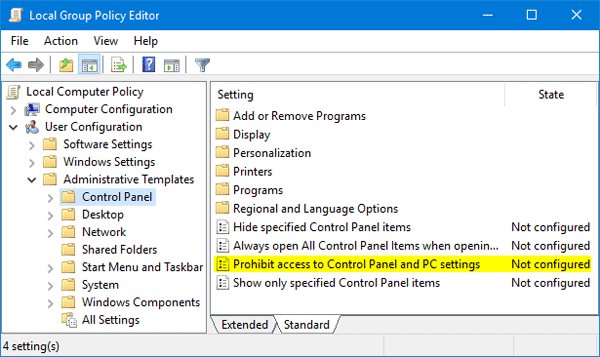
  2. Navigate to the User Configuration > Administrative Templates > Control Panel option from the left sidebar. Next, double-click the “Prohibit access to Control Panel and PC settings” or “Prohibit access to the Control Panel” policy on the right side.

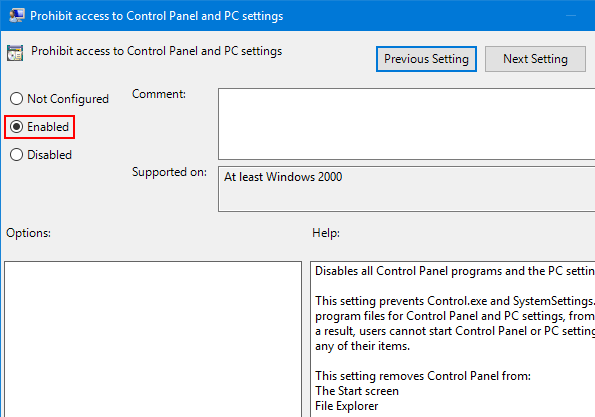
  3. Select the Enabled option, click Apply and then OK. If you want to enable the Control Panel later, just set the value to Not Configured or Disabled.

  4. This policy should take effect immediately. No restart is required. When you try to open the Control Panel, you’ll get this error message: “This operation has been canceled due to restrictions in effect on this computer. Please contact your system administrator.

Method 2: Disable / Enable Control Panel Using Registry Editor

  1. Use the Windows key + R keyboard shortcut to open the Run command. Type regedit and click OK to access Registry Editor.
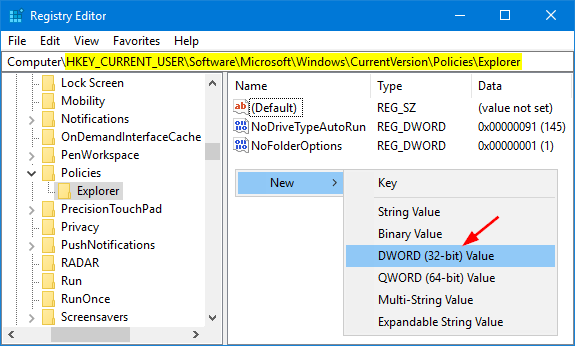
  2. Navigate to HKEY_CURRENT_USER\Software\Microsoft\Windows\CurrentVersion\Policies\Explorer from the left sidebar, right-click empty space in the right pane and choose New > DWORD (32-bit) Value.

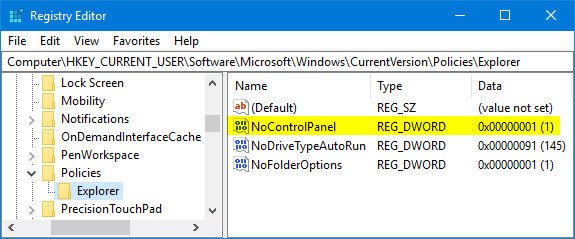
  3. Name your new value NoControlPanel and change the value from 0 to 1.

  4. Restart needed for the registry changes to take effect. After rebooting you’ll be unable to open Control Panel. If you want to restore access to Control Panel, just change the NoControlPanel value from 1 back to 0. That’s it!

How to Import EFS Certificate into Windows 10, 8 and 7

October 17th, 2017 by Admin

If you lost access to your EFS encrypted files, you’ll not be able to open them unless you have a backup of the EFS certificate to decrypt the data. In this tutorial we’ll show you 2 simple ways to import EFS certificate into Windows 10, 8 and 7, so you can regain access to your EFS encrypted files.

Method 1: Import EFS Certificate into Windows Using Certificate Import Wizard

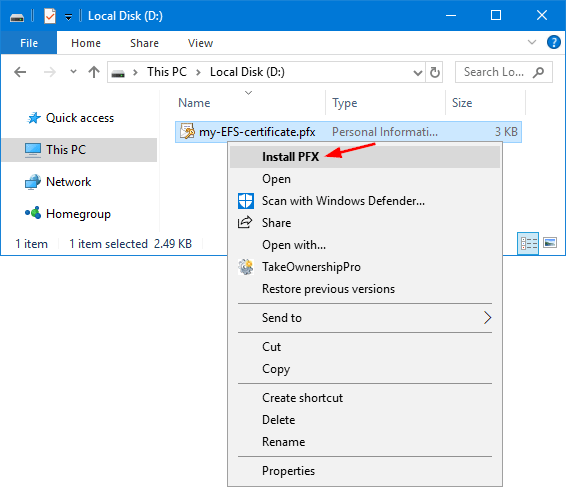
  1. Right-click on your EFS certificate (.pfx) in Windows Explorer, and then select Install PFX from the context menu.

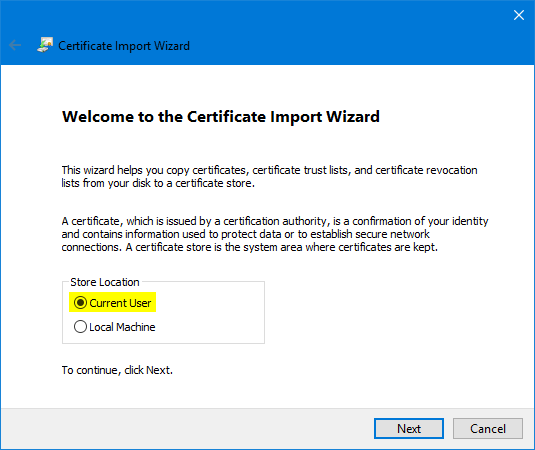
  2. When the Certificate Import Wizard opens, click Next.

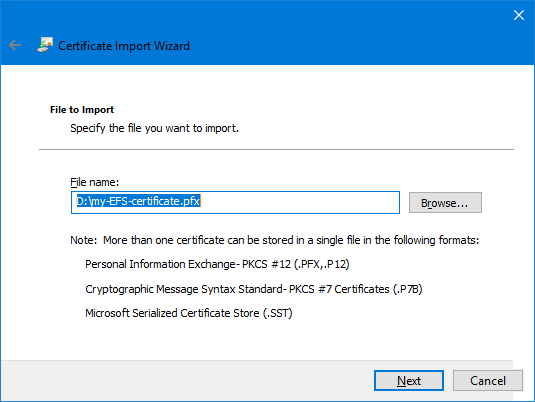
  3. Confirm the EFS certificate file with the .PFX extension is entered in the File name field. Click Next.

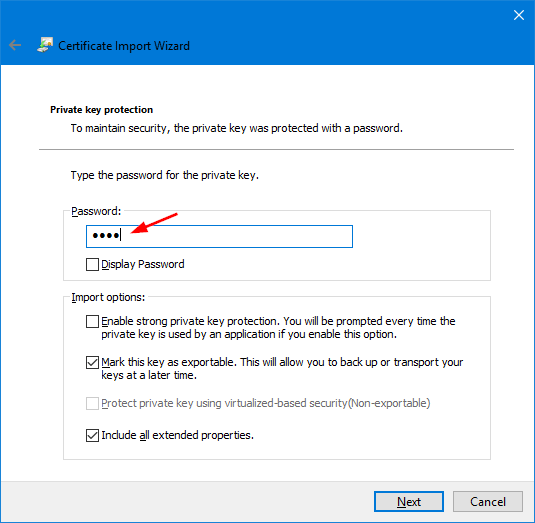
  4. Enter the password to access the private key associated with the EFS certificate. Select the box “Mark this key as exportable. This will allow you to back up or transport your keys at a later time“. Click Next.

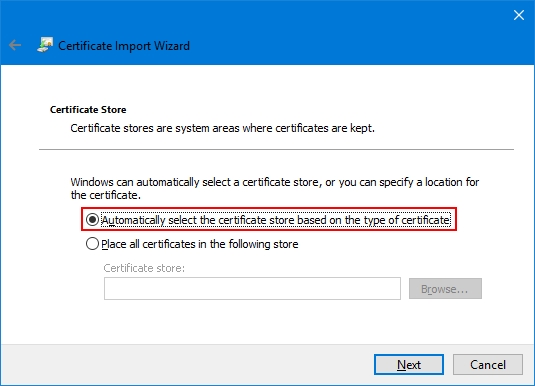
  5. Click “Automatically select the certificate store based on the type of certificate” and click Next.

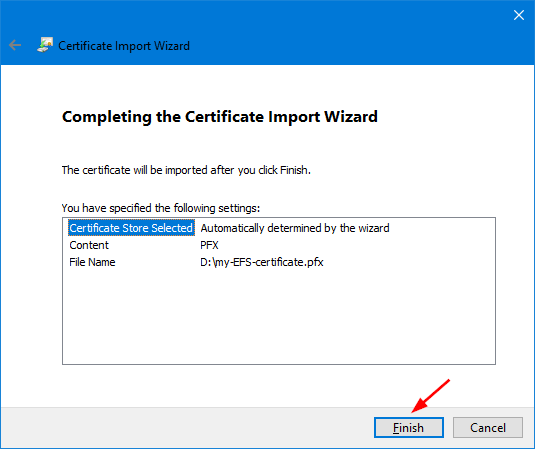
  6. Click Finish.

    You should see a message reporting that the import was successful.

Method 2: Import EFS Certificate into Windows Using Command Prompt

  1. Open the Command Prompt as administrator.
  2. If you want to import EFS certificate you’ve backed up, type the following command and press Enter.

    certutil.exe -p [certificate_password] -user -importpfx [certificate_full_path]

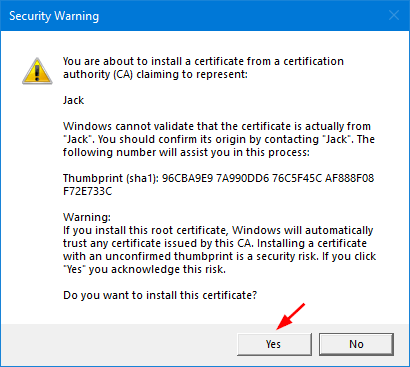
  3. You will get a security warning indicating that the self-signed EFS certificate is not signed from a trusted authority. Click Yes to continue.

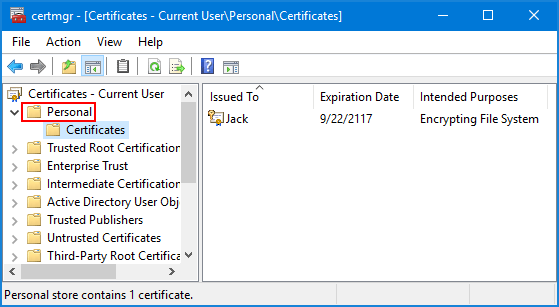
  4. Now you’ve successfully imported the EFS certificate (.pfx) into the Personal store of Certificates Manager.

2 Ways to Backup or Export EFS Certificate in Windows 10 / 8 / 7

October 16th, 2017 by Admin

When you encrypts a folder or file with EFS, Windows will create a EFS certificate and store it locally, so you can transparently access encrypted files without being prompted for certificate / password. In the event of a system failure or your EFS certificate is corrupted or lost, you’ll be unable to access EFS encrypted files any more. So it is very important to backup or export EFS certificate in Windows 10 / 8 / 7.

Method 1: Backup or Export EFS Certificate Using Certificates Manager

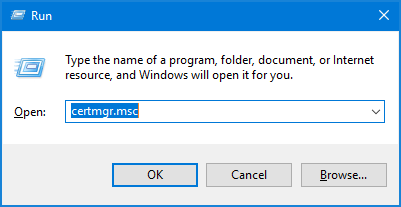
  1. Press the Windows key + R together to open the Run box. Type certmgr.msc and click OK to open Certificates Manager.

  2. In the left pane of the Certificates console, expand the Personal node and then click on Certificates.

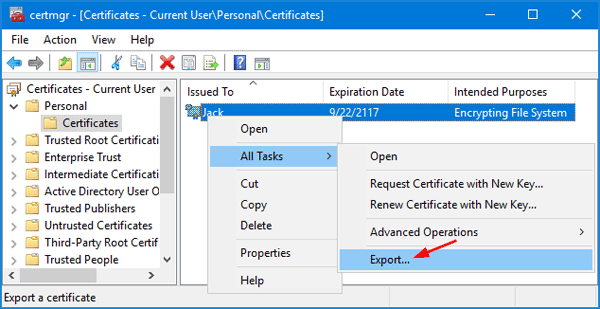
  3. In the right pane, right-click the certificate that lists Encrypting File System under Intended Purposes, and then select All Tasks -> Export.

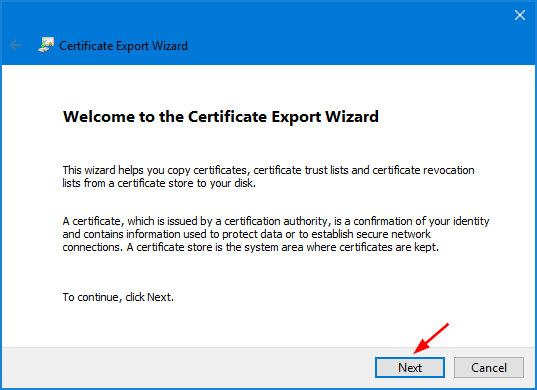
  4. When the Certificate Export Wizard opens, click Next.

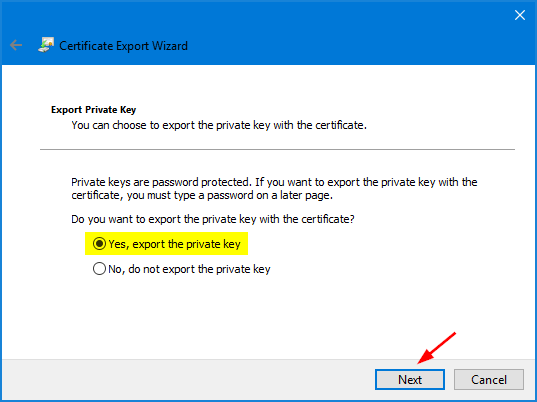
  5. Choose “Yes, export the private key” and click Next.

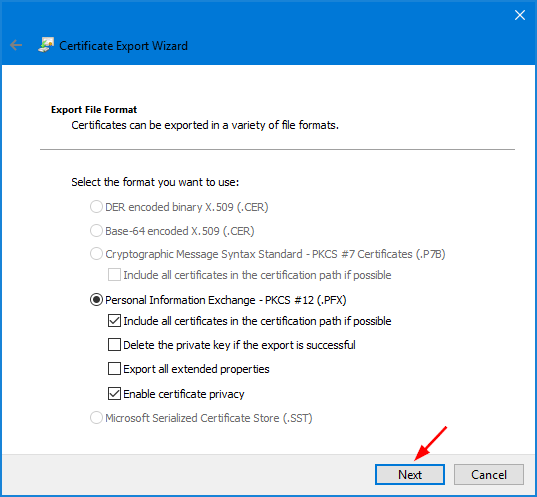
  6. Click the checkbox next to “Include all certificates in the certification path if possible” and click Next.

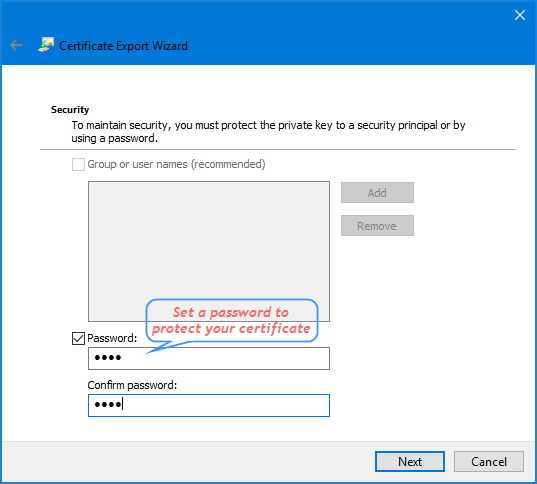
  7. Enter a password that will be used to protect your exported EFS certificate. Confirm it and click Next.

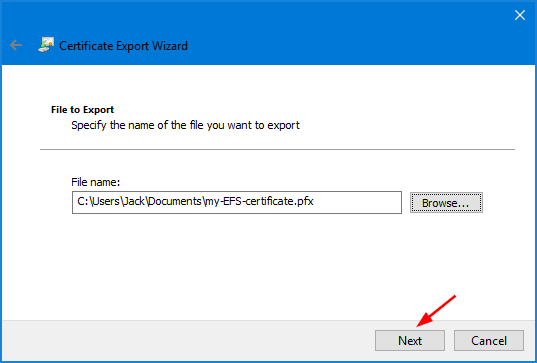
  8. Click the Browse button to find a location to save your exported EFS certificate (.pfx). Type in a name such as “my-EFS-certificate.pfx” and then click Next.

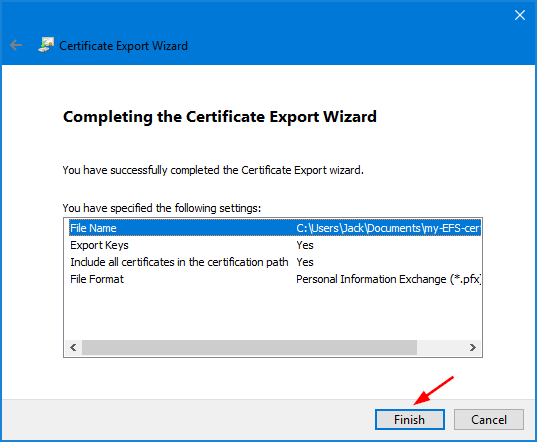
  9. Click Finish.

    You can then backup the exported EFS certificate in a safe place!

Method 2: Backup or Export EFS Certificate Using Command Prompt

  1. Open the Command Prompt as administrator.
  2. In order to export EFS certificate stored in Certificates Manager, type the following command:

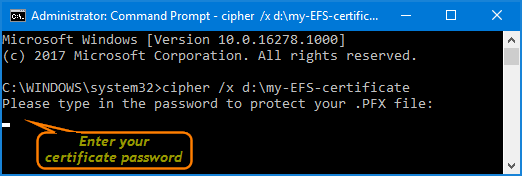
    cipher /x d:\my-EFS-certificate

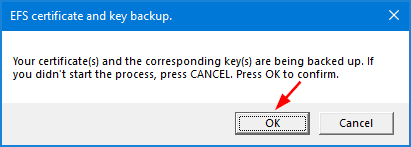
  3. Once you press Enter, you’ll be prompted to confirm backing up EFS certificate. Click OK to continue.

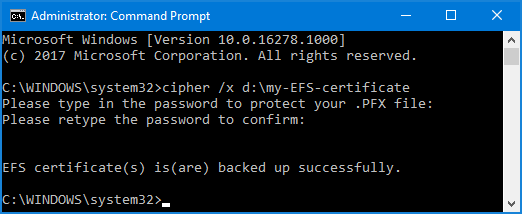
  4. Type a password used for protecting your EFS certificate, then confirm the password.

  5. The .pfx file containing the EFS private key certificate is now saved to the location d:\my-EFS-certificate.

    That’s it!