Archive for the ‘Windows 7’ category

How to Protect Outlook .OST File from Unauthorized Access

October 23rd, 2020 by Admin

How can I set a password for my .OST file in Outlook 2013? It’s super simple to password protect a .PST file, but Outlook doesn’t offer built-in encryption for OST file. If you need to prevent other users from accessing the email messages stored in an .OST file, you can protect Outlook .OST file using third-party software – Protect My Folders.

Part 1: Find the location of OST file

Before getting started, you need to find the location of OST file in Outlook application. Follow these steps:

  1. Open the Control Panel in Large icon view, and click on the Mail option.
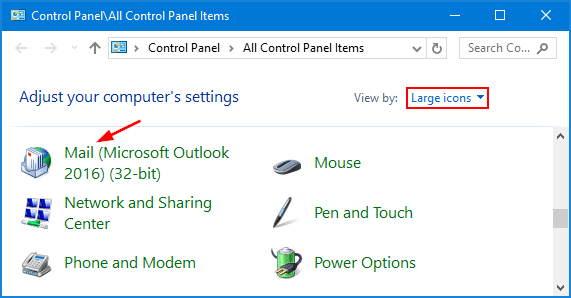
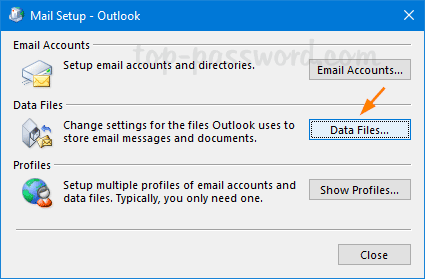
  2. When the Mail Setup window appears, click on the the Data Files button.
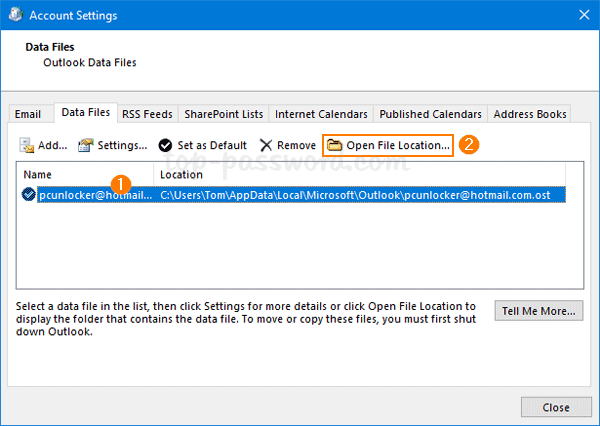
  3. The Account Settings dialog should list .pst or .ost files for all your email accounts in Outlook. Choose the .ost file you want to protect, and then click on the “Open File Location” button.
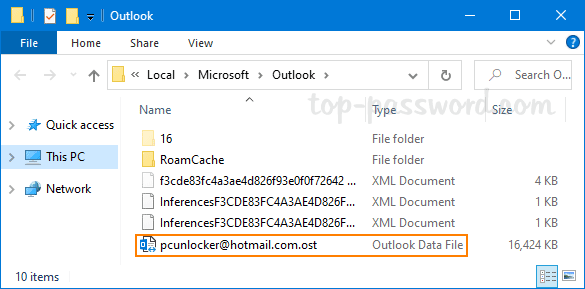
  4. File Explorer will open the folder that contains the specified outlook .ost file.
Part 2: Protect Outlook OST File from Unauthorized Access

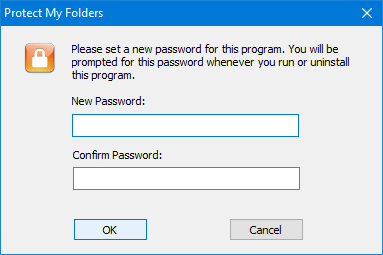
  1. Download and install the Protect My Folders application on your computer. The first time you launch the program, it will prompt you to set up a master password in order to manage protected folders / files.
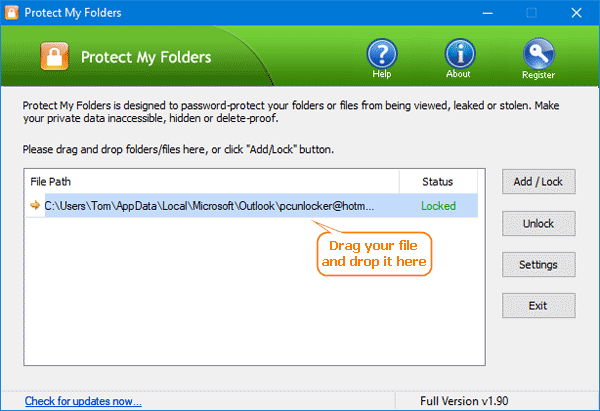
  2. Just drag your desired .ost file from File Explorer and drop it to the Protect My Folders app, it will be hidden and locked down.
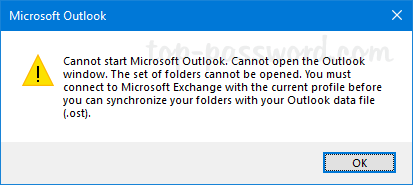
  3. Nobody can access, copy, or delete a secured .ost file. If you launch Outlook application, you’ll get the error that says the ost file can’t be opened.
  4. Whenever you need to access the secured .ost file, just launch Protect My Folders and enter the master password. Select your .ost file and click on “Unlock“. You can then start Outlook application and access anything stored in that .ost file.

That’s it!
Keep Notepad or Any Window Always On Top in Windows 10 / 8 / 7

September 13th, 2020 by Admin

Could I keep a browser window or Notepad on top of all other windows? Most of Windows programs don’t natively support “Always On Top” feature. Today we’ll show you an easy way to keep Notepad or any other window always on top in Windows 10 / 8 / 7.

How to Keep Notepad or Any Window Always On Top in Windows

  1. Before getting started, you need to download and install a lightweight, free software – AutoHotkey, which lets you create a simple script to make any window stay on top.
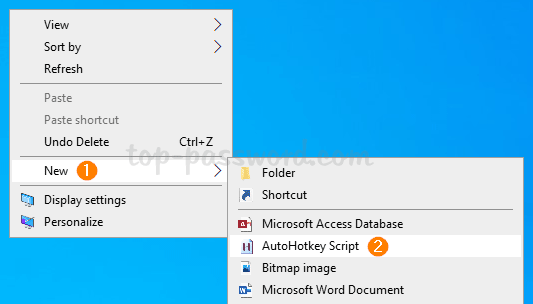
  2. After installing, right-click any blank area on the desktop or a File Explorer window, and then select New -> AutoHotkey Script from the context menu.

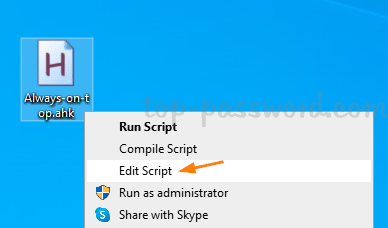
  3. Enter a meaningful name for the new script file. Right-click it and select Edit Script.

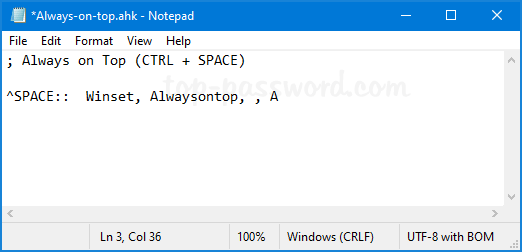
  4. Remove the auto-generated text, and then paste the following command. Save and close the script.

    ; Always on Top (CTRL + SPACE)
    ^SPACE:: Winset, Alwaysontop, , A

    Note: This command will make the active window always on top when you press Ctrl + Space. The “^” character represents the Ctrl key. If you want to assign a different keyboard combination, just refer to the AutoHotkey help page and edit your script.

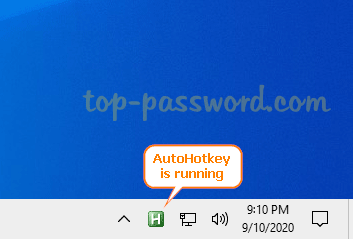
  5. Next, double-click your script to run it. You’ll see a green “H” icon appear in the system tray.

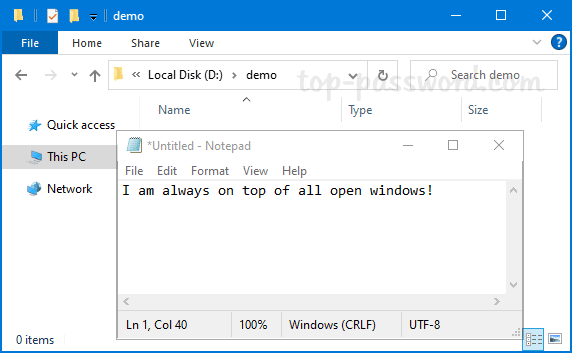
  6. Now you can make any open window always stay on top. Just bring your target window to the foreground and then press the Ctrl + Space keyboard shortcut to keep it on top of all other windows.

    If you want to disable “Always On Top” for the current active window, just press Ctrl + Space again or exit the AutoHotkey app.

Easy Ways to Change Windows Password from Remote Desktop Session

September 8th, 2020 by Admin

How can I change a Windows password before expiration on Remote Desktop session? Pressing Ctrl + Alt + Del doesn’t give you options to change the password in the remote session, as that command will execute on your local PC instead of the remote one. In this tutorial we’ll show you 4 easy ways to change Windows password from Remote Desktop session.

Method 1: Pressing Ctrl + Alt + End

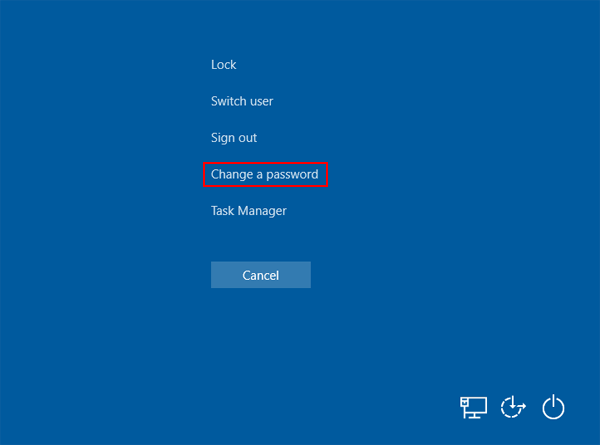
While connected to Remote Desktop session, press the Ctrl + Alt + End keyboard combination and it will open the Windows Security Screen. You’ll see the option to change your Windows password.

Method 2: Using On-Screen Keyboard

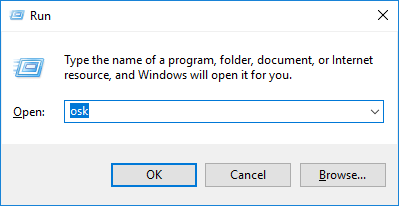
From within the Remote Desktop session, press the Windows key + R to open the Run box. Type osk.exe to bring up the On-Screen Keyboard.

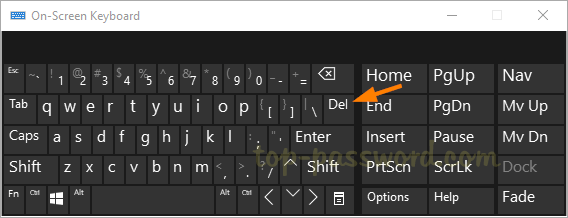
Hold down both Ctrl and Alt keys on your physical keyboard, and then click the Del key in the On-Screen Keyboard. This will also open up the Windows Security screen.

Method 3: Using Command Prompt

Open an elevated Command Prompt. Type the following command and press Enter.
explorer.exe shell:::{2559a1f2-21d7-11d4-bdaf-00c04f60b9f0}

The new screen will show the option to change the password. If you need to frequently change a Windows password from RDP, you can create a batch file or desktop shortcut to run the above command.

Method 4: Using Windows PowerShell

Open Windows PowerShell as admin, and then execute this command:
(New-Object -COM Shell.Application).WindowsSecurity()

This will bring up the Windows Security screen. There you can select “Change a password” to update your password.

Conclusion

In contrast to resetting Windows password, changing a password requires you to remember the current password. After changing your Windows password using the above methods, you should still have access to the EFS protected files.

3 Ways to Disable IPv6 in Windows 10 / 8 / 7

August 20th, 2020 by Admin

IPv6 causes connectivity issues? IPv6 is the latest version of the Internet Protocol, which is supposed to replace IPv4. However, most websites or softwares don’t work with IPv6 yet. It is common for IT administrators to disable IPv6 to fix some unknown, networking-related issue. In this tutorial we’ll show you 3 easy methods to disable IPv6 in Windows 10 / 8 / 7.

Method 1: Disable IPv6 in Network Adapter Properties

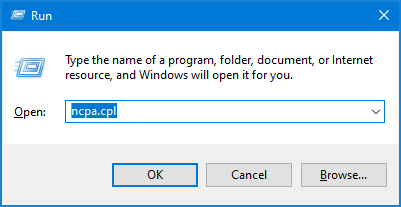
  1. Press the Windows logo key + R to open the Run dialog. Type ncpa.cpl and hit Enter.

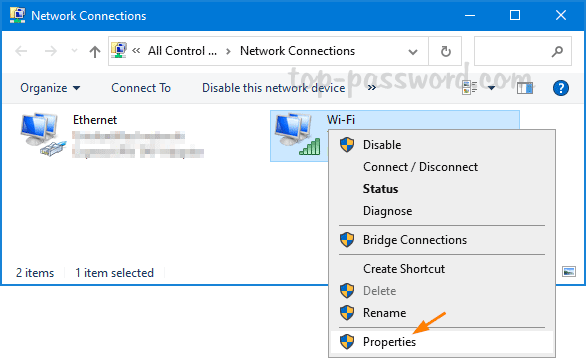
  2. It will open the Network Connections window. Right-click the network adapter you want to disable IPv6 on, and then select Properties.

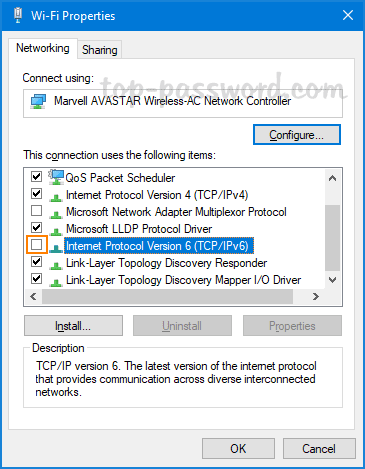
  3. In order to disable IPv6, uncheck the box next to Internet Protocol Version 6 (TCP/IPv6). Click OK.

  4. You can use the same method to disable IPv6 for other network adapters.

Method 2: Disable IPv6 Using PowerShell

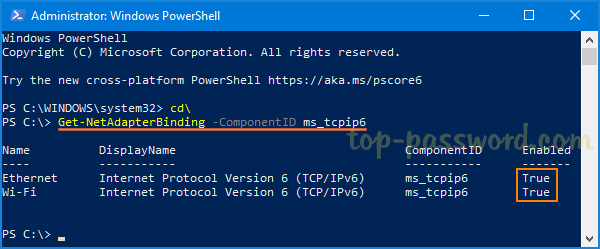
  1. First, you need to open Windows PowerShell as administrator. Next, run the following command to check the status of IPv6 for all network adapters available in your computer.

    Get-NetAdapterBinding -ComponentID ms_tcpip6

    In my example, “Wi-Fi” is the name of the network adapter I want to disable IPv6 on.

  2. To disable IPv6 on a specific network adapter only, type the following command. Replace “Wi-Fi” with the name of your network adapter card.
    Disable-NetAdapterBinding -Name "Wi-Fi" -ComponentID ms_tcpip6

    You can use the wildcard * to disable IPv6 on all network adapters, instead of disabling them one by one.
    Disable-NetAdapterBinding -Name "*" -ComponentID ms_tcpip6

  3. Whenever you need to enable IPv6 again, just run this command:
    Enable-NetAdapterBinding -name * -ComponentID ms_tcpip6

Method 3: Disable IPv6 Using Command Prompt

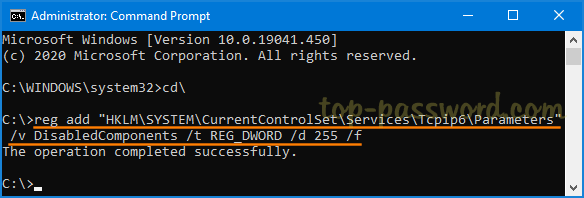
  1. Open the Command Prompt as administrator, and execute this command to disable IPv6 completely:
    reg add "HKLM\SYSTEM\CurrentControlSet\Services\Tcpip6\Parameters" /v DisabledComponents /t REG_DWORD /d 255 /f

  2. Restart the computer for changes to take effect. To verify if IPv6 is disabled, run ipconfig /all and see if the interface shows IPv6 address.

    To revert and enable IPv6, you can delete DisabledComponents registry key with this command:
    reg delete "HKLM\SYSTEM\CurrentControlSet\Services\Tcpip6\Parameters" /v DisabledComponents /f

That’s all there is to it.

How to Change Storage Capacity for Recycle Bin in Windows 10 / 8 / 7

June 24th, 2020 by Admin

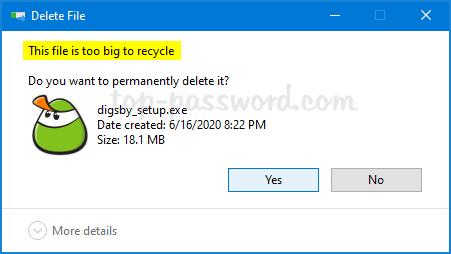
Recycle Bin is a hidden folder in Windows which can store deleted files. Once the maximum storage size for the Recycle Bin is reached, Windows will automatically delete the oldest files permanently to make space for newly deleted files. If your Recycle Bin’s storage capacity is too small to hold a large file, you’ll get the following warning.

“This file is too big to recycle. Do you want to permanently delete it?”

To get rid of this warning, you need to increase the maximum storage size for the Recycle Bin. In this tutorial we’ll walk you through the steps to change storage capacity for Recycle Bin in Windows 10 / 8 / 7.

How to Change Storage Capacity for Recycle Bin in Windows

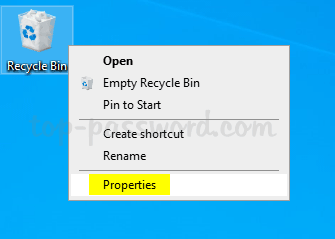
  1. Right-click the Recycle Bin icon on your desktop and then select “Properties” from the context menu.

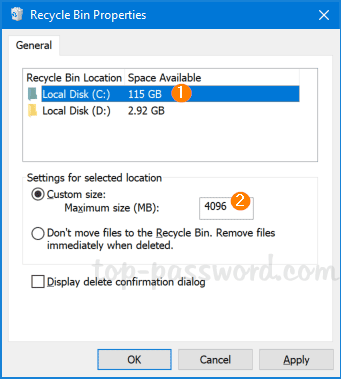
  2. In the Recycle Bin Properties window, select a drive listed in the box and click the Custom size option, then specify the maximum size that it can hold deleted files. Each drive has its own Recycle Bin folder so you can set the storage capacity differently.

    The default maximum storage size of a Recycle Bin location is about 5% of its space available.

  3. Click OK to save your changes.

That’s it!
How to Prevent Windows from Turning off Hard Drive after Idle

May 29th, 2020 by Admin

By default, Windows will automatically turn off your hard drive after 20 minutes of idle time. This can help save energy and extend a laptop’s battery life. When you try to access a hard disk that is turned off, you will notice a slight delay for the drive to spin back up. Constantly spinning down/up can reduce the life of the hard disk, so I recommend you leave the drive spinning all the time, or set the drive to turn off after a longer period (one or two hours) of inactivity. In this tutorial we’ll show you 2 methods to prevent Windows from turning off hard drive after idle.

Method 1: Prevent Turning off Hard Drive via Power Options

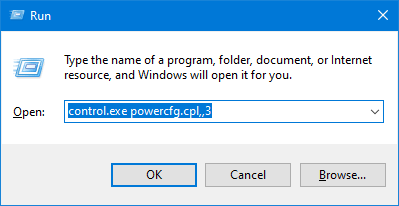
  1. Press the Windows logo key + R to open the Run box. Type the following and hit Enter to open the Power Options window.
    control.exe powercfg.cpl,,3

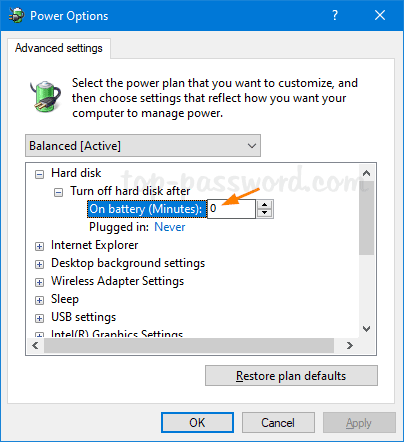
  2. Expand Hard disk and Turn off hard disk after, change the value to 0 and click OK.

    Your hard drive will never fall into sleep after idle.

Method 2: Prevent Turning off Hard Drive via Command Prompt or PowerShell

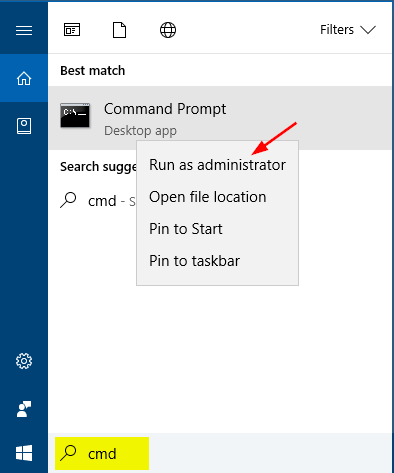
  1. Open the Command Prompt or PowerShell as administrator.

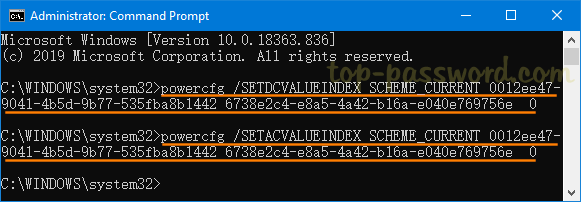
  2. Run the following commands one by one, replacing “seconds_of_idle” with 0.

    powercfg /SETDCVALUEINDEX SCHEME_CURRENT 0012ee47-9041-4b5d-9b77-535fba8b1442 6738e2c4-e8a5-4a42-b16a-e040e769756e seconds_of_idle

    powercfg /SETACVALUEINDEX SCHEME_CURRENT 0012ee47-9041-4b5d-9b77-535fba8b1442 6738e2c4-e8a5-4a42-b16a-e040e769756e seconds_of_idle

  3. When it’s done, your hard drive should keep spinning all the time and it never goes to sleep after idle.

3 Ways to Configure Windows to Create Crash Dumps on BSOD

May 19th, 2020 by Admin

The blue screen of death (BSOD) usually happens when a critical error occurs and Windows is unable to recover and repair it automatically. In order to identify the cause of the blue screen, you need to configure Windows to create minidump on every crash.

Method 1: Enable Minidump Creation Using System Properties

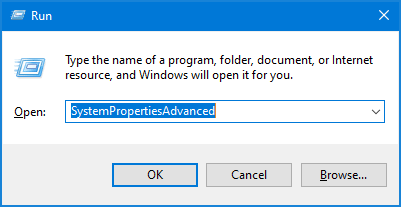
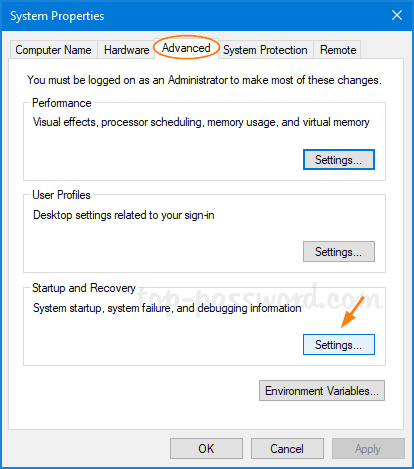
  1. Press the Windows key and R to bring up the Run box, and type SystemPropertiesAdvanced and hit Enter to open the System Properties window.

  2. Click on the Settings button under the “Startup and Recovery” section.

  3. The memory dump options are in the “Write debugging information” section. By default, it is Automatic memory dump. Just change it to “Small memory dump (256 KB)” and click OK.

  4. Whenever your PC presents a blue screen, it will automatically collect some diagnostic information and store them in a minidump file which you can find under the directory C:\Windows\Minidump.

Method 2: Enable Minidump Creation Using Registry Tweak

  1. Open Registry Editor and browse to the following location:
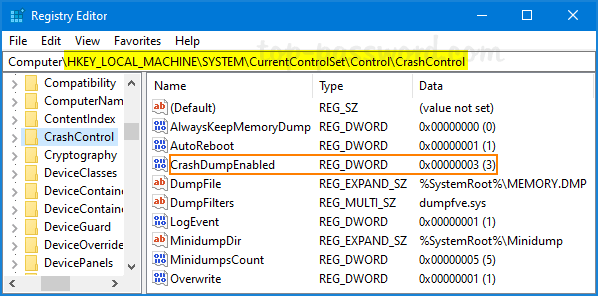
    HKEY_LOCAL_MACHINE\SYSTEM\CurrentControlSet\Control\CrashControl
  2. On the right side, double-click on the 32-bit DWORD CrashDumpEnabled and change its value from the default value 7 to 3.

    • 0x0: None
    • 0x1: Complete memory dump
    • 0x2: Kernel memory dump
    • 0x3: Small memory dump (64 KB)
    • 0x7: Automatic memory dump
  3. You must restart Windows in order for your registry changes to take affect.

Method 3: Enable Minidump Creation Using Command Prompt

  1. Open the Command Prompt as administrator. Enter the following command to find out which type of memory dumps you are using.
    wmic RECOVEROS get DebugInfoType

  2. If you want to enable minidump creation, run the below command:
    wmic RECOVEROS set DebugInfoType = 3

  3. When it’s done, reboot your computer.

Minidump file is stored in a binary format. In order to view and analyze its content, you need to use the third-party software like WinDbg or BlueScreenView.

How to Export a Directory Structure in Windows 10 / 8 / 7

May 11th, 2020 by Admin

How can I print the hierarchical structure of a particular directory so I can share it to other people? Printing a directory listing sounds so easy, but Windows doesn’t provide a straightforward way to do this. In this tutorial we’ll show you how to use Command Prompt or PowerShell to export a directory structure in Windows 10 / 8 / 7.

Method 1: Export Directory Structure Using Command Prompt

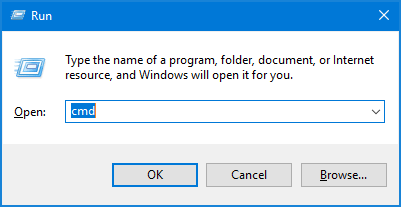
  1. Press the Windows key + R to launch the Run box. Type cmd and hit Enter to open Command Prompt.

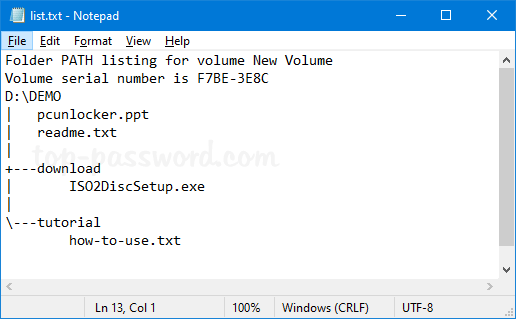
  2. You can run the “tree” command to export the directory tree of any folder to a text file. In our case, the “d:\demo” is the folder we want to export the directory tree, and the result is saved in a plain text file (*.txt).

    tree d:\demo /a /f > d:\list.txt

  3. Open the text file using Notepad and the entire directory tree is listed inside, and you can print them out.

If you look for a way to export the directory structure in .csv format so you can open it with Microsoft Excel, proceed to the next method.

Method 2: Export Directory Structure Using PowerShell

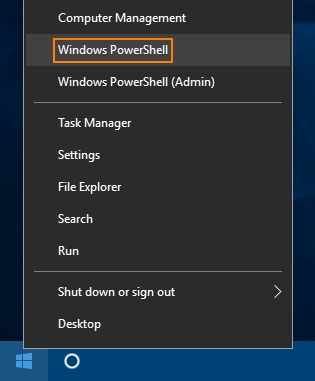
  1. To get started, you need to open the Windows PowerShell window. If you’re running Windows 10, press the Windows key + X together and select “Windows PowerShell“.

  2. Enter the following command and press Enter. Make sure you replace “d:\demo” with the folder which you want to export the directory structure.

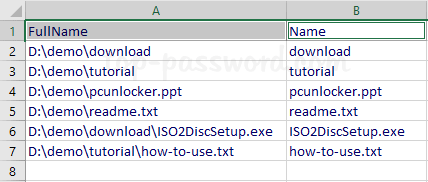
    Get-ChildItem -Recurse 'd:\demo' | Select-Object FullName, name | Export-Csv -path d:\list.csv -noTypeInfo

  3. It will generate a .csv file which lists all files and sub-folders in your target directory. But it doesn’t show you the hierarchical levels like the Method 1 will.

That’s it!

2 Ways to Prevent NTLM Credentials from Being Sent to Remote Servers

April 14th, 2020 by Admin

When you try to access a web page which contains a file hosted on a SMB server, Windows automatically sends your user name and NTLM credentials to authenticate. Although the credentials are not sent in clear-text, the attacker can crack them to recover your Windows password. To avoid leaking your account credentials, you can block NTLM (allowing only Kerberos) so Windows will no longer send your NTLM credentials to remote servers.

Method 1: Restrict Outgoing NTLM Traffic Using Group Policy

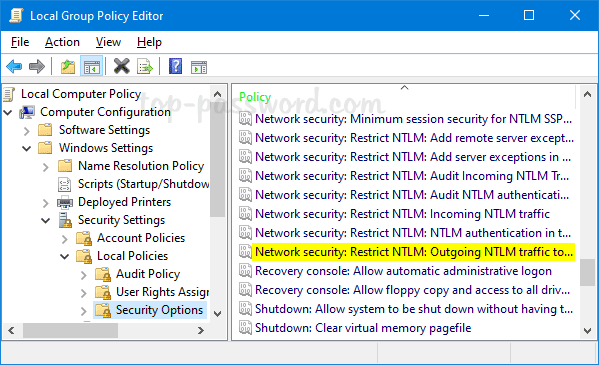
  1. Open the Local Group Policy Editor and navigate to: Computer Configuration -> Windows Settings -> Security Settings -> Local Policies -> Security Options. On the right pane, double-click the “Network security: Restrict NTLM: Outgoing NTLM traffic to remote servers” policy.

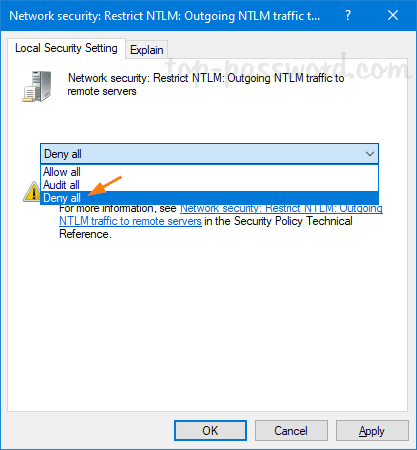
  2. Select Deny all from the drop-download list, click Apply and then OK.

  3. Reboot your computer and Windows will no longer automatically send your NTLM credentials to a remote server when accessing a share.
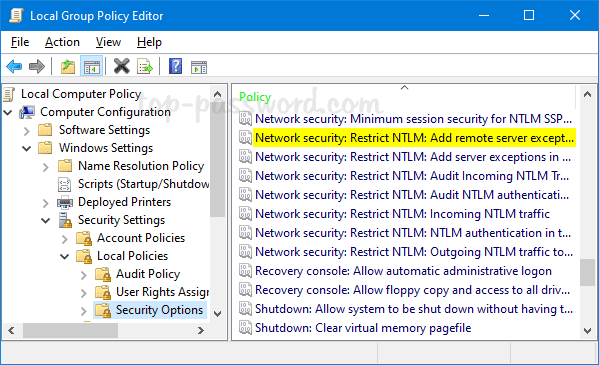
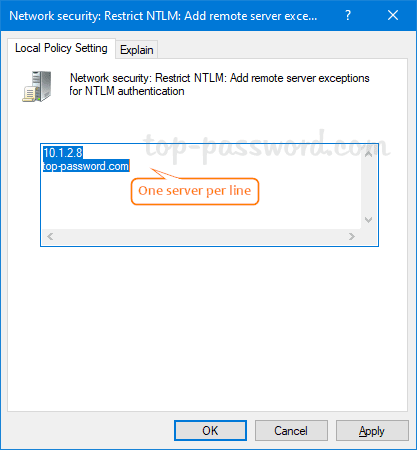
  4. If you need to add some remote servers to a whitelist, double-click on the “Network security: Restrict NTLM: Add remote server exceptions for NTLM authentication” policy.

  5. Add the remote servers to the list of exceptions, click Apply and then OK.

Method 2: Restrict Outgoing NTLM Traffic Using Registry Tweak

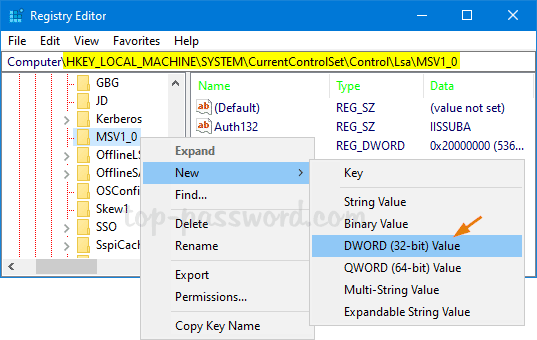
  1. Open Registry Editor and browse to: HKEY_LOCAL_MACHINE\SYSTEM\CurrentControlSet\Control\Lsa\MSV1_0. Right-click on the MSV1_0 key, select New -> DWORD (32-bit) Value.

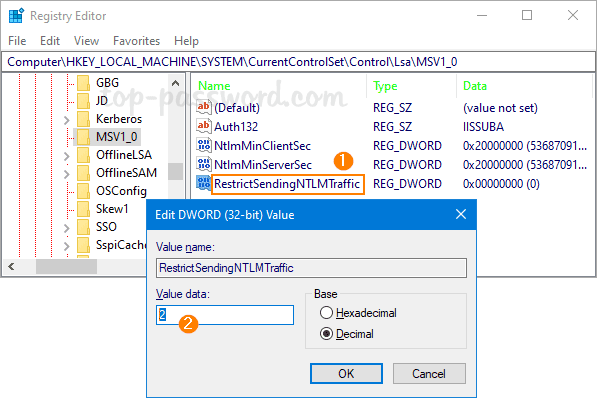
  2. Name the newly created DWORD RestrictSendingNTLMTraffic, then double-click it to set the value data to 2 and click OK.

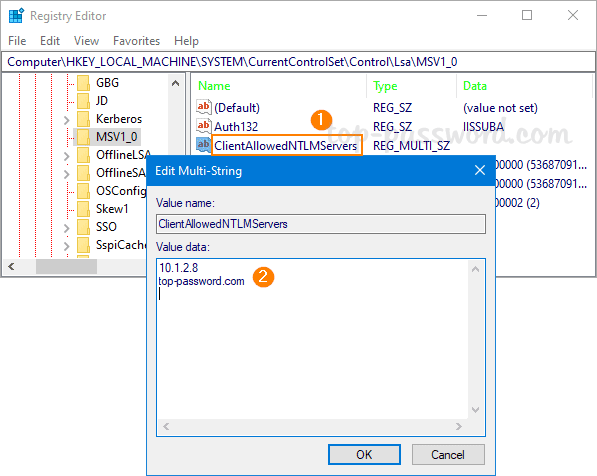
  3. If you want to add certain servers that you wish to whitelist, use the similar method to create a new DWORD named ClientAllowedNTLMServers. Double-click it and add remote servers which you allow sending NTLM credentials to.

  4. Reboot your computer to apply the changes. You can continue accessing files on remote servers which are whitelisted while stopping Windows from potentially sending your NTLM credentials over the network.

4 Ways to Turn Off / On Thumbnail Previews in Windows Explorer

April 7th, 2020 by Admin

Is there any way to disable video and image thumbnail preview in Windows 10? Thumbnail previews are useful since they let you preview Windows files without opening them, but it might slow down folder navigation process. In this tutorial we’ll show you 4 ways to turn off or on thumbnail previews in File Explorer on Windows 10 / 8 / 7.

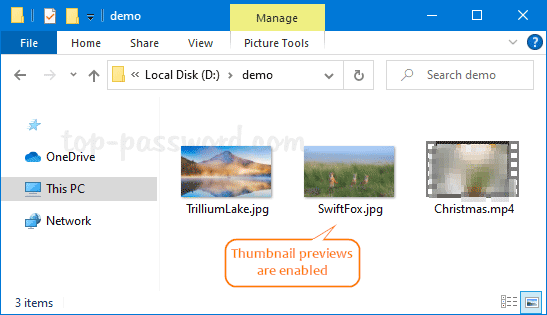
Thumbnail previews are enabled:

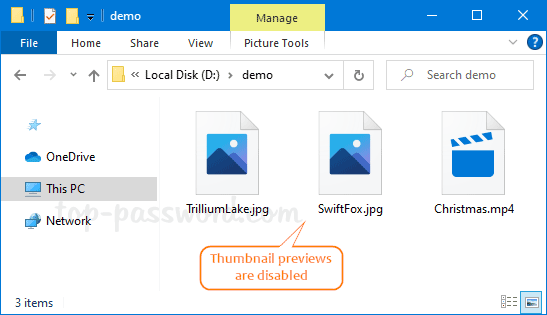
Thumbnail previews are disabled:

Method 1: Disable or Enable Thumbnail Previews via Folder Options

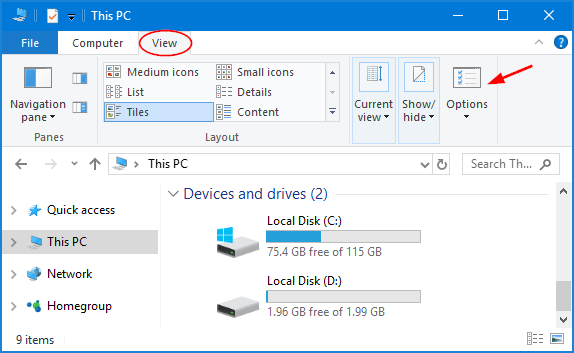
  1. Open Windows Explorer. Go to the View tab and click the Options button in the Ribbon menu.

  2. Click on the View tab and check the option “Always show icons, never thumbnails” to disable thumbnail previews, or uncheck it to enable thumbnail previews.

  3. Click OK to save your changes.

Method 2: Disable or Enable Thumbnail Previews via Performance Options

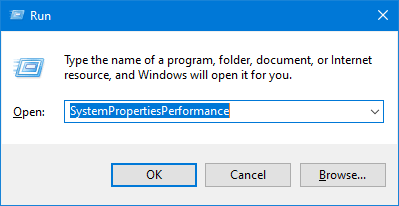
  1. Press the Windows key + R keyboard shortcut, then type SystemPropertiesPerformance in the Run box and press Enter.

  2. The Performance Options window will open. Uncheck or check the “Show thumbnails instead of icons” option under the Visual Effects tab, and click OK.

Method 3: Disable or Enable Thumbnail Previews via Registry Editor

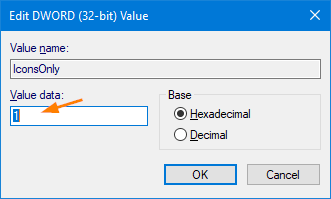
  1. Open Registry Editor and navigate to HKEY_CURRENT_USER\SOFTWARE\Microsoft\Windows\CurrentVersion\Explorer\Advanced. On the right pane, double-click the DWORD value IconsOnly to modify.

  2. Change the value data to 1 to hide thumbnails or 0 to show thumbnails, and click OK.

  3. You only need to refresh your File Explorer to see the changes immediately.

Method 4: Disable or Enable Thumbnail Previews via Group Policy

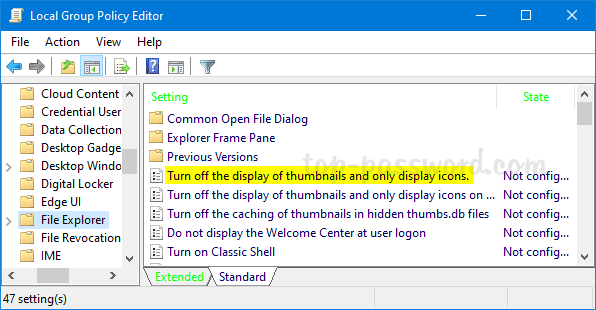
  1. Open Local Group Policy Editor and browse to: User Configuration -> Administrative Templates -> Windows Components -> File Explorer. Double-click the “Turn off the display of thumbnails and only display icons” policy on the right pane.

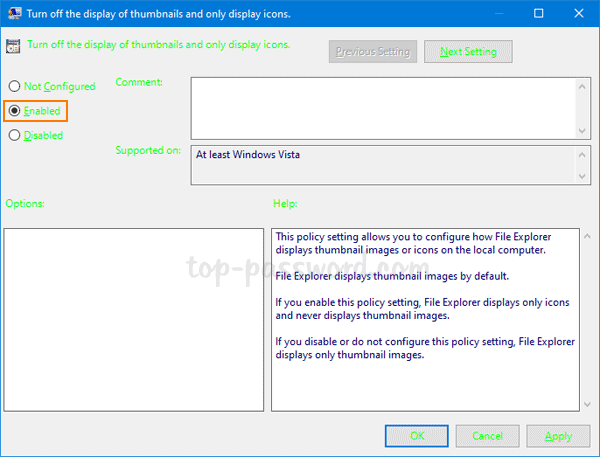
  2. Select Enabled to turn off thumbnail previews, or select Not configured to turn on thumbnail previews. Next, click OK.

  3. You can see the changes by refreshing your folder in Windows Explorer. No need to restart Windows. After disabling thumbnail previews with group policy, it’s impossible to enable thumbnail previews using other methods above until you set this policy back to Not configured.