Archive for the ‘Others’ category

How to Copy and Paste Files Across Remote Desktop

October 23rd, 2012 by Admin

There are occasions when you need to copy or transfer files between your local and remote computers via remote desktop. However the copy and paste generally doesn’t work. The well-known solution is to enable drive mapping in remote desktop, so you can access your local drive from the remote computer. But it will expose your personal local drive to that computer, which can also lead to virus attack.

Actually, you can make the copy and paste function work by starting the Rdpclip utility. Rdpclip (remote desktop clipboard) is responsible for providing copy/paste functionality over a remote desktop connection, which is available in all versions of Windows. To regain the copy and paste function, you’ll need to manually restart the Rdpclip.exe utility.

How to Copy and Paste Files Across Remote Desktop?

  1. Click Start, type mstsc in the Run box to start up a remote desktop connection dialog.
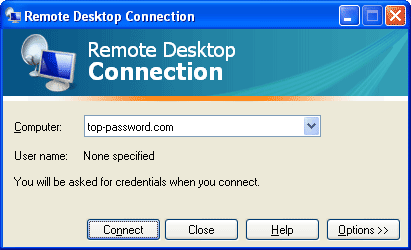
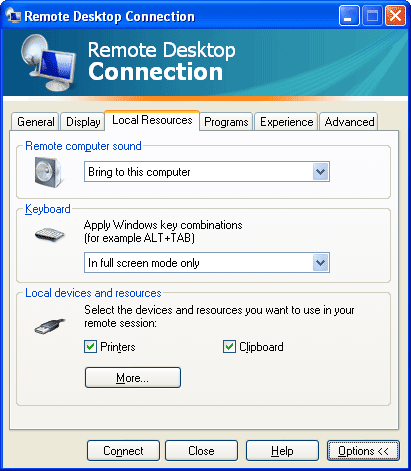
  2. Then expand the dialog by clicking on Options, then check the Local Resources tab.
  3. Make sure the Clipboard is checked, so the Rdpclip utility will be automatically started in your remote computer after setting up a remote desktop connection.
  4. The next step is to launch the Rdpclip utility on your local computer. Just click Start menu, type rdpclip in the Run box, press Enter key. The program will run in the background.
  5. Now you should be able to copy and paste files from your local computer to a remote desktop session, drag and drop files from the remote desktop machine to your local machine.

If the copy and paste function still does not work or stops working all of a sudden, you may need to kill the Rdpclip process and start it again.
How to Locate and Encrypt PST File in Outlook 2010

October 12th, 2012 by Admin

Microsoft Outlook 2010 stores your email in a .pst file. The PST file format is also be known as a Personal Folder File. Outlook uses this file format to store your data including emails, contacts, calendars, email account settings, etc. When you install Outlook 2010 and set up an email account, Outlook creates the .pst file for that account in a specific folder on your computer’s hard drive. In this tutorial we’re going to show you how to locate and encrypt .pst file with a password in Microsoft Outlook 2010.

The Quickest Way to Locate PST File in Outlook 2010:

  1. Launch Microsoft Outlook 2010.
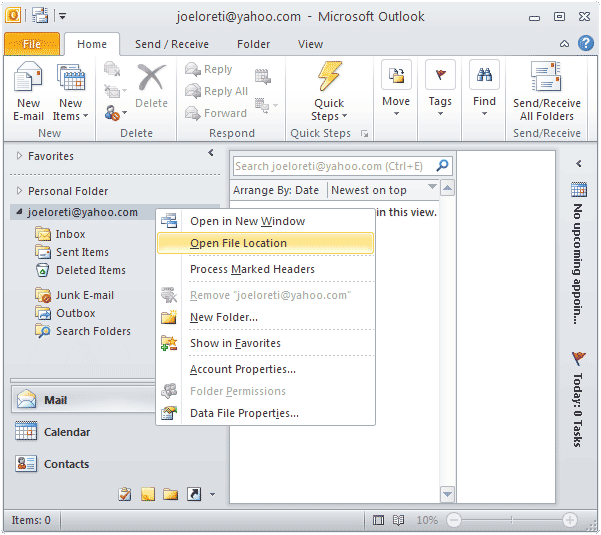
  2. Right-click on the Data Store for your email account on the left panel in Outlook 2010 and select Open File Location.
  3. It will quickly locate the .pst file in Windows Explorer.

How to Encrypt PST File in Outlook 2010?

  1. Launch Microsoft Outlook 2010.
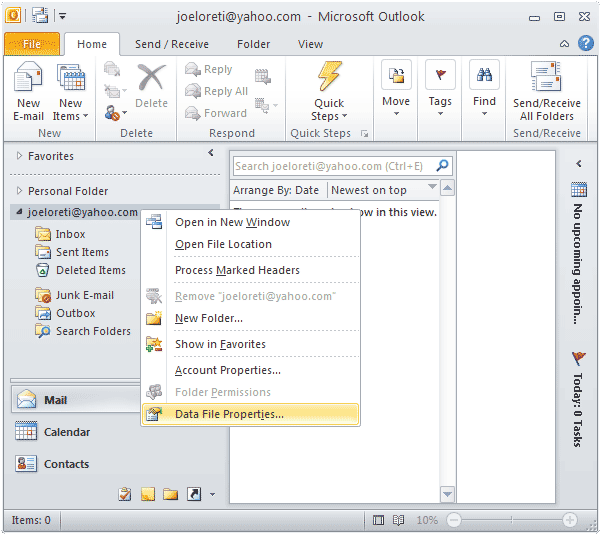
  2. Right-click on the Data Store for your email account on the left panel in Outlook 2010 and select Data File Properties.
  3. This will bring up the Properties window. Click on the Advanced button.
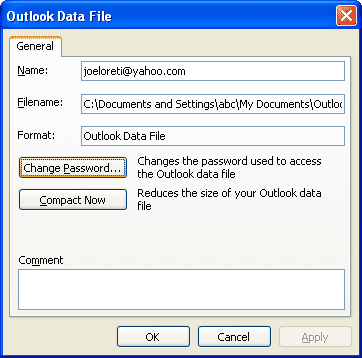
  4. Click on the Change Password button on the Outlook Data File window.
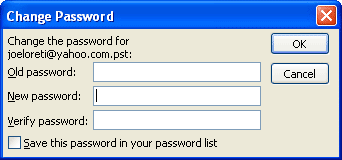
  5. Set a new password for your .pst file. If the .pst file is already protected with a password, you also need to enter the old password. Click OK.

After setting up a password to encrypt the .pst file, you need to enter the password to access all your data in Outlook every time you launch Microsoft Outlook application. MS Outlook users often encrypt PST file to ensure their confidential data are not accessed by unauthorized users. But sometimes when you lost your pst file password then you need to use Outlook Password Recovery program to recover lost password.

How to Install Windows 8 on a Virtual Hard Drive for Dual Booting

October 8th, 2012 by Admin

In my previous blog post, Dual-boot Windows 7 and Windows 8, I showed you how to configure your Windows 7/Vista system to dual-boot Windows 8 from a new partition on your existing Windows 7 hard disk. Here I’ll show you how to install Windows 8 on a virtual hard drive (VHD) for dual booting. No need to shrink your existing partition or repartition your hard drive.

How to Install Windows 8 on A Virtual Hard Drive for Dual Booting?

The first step is to create a virtual hard drive on your Windows 7 system. Microsoft recommends a minimum of 20 GB for Windows 8 64-bit. I suggest setting the VHD disk size to at least 30 GB so you have disk space for apps. If you don’t know how to create one, please refer to this step-by-step guide: How to Create a Virtual Hard Drive (VHD) in Windows 8/7.

Next, reboot your computer and boot up with a Windows 8 DVD or USB flash drive. After a few minutes, you’ll see the Windows Setup screen. Specify your language settings before clicking Next.

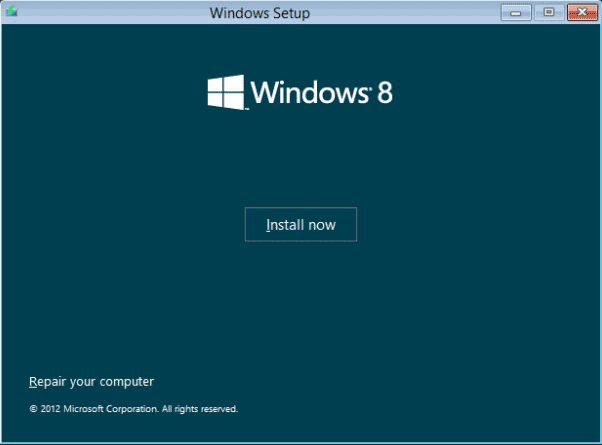
You’ll see the Windows Setup screen shown as follow. Click the Install Now button.

When you see the next Windows Setup screen, you will immediately press Shift +F10 to open the Command Prompt.

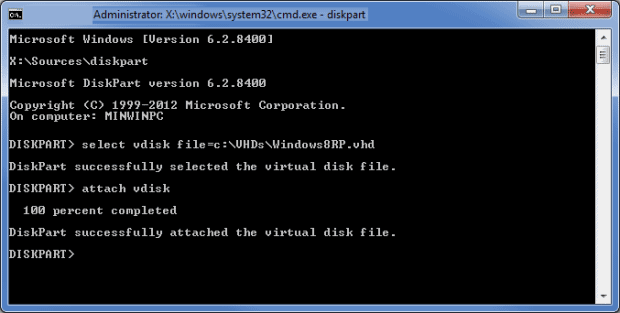
The virtual hard drive that you created earlier needs to be attached so you can select the VHD as the install destination. Once the command prompt is open, run the following:
diskpart
select vdisk file=c:\VHDs\Windows8RP.vhd
attach vdisk

Replace c:\VHDs\Windows8RP.vhd with the full path to the VHD file you created. The drive letter may be different from what you see in Windows 7. You can use the dir command to confirm the VHD file path.

Once you are done, you can type exit to leave the Diskpart environment and then click the Close button the close the Administrator Command Prompt window. When you return to the Windows Setup screen, you select the Custom option.

Windows Setup will prompt you to choose the location to which you want to install Windows 8 and you can now select your VHD. Keep in mind that when you select the VHD, you’ll see a warning message that says that Windows cannot be installed to this disk. Just ignore it as the procedure does indeed function correctly.

As soon as you click Next, the installation will begin. When the installation is complete, Windows Setup will reboot your system and you will then see the new Windows 8 style dual boot screen. Done!

How to Create a Virtual Hard Drive (VHD) in Windows 11/10/8/7

October 8th, 2012 by Admin

Have you ever wished you had an extra hard drive or partition to setup a dual-boot or multi-boot operating system? You can shrink your existing partition to create a new partition but it always carries some risk of data loss. Beginning with Windows 7, you can create a virtual hard drive (VHD) which acts as a separate hard drive in your computer.

The virtual hard drive (VHD) is stored as a .vhd or .vhdx file on your physical disk. By mounting a virtual hard drive, you can easily copy files to and from the virtual disk. Additionally, Windows 11/10/8/7 can be configured to boot from a VHD. In this tutorial we’ll go through the steps of creating a virtual hard drive (VHD) in Windows 11/10/8/7.

How to Create a Virtual Hard Drive (VHD) in Windows 11/10/8/7?

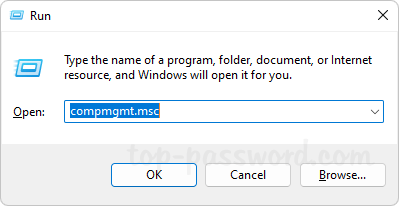
  1. Press the Windows + R key combination to bring up a Run box, type compmgmt.msc and hit Enter.

  2. The Computer Management dialog opens, click Disk Management in the left pane of the window and wait until you see all currently installed disks in the right pane.
  3. Right-click Disk Management and then select Create VHD.

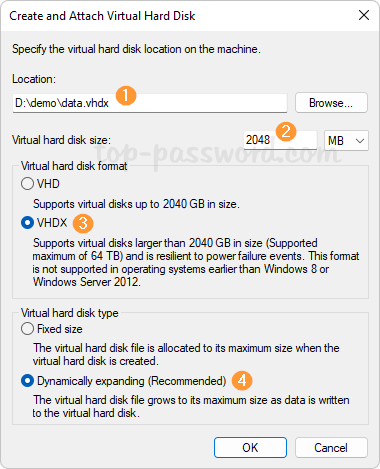
  4. Click Browse to choose the location where you want your VHD stored, and give it a descriptive name. Choose the size you want it to be, and select dynamic or a fixed. If you want the disk to expand in size as you add files to it, then pick Dynamically expanding. Check Fixed size if you want a specific size and for it to stay that way. Click OK.

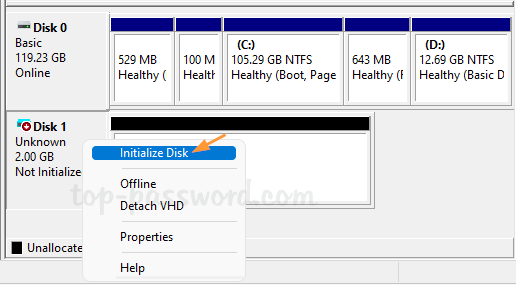
  5. You will see the virtual hard drive listed as unallocated space in Disk Management. Right click on the virtual hard drive (Disk 1) and select Initialize Disk.

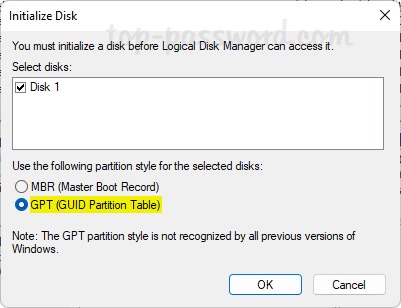
  6. Press OK in the Initialize Disk box.

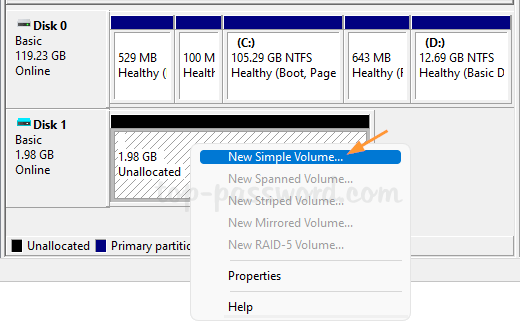
  7. Now it is time to create a volume by right-clicking the unallocated space and select New Simple Volume.

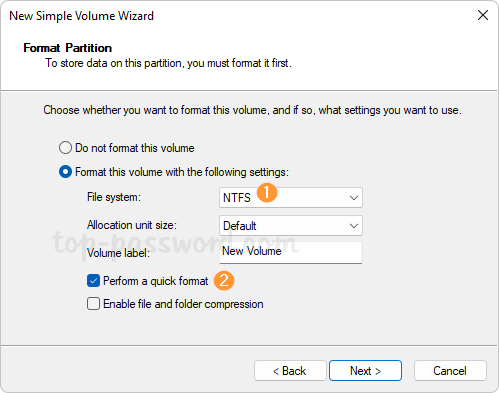
  8. The New Simple Volume Wizard starts up and just press Next until the wizard is complete.

  9. Now the new virtual disk is ready to be used, just like any other disk. You can see the virtual hard drive on your computer.

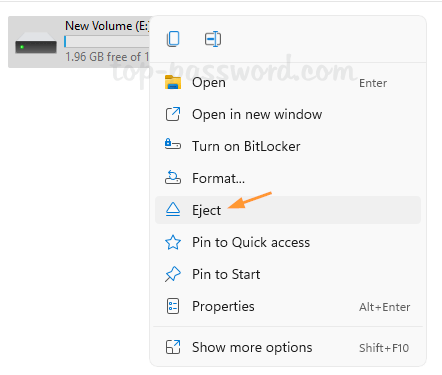
    Windows will automatically dismount the virtual hard drive after a restart. You can also manually dismount the drive by right-clicking it in File Explorer and selecting Eject.

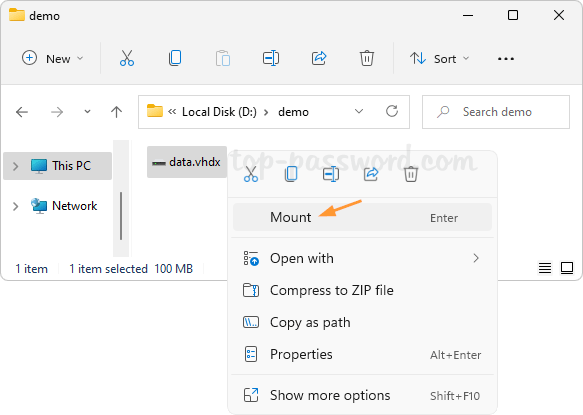
  10. Whenever you need to mount a vhd/vhdx file as a virtual hard disk, just right-click it in File Explorer and choose Mount.

How to Dual Boot Windows 8 and Windows 7

October 7th, 2012 by Admin

Want to install Windows 8 and explore the new features but don’t want to overwrite your current Windows setup? You can easily create a dual boot setup of Windows 8 along with your current Windows 7 or Vista system.

Note: Since the boot manager of Windows 7/Vista is not well compatible with Windows 8, please make sure that you install 7/Vista before installing Windows 8. If you install Windows 8 first and then install the old versions of Windows, the Windows 8 boot menu will be lost in the dual-boot menu and you won’t be able to boot into Windows 8 anymore.

How to Dual Boot Windows 8 and Windows 7?

Follow this guide to configure your Windows 7 or Vista system to dual-boot Windows 8. The whole procedure can be divided into 3 steps: Create a new partition, Install Windows 8 and optionally set default boot operating system.

Step 1: Create A New Partition

You need to create a new partition of at least 16GB ( 20GB for 64-bit Windows 8 ) for your Windows 8 installation. If there is already a free partition up to the requirement, just skip this step. Otherwise you need to shrink the existing partition to create unallocated disk space, from which you create a new partition during the installation of Windows 8.

  1. Open the Start Menu and right click on the Computer option. Click Manage, and in the window that appears, click on Disk Management in the left sidebar.
  2. Right-click the volume you want to shrink, and then click Shrink Volume.
  3. Shrink it down so you have at least 16GB of space left on the end of the drive, and click OK.

Step 2: Install Windows 8

Create a Windows 8 installation disk, boot from it and start the Windows 8 setup. Follow this step-by-step guide: How To Install Windows 8 from USB Flash Drive.

For a dual-boot setup, the steps are the same as in that guide. The only difference is that when you are asked to select where to install Windows 8, select the partition that you created and make sure you don’t select the partitions where other operating systems are installed.

Step 3: Set Default Boot Operating System

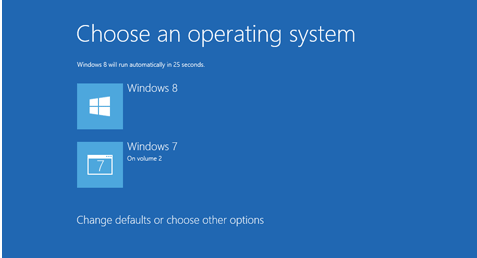
When the installation is complete, Windows Setup will reboot your system and you will then see the new Windows 8 style dual boot screen shown as follow.

As you can see, Windows 8 is set as your default boot operating system.If you plan to use it as a secondary operating system and change the default boot operating system, you can click the Change defaults or choose other options at the bottom of the boot screen.

How to Crack PST Password if You Forgot It

October 4th, 2012 by Admin

When you lost or forgot Outlook PST password, it means that you are not able to open Outlook and read email from the protected PST file. To explain, the PST file is used by Outlook to hold all of your emails, appointments and contacts in Outlook. You can copy the file to another computer or a USB drive, but when trying to import the file onto a fresh install of Outlook, a window will pop up asking you to enter the PST password.

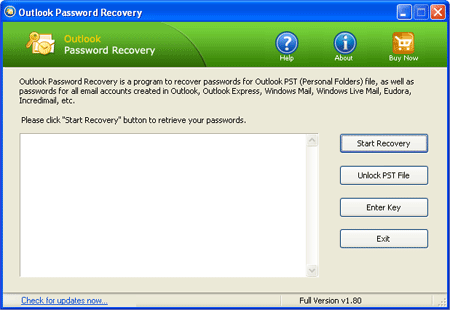
It is good practice to set up a password to prevent unauthorized access to your PST file, but we often forgot the password for various reasons. Here I’ll show you an easy way to crack PST password if you forgot it. Outlook Password Recovery is the best PST password cracker which allows you to crack PST password in seconds on all versions of Outlook files.

How to Crack PST Password if You Forgot It?

  1. Download and install Outlook Password Recovery program on your computer.
  2. Launch the program and then click on the Unlock PST File button.
  3.  On the pop-up dialog, locate your Outlook PST file and then click on the Open button. If you don’t know where the PST file is located, please refer to this article: Introduction to Outlook Personal Folders File (.pst)
  4. Your Outlook PST password will be cracked and recovered immediately.

After cracking, you can use the recovered password to open your password-protected PST file in Outlook. The method works on PST files created in Microsoft Outlook 2010, 2007, 2003, XP, 2000 and 98. Happy cracking!

How to Bypass Windows Logon Password in 3 Steps

October 2nd, 2012 by Admin

Have you forgot your XP, Vista or Windows 7 logon password? Sure, there are a few workarounds to access your account using some password cracking software but they are time consuming and boring as you need to go through a long procedure. In this tutorial we’ll show you how to bypass Windows logon password in just 3 steps. The procedure is quick and easy.

How to Bypass Windows Logon Password in 3 Steps?

1. Download the Reset Windows Password CD-ISO ZIP file (It’s about 28.1 Mb) and extract it to get the ISO file: ResetWindowsPwd.iso. Burn the ISO file to a CD/DVD to create a bootable CD/DVD. You can also burn the ISO on to a USB flash drive using ISO2Disc tool.

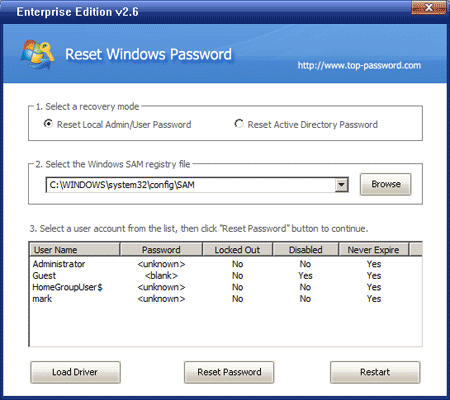
2. Before inserting the CD/DVD make sure that you have made necessary changes to boot priority setting in the BIOS so that you can boot from CD/DVD. Insert the CD/DVD into the optical drive and restart your machine. After a while you will see the following screen of Reset Windows Password utility.

3. Choose your Windows SAM registry file from the drop-down list, the program will display all user accounts inside the SAM file. Select an account and then click on the Reset Password button to remove your forgotten Windows logon password.

Take out the CD/DVD and restart the computer, you can then log on to Windows with a blank password. That’s it!

How to Recover Thunderbird Password

October 1st, 2012 by Admin

There might be times when you have lost or forgotten the email account password in Mozilla Thunderbird. Thunderbird, like most other email clients, allows you to save your email password so you can check your mailbox without entering the password every time you launch Thunderbird. It is a great convenience but also let you tend to forget the password remembered by Thunderbird.

Forgot Thunderbird password? What if you want to use the email account on another computer or a mobile? Also the saved password will be erased after reinstalling. Is there a way to recover the lost or forgotten email password in Thunderbird? Here we’ll show you how to recover email account logins and passwords from Mozilla Thunderbird with Email Password Recovery program.

How to Recover Thunderbird Password?

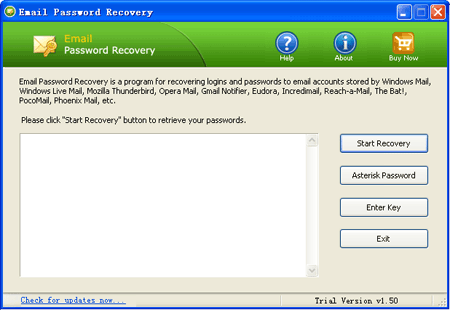
  1. Launch the Email Password Recovery program.
  2. Click the Start Recovery button, a drop-down list will appear which displays all supported email clients.
  3. Select the Mozilla Thunderbird Password option from the list.

    Email Password Recovery

  4. The program will instantly decrypt and recover email account logins and passwords stored by your Thunderbird email client.

With Email Password Recovery program you can also recover email account passwords from many other email client applications, including Windows Mail, Windows Live Mail, Opera Mail, Gmail Notifier, Eudora, Incredimail, Reach-a-Mail, The Bat!, PocoMail, Becky! Internet Mail, Phoenix Mail, Ipswitch IMail Server, Pegasus Mail, etc.

How To Protect PDF Document with Password

September 29th, 2012 by Admin

PDF Document is one of the most secure document formats because it encrypts content of document and allow user to create different type of password for different purposes. You can set password to open as well as restrict editing and printing PDF document with permissions password. To make protected PDF file you need to get a copy of Adobe Acrobat software.

Adobe Acrobat Pro software lets you share documents with confidence by easily applying passwords and permissions to your PDF files. Use PDF passwords to help control document access, and apply file permissions to restrict printing, copying, or altering.

Part 1: How to Password Protect PDF Document Content

Acrobat Pro lets you add a password to a PDF document to prevent unauthorized access. Anyone who knows the password can open the file, making document protection quick and easy.

  1. Open the PDF document in Acrobat Pro.
  2. Under the Advanced menu bar, select Security, and then click on Password Encrypt. You will then be presented with the Password Security dialogue box.
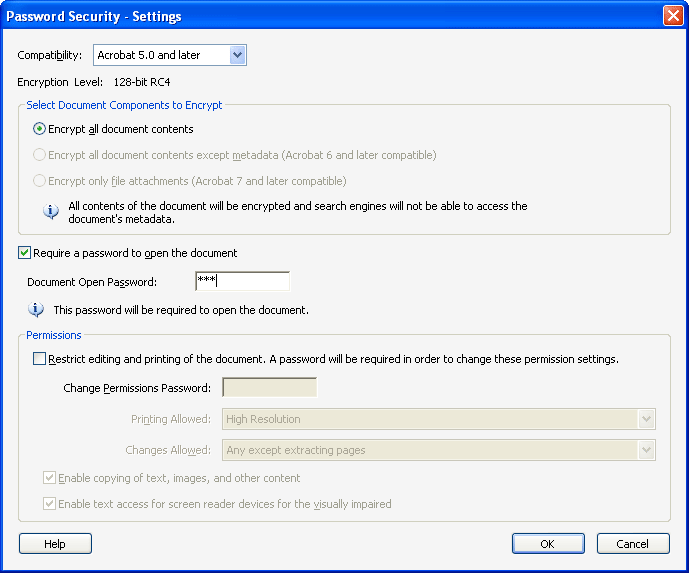
  3. Tick the Require a password to open the document checkbox and enter a password in the Document Open Password field. This allows us to create a password which is require to open PDF document. This password will protect document from unauthorized access.

  4. When you finish all settings click OK.
  5. Now go to File menu and click on Save. This file will be saved at original location will all your security settings.

Part 2: How to Set Permissions to Restrict Document Usage

Acrobat Pro also lets you block access to PDF document, including printing, editing, and commenting, as well as copying, extracting, or modifying content. By setting a permissions password, people will be able to read this PDF document only or have limited access to the PDF.

  1. Open the PDF document in Acrobat Pro.
  2. Under the Advanced menu bar, select Security, and then click on Password Encrypt. You will then be presented with the Password Security dialogue box.
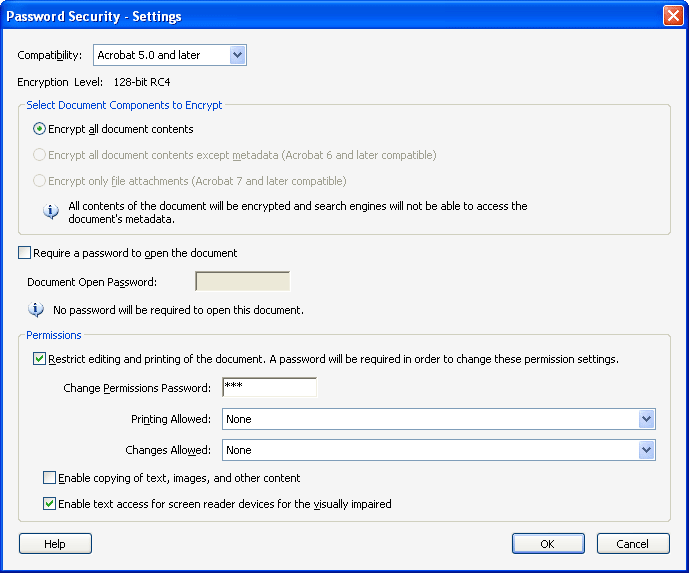
  3. Tick the Restrict editing and printing of the document checkbox and enter a password in the Change Permissions Password field.

  4. When you finish all settings click OK.
  5. Now go to File menu and click on Save to save the permissions password and permission settings.

In case if you have lost your PDF password to open or password to edit and print then you could not able to open or edit/print PDF file. In such situation you need to recover password of protected PDF file with PDF password recovery software.


Introduction to Outlook Personal Folders File (.pst)

September 27th, 2012 by Admin

Outlook Personal Folders file (.pst) provides a centralized storage of email folders, email messages, attachments, contacts, calendar items, and so on.  For security purpose you can set a password to protect the Outlook Personal Folders file (.pst). Every time you open Microsoft Outlook application, you’ll be required to enter the password before accessing any data in Outlook. This is very useful to prevent unauthorized users from reading your emails when you are absent.

Part 1: Where is the Outlook Personal Folders File (.pst)?

The fastest way to open the folder where your Outlook Personal Folders file (.pst) is saved is to do the following:

  1. In Outlook 2010, click the File tab.
  2. Click Account Settings, and then click Account Settings.
  3. On the Data Files tab, click an entry, and then click Open Folder Location.

Outlook Personal Folders file (.pst) created by using Outlook 2010 are saved on your computer in the Documents\Outlook Files folder. If you are running Windows XP, these files are created in the My Documents\Outlook Files folder.

If you upgraded to Outlook 2010 on a computer that already had data files that were created in earlier versions of Outlook, these files are saved in a different location in a hidden folder.

Windows 7 and Windows Vista     <drive>:\Users\<user>\AppData\Local\Microsoft\Outlook

Windows XP     <drive>:\Documents and Settings\<user>\Local Settings\Application Data\Microsoft\Outlook

 Note: To use Windows Explorer to navigate to the folder where your Outlook Personal Folders file (.pst) is saved, you must first turn on the display of hidden folders. In Windows Explorer, on the Tools menu, click Folder Options. On the View tab, under Advanced Settings, under Files and Folders, under Hidden files and folders, click Show hidden files and folders. If you want to see all file name extensions, clear the Hide extensions for known file types check box under Files and Folders. Hidden folders appear dimmed to indicate they are not typical folders.

Part 2:  Forgot Your Outlook Personal Folders File (.pst) Password?

Forgot your Outlook Personal Folders file (.pst) password? You may lost access to the entire email data in Outlook, including the incoming and outgoing messages, calendar info, contacts and contact groups, tasks and to-dos, journals and much more. Don’t worry! With Outlook Password Recovery program you can recover Outlook Personal Folders file (.pst) password instantly.

Here are steps to recover Outlook Personal Folders file (.pst) password:

  1. Download and install Outlook Password Recovery program on your computer.
  2. Launch Outlook Password Recovery and then click on the Unlock PST File button.
  3. Browse to your Outlook Personal Folders file (.pst), and click Open.
  4. The program will recover and display Outlook Personal Folders file (.pst) in seconds.