So I was going to start working earlier this morning. I started my computer as usual and at Windows login screen my keyboard stopped working. However, the keyboard did work after I entered into BIOS Setup, but as soon as Windows started loading the keyboard will stop working, even if I boot Windows into Safe Mode. After spending many frustrating hours to try the methods available on the net, I found this solution and it worked great!
Note: I recommend you to create a backup of your registry or create a System Restore point before you proceed! If your keyboard also doesn’t work in BIOS Setup, it may be physically damaged.
Get Around Windows Login Screen
To use this method, you should be able to access the Windows Registry in some way and change the registry keys. I managed to get into Windows by using a separate USB mouse and accessing the On-Screen Keyboard by which I could login and do the necessary registry changes. You can access the On-Screen Keyboard from Windows login screen:
- On the log on screen in the bottom left-hand corner is an “Ease of Access” button, pictured below. Click on this button to access the Ease of Access panel on the log on screen.

- On this panel, check the box for “Type without the keyboard (On-Screen Keyboard)” and then click on Apply.
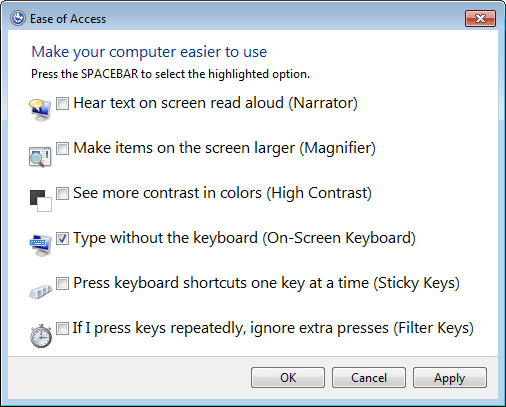
- In about five seconds, the on-screen keyboard will pop up and you will be able to use it to enter your password on the log on screen.
If both your keyboard and mouse stop working, try to boot your computer from a WinPE or Linux Live CD, the keyboard or mouse might just work fine and you can then proceed to the next step for changing registry keys.
Manually Fix Corrupted Registry Key
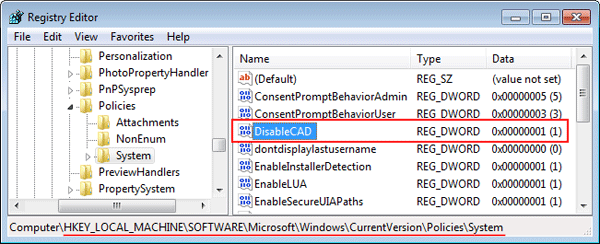
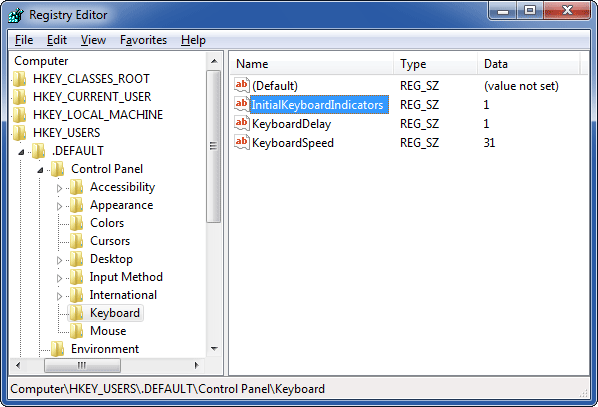
This problem may be caused by a Windows registry entry that has become corrupted. To use Registry Editor to fix the corrupted Registry entry, follow these steps:
- Press the Windows logo key + R to open the Run dialog box. Type
regeditand press Enter to open the Registry Editor. - In the left panel, navigate to the following registry key:
HKEY_LOCAL_MACHINE\SYSTEM\CurrentControlSet\Control\Class\{4D36E96B-E325-11CE-BFC1-08002BE10318} - In the right panel, you should now see a key
UpperFilterswhich should contain at least one entry “kbdclass”. If there are more entries out there, double-click on the UpperFilters key and delete other entries except “kbdclass” (without quotes).
- Restart Windows, and the problem should be fixed.
The problem in my situation was that there was also a keyboard driver installed from VMware. The VMware Keyboard Driver had an additional entry “vmkbd” in the UpperFilters key, but as I discovered the driver file that was needed (C:\Windows\system32\drivers\vmkbd.sys) was missing which in effect caused all the problems.
I hope this trick will be helpful to others in the same predicament.