Archive for June, 2012

Windows won’t Start with Error “NTLDR is missing”

June 19th, 2012 by Admin

Every once in a while I note, in the forums where I participate, series of questions that appear over and over again. So is the case with the “NTLDR is Missing. Press any Key to Restart” error when the user attempts to boot their system.

What’s NTLDR?

NTLDR is short for NT loader – a program loaded from the hard drive boot sector that displays the Microsoft Windows NT startup menu and helps Microsoft Windows NT load. So when it goes missing for some reason, your windows cannot load. I use Windows XP on a Pentium 4 PC. Though it seemed common on a routine google search, it was not so easy to fix and many forums reported that formatting hard drive was the last solution eventually.

Fix the Error of NTLDR is missing

First please check if your system is trying to boot from a CD or USB stick. Remove the CD and USB stick and try again.  If your computer still throws the same error message at startup, please follow these steps to fix or repair the problem so your system should boot up properly.

  1. Insert your Windows installation DVD into the computer.
  2. When prompted to press any key to boot from the CD, press any key.
  3. Once in the Windows setup menu, press the R key to repair Windows.
  4. Log into your Windows installation by pressing the 1 key and pressing Enter.
  5. You will then be prompted for your administrator password, enter that password.
  6. Copy the below two files to the root directory of your Windows installation.  For example, my system drive is C:\ and the CD-ROM drive is E:\. Type the following command to copy the missing files from CD-ROM to your system drive:
    copy e:\i386\ntldr c:\
    copy e:\i386\ntdetect.com c:\
  7. Once both of these files have been successfully copied, remove the CD from the computer and reboot.

The trick can be used to fix the NTLDR errors with Windows XP/2003/2000/Me. Windows 8, Windows 7, and Windows Vista utilize BOOTMGR, not NTLDR.

Video Guide: How to Deal with a Forgotten Windows Password

June 18th, 2012 by Admin

What do you do when you forgot Windows administrator password? Most of computer users end up reinstalling Windows and lose their data as well.

Forgetting your Windows administrator password can leave you without access to your system, or worse. This could happen out of honest forgetfulness, the result of idiotic roommates with nothing better to do, or any number of other situations that could result in a total loss of access to your system.

Thankfully, being locked out doesn’t mean you can’t regain control through some Windows password recovery tools. In fact, all you really need is a CD/DVD or USB thumb drive for creating a Windows password reset disc. Just sit back and watch the step-by-step video guide below,  learn how can you reset Windows administrator password in just a few minutes.

The guide can be divided into 3 steps:

  1. Burn a Windows password reset disk on an accessible computer
  2. Change BIOS to set the locked computer to boot from the Windows password reset disk
  3. Boot from it and perform password resetting

How to Recover CuteFTP Password

June 16th, 2012 by Admin

“I have a bunch of my websites setup in CuteFTP. I set them up a couple years ago and forgot the password for one of the sites. I would look in CuteFTP, but the passwords are blacked-out with dots. Is there any way to find out what I entered for the password? Is there a crack that can take away the black dots, or a way to find the password in the registry… PLEASE HELP!!!”

Forgot your FTP passwords setup in CuteFTP application?  You may think of using CuteFTP’s Import / Export feature to export your FTP site list, but the passwords are not included in the exported file.  What to do if you want to transfer your FTP login details over to a new machine or if for some reason you need to reinstall CuteFTP?

In this tutorial I’ll show you an easy way to recover forgotten FTP logins and passwords saved in CuteFTP application.  FTP Password Recovery is a small utility that can help you recover CuteFTP password in just a few simple steps.

How to Recover CuteFTP Password:

  1. Launch the FTP Password Recovery program.
  2. Click the Start Recovery button, a drop-down list will appear which displays all supported FTP clients.
  3. Select the  CuteFTP Passwordoption from the list.FTP Password Recovery
  4. The program will automatically recover CuteFTP password instantly. Display all your FTP hostnames, usernames and passwords stored in CuteFTP application.

Apart from CuteFTP, FTP Password Recovery can also recover logins and passwords saved in many other FTP applications, such as SmartFTP, FileZilla, FlashFXP, WS_FTP, Core FTP, FTP Control, FTP Navigator, FTP Commander, etc.

Forgot Your Content Advisor Password in Internet Explorer?

June 16th, 2012 by Admin

You can restrict access to Web sites using the Content Advisor feature of Internet Explorer. This is a useful feature for parents who have children that use the computer to surf the Internet. By creating a supervisor password, only those users who know the password can access restricted Web sites. However, what happens if you forget the password? It does happen, especially these days when you need to remember a username or password or pin or code for so many things.

No, you don’t need to format your hard drive and reinstall the operating system. The work around for this is to remove Content Advisor password using IE Password Recovery program.

How to Remove Content Advisor Password in Internet Explorer:

  1. Launch the IE Password Recovery program.
  2. Click the Start Recovery button, it will bring up a drop-down menu: Recover IE Password and Remove Content Advisor Password.
  3. Select the Remove Content Advisor Passwordoption, it will instantly remove your forgotten Content Advisor password set in Internet Explorer.

    IE Password Recovery

PDF Password Remover

June 16th, 2012 by Admin

Part 1: Knowledge Base about the Security of PDF files

An obvious trend is that PDF, as the most popular document format, have become more and more important day by day. In our daily work, we need to deal with PDF files frequently, like contracts, study materials and so on. In consideration of the security, some PDF files have been protected with PDF password. And in these cases, even if we have the legal rights to use them, but failed, for the reason that we don’t know how to remove security from PDF files.

The secured PDF files always have been protected with two kinds of PDF password:

  • User Password – Also known as open password, because we would be asked to input password when clicking to open them.
  • Owner Password – We can read the contents of owner password protected PDF files, but could not copy or print it. Click “Document”-“Security”-“Show Security Properties” to check out the Document Restrictions Summary.

Part 2: How to Remove Security from PDF files

Are you looking for a PDF Password Remover tool to remove PDF restrictions, so that you can copy, edit and print your PDF files? If so, you have come to the right place. PDF Password Recovery is designed to remove the password and restrictions of PDF files. This best PDF Password Remover can remove restrictions from encrypted PDF files instantly and it is a standalone software, that means no Adobe Reader needed.

Follow the steps below to remove PDF password:

  1. Download and install PDF Password Recovery software.
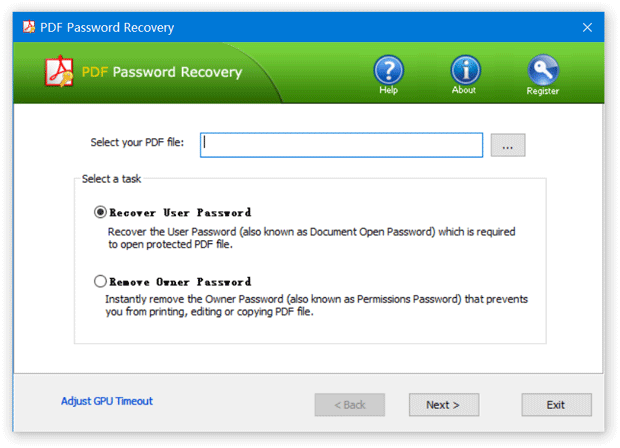
  2. Run PDF Password Recovery program, then click the button to select your password-protected PDF document (*.pdf), then choose the Remove Owner Password option.PDF Password Recovery
  3. Click the Next button.
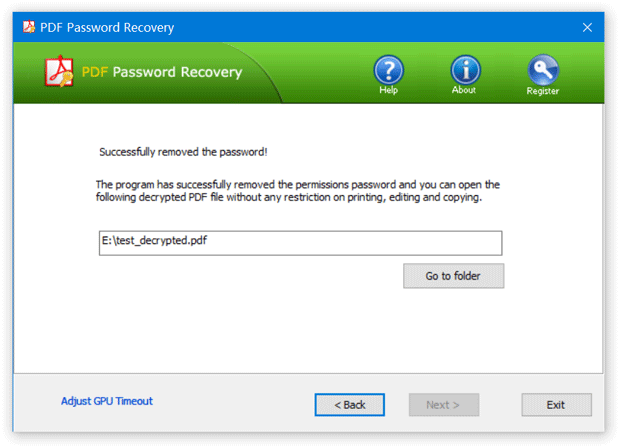
  4. The program will instantly decrypt your PDF file and save the decrypted file to the same folder with the original file. “_decrypted” ending is added to the decrypted file.Remove PDF Owner Password

Now you can open the decrypted PDF file without any restriction. It’s so easy to remove PDF password.

Forgot Windows XP Password? How to Reset it with Sticky Key

June 15th, 2012 by Admin

Forgot Windows XP password? There are many ways to unlock your Windows installation if you forgot Windows password and can’t log on your computer. Today I’ll show you another procedure to reset Windows XP password with Sticky key. The main advantage of this password reset method is that you don’t need third-party software,  but it requires that you have a Windows PE bootdisk, or create one if you don’t have.

Note: For average computer users, we recommend you to use this password reset utility to reset your forgotten Windows XP password – Reset Windows Password.  The software also works with Windows 8/7/Vista and Windows Server 2008/2003/2000.

Supposed you have created a Windows PE bootdisk, then follow these steps below to reset Windows XP administrator password:

  1. Boot from Windows PE and access the command prompt.
  2. Find the drive letter of the partition where Windows XP is installed. It is usually C:. To find the drive letter, type C: (or D:, respectively) and search for the Windows folder. Note that Windows PE usually resides on X:.
  3. Type the following command (replace “c:” with the correct drive letter if Windows is not located on C:):
    copy c:\windows\system32\sethc.exe c:\
    This creates a copy of sethc.exe to restore later.
  4. Type this command to replace sethc.exe with cmd.exe:
    copy /y c:\windows\system32\cmd.exe c:\windows\system32\sethc.exe
    Reboot your computer and start the Windows installation where you forgot the administrator password.
  5. After you see the logon screen, press the SHIFT key five times.
  6. You should see a command prompt where you can enter the following command to reset the Windows password:
    net user administrator new_password
    If you want to reset other account password, replace administrator with your desired account.
  7. You can now log on with the new password.

I recommend that you replace sethc.exe with the copy you stored in the root folder of your system drive in step 3. For this, you have to boot up again with Windows PE because you can’t replace system files while the Windows installation is online. Then you have to enter this command:

copy /y c:\sethc.exe c:\windows\system32\sethc.exe

Now you are done! The sticky key trick takes advantage of the security holes in all current available Windows system. So I can’t assure if it will also work with Windows 8 or later operating system.

How To Install Active Directory on Windows Server 2008

June 14th, 2012 by Admin

In any small network setup where there are maximum of 15 computers, peer-to-peer network infrastructure is the best solution. However when the number of computers are increased and it becomes practically impossible for the administrators to manage several computers as a peer-to-peer setup, installation of Active Directory Services becomes essential.

In this scenario we are going to install Active Directory fresh with a brand new Domain Controller after a fresh install of Windows Server 2008.

Requirements for Active Directory:

Let’s go through some of the requirements for a fresh install of Active Directory Domain Services. Some of these will be required to be done beforehand, others as noted can be done during the install:

  • Install Windows Server 2008
  • Configure TCP/IP and DNS networking configurations
  • An NTFS partition with enough free space
  • Active Directory requires DNS to be installed in the network. If it is not already installed you can specify DNS server to be installed during the Active Directory Domain Services installation.

Once you verify that these requirements have been met we can get started.

How to Install Active Directory on Windows Server 2008:

Let’s start by installing Active Directory through Server Manager. This is the most straight forward way, as a wizard will guide you through the steps necessary.

1. Start Server Manager.

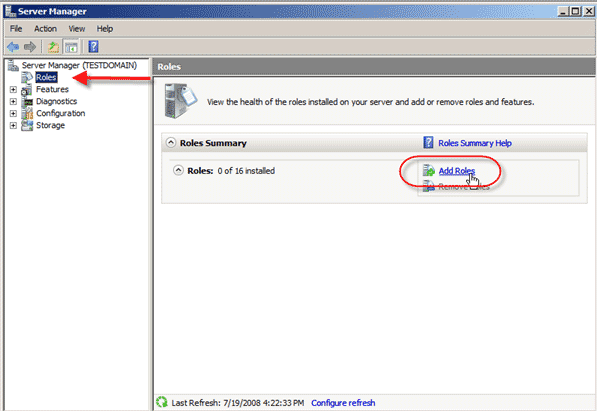
2. Select Roles in the left pane, then click on Add Roles in the center console.
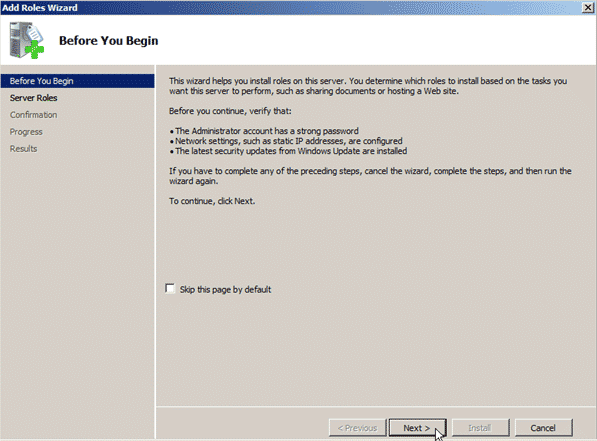
3. Depending on whether you checked off to skip the Before You Begin page while installing another service, you will now see warning pages telling you to make sure you have strong security, static IP, and latest patches before adding roles to your server.

If you get this page, then just click Next.
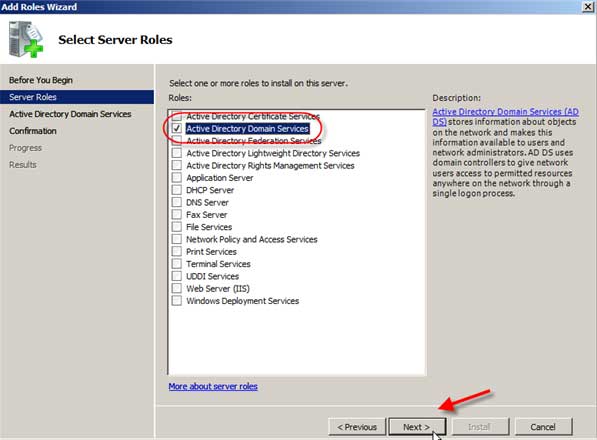
4. In the Select Server Roles window we are going to place a check next to Active Directory Domain Services and click Next.
5. The information page on Active Directory Domain Services will give the following warnings, which after reading, you should click Next:
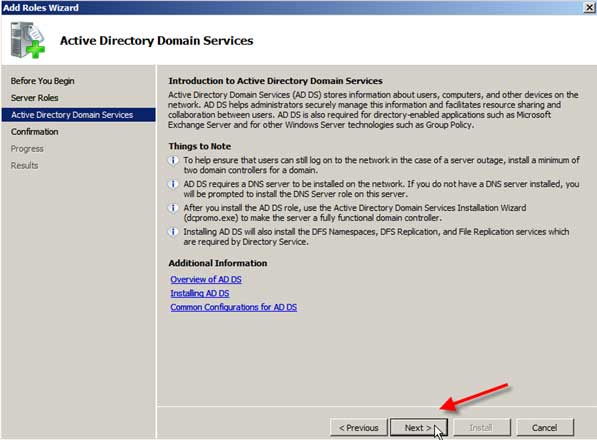
 

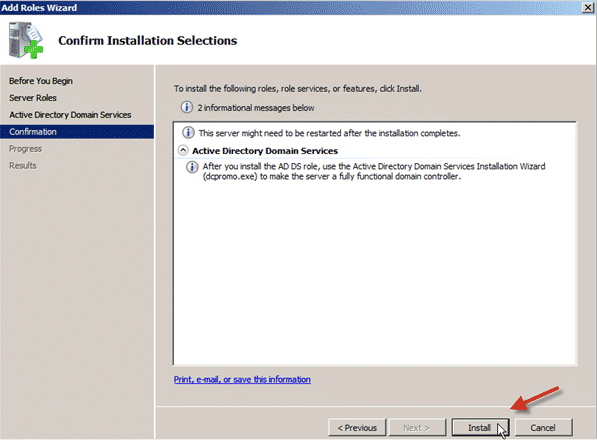
6. The Confirm Installation Selections screen will show you some information messages and warn that the server may need to be restarted after installation. Review the information and then click Install.
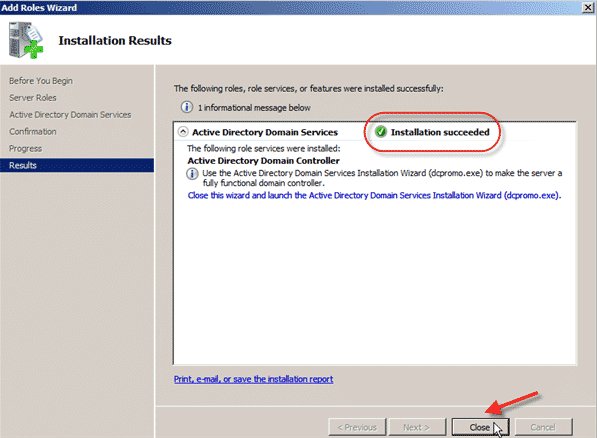
7. The Installation Results screen will hopefully show Installation Succeeded, and an additional warning about running dcpromo.exe (I think they really want us to run dcpromo). Click Close.
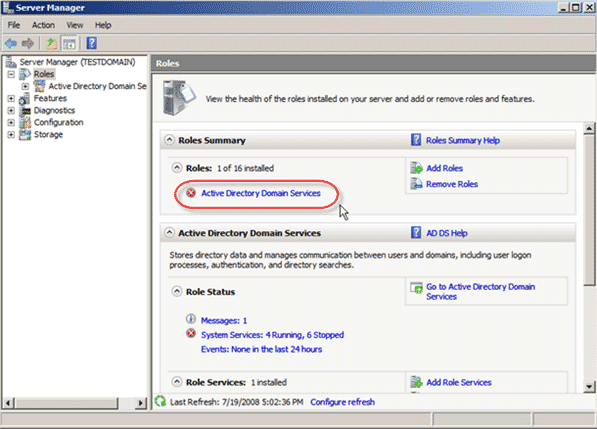
8. After the Installation Wizard closes you will see that Server Manager is showing that Active Directory Domain Services is still not running. This is because we have not run dcpromo yet.
9. Click on the Start button, type dcpromo.exe in the search box and either hit Enter or click on the search result.
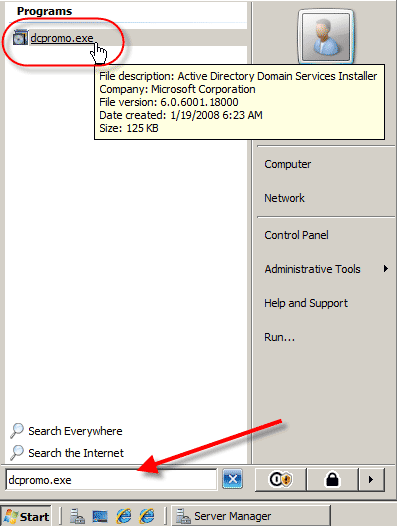
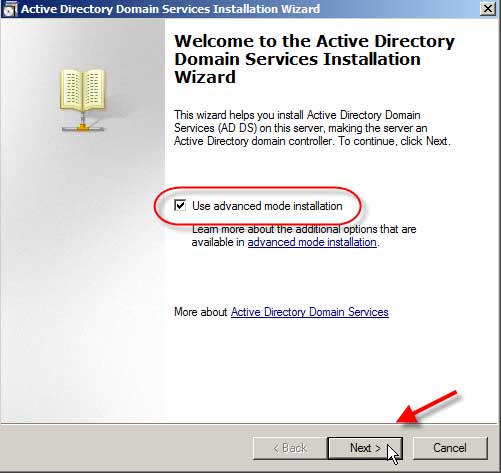
10. The Active Directory Domain Services Installation Wizard will now start. There are links to more information if you want to learn a bit more you can follow them or you can go ahead and click Use advanced mode installation and then click Next.
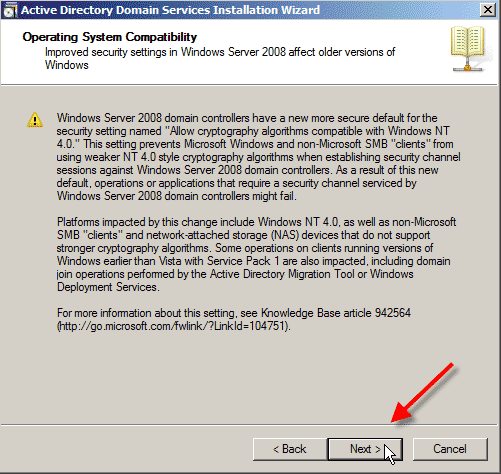
11. The next screen warns about some operating system compatibility with some older clients. Click Next.
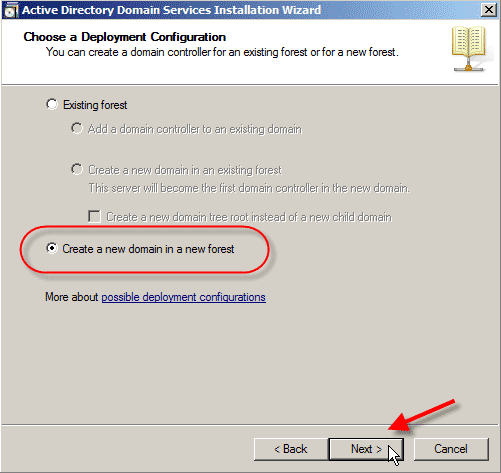
12. Next is the Choose Deployment Configuration screen and you can choose to add a domain to an existing forest or create a forest from scratch. Choose Create a new domain in a new forest and click Next.
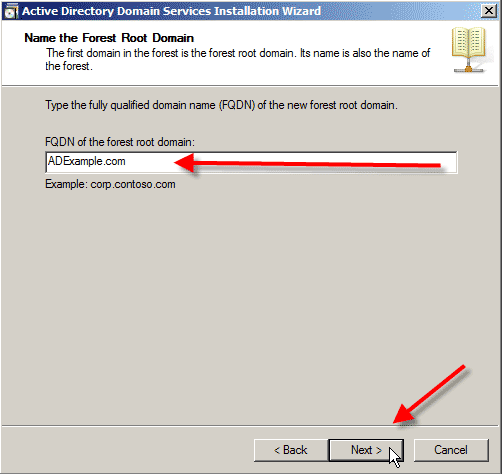
13. The Name the Forest Root Domain wants you to name the root domain of the forest you are creating.

For the purposes of this test we will create ADExample.com. After typing that go ahead and click Next.
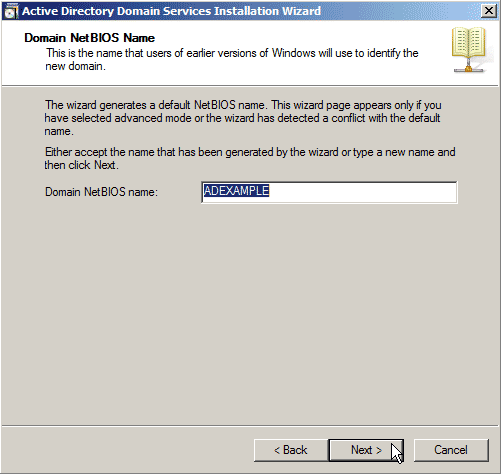
14. The wizard will test to see if that name has been used, after a few seconds you will then be asked for the NetBios name for the domain. In this case I will leave the default in place of ADEXAMPLE, and then click Next.
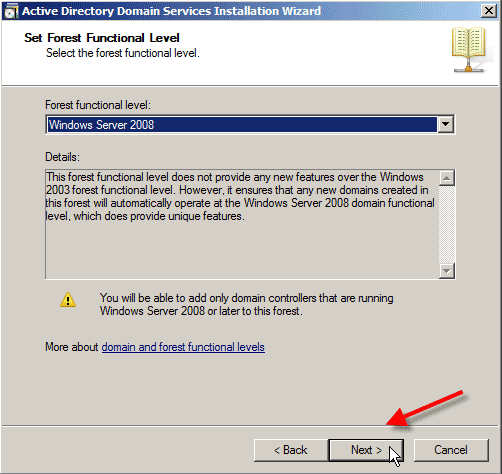
15. The next screen is the Set Forest Functional Level that allows you to choose the function level of the forest.

Since this is a fresh install and a new forest with no additional prior version domains to worry about I am going to select Windows Server 2008. If you did have other domain controllers at earlier versions or had a need to have Windows 2000 or 2003 domain controllers (because of Exchange for example), then you should select the appropriate function level.

Select Windows Server 2008 and then click Next.
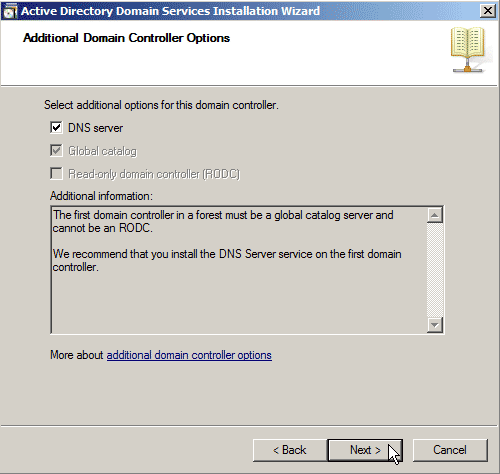
16. Now we come to the Additional Domain Controller Options where you can select to install a DNS server, which is recommended on the first domain controller.

Let’s install the DNS Server by placing a check next to it and clicking Next.
17. You will get a warning window about delegation for this DNS server cannot be created, but since this is the first DNS server you can just click Yes and ignore this warning.

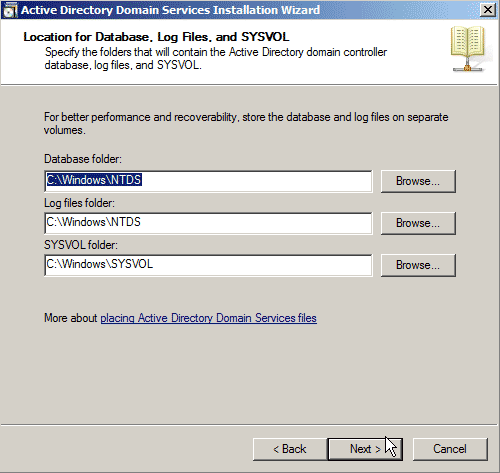
18. Next you can choose to place the files that are necessary for Active Directory, including the Database, Log Files, and SYSVOL.

It is recommended to place the log files and database on a separate volume for performance and recoverability. You can just leave the defaults though and click Next.
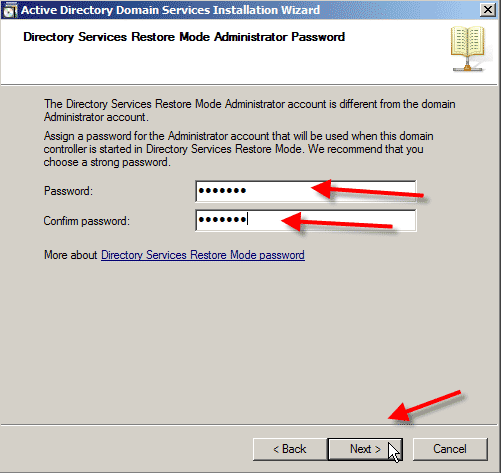
19. Now choose a password for Directory Services Restore Mode that is different than the domain password. Type your password and confirm it before hitting Next.

Note: You should use a STRONG password for this and will be warned if it doesn’t meet criteria.
20. Next you will see a summary of all the options you have went through in the wizard.

If you plan on creating more domain controllers with the same settings hit the Export settings … button to save off a text copy of the settings to use in an answer file for a scripted install. After exporting and reviewing settings click on Next.

21. Now the installation will start including the DNS server option if selected. You will notice a box to Reboot on completion that you can check to reboot soon as everything is installed (A reboot is required you can do it manually or use this function to do it automatically).

NOTE: This can be from a few minutes to several hours depending on different factors.


When its done you will be notified and required to reboot your PC. That’s all!  Now you have a working installation of Active Directory.
How to Delete Windows 7/Vista/XP Password Using USB Drive or CD

June 13th, 2012 by Admin

A lot of methods are available to crack and recover Windows password. One of the most popular software is Ophcrack. Even I have written a tutorial to cover the steps of recovering Windows 7 password using Ophcrack, many users still can’t get it to work. I think the mainly factor is that Ophcrack is a Linux-based CD and it’s only appropriate for experienced computer users. Also we can’t assure a 100% recovery rate with the software.

In this article I’ll show you a much easier way to delete Windows 7/Vista/XP password using a professional Windows password recovery software – Reset Windows Password. That is what this post is about. I have not found any other method simpler than this one, it resets your forgotten Windows password instantly. We only need to prepare a blank CD or USB drive to perform the password resetting. Let’s go!

How to Delete Windows 7/Vista/XP Password Using USB Drive or CD:

  1. Click this link to download and extract the zip archive of Reset Windows Password, which contains an ISO image file: ResetWindowsPwd.iso.
  2. Burn the ISO image to a blank CD or USB drive using the freeware ISO2Disc.
  3. Now start the system which you want to reset the password by putting the CD or the USB in the computer. While start up you have to make sure that it boots up from the disc you just burned. In order to do this, go to your BIOS settings and change the boot order: move CD/DVD or Removable Device on top of other boot devices.
  4. After booting from the CD or USB drive,  the computer will load a mini Windows PE operating system, not any operating system on your local hard drive.
  5. Less than one minute, the bootdisk will launch the Reset Windows Password program.  It’ll automatically select the Windows SAM registry hive for your Windows installation, also display a list of Windows user accounts.
  6. Choose the user account whose password you want to reset.  Click Reset Password button to delete the forgotten/unknown password.

Now start the computer and you will find that it is not asking for password for the user whose password you just deleted. That’s it, you are done.