Archive for the ‘Others’ category

3 Ways to Turn off Advertising ID for Relevant Ads in Windows 10

November 12th, 2018 by Admin

By default, Microsoft generates a unique advertising ID for each account to track your activity in Windows Apps to target you with relevant ads. If you want to stop personalized ads from appearing on apps in your Windows 10 PC, here are 3 ways to turn off Advertising ID for your Windows account.

Method 1: Disable Advertising ID for Current Account Using Settings App

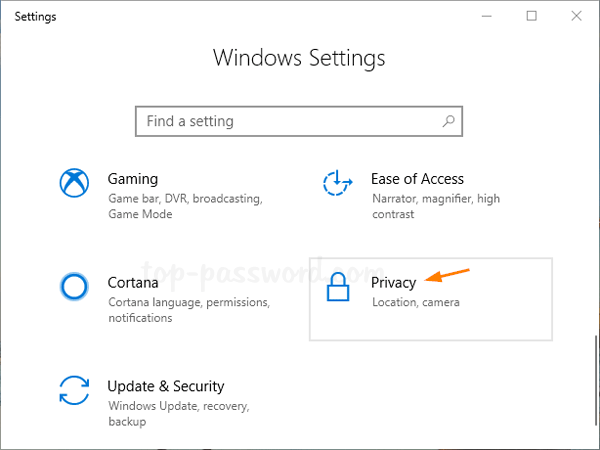
  1. Press the Windows + I keyboard shortcut to open the Settings app. Click on Privacy.

  2. Make sure the General tab is selected. On the right side, turn off the “Let apps use advertising ID to make ads more interesting to you based on your app usage“.

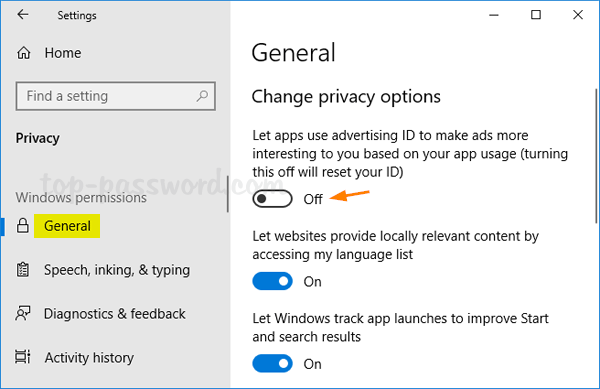
  3. Now you’ve reset your advertising ID. You’ll still see ads, but they won’t be personalized to your tastes and preferences.

Method 2: Disable Advertising ID for Current Account Using Registry Editor

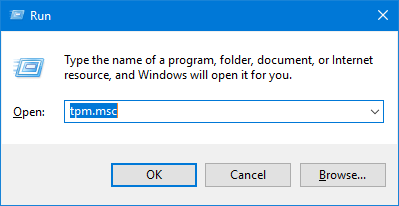
  1. Open Registry Editor and browse to the following location:
    HKEY_CURRENT_USER\Software\Microsoft\Windows\CurrentVersion\AdvertisingInfo

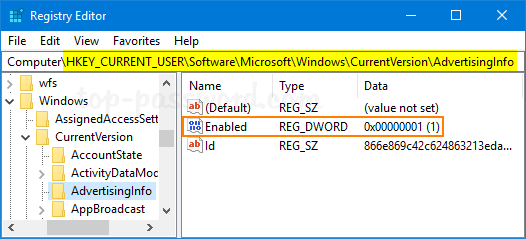
    In the right pane, double-click on the 32-bit DWORD “Enabled” to edit it.

  2. Set its value to 0 to disable your advertising ID. If you want to turn on advertising ID, change the value back to 0.

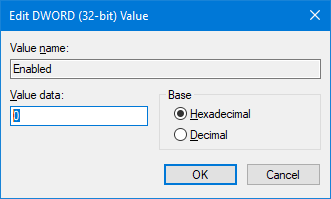
  3. Now you should be able to use Windows 10 apps without getting targeted ads from Microsoft.

Method 3: Disable Advertising ID for All Accounts Using Group Policy

  1. Open the Local Group Policy Editor and navigate to:
    Computer Configuration\Administrative Templates\System\User Profile

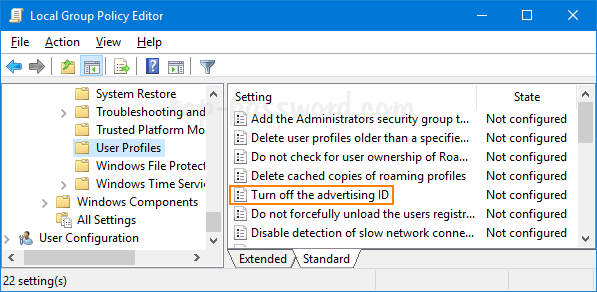
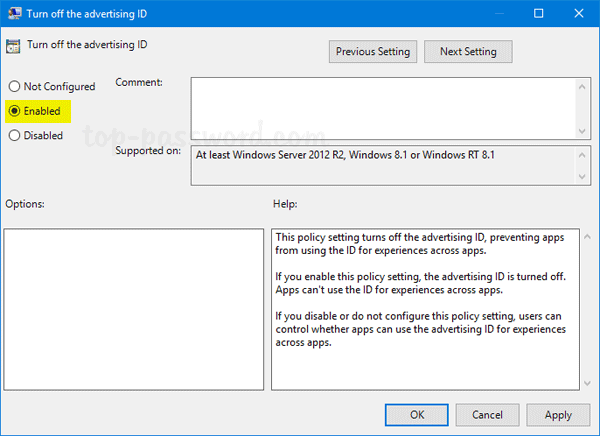
    Double-click on the “Turn off the advertising ID” policy on the right side to edit it.

  2. Select Enabled. Click Apply and then OK.

  3. Now you’ve turned off interest-based advertising, but you will still see ads but they will no longer be as relevant to your interests.

How to Disable or Enable Touch Screen on Windows 10 PC

November 9th, 2018 by Admin

Many Windows 10 laptops and tablets ship with a touch screen. If you want to turn off touch screen function to prevent accidental input, you can disable it completely. In this tutorial we’ll show you how to disable or enable touch screen on Windows 10 PC, using Device Manager or PowerShell command line.

Method 1: Disable or Enable Touch Screen Using Device Manager

  1. Press the Windows key + X to open the Quick Link menu and then select Device Manager.

  2. When the Device Manager window opens, click the little arrow next to “Human Interface Devices” to expand the category. Right-click the “HID-compliant touch screen” and choose Disable device.

  3. A pop-up will appear asking you to confirm disabling your touch screen. Click Yes.

  4. This change will take effect immediately. Try to touch your screen and it should stop responding. If you want to enable the touch screen again, just enable the “HID-compliant touch screen” device and you’re done!

Method 2: Disable or Enable Touch Screen Using PowerShell

Open the PowerShell as administrator and run the following command to disable touch screen on your Windows 10 computer:

Get-PnpDevice | Where-Object {$_.FriendlyName -like '*touch screen*'} | Disable-PnpDevice -Confirm:$false

If you want to enable touch screen, just execute this command instead:
Get-PnpDevice | Where-Object {$_.FriendlyName -like '*touch screen*'} | Enable-PnpDevice -Confirm:$false

That’s it!

How to Add “Show Desktop” Shortcut to Taskbar in Windows 11 / 10 / 8 / 7

November 8th, 2018 by Admin

How can I switch to the desktop without closing all opened windows? You can use the Windows key + D shortcut to minimize all open windows at once to view the desktop. If you want to get to the desktop with a single click instead of keyboard shortcut, you can add a “Show Desktop” shortcut icon to the taskbar in Windows 11 / 10 / 8 / 7.

How to Add “Show Desktop” Shortcut to Taskbar in Windows?

Right-click an empty area on your desktop and select New -> Shortcut.

Paste the following into the location box and click Next.
explorer.exe shell:::{3080F90D-D7AD-11D9-BD98-0000947B0257}

Name this shortcut something meaningful, and click Finish.

The icon of your created shortcut should appear on the desktop. Right-click it and select Properties.

Under the Shortcut tab, click the Change Icon button at the bottom.

Select the icon highlighted in blue, and click OK.

Now, right-click on the “Show Desktop” shortcut on your desktop, and you can pin it to the taskbar or pin it to the Start Menu as a tile.

Every time you need to switch to the desktop, just click the “Show Desktop” icon in the taskbar and it will hide all your open windows without closing.

That’s it!

How to Change BitLocker PIN in Windows 10

November 7th, 2018 by Admin

How do I change the BitLocker PIN? It’s a good practice to change your BitLocker PIN periodically to ensure the security of your operating system drive. In this tutorial we’ll show you the easiest ways to change BitLocker PIN in Windows 10.

Method 1: Change BitLocker PIN in File Explorer

Open File Explorer. Right-click on your operating system drive which is encrypted with BitLocker, and select “Change BitLocker PIN” from the context menu.

Enter the old PIN and then enter the new PIN twice, click on Change PIN.

You should receive the message “the PIN has been successfully changed” immediately. If you’ve forgotten your BitLocker PIN, just click the “Reset a forgotten PIN” link underneath. It will let you set up a new PIN without asking for your current PIN.

Method 2: Change BitLocker PIN from Command Line

Open an elevated Command Prompt.

To change your BitLocker PIN, enter the following command into the Command Prompt window. If your Windows partition is not C:, use the drive letter that’s correct for your system.
manage-bde -changepin C:

Once pressing Enter, you’ll be prompted to enter the new PIN twice. For security reasons, you will not be able to see your new PIN as you type it.

How to Reset Hosts File Back to Default in Windows 10

November 1st, 2018 by Admin

Every Windows version comes with a Hosts file which provides a simple mechanism to redirect website to IP address. If the HOSTS file is modified incorrectly or maliciously, it can break your Internet. In this tutorial we’ll show you how to easily reset the HOSTS file (C:\Windows\System32\drivers\etc\hosts) back to default in Windows 10.

How to Reset Hosts File Back to Default in Windows 10?

By default, the HOSTS file is protected by the operating system so you’re unable to edit it without admin rights. Here we’re going to open the HOSTS file with Notepad and restore its content back to default:

Click the Start button and type notepad. Right-click the Notepad app appeared in the search result, and then select “Run as administrator“.

With Notepad open in administrator mode, you’re ready to open the HOSTS file. Click on the File menu and select Open.

Browse to the directory C:\Windows\System32\drivers\etc\hosts. Change the file filter drop-down box from “Text Documents (*.txt)” to “All Files“, and select the HOSTS file and click Open.

Now, paste the following text into Notepad:

# Copyright (c) 1993-2006 Microsoft Corp.
#
# This is a sample HOSTS file used by Microsoft TCP/IP for Windows.
#
# This file contains the mappings of IP addresses to host names. Each
# entry should be kept on an individual line. The IP address should
# be placed in the first column followed by the corresponding host name.
# The IP address and the host name should be separated by at least one
# space.
#
# Additionally, comments (such as these) may be inserted on individual
# lines or following the machine name denoted by a '#' symbol.
#
# For example:
#
# 102.54.94.97 rhino.acme.com # source server
# 38.25.63.10 x.acme.com # x client host
# localhost name resolution is handle within DNS itself.
# 127.0.0.1 localhost
# ::1 localhost

Click on the File menu and Save. Now you’ve successfully reset the HOSTS file back to default in Windows 10. For Windows 8/7/Vista, the contents of the HOSTS file are different and you can copy them from Microsoft’s website.

Configure Windows 10 to Prompt for BitLocker PIN During Startup

October 31st, 2018 by Admin

Setting up BitLocker PIN can add an additional layer of security to your computer as it acts as a second authentication factor, which can prevent DMA attacks and unauthorized access to Windows logon screen. In this tutorial we’ll show you how to configure Windows 10 to prompt for BitLocker PIN during startup.

How to Enable BitLocker Startup PIN in Windows 10

Before proceed, you have to turn on BitLocker Drive Encryption for your system drive with TPM. Once you’ve enabled BitLocker, follow these steps to set up a pre-boot PIN:

  1. Open the Local Group Policy Editor and browse to:
    Computer Configuration > Administrative Templates > Windows Components > BitLocker Drive Encryption > Operating System Drives

    In the right pane, double-click on the “Require additional authentication at startup” the policy.

  2. Now you should select Enabled. Under “Configure TPM startup PIN”, select Require startup PIN with TPM. Click OK and then reboot the system.

  3. Open an elevated Command Prompt and run the following command to add a pre-boot PIN for your BitLocker-encrypted OS drive. Make sure you set a strong PIN that you can remember.
    manage-bde -protectors -add C: -TPMAndPIN

  4. Next, type manage-bde -status to check whether the TPMAndPin protector has been added.
  5. After all that is done, you’ll need to enter the BitLocker PIN each time you turn on your PC, before Windows boots up.

That’s it!

Step-by-Step Tutorial to Enable BitLocker on Windows 10 OS Drive

October 29th, 2018 by Admin

BitLocker offers the easiest and most secure way to encrypt your partition or hard drive in Windows. In order to prevent most offline physical attacks and firmware-level malware, you can encrypt the operating system drive with BitLocker. In this tutorial we’ll walk you through the steps to turn on BitLocker drive encryption on Windows 10 OS drive.

Note: BitLocker is only available in the Pro, Enterprise and Education editions of Windows 10. Before getting started, you need to find out if your computer has a TPM chip installed. When TPM is not available, you have to use group policy to enable additional authentication at startup.

How to Enable BitLocker on Windows 10 Operating System Drive

  1. Open the Control Panel in Large icons view, and then click BitLocker Drive Encryption.

  2. Click the Turn on BitLocker link to the right of your operating system drive.

  3. The system will check whether your PC meets the system requirements for using BitLocker. If everything’s OK, you’ll be prompted to save the BitLocker recovery key just in case you have problems unlocking your PC.

  4. In my case, I chose to save the recovery key to a file on external USB drive. Afterwards, click Next to continue.

  5. You’re asked to choose how much of your drive you want to encrypt: encrypt the used disk space only, or encrypt the entire drive to ensure no one can recover previously-deleted files.

  6. Next, you need to choose the encryption mode. New encryption mode is introduced since Windows 10 version 1511, so its encrypted drive can only be used on computers running Windows 10 (version 1511) or later.

  7. Make sure to check the “Run BitLocker system check” option, and click Continue.

  8. Restart your computer when asked.

  9. After the PC boots back up, Windows will encrypt your drive in the background. To check out the encryption progress, you can run the following command at an elevated Command Prompt:
    manage-bde -status

  10. You can continue using your computer while the OS drive is being encrypted, but things may be running a little more slowly than usual.

If you’ve bought a brand-new computer with BitLocker turned on by default, make sure you recover and backup the BitLocker recovery key before you have trouble logging into Windows or you’re prompted for the recovery key during boot.

4 Ways to Find out if Your Windows PC Has a TPM Chip

October 26th, 2018 by Admin

How can I determine if my computer has TPM available? Need to check if the TPM on a Windows machine is enabled or activated? TPM (Trusted Platform Module) is a security chip that is soldered to the motherboard on most new PCs. It provides a hardware-based approach to store cryptographic keys and ensure it is tamper-free. In this tutorial we’ll show you 4 ways to find out if your Windows PC has a TPM chip, and check out TPM version and status.

Method 1: Check if Your PC has TPM Using TPM Management Tool

Press Windows + R to open the Run dialog window. Type tpm.msc into it and press Enter.

This opens the built-in utility – Trusted Platform Module (TPM) Management. If TPM is installed, you can see the manufacturer information about the TPM in the PC. In my case, the TPM version is 2.0.

If you see a “Compatible TPM cannot be found” message instead, your computer does not have a TPM or it’s turned off in the BIOS/UEFI.

Method 2: Check if Your PC has TPM Using Device Manager

Open the Device Manager and look for a node called “Security devices“. Expand it and see if it has a “Trusted Platform Module” listed.

Method 3: Check if Your PC has TPM Using Command Prompt

Open the elevated Command Prompt and run the following command:
wmic /namespace:\\root\cimv2\security\microsofttpm path win32_tpm get * /format:textvaluelist.xsl

This will let you view the current status of the TPM chip: activated or enabled. If there is no TPM installed on your computer, you’ll get the message “No Instance(s) Available“.

Method 4: Enter into UEFI/BIOS to Check if Your PC has TPM

If you’re unable to find any TPM on your PC using the above methods, it’s possible that the TPM is disabled in the UEFI/BIOS firmware. To check for this, restart your PC into the UEFI / BIOS screen. Navigate to the Security tab or the Advanced tab, look for a setting called “TPM Support“, “Security Chip“, “TPM Security” or something like that. Make sure it’s enabled.

If there is no such setting, your computer probably doesn’t have TPM chip.

How to Change Another User’s Password in Windows 10 / 8 / 7

October 25th, 2018 by Admin

How can I change other user password without logging in as that user? Provided you are the administrator, you have many ways to reset any Windows user password. If you try to change another user’s password from a standard account, you may receive the “access denied” error message.

Here we’re going to show you several ways to change another user’s password from standard account in Windows 10 / 8 / 7. Privilege elevation is required for this task.

Method 1: Change Another User’s Password from Control Panel

  1. Open the Control Panel in Large icons view, and click on User Accounts.

  2. Click on the Manage another account link as shown in the image below.

  3. If you’re logged on as a standard account, a UAC prompt will ask you for the administrator password in order to gain elevated privileges.

  4. Select another user that you want to change password for.

  5. Click the “Change the password” option.

  6. Type new password and confirm it, then click on the “Change password” button on the lower right hand side.

Method 2: Change Another User’s Password from Elevated Command Prompt

  1. Click on Start, and begin typing “cmd“. You’ll see the Command Prompt appear at the top of the search results. Right-click on it and select “Run as administrator“.

  2. In the UAC elevation prompt, enter your administrator password and click Yes.

  3. In order to change another user’s password, type net user user_name * and press Enter. It will ask you to type a new password twice. For security purpose, the new password you typed won’t appear on the screen.

If you’re still unable to change another user’s password, follow our tips for promoting your standard account to administrator in Windows 10 / 8 / 7. That’s it!

How to Open Elevated Command Prompt from Standard User in Windows

October 25th, 2018 by Admin

Is it possible to run an elevated Command Prompt from standard account? Though Standard account has limited privileges as opposed to administrator account, most people still like to use it for everyday computer use in order to lower the risk of being infected with malware. When an administrative task needs to be performed, they would do it from an elevated Command Prompt. In this tutorial we’ll show you different ways to open elevated Command Prompt from standard user in Windows 10 / 8 / 7.

Method 1: Open Elevated Command Prompt from Standard User via Run or Command Line

Use the Windows key + R keyboard combination to open the Run dialog box. Type the following and press Enter.
powershell -Command "Start-Process cmd -Verb RunAs

Or run the above command in a Command Prompt window that has already been opened with normal privileges.

A pop-up window will appear asking to enter your administrator password.

Once you’ve entered the correct password and click Yes. It will run an elevated Command Prompt immediately.

In addition, the command “runas /user:Administrator cmd” can also let you run Command Prompt using an administrator profile, but note that the cmd is still running without elevated privileges.

Method 2: Open Elevated Command Prompt from Standard User via Windows Search

Click on the Start button and then type “cmd” in the search box that appears. Right-click on the Command Prompt in the result and select “Run as administrator“.

You will see a UAC pop-up window asking you to type the administrator password before opening up the elevated Command Prompt.

Method 3: Open Elevated Command Prompt from Standard User via Start Menu

Click on the Start button. In the Start Menu, scroll down to the “Windows System” folder and expand it. There you can right-click on the Command Prompt shortcut, and select More -> Run as administrator.

These are all the methods we know of running elevated Command Prompt from standard user. If you need to access elevated Command Prompt frequently, it’s a good idea to pin the Administrator Command Prompt to the Windows taskbar. That’s it!