Many Windows 10 laptops and tablets ship with a touch screen. If you want to turn off touch screen function to prevent accidental input, you can disable it completely. In this tutorial we’ll show you how to disable or enable touch screen on Windows 10 PC, using Device Manager or PowerShell command line.
Method 1: Disable or Enable Touch Screen Using Device Manager
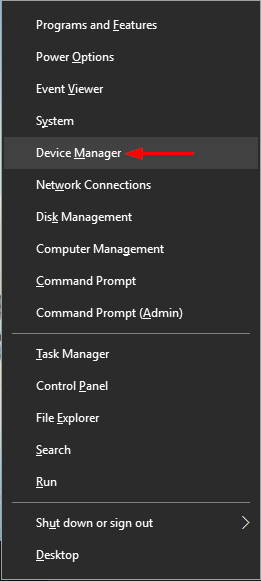
- Press the Windows key + X to open the Quick Link menu and then select Device Manager.
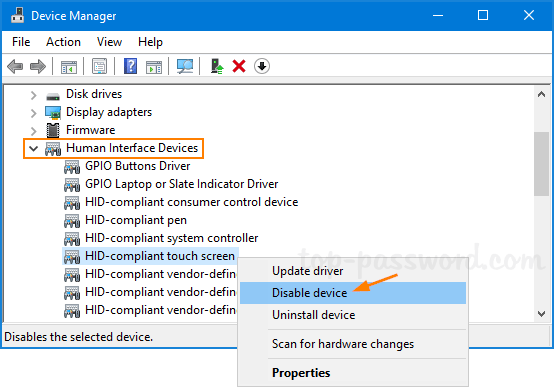
- When the Device Manager window opens, click the little arrow next to “Human Interface Devices” to expand the category. Right-click the “HID-compliant touch screen” and choose Disable device.
- A pop-up will appear asking you to confirm disabling your touch screen. Click Yes.

- This change will take effect immediately. Try to touch your screen and it should stop responding. If you want to enable the touch screen again, just enable the “HID-compliant touch screen” device and you’re done!
Method 2: Disable or Enable Touch Screen Using PowerShell
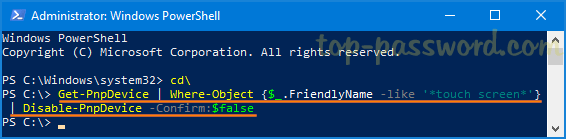
Open the PowerShell as administrator and run the following command to disable touch screen on your Windows 10 computer:
Get-PnpDevice | Where-Object {$_.FriendlyName -like '*touch screen*'} | Disable-PnpDevice -Confirm:$false
If you want to enable touch screen, just execute this command instead:
Get-PnpDevice | Where-Object {$_.FriendlyName -like '*touch screen*'} | Enable-PnpDevice -Confirm:$false
That’s it!