Author Archive

Reset Forgotten Windows 11 Password with Utilman.exe Trick

October 29th, 2021 by Admin

Forgot your Windows 11 password? Using your laptop some time ago and can’t remember the password now? If you have previously created a password reset disk, you can get in without much trouble. In this tutorial we’ll show you another method for resetting forgotten Windows 11 password – the Utilman.exe trick, without using any third-party software.

How to Reset Forgotten Windows 11 Password with Utilman.exe Trick

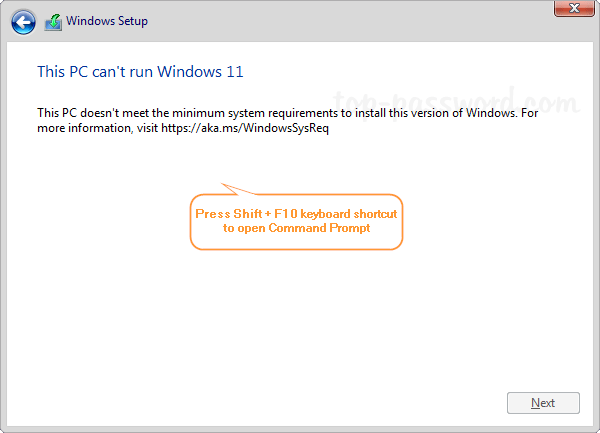
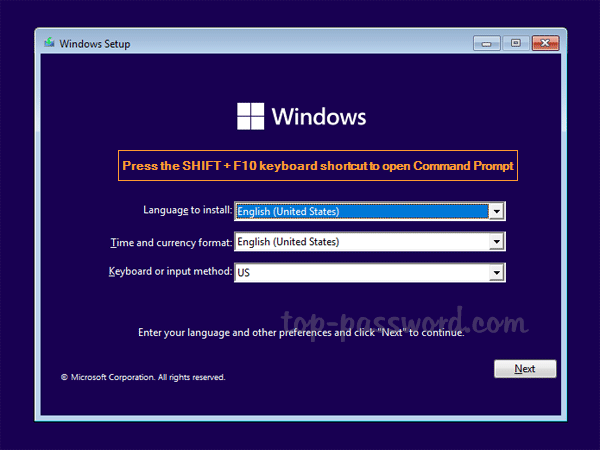
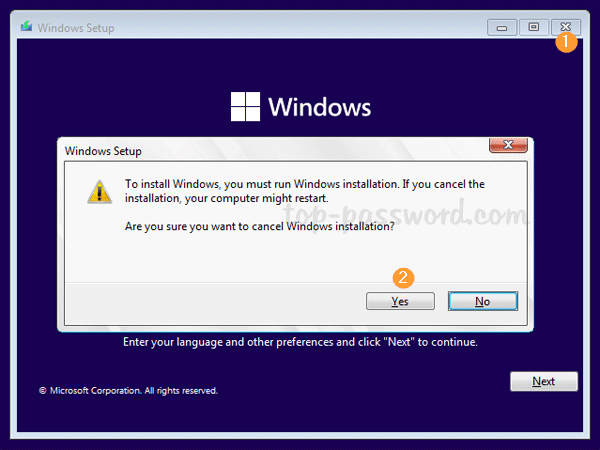
  1. Boot your locked PC from Windows 11 installation media (CD or USB). When you get to the initial setup screen, press the SHIFT + F10 keyboard shortcut to open Command Prompt.

  2. Type the following commands to launch the diskpart utility and display the partitions on all disks.
    diskpart
    list volume

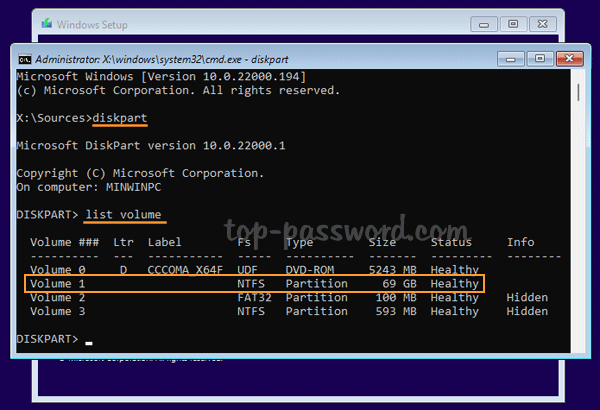
    You need to determine which volume has the OS on it. The system partition can be identified by its size, and it’s not assigned a letter by default.

  3. To make the system partition accessible, we need to run these commands to assign a drive letter to it. Replace 1 with the volume number of your system partition, and C with an unused drive letter.

    select volume 1
    assign letter=C
    exit

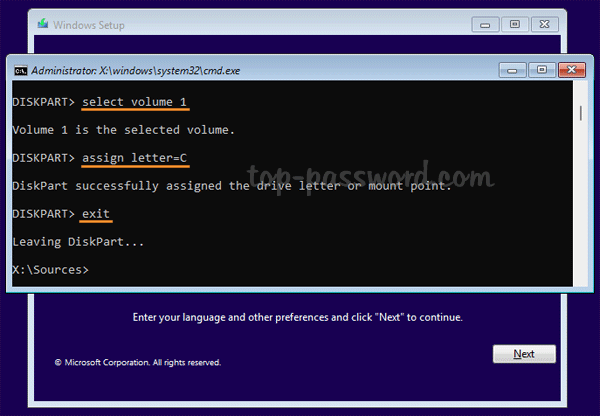
  4. At this point, type the following commands to make backup of your existing Accessibility Manager tool (Utilman.exe), and replace Utilman.exe with cmd.exe.

    copy c:\windows\system32\utilman.exe c:\
    copy /y c:\windows\system32\cmd.exe c:\windows\system32\utilman.exe

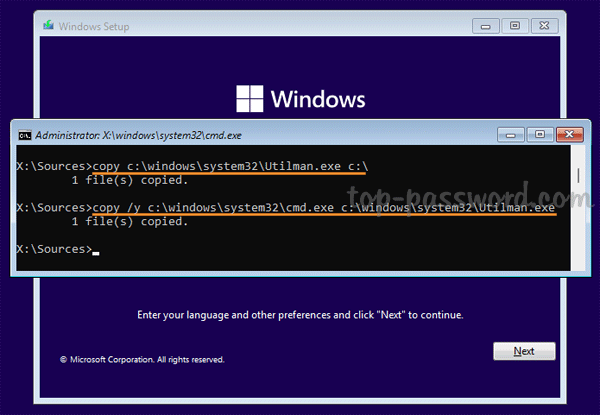
  5. Close all open windows and restart the computer without Windows 11 installation media.

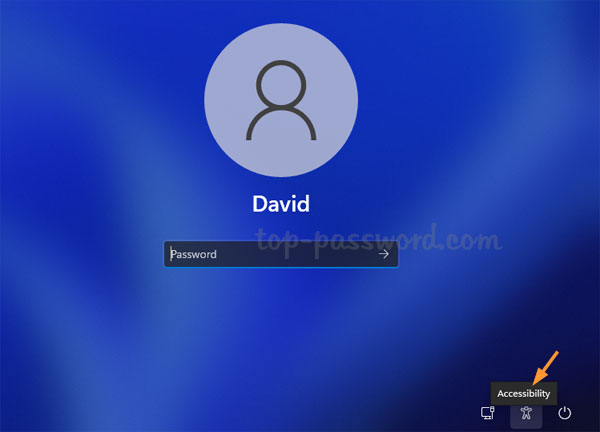
  6. After you get to the Windows login screen, click the Accessibility icon in the lower-right corner. It will launch Command Prompt.

  7. You can now reset the forgotten password of any existing user, by using the net user command:
    net user account_name new_password

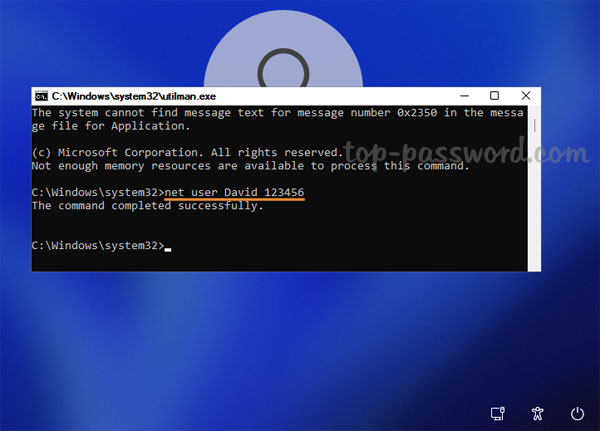
  8. Close Command Prompt and you can then log in with your new password. To restore the original Utilman.exe, reboot with the installation media that you used earlier, and execute this command:

    copy c:\utilman.exe c:\windows\system32

That’s it!

How to Fix the Error: This PC can’t run Windows 11

October 14th, 2021 by Admin

When you boot from Windows 11 installation media to begin setup, you may get the error message “This PC doesn’t meet the minimum system requirements to install this version of Windows. For more information, visit https://aka.ms/WindowsSysReq“.

This problem usually happens when your PC doesn’t have a modern CPU, TPM 2.0 chip or enough RAM. In this tutorial we’ll walk you through the steps to bypass / fix the error “This PC doesn’t meet the minimum system requirements to install this version of Windows” during Windows 11 setup.

How to Fix the Error: This PC can’t run Windows 11

  1. When you’re greeted with the error “This PC can’t run Windows 11” during installation, press the Shift + F11 keyboard shortcut to open up the Command Prompt window.

  2. Type regedit and press Enter to launch Registry Editor.

  3. Navigate to the location: HKEY_LOCAL_MACHINE\SYSTEM\Setup. Right-click on the Setup key and select New -> Key.

  4. Name the newly-created key as LabConfig, next right-click on the right pane and select New -> DWORD (32-bit) Value.

  5. Name the new DWORD as BypassTPMCheck, and then double-click it and change its value data to 1.

  6. Repeat the same process to create other DWORD values: BypassSecureBootCheck,BypassRAMCheck and BypassCPUCheck, and also set their value data to 1.

  7. Close Registry Editor and quit Windows Setup.

  8. It will go back to the first Windows Setup screen and you can proceed with Windows 11 installation.

Easy Way to Uninstall Microsoft Edge in Windows 11 / 10

September 26th, 2021 by Admin

Microsoft Edge comes preinstalled as the default web browser in Windows 11 and Windows 10. When you try to uninstall Microsoft Edge using either Control Panel or the Settings app, you will find the Uninstall option is missing or greyed out. In this tutorial we’ll show you a simple way to uninstall Microsoft Edge in Windows 11 / 10.

How to Uninstall Microsoft Edge in Windows 11 / 10

  1. Right-click on the Microsoft Edge shortcut on your desktop and then select “Open file location” from the context menu.

  2. File Explorer will open to the folder: C:\Program Files (x86)\Microsoft\Edge\Application. Simple double-click the folder which is named with the version number of your Microsoft Edge. In my case, it is 94.0.992.31.

  3. Next, double-click and open the Installer folder.

  4. We’ll later use the setup.exe file for uninstalling Microsoft Edge. To open an elevated PowerShell at this location, click the File menu in the top-left corner.

  5. select Open Windows PowerShell, and then Open Windows PowerShell as administrator. Click Yes if the UAC dialog appears.

  6. When a PowerShell window opens up, type the following command and press Enter. After a while, Microsoft Edge will be removed and uninstalled from your system.

    .\setup.exe -uninstall -system-level -verbose-logging -force-uninstall

    Whenever you need to install Microsoft Edge later, you can download it from https://www.microsoft.com/en-us/edge.

That’s it!

Fix: The parameter is incorrect when changing drive letter in Windows 10

September 22nd, 2021 by Admin

Recently when I attempted to change drive letter using Disk Management, it kept giving out the error message “The parameter is incorrect” even though the new drive letter is unused.

It turns out that this problem happens with only drives which are holding page files. To fix the “The parameter is incorrect” issue in Windows 10, you need to temporarily disable paging files on the drive which you want to change the drive letter for.

How to Fix: The parameter is incorrect when changing drive letter

  1. Press the Windows key + R together to open the Run box, type sysdm.cpl and press Enter.

  2. When the System Properties window opens, select the Advanced tab. Click the Settings button under the Performance section.

  3. Go to the Advanced tab and click the Change button.

  4. Make sure the “Automatically manage paging file size for all drives” option is unchecked.

  5. Select the drive which you want to change the drive letter for. Choose the “No paging file” radio button and click the Set button.

  6. Click OK. Restart your computer and Windows will delete the paging file automatically. The next time you log back in to Windows 10, you should be able to change the drive letter successfully using Disk Management.

After changing drive letter, you can enable paging file again on your original drive if necessary. That’s it!

How to Block Chrome from Popping up Notifications in Windows 10 Taskbar

September 15th, 2021 by Admin

How can I stop Chrome from popping up annoying notifications in the lower right-hand corner of my screen? When visiting a new website, you may receive a pop-up saying “this website wants to show notifications“.

If you click on Allow unintentionally, that website’s ads or news will automatically pop up in Windows 10 notification area.

In this tutorial we’ll walk you through the steps to block Chrome from popping up notifications in Windows 10 taskbar.

How to Block Chrome from Popping up Notifications in Windows 10 Taskbar

  1. Open your Chrome browser, type chrome://settings/privacy in the address bar and hit Enter. Next, click Site Settings under the Privacy and security section.

  2. Click Notifications under the Permissions section.

  3. In order to prevent websites from asking permission to send you notifications, change the default behavior from “Sites can ask to send notifications” to “Don’t allow sites to send notifications“.

  4. Scroll down to the “Customized behaviors” section, you can remove any specific website from allowed list. Just click the more icon (three vertical dots) next to your target website, and select Remove from the pop-up menu.

That’s it!

How to Hide Only Shut down or Restart Option from Windows 10 Sign-in Screen

September 6th, 2021 by Admin

Is there a way to remove the ‘Restart‘ option from Windows 10 login screen? How can I disable ‘Shut down‘ option but keep ‘Restart‘? To prevent accidentally shutdown or restart, you can use a simple registry trick to hide only Shut down or Restart option from Windows 10 sign-in screen, as well as the Start Menu.

How to Hide Only Shut down or Restart Option from Windows 10 Sign-in Screen

  1. Open Registry Editor and navigate to one of the following paths, depend on which option you want to hide from Windows 10 sign-in screen. Next, double-click the “value” item in the right pane to edit it.

    Hide Shut down option:
    HKEY_LOCAL_MACHINE\SOFTWARE\Microsoft\PolicyManager\default\Start\HideShutDown

    Hide Restart option:
    HKEY_LOCAL_MACHINE\SOFTWARE\Microsoft\PolicyManager\default\Start\HideRestart

    Hide Sleep option:
    HKEY_LOCAL_MACHINE\SOFTWARE\Microsoft\PolicyManager\default\Start\HideSleep

    Hide the Power button completely:
    HKEY_LOCAL_MACHINE\SOFTWARE\Microsoft\PolicyManager\default\Start\HidePowerButton

  2. Change the value data from 0 to 1, and click OK.

    Note: whenever you need to restore the hidden Shut down/Restart or other options, just change the value data back to 0.

  3. Close Registry Editor. You’ll find your desired option is already removed from the Start Menu, Windows sign-in screen as well as the ALT + CTRL + DEL screen, but other options are still there.

How to Disable the Power Button in Windows 10 Start Menu

August 27th, 2021 by Admin

When you click the Power button in the Start Menu, it will list all actions you can perform: Shut Down, Restart, Sleep, and Hibernate. If you want to prevent access to all those commands, here are two simple ways to disable the Power button in the Start Menu on Windows 10.

Method 1: Disable the Power Button in Windows 10 Start Menu via Group Policy

  1. Open Local Group Policy Editor and navigate to: User Configuration -> Administrative Templates -> Start Menu and Taskbar. Double-click the “Remove and prevent access to the Shut Down, Restart, Sleep, and Hibernate commands” policy in the right pane.

  2. Select the Enabled option. Click Apply and then OK.

  3. Restart your system to apply the changes. The next time you click the Power button in the Start Menu, it will display the error message “There are currently no power options available”.

    The Shut Down, Restart, Sleep, and Hibernate options will also been removed from the CTRL+ALT+DEL screen.

Method 2: Disable the Power Button in Windows 10 Start Menu via Group Policy

  1. Open Registry Editor and browse to: HKEY_CURRENT_USER\SOFTWARE\Microsoft\Windows\CurrentVersion\Policies\Explorer. In the right pane, right-click the blank area and select New -> DWORD (32-bit) Value.

    Note: if the Explorer key doesn’t exist, you need to create it first.

  2. Name the new DWORD as NoClose. Next, double-click it and change its value data to 1.

  3. Close Registry Editor and reboot your PC. It will disable Shut Down, Restart, Sleep, and Hibernate in the Start Menu, as well as the CTRL+ALT+DEL screen.

How to Disable Printing in Microsoft Edge on Windows 10

August 15th, 2021 by Admin

How can I turn off printing in the new Chromium-based Microsoft Edge? Microsoft Edge allows users to print web pages, PDF files, or any other content with the “Print” context menu. If you don’t allow others to print from Microsoft Edge, here is a simple registry trick to disable printing in Microsoft Edge on Windows 10.

How to Disable Printing in Microsoft Edge on Windows 10

  1. Open Registry Editor and navigate to: HKEY_LOCAL_MACHINE\SOFTWARE\Policies\Microsoft. In the left side, right-click on the Microsoft key and select New -> Key.

  2. Name the new key as Edge. Next, right-click it and select New -> DWORD (32-bit) Value.

  3. Name the new DWORD as PrintingEnabled and leave the Value data at 0. A value of 0 indicates that printing is disabled. A value of 1 allows printing.

  4. Close Registry Editor and relaunch Microsoft Edge. You’ll find the “Print” context menu is greyed out in your Edge browser.

That’s it!

3 Ways to Check RAM Speed or Frequency on Windows 11 / 10

July 27th, 2021 by Admin

Before upgrading or adding memory, it’s necessary to find out your RAM speed and check if your PC has empty slots available. In this tutorial we’ll show you 3 simple ways to check RAM speed or frequency on Windows 11 / 10, without using any third-party software.

Method 1: Check RAM Speed or Frequency Using Task Manager

Press Ctrl + Shift + Esc keyboard shortcut at the same time to open Task Manager. Go to the Performance tab and then click Memory. In the right pane, you can see the RAM speed, slots used.

Method 2: Check RAM Speed or Frequency Using Command Prompt

Open up the Command Prompt window and run the following command:
wmic MemoryChip get DeviceLocator, Manufacturer, Speed

It will display your RAM speed and the number of memory slot in used.

Method 3: Check RAM Speed or Frequency Using PowerShell

Open Windows PowerShell and execute the command below:
Get-CimInstance -ClassName Win32_PhysicalMemory | Format-Table Devicelocator, Manufacturer, Speed

It will show the speed of RAM in each slot.

Conclusion

It’s easy to find out the RAM speed using Task Manage, Command Prompt and PowerShell. If you also need to check if the RAM type is DDR, DDR2, DDR3 or DDR4, I recommend using the third-party freeware CPU-Z.

Remove Sign out from Ctrl+Alt+Del Screen in Windows 10

July 20th, 2021 by Admin

Whenever you leave your computer unattended, you can lock Windows and bring up the Ctrl + Alt + Del screen. If you want to prevent others from logging off your account, here are simple ways to remove the “Sign out” option from the Ctrl + Alt + Del screen in Windows 10.

Method 1: Remove Sign out from Ctrl+Alt+Del Screen via Group Policy

  1. Open Local Group Policy Editor and browse to: User Configuration -> Administrative Templates -> System -> Ctrl+Alt+Del Options. In the right pane, double-click the “Remove Logoff” policy.

  2. Select the Enabled option. Click Apply and then OK.

  3. Close Local Group Policy Editor and restart your system. The next time you press the Windows + L key combination, you’ll see that the “Sign out” option is missing.

Method 2: Remove Sign Out from Ctrl+Alt+Del Screen via Registry Editor

  1. Open Registry Editor and navigate to: HKEY_CURRENT_USER\Software\Microsoft\Windows\CurrentVersion\Policies\Explorer. In the right pane, right-click the blank area and select New -> DWORD (32-bit) Value.

  2. Name the new DWORD NoLogoff, then double-click it and change its value to 1. Click OK.

  3. Close Registry Editor. After rebooting, you can check if the “Sign out” option is removed from the Ctrl + Alt + Del screen.

That’s it!