Archive for May, 2022

How to Move Windows 11 Taskbar to Top, Left or Right

May 18th, 2022 by Admin

After upgrading to Windows 11, you may find that the taskbar is locked to the bottom of the screen, and you’re no longer able to change taskbar location using the Settings app. Luckily, there is a simple registry tweak which can help you move Windows 11 taskbar to the top, left or right of the screen.

How to Move Windows 11 Taskbar to Top, Left or Right

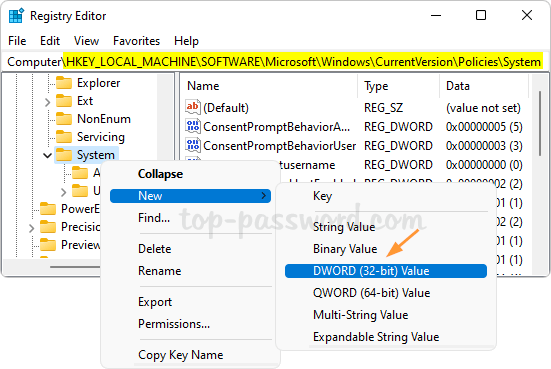
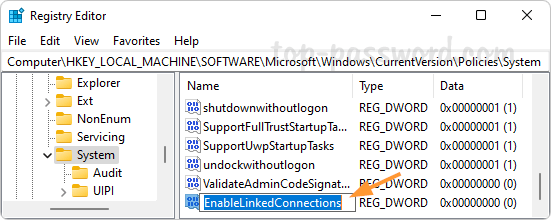
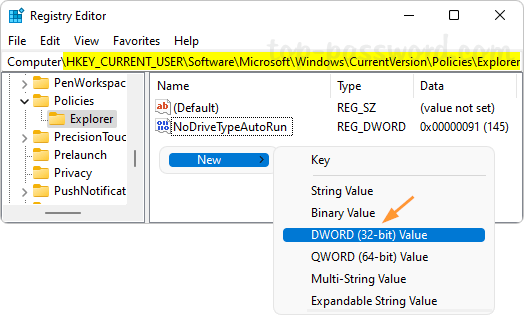
  1. Open Registry Editor. Copy-paste the following location in the address bar and press Enter.
    HKEY_CURRENT_USER\Software\Microsoft\Windows\CurrentVersion\Explorer\StuckRects3

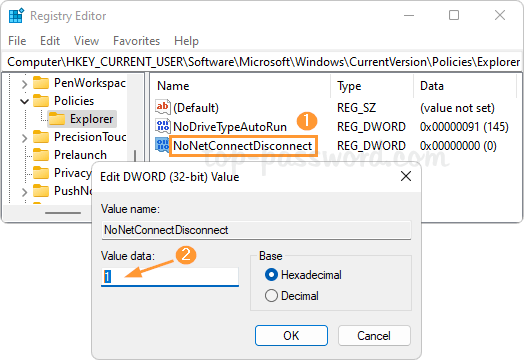
    Next, double-click the Settings binary value in the right pane.

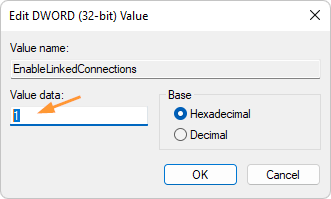
  2. When the binary-editor window opens, you will see a table of binary numbers under the “Value data” section. Place your cursor over the fifth column in the second row, double-click the 03 value and make sure it is highlighted in blue, then type one of the following values and click OK. In my example, I type 01 as I want to move the taskbar to the top of the screen.

    • 00: move taskbar to the left
    • 01: move taskbar to the top
    • 02: move taskbar to the right
    • 03: move taskbar to the bottom

    Note: Click Cancel if you typed the binary numbers incorrectly.

  3. Close Registry Editor. After restarting File Explorer or logging off your account, your taskbar will appear in the desired side of your screen.

That’s it!

How to Remove or Forget a Wi-Fi Network in Windows 11

May 17th, 2022 by Admin

How do I forget a Wi-Fi network so the system doesn’t automatically connect to it? Can’t connect to the same wireless network after changing the Wi-Fi password on router? Removing previously saved Wi-Fi networks is often a helpful step to fix wireless connection problems. In this tutorial we’ll show you how to remove or forget a Wi-Fi network in just 3 steps on Windows 11.

How to Remove or Forget a Wi-Fi Network in Windows 11

  1. Press the Windows key + I keyboard combination to launch the Settings app. Click Network & internet on the left menu, and then click Wi-Fi on the right pane.

  2. Click “Manage known networks“.

  3. You can see the full list of all the Wi-Fi networks that Windows 11 has remembered previously. Once you find the Wi-Fi network that you want to remove, click the Forget button next to its name.

Conclusion

That’s how you can easily forget a Wi-Fi network in Windows 11. You can also remove saved Wi-Fi networks using the other 3 methods: How to Delete Wireless Network Profiles in Windows 11 / 10 / 8 / 7 using system tray, Command Prompt or Registry Editor

How to Change Wi-Fi Password in Windows 11 / 10

May 16th, 2022 by Admin

How do I update password on saved Wi-Fi connection? Looking for a way to change the Wi-Fi password on your router to improve the network security? In this tutorial we’ll walk you through the steps to change Wi-Fi password from your Windows 11 / 10 computer or router.

Part 1: Change Saved Wi-Fi Password on Windows 11

  1. Press Win + R key combination to open the Run command box. Type ncpa.cpl and hit Enter.

  2. It will launch the Network Connections window listing all the available network adapters. Right-click your wireless network adapter and choose Status from the pop-up menu.

  3. Click the Wireless Properties button.

  4. Go to the Security tab. Enter your new Wi-Fi password in the Network security key field and click OK. Of course, you can tick the “Show characters” checkbox to view the old saved password before changing it.

Additionally, you can also choose to delete the saved Wi-Fi networks so it will ask you to enter new password before connecting.

Part 2: Change Wi-Fi Password on Your Router

Before getting started, make sure your current device is connected to your router via Wi-Fi or Ethernet cable. By default, the router’s IP address is 192.168.0.1, 192.168.1.1 or the default gateway which you can find out using the ipconfig command.

  1. Open your Web browser and enter the IP address of your router in the address bar, press Enter to access the router’s web-based management page. You need to login with your router password.

    You can locate the default username, default password and router’s IP address on the bottom of the router itself. If you’ve changed the router password but forgot it, you can reset your router to the factory. With the power switched on, use a pin to press and hold the Reset button on the side panel of your router for 10 seconds.

  2. Look for a section like “Wireless” or “WLAN”. From there you should be able to see the current SSID and Wi-Fi password, and set a new password. If you are using a dual-band router, you can click 2.4 GHz or 5 GHz to set a separate password for each network.

  3. After changing your Wi-Fi password, you need to restart the router to apply the changes.

Quick Methods to Run as Different User in Windows 11

May 12th, 2022 by Admin

If your PC has multiple accounts, you can run a program under different credentials than the currently logged on user. No need to switch back and forth between multiple accounts. In this tutorial we’ll show the most common and quickest methods to run a program as different user in Windows 11.

Method 1: Run as Different User from File Explorer

  1. Press and hold the Shift key on the keyboard, then right-click the executable (.exe) file in File Explorer and select “Show more options“.

  2. Next, choose “Run as different user” and release the Shift key.

  3. When prompted, fill in the the user credentials of the Windows account you want to run as, and click OK.

Method 2: Run as Different User from Taskbar

  1. If your app is already pinned to Windows taskbar, press and hold the Shift key, and then right-click the app icon in the taskbar.

  2. Choose the “Run as different user” option from the pop-up menu, and you can start the app with a different user profile.

Method 3: Add “Run as different user” Option to Start Menu

If your app is pinned to the Start Menu or appears under the “All apps” list, you can add the “Run as different user” option to the Start Menu. Follow these steps:

  1. Open Local Group Policy Editor and navigate to: User Configuration -> Administrative Templates -> Start Menu and Taskbar. On the right pane, double-click the policy called “Show Run as different user command on Start“.

  2. Choose the Enabled option. Click Apply and then OK.

    If Local Group Policy Editor is missing from your version of Windows 11, you can enable the above group policy using this registry tweak.

After making the above change, right-click the app pinned in the Start Menu and you’ll see the “Run as different user” option.

If you right-click the app under the “All apps” list and select “More” -> “Run as different user“, the app will start under your provided credentials of the different user.

Conclusion

That’s how you can run an app as different user from File Explorer, taskbar or Start Menu. Actually, you can also open Windows Terminal (either Command Prompt or Windows PowerShell), and use the built-in “runas” command to run your program as different user.

Fix: Mapped Network Drive Not Showing in Windows 11

May 10th, 2022 by Admin

Mapped network drive doesn’t appear in File Explorer? This problem usually happens when you map a network drive using administrative Command Prompt or a logon script. By default, only network drives created with standard rights will show up in File Explorer. In this tutorial we’ll show you two solutions to fix the issue of mapped network drive not showing in Windows 11.

Method 1: Configure the EnableLinkedConnections registry value

  1. Open Registry Editor and navigate to: HKEY_LOCAL_MACHINE\SOFTWARE\Microsoft\Windows\CurrentVersion\Policies\System. Right-click the System key in the left navigation pane, and choose New -> DWORD (32-bit) Value.

  2. Type EnableLinkedConnections and then press Enter.

  3. Next, double-click it to modify. In the Value data field, enter 1 and click OK.

  4. After restarting the computer, network drives created by elevated apps will be visible in File Explorer, and elevated apps can also access the network drives created by programs running with standard rights.

Method 2: Map a network drive with normal Command Prompt

If the mapped network drives are not available, try to use the standard Command Prompt to map a network drive. Follow these steps:

  1. Open up a regular Command Prompt (NOT in admin/elevated mode). Type the following command and press Enter. Replace “remote_ip” and “shared_folder” with the IP address of your network computer and the name of the shared folder.
    net use z: \\remote_ip\shared_folder /persistent:yes

  2. The above command will map the shared folder to Z: and you can then access the network drive in File Explorer.

    If you want to hide a mapped network drive for all users but letting programs access them, please use the method described in this article: How to Hide A Drive / Partition from Windows Explorer

  3. Whenever you want to disconnect the network drive, run this command:
    net use z: /delete

That’s it!

2 Methods to Remove “Map network drive” Context Menu in Windows 11

May 9th, 2022 by Admin

When you right-click This PC icon on your desktop, you’ll see two options: Map network drive and Disconnect network drive.

You can also access these options from the toolbar if you open File Explorer to This PC.

If you don’t need to access network resources frequently, it’s not necessary to map a network drive and you can hide the above options. In this tutorial we’ll show you 2 simple methods to remove “Map network drive” and “Disconnect network drive” context menus in Windows 11.

Method 1: Remove “Map network drive” Context Menu via Group Policy

  1. Open Local Group Policy Editor and browse to: User Configuration -> Administrative Templates -> Windows Components -> File Explorer. On the right pane, double-click the policy called “Remove Map Network Drive and Disconnect Network Drive” policy to edit it.

  2. Choose the Enabled option. Click Apply and then OK.

  3. This change will take effect immediately. You’ll see that the “Map Network Drive” context menu is missing.

Method 2: Remove “Map network drive” Context Menu via Registry Editor

  1. Open Registry Editor and navigate to: HKEY_CURRENT_USER\Software\Microsoft\Windows\CurrentVersion\Policies\Explorer. On the right pane, right-click the blank area and select New -> DWORD (32-bit) Value.

  2. Rename the newly-created DWORD to NoNetConnectDisconnect, then double-click it and change its value data to 1.

  3. Close Registry Editor. The next time you log in to your Windows account, the “Map Network Drive” context menu will no longer show up. Whenever you need to restore it, just delete the DWORD NoNetConnectDisconnect.

Conclusion

These methods just hide the “Map network drive” and “Disconnect network drive” from the context menu in Windows 11. After removing the “Map network drive” option, you can still map a network drive using Command Prompt.

How to Change Windows 11 Display Language with Ease

May 5th, 2022 by Admin

When you buy a computer with Windows 11 preinstalled, it may not come with your desired language. Starting with Windows 11, you can change system language without reinstallation. In this tutorial we’ll walk you through the steps of changing Windows 11 display language with ease.

How to Change Windows 11 Display Language with Ease

  1. To begin, open Settings app. In the left sidebar select Time & language, then click Language & region on the right.

  2. If your preferred language pack is not installed, click the “Add a Language” button.

  3. Scroll down until you locate the preferred language, or search for it using the search box at the top. Click Next.

  4. On the next screen, make sure at least the “Language pack” option is checked. Click Install.

  5. Windows will start to download and install the language pack and related features. When it is complete, go back to the “Language & region” page, click the drop-down list next to “Windows display language” and select your preferred language.

  6. You’ll be prompted to click Sign out to apply the new display language. The next time you sign back into your account, you’ll see the language changed system-wide.

That’s it!