Desktop icons disappeared after Windows 11 update? Cannot right-click anywhere on the desktop to restore the missing icons? Here are a couple of troubleshooting tips to fix the problem of Windows 11 desktop icons not showing.
Method 1: Enable Show Desktop Icons
Right-click any empty space on your desktop and navigate to the View tab at the top, then check the “Show desktop icons” option.
![]()
Make sure there is a check-mark next to the “Show desktop icons” option.
Method 2: Configure Your Desktop Icons’ Settings
Press the WIN + I keyboard shortcut to open the Settings app, then navigate to: Personalization -> Themes. On the right-hand side pane, click the “Desktop icon settings” option.

Select the icons that you want to display on the desktop, For example, Computer, Recycle Bin, User’s Files, Network, or Control Panel.
![]()
Click Apply and then OK to see if the missing desktop icons appear.
Method 3: Check Group Policy Setting
If all desktop icons disappear and you cannot right-click on the desktop, then check if this issue is caused by a improper group policy.
- Open Local Group Policy Editor and browse to:
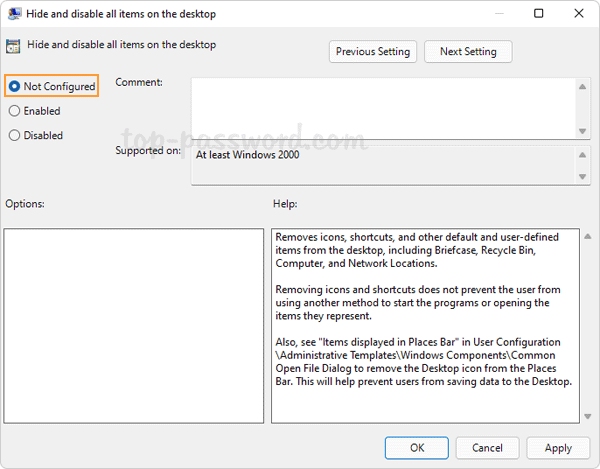
User Configuration -> Administrative Templates -> Desktop. On the right-side, double-click the “Hide and disable all items on the desktop” policy.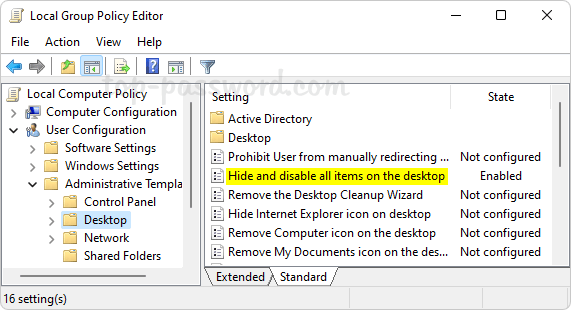
- If this policy is enabled, select “Not Configured” and click OK.
- Restart your computer to make the changes take effect. The missing desktop icons should come back and the right-click problem should also be fixed.
Method 4: Rebuild the Icon Cache
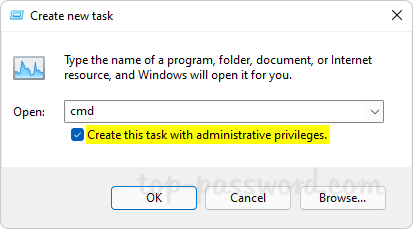
If your desktop icons are missing or appear blank or broken, you can fix the issue by rebuilding the desktop icon cache. Just open the elevated Command Prompt and execute the following command:
DEL %userprofile%\AppData\Local\IconCache.db /a
![]()
Log off your account and log in to see if the problem is fixed.
Conclusion
Desktop icons still don’t show up after trying the above methods? It’s possible that you’ve been logged in with a temporary profile, or you need to fix corrupted values for icon spacing in Registry Editor. As a last resort, you can perform a clean boot or restore your PC to an earlier restore point.