Archive for the ‘Tips & Tricks’ category

3 Ways to Run Disk Error Check in Windows 10, 8 and 7

September 17th, 2016 by Admin

All versions of Windows come with a useful disk checking feature which can check the integrity of your hard disk, fix file system errors and scan for bad sectors. In this tutorial we’ll show you 3 ways to run disk error check in Windows 10, 8 and 7.

Method 1: Run Disk Check from Windows Explorer

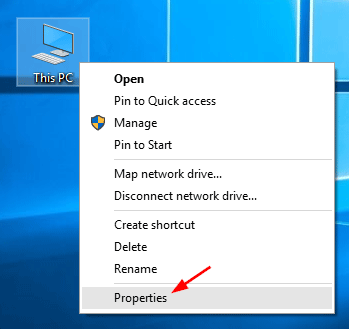
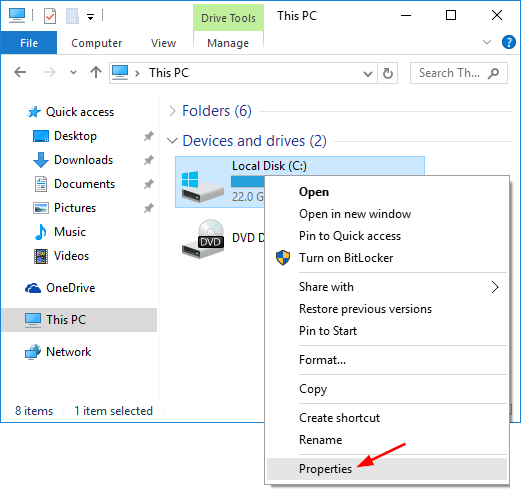
  1. Open Windows Explorer. Right-click on the drive you want to run the disk check on, and choose Properties.

    disk-properties

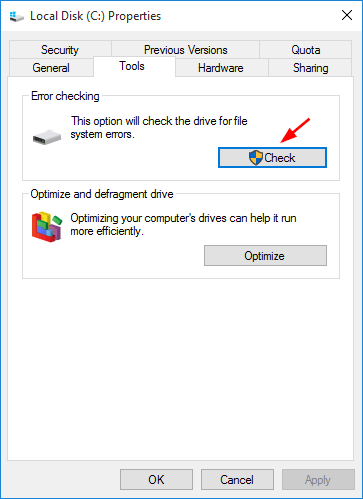
  2. Select the Tools tab. Under the “Error checking” section, click on the Check button.

    disk-error-checking

  3. Click on Scan drive button to run the disk check.

    scanning-disk

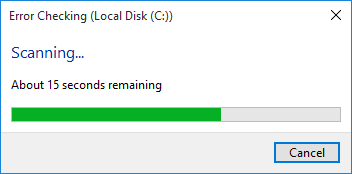
    If your selected drive is a system partition that is being used, Windows will let you schedule a disk check on the next restart.

Method 2: Run Disk Check Using the Chkdsk Command Line

  1. Open an elevated Command Prompt.

    • In Windows 10/8, simply press the Windows key + X and select “Command Prompt (Admin)“.
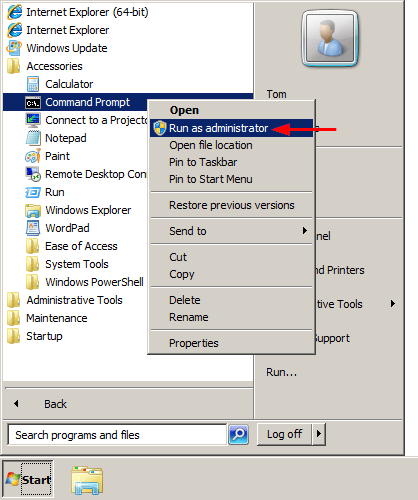
    • In Windows 7, click on Start, navigate to Accessories, right-click on Command Prompt and select Run as administrator.
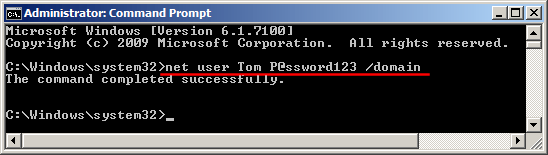
  2. You can run the chkdsk command to run the disk check. Replace C: with the letter of the drive you’d like to run a disk check.

    chkdsk /f /r C:

    chkdsk-cmd

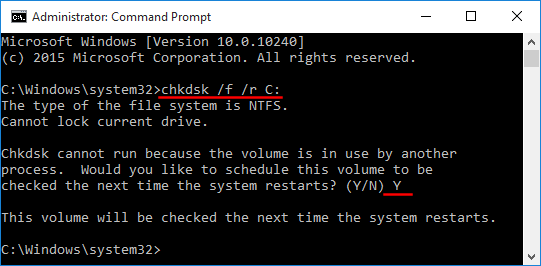
    The /f flag tells windows to fix any issues and the /r flag tells it to do a deep scan. It locates bad sectors and recovers whatever information is readable.

Method 3: Run Disk Check By Setting The Dirty Bit

Sometimes if your PC is not properly shut down or crashed, a dirty flag is set on the disk to force disk check to be run at the next reboot. Here is a simple way to set a dirty bit for your drive manually:

  1. Open an elevated Command Prompt.
  2. Type the following command and press Enter. Replace C: with the letter of the drive you want to set as dirty.
    fsutil.exe dirty set C:

    mark-disk-dirty

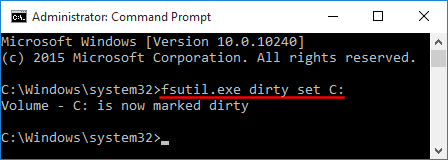
  3. Reboot your computer and Windows will force a disk check on your specified drive.

3 Ways to Reset Windows 10 Computer to Factory Settings

September 13th, 2016 by Admin

If your computer becomes sluggish, or freezes or hangs randomly, you might consider doing a factory reset. This will bring your Windows 10 laptop or desktop to the state when it was first turned on. In this tutorial we’ll show you 3 ways to reset Windows 10 computer to its factory default state, even if your computer is locked out or unbootable.

factory-reset-windows-10-pc

Method 1: Reset Windows 10 PC to Factory Settings After Logging in

After logging in to Windows 10, you can reset your computer to factory default settings using the Settings app. Follow these steps:

  1. To open the Settings app, you can click the Start button and then click Settings, or press Windows key + I keyboard shortcut.
  2. Click on Update & Recovery.

    update-security

  3. Select Recovery in the left-hand menu. Under Reset this PC, click on Get Started.

    get-started-pc-reset

  4. A new window will appear with two options: Keep my files or Remove everything. The former option will keep your personal documents, photos and music files intact. But both options will remove all your apps, programs and settings.

    choose-an-option

  5. if you chose “Remove everything” in the prior step, you now have the option to “Just remove my files” or “Remove files and clean the drive.” In most cases, select “Just remove my files”. If the computer is going to be recycled or given to someone else, select “Remove files and clean the drive”.

    clean-the-drive

  6. Click on Reset. Your PC will reboot automatically and begin the factory reset process. This might take an hour or more.

    reset-this-pc

Method 2: Reset Windows 10 PC to Factory Settings from The Login Screen

If you forgot Windows 10 password and couldn’t log on to your computer, you can also perform a factory reset from the login screen. Here’s how:

  1. When you’re on the login screen, hold down the SHIFT key, click the Power button in the lower-right corner and select Restart.

    shift-restart

  2. The computer will reboot and take you to the Choose an option screen. Click on Troubleshoot.

    troubleshoot

  3. On the next screen, click on Reset this PC.

    reset-this-computer

  4. You’ll be presented with two options: Keep my files or Remove everything. If you’re not concerned about your personal files, click on the latter option.

    keep-or-remove-files

  5. If you choose to remove everything, you’ll also see a new option asking if you want to clean the drive, which means it will not only delete everything, but will try to securely erase everything so that data cannot be recovered.

    fully-clean-drive

  6. Click on Reset button to start restoring Windows 10 to factory settings.

    reset-windows-10-to-factory

Method 3: Reset Windows 10 PC to Factory Settings Using Install Disc

When your computer becomes crashed or unbootable, then you’re unable to perform a factory reset using the above methods. In this case, you need to use your Windows 10 installation DVD to access the Factory Reset option.

  1. Boot your computer with Windows 10 installation DVD. You may have to change the boot sequence in your BIOS if booting from a CD/DVD is not enabled.
  2. On the Windows Setup screen, select your keyboard layout and language, and then click on Next.

    windows-setup

  3. On the next screen, click “Repair your computer“. Do NOT click “Install now“.

    repair-your-computer

  4. When the Choose an option screen appears, click on Troubleshoot.

    troubleshoot

  5. Click on Reset this PC.

    reset-this-computer

  6. Click either “Keep my files” or “Remove everything,” depending on whether you want to keep your personal files untouched.

    keep-or-remove-files

  7. You’ll then be prompted to choose the target operating system.

    choose-target-os

  8. If you want to restore only the drive on which Windows 10 is installed, you should click on “Only the drive where Windows is installed“. If you want to factory reset all the drives on your Windows 10 computer, you should click on “All drives“.

    reset-which-drive

  9. Now you’ll be presented with two options: Just remove my files and Fully clean the drive. If you choose “Fully clean the drive”, it will erase your files and data thoroughly.

    fully-clean-drive

  10. Click Reset and the factory reset process will begin.

    reset-windows-10-to-factory

4 Ways to Reset Domain Admin Password on Windows Server 2008

September 9th, 2016 by Admin

How can I change domain password from command line? Have you forgotten domain administrator password? In this tutorial we’ll show you 4 ways to reset domain admin password on Windows Server 2008 domain controller.

Method 1: Reset Domain Admin Password Using Active Directory Users and Computers snap-in

  1. Click the Start button, and then select All Programs > Administrative Tools > Active Directory Users and Computer.

    active-directory-users-and-computers

  2. When the Active Directory Users and Computers MMC snap-in opens, expand your domain and click Users in the left pane.
  3. In the right pane, right-click the name of the account, and click Reset Password.

    reset-domain-password

  4. Type and then confirm the new password. Click OK.

    enter-new-domain-password

Method 2: Reset Domain Admin Password from Command Line

  1. To get started, you need to open an elevated Command Prompt. Click the Start button, and then select All Programs > Accessories. Right-click on Command Prompt and select Run as administrator.

    run-cmd-as-admin

  2. At the Command Prompt, you can run the net user user_name new_password /domain command to change your domain user password. For example, if you wan to change the password of the user Tom to P@ssword123, run the below command:
    net user Tom P@ssword123 /domain

    reset-domain-password-from-command

  3. Now you’ve successfully reset your domain administrator password from command line.

Method 3: Reset Domain Admin Password by Pressing Ctrl+Alt+Del

  1. When you’re logged into Windows Server, press the Ctrl+Alt+Del key combination, you will still see this task menu. Click Change a password.

    ctrl-alt-del-screen

  2. Type your old password followed by a new password as indicated, and then type the new password again to confirm it. Press Enter or click on the blue arrow pointing right.

    change-domain-password

  3. You should then receive a message stating that you have successfully changed your password.

Method 4: Reset Domain Admin Password Using PCUnlocker

  1. Download PCUnlocker Enterprise (distributed as .zip format) and save it to your desktop. When the download is complete, right-click on the .zip file to extract it.
  2. After extracting, burn the PCUnlocker ISO file to your USB flash drive using ISO2Disc – an excellent utility that helps to create bootable CD/USB flash drive from ISO file.

  3. Next insert the USB flash drive into your Windows Server machine. Restart the server and enter into BIOS Setup: set the USB as first boot device. After booting from USB, it’ll take you to the PCUnlocker application.
  4. Switch the recovery mode to Reset Active Directory Password. The program will display your domain accounts stored in the Active Directory database. Choose an user and click Reset Password.

    pcunlocker

  5. Click Yes to confirm and your domain user password will be changed to Password123 immediately.

    reset-forgotten-domain-password

    Reboot the server without USB, you can then log in to Windows Server 2008 domain controller successfully. That’s it!

How to Change Lock Screen Timeout in Windows 10 / 8

September 8th, 2016 by Admin

The lock screen appears as a background image that is displayed when a user locks the PC. You need to tap any key or click the lock screen before you reach the login prompt.

windows-10-lock-screen

By default, the lock screen will automatically turn off the display after one minute of idle time. You might want to increase the idle time to make the lock screen stay longer, or set your PC to never turn off monitor. In this tutorial we’ll show you how to change the lock screen timeout in Windows 10 / 8.

Part 1: Add Lock Screen Timeout Setting to Power Options

To add the lock screen timeout setting to Power Options, you need to change the registry setting. Follow these steps:

  1. Press the Windows key + R to open the Run box. Type regedit and hit Enter.
  2. After the Registry Editor opens, navigate to the following key:
    HKEY_LOCAL_MACHINE\SYSTEM\CurrentControlSet\Control\Power\PowerSettings\7516b95f-f776-4464-8c53-06167f40cc99\8EC4B3A5-6868-48c2-BE75-4F3044BE88A7
  3. In the right-hand pane, double-click the Attributes entry and change its value from 1 to 2 (Or set it back to 1 if you want to hide the lock screen timeout settings later).

    power-settings-registry

  4. Immediately after editing the registry, you will see a new option (Console lock display off timeout) to adjust in the advanced power settings for your power plan.

If you want to quickly make the registry changes without opening Registry Editor, simply open Notepad and copy / paste the following lines, save as any name with .reg extension.

Windows Registry Editor Version 5.00
[HKEY_LOCAL_MACHINE\SYSTEM\CurrentControlSet\Control\Power\PowerSettings\7516b95f-f776-4464-8c53-06167f40cc99\8EC4B3A5-6868-48c2-BE75-4F3044BE88A7]
"Attributes"=dword:00000002

Then right-click on the .reg file and select “Open with” -> “Registry Editor” from the context menu. This will import your registry settings immediately.

Part 2: Change Lock Screen Timeout in Power Options

  1. Open Control Panel in large or small icons view. Click on Power Options.

    power-options

  2. From the settings on the left-hand side, select Choose when to turn off the display.

    choose-when-turn-off-display

  3. Click Change advanced power settings.

    change-power-settings

  4. Now, scroll down to Display, and expand it. You’ll see the new setting “Console lock display off timeout” that is only available after we’ve made the registry change above. As you can see, the lock screen timeout is set to 1 minute by default.

    console-lock-display-off-timeout

  5. You can adjust the timeout for however many minutes you want, or set it to 0 so the lock screen will never time out and turn off the monitor.

    change-lock-screen-timeout

    Click Apply and then OK. Now you’ve successfully changed the lock screen timeout settings in Windows 10/8.

Recover Unbootable Windows 10 or 8 with Restore Point

September 7th, 2016 by Admin

What to do if your Windows computer has become corrupt, unusable or unstable? Most of the time, it’s very difficult to find out the exact cause of the problem and we’re suggested to roll back all recent changes to the operating system. In this tutorial we’ll show you how to recover unbootable Windows 10 or 8 system with your previously-created restore point.

How to Recover Unbootable Windows 10 or 8 with Restore Point?

When your computer is crashed, unbootable or it’s not working as you expected, you can use System Restore to restore your computer to the latest restore point. Follow these steps:

  1. Boot your computer with Windows 10/8 installation DVD. If you don’t have a install disc, you can use a working PC to download the ISO file from Microsoft and create a bootable USB drive for Windows Setup.
  2. Once booted to the Windows Setup screen, you’re prompted to select language and keyboard layout. Click Next.

    windows-setup

  3. Click Repair your computer at the bottom.

    repair-your-computer

  4. Select Troubleshoot from Choose an option screen.

    troubleshoot

  5. Click Advanced options.

    advanced-options

  6. Click System Restore.

    system-restore

  7. Click on the operating system you’re going to perform a system restore on.

    select-operating-system

  8. When the System Restore wizard opens, click Next.

    system-restore-wizard

  9. You’ll be presented with a list of previously created restore points. Select the restore point you want to restore to and click Next.

    select-restore-point

  10. Confirm the restore point and click Finish.

    review-restore-steps

  11. A dialog box will pop up to ensure you really want to perform a system restore. It can’t be undone. If you’re sure, click Yes. This starts your system restore.

    confirm-system-restore

  12. Your PC will restart and begin the system restore process. This may take a few minutes to revert back to the selected restore point.

    restoring-files

  13. After successful restoration, you’ll have a message saying system restore completed successfully.

    system-restore-completed

    Click on Restart and your computer should boot successfully into Windows. You’ll still have all of your documents, but might be missing a couple of programs that you’ll just need to reinstall again.

How to Create System Restore Point in Windows 10 / 8 / 7

September 7th, 2016 by Admin

System Restore has been around since Windows 7. It’s very useful feature of Windows that helps you to restore your computer to previous working condition. If your computer gets messed up, corrupted or becomes unbootable, you can revert the operating system back to the recent restore point created. In this tutorial we’ll show you how to enable system restore and create a system restore point in Windows 10, 8 and 7.

How to Create System Restore Point in Windows 10 / 8 / 7?

  1. Right-click on This PC (or My Computer) icon on your desktop and then select Properties from the context menu. For Windows 10, you might need to configure Windows 10 to display This PC icon on the desktop.

    right-click-this-pc

  2. Click the Advanced system settings link on the left side of the screen.

    advanced-system-settings

  3. Click System Protection tab. Make sure Protection is turned on for your system drive (most of the time it’s C:\ drive).

    configure-system-restore

    If protection is turned off, select the system drive and click Configure, next select Turn on system protection option in the resulting dialog.

    turn-on-system-protection

  4. To create a restore point manually, click on the Create button.

    create-restore-point

  5. Enter a name or description for your new restore point, and then click Create button again.

    name-restore-point

  6. Restore point creation are fast, it shouldn’t take longer than a few minutes.

    creating-restore-point

    Once the restore point is created, you will see the “Restore point was created successfully” message.

The above process is very simple to create a restore point in Windows 10, 8 and 7. Afterwards, you can use System Restore to restore Windows to your created restore point when your computer becomes damaged in future.

How to Turn Off Safe Mode without Logging into Windows

September 5th, 2016 by Admin

“I tried to restart my computer into Safe Mode using msconfig without thinking. Now I can’t log in because I couldn’t remember the Administrator password. How can I disable Safe Mode and start my PC normally?”

Stuck at Windows login screen but your computer keeps booting into Safe Mode? Is there a way to turn off Safe Mode without logging into Windows? If you could log into Windows, you can easily disable Safe Mode using Msconfig or Command Prompt. What to do if you forgot the Safe Mode administrator password? In this tutorial we’ll show you how to turn off Safe Mode by booting your PC with Windows installation disc.

How to Turn Off Safe Mode without Logging into Windows?

  1. Boot your computer from Windows installation disc and press any key when prompted. If your computer still boots into Safe Mode, you need to enter into BIOS and change the boot sequence to CD/DVD first.
  2. When you see Windows Setup, press the Shift + F10 keys to open a Command Prompt.

    windows-setup

  3. Type the following command and press Enter to turn off Safe Mode:

    bcdedit /deletevalue {default} safeboot

    turn-off-secure-boot

  4. When it’s done, close the Command Prompt and stop Windows Setup.

    cancel-windows-setup

    Reboot without installation disc, and your computer should boot in normal mode by default. This method works with Windows 10, 8.1, 8, 7 and Vista.

4 Ways to Uninstall Updates in Windows 10

September 4th, 2016 by Admin

If you installed an update that is causing severe issues with your PC, you probably want to uninstall or remove it. So here we’ll show you 4 ways to remove & uninstall updates in Windows 10.

Method 1: Uninstall Windows 10 Updates from Control Panel

  1. Open the Control Panel in Large icons view, and then click Programs and Features.

    programs-and-features

  2. Click View installed updates in the left pane.

    view-installed-updates

  3. This displays all updates installed on the system. Select the update that you want to remove, and then click Uninstall.

    uninstall-windows-updates

Method 2: Uninstall Windows 10 Updates from Settings

  1. Open Settings app by pressing the Windows key + I hotkey, or clicking Settings from the Start Menu.
  2. Click Update and security.

    update-security

  3. Click Windows Update on the left side, and click on the Advanced options link on the right side.

    advanced-update-options

  4. Click the View your update history link to see all updates installed on your Windows 10 PC.

    view-update-history

  5. Click the Uninstall updates link.

    uninstall-updates

  6. This opens the Installed Updates window of Control Panel. Locate the problematic update and click Uninstall.

    uninstall-windows-updates

Method 3: Uninstall Windows 10 Updates Using Command Prompt

  1. Open an elevated Command Prompt by pressing WIN + X keys and select “Command Prompt (Admin)” from the Quick Access menu.
  2. At the Command Prompt, type the following command to view all installed updates:
    wmic qfe list brief /format:table

    view-updates-via-cmd

  3. To uninstall an update, you can use WUSA (a built-in Windows utility for managing Windows updates). For example, to uninstall the update KB3172729, you can type this command line and press Enter.
    wusa /uninstall /kb:3172729

    uninstall-update-via-cmd

  4. When you see the Windows Update Standalone Installer dialog box, click Yes to confirm and it will uninstall your selected update.

    333

Method 4: Uninstall Windows 10 Updates Using a Batch File

If you want to uninstall multiple updates silently, you can create a batch script (.bat) to run the WUSA commands in the background, by adding /quiet and /norestart option. Change the KB number as needed.

@echo off
wusa /uninstall /kb:3172729 /quiet /norestart
wusa /uninstall /kb:3074686 /quiet /norestart
END

This will run the uninstall without any open windows, and will not prompt for a reboot. After all updates have been removed, you can restart the system manually, or set your computer to reboot automatically by adding the shutdown -r command to the end of the batch file.