After upgrading to a 64-bit operating system or an operating system that does not support BusLogic, you may receive the following error on startup:
The BusLogic SCSI adapter is not supported for 64-bit guests in this release
If you boot the virtual machine from a WinPE bootdisk, you’ll be unable to see your hard drive. BusLogic is not supported in a lot of the newer operating systems. BusLogic is not actively being improved by VMware so bugs come along as things change in the OS and none fixes them.
To get around this issue on a VMware virtual machine, you need to change the SCSI controller type from BusLogic to LSI Logic. There isn’t an option in the VMware Player or Workstation to change the SCSI type, so I turn to edit virtual machine’s configuration (.vmx ) file by following these steps:
- Power off your VMware virtual machine and then use a text editor to open your virtual machine’s configuration (.vmx ) file.
- Find the line that begins with scsi0.virtualDev, where 0 is the SCSI controller number of your virtual hard drive. If your current SCSI control type is BugLogic, there should be a line present in your .vmx file:
scsi0.virtualDev = "buslogic". Replace this line with withscsi0.virtualDev = "lsilogic" - If there is no such line, simply add the following line to your .vmx file:
scsi0.virtualDev = "lsilogic"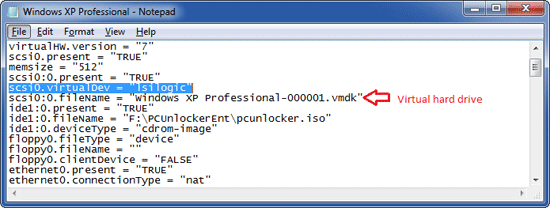
- Save the .vmx file and close the text editor. Start your virtual machine and it will run with the LSI Logic SCSI controller.
The SCSI controller type of a virtual hard drive can be one of the following ones, but only the BusLogic SCSI adapter does not work under 64-bit operating system.
- buslogic – BusLogic SCSI
- lsilogic – LSI Logic SCSI
- lsisas1068 – LSI Logic SAS
- pvscsi – VMware Paravirtual SCSI