Forgot Windows user account password and can’t log into your machine? Are you looking for a free option to reset or bypass lost Windows password? Here it comes, you can reset lost Windows user account password easily in Safe Mode. Let’s get started to know how it works.
In Windows 8/7/Vista/XP, there is a default built-in administrator account which is automatically created at the time of Windows installation. For security reasons the built-in administrator account is hidden and inactive by default. But there is no password protected with it and you can access this administrator account from Safe Mode. After log into Safe Mode with the built-in administrator account, you can reset lost password for any other user account easily. Here are step-by-step instructions:
How to Reset Lost Windows User Account Password in Safe Mode?
Power on your computer and repeatedly press F8. It will show you black screen with few options, select “Safe Mode with Command Prompt” option with arrow keys and hit Enter. Now computer will start Windows in Safe Mode and at the end command prompt will visible.

Now with the help of this command prompt you can reset lost Windows user account password easily. Type “net user” command and hit Enter it will show list of all users.
Now type net user owner 123 to reset the password of the user owner to 123 (in place of owner you need type the name of user for which you want to change password) and press Enter. A message “the command completed successfully” will appear that means your password has been successfully reset.

Now restart your computer and login with username: owner and password: 123. you can access your computer and continue to reset other account password through Control Panel.
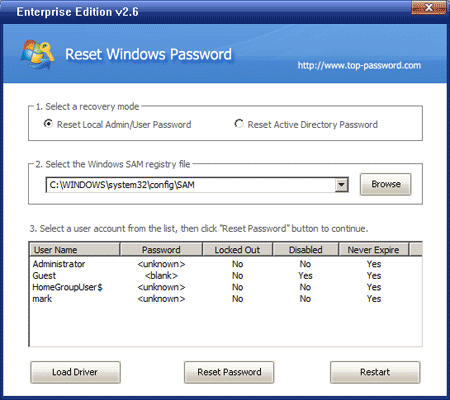
This is the easiest way to reset lost windows user account password. But it only works when you are able to start computer in Safe Mode. If safe mode could not be loaded or there is a password set on the built-in administrator account, then you need to use some third party software to reset lost Windows user account password, such as Reset Windows Password utility.