Archive for the ‘Tips & Tricks’ category

Forgot Active Directory Password? How to Reset It Easily

April 28th, 2012 by Admin

I have install first time Active Directory on my server 2003 and set the password within installation. And after this I forget password. Now I cannot logon even server 2003. Is there any possibility to logon my server and Active Directory or I need format & do installation again.If there is any way to out over this problem, tell me how to do this?

Forgot Active Directory password? The network administrator left without leaving the server password?  The problem may become quite tricky if there are a lot of domain accounts in it. You may couldn’t simply choose to reinstall Active Directory as there are many factors you need to consider. Fortunately there is an easy-to-use Windows password recovery software that can give you a hand. With Reset Windows Password utility, you can easily and quickly reset forgotten Active Directory password in minutes.

Let’s see how can you reset Active Directory password you forgot:

Step 1: Burn a bootable CD/DVD or USB flash drive

  1. Click here to download and save the Reset Windows Password self-extracting Zip file to a folder on your hard drive, then extract the ISO image file: ResetWindowsPwd.iso from it.
  2. Insert a blank CD/DVD or USB flash drive on your computer.
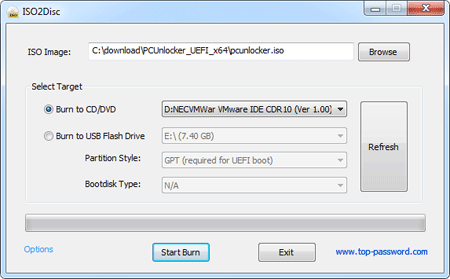
  3. Download and install the ISO2Disc utility, launch the program.
  4. Click the Browse button to locate your ISO image file, then click the Start Burn button to burn the ISO image to your CD/DVD or USB flash drive.

    Burn ISO Image to CD/DVD or USB flash drive

Step 2: Change BIOS Settings

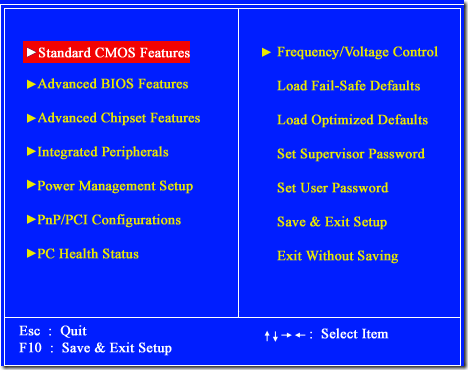
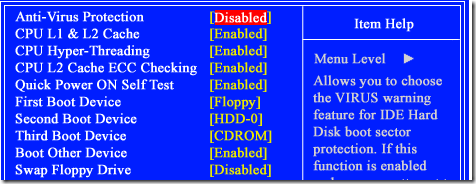
  1. Boot your locked computer. When it is powered on, check the boot-screen for setup key (i.e. DELETE key, F8 key, F2 key) to enter BIOS Setup Utility.
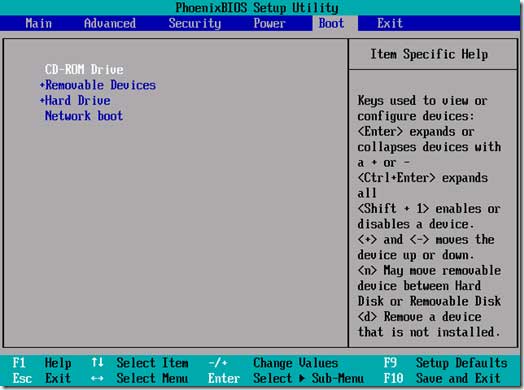
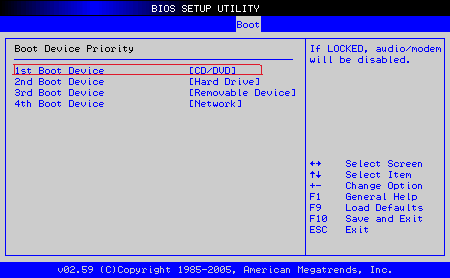
  2. Use the arrow keys to select the BOOT tab, then change the Boot Device Priority: Set 1st Boot Device to CDROM if you just created a bootable CD or DVD, or set 1st Boot Device to Removable Device if a bootable USB flash drive was created.

    BIOS Setting

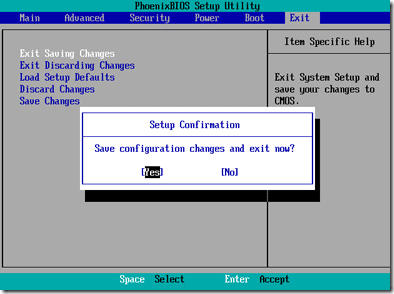
  3. Press F10 to save your changes. Now your computer is able to boot from CD/DVD or USB flash drive.

Step 3: Reset Windows Active Directory Password

  1. Insert the newly burned CD/DVD or USB flash drive to your locked computer, then reboot your computer.
  2. Then you will see Reset Windows Password is initializing.

    Loading from the Reset Windows Password bootdisk

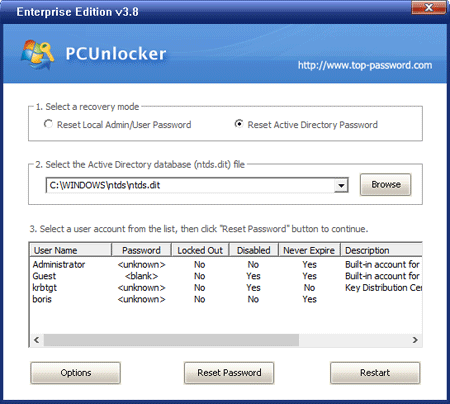
  3. Simply select the Active Directory database file (ntds.dit), the program will list all domain accounts for your domain controller. Select a user account and click the Reset button, the password will be changed to Password123.

    Reset Windows Password

  4. Click the Restart button to reboot the computer, you are able to log in to Active Directory (AD) server using the new password: Password123.

In addition, Reset Windows Password also enables you to reset Windows local administrator and user password on Windows 8, 7, 2008, Vista, 2003, XP, 2000.

How to Recover Acer eRecovery Password

April 26th, 2012 by Admin

Acer eRecovery is a vendor-specific method you can use to restore your computer to its original factory settings, or to custom settings you create and store on your hard drive or other removable media. eRecovery also contains a backup utility you can use to back up data to your hard drive or other removable media. Access to eRecovery requires you to use the default “000000” password or one you select. While it is important to store a custom password in a safe location, if you lose or forget it, there are steps you can take to recover your Acer eRecovery password.

Stage 1: Locate and Unhide Hidden Rescue Partition
Acer stores custom eRecovery passwords on your computer in PQService, a hidden rescue partition. We need to make this partition visible so that we can access it to recover eRecovery password.

1. Right click on My Computer icon and select Properties.
2. Under Computer Management, click Disk Management. In the right pane, you’ll see all drivers on your local computer, including the hidden partition PQService.
3. Right click on the PQService partition, and then click Change Drive Letter and Paths.
4. Click Change and then assign a drive letter to your PQService partition.

Now you should be able to open and view the PQService partition from Windows Exporer.

Stage 2: Reset eRecovery Password

1. Navigate to the drive containing PQService. Find the file aimdrs.dat. Right-click on the file and select Open with and then choose Notepad or another text editor you prefer.

2. Open the file with your text editor and locate the eRecovery password. Look for a line that reads, “Password=password name”, “Hint=the password hint”. Write down the password and close the file.

Now you can access Acer eRecovery with the recovered password.

Forgot Windows 8 Password? How to Reset Windows 8 Password Easily

April 24th, 2012 by Admin

Forgetting Windows password is one of the most common problems and it can become a critical problem if your system contains important data. Advanced users can easily remove passwords from the computer but average computer users don’t have any idea about password reset disk and other methods to reset the password in Windows 8 or any other Windows versions.

Things will become easier if you have created a password reset disk in Windows 8 beforehand. So in case you have not taken precautionary steps earlier and you forget the password, you can’t create any type of password reset disk without logging into Windows 8. Here, I am going to discuss most of methods to reset Windows 8 password if you have forgotten it.

Option 1: Login with Administrator Account

It is the best way to get Windows 8 password back as by using the Administrator account, you can login on the system and then reset the user password from User management. When you install Windows 8 for the first time, it asks you to create a new user account to use on the computer and once you create it, Windows setup automatically disables the Administrator account and you can’t access it in normal mode. The next time you forget your user password, you can go to Windows Safe Mode and login with Administrator account and reset the user password. By default, Administrator account is automatically enabled in Safe Mode. To open the Safe Mode of any Windows OS, press the F8 (Function key) and after closing the BIOS messages you will see all the available options in Safe Mode and from there select Safe Mode.

Option 2: Login with Hotmail ID and Password

It is well known that Windows 8 offers us multiple ways to log into Windows 8 like using normal username and password, using Hotmail ID and password and finally using PIN password. If you set your Hotmail ID and password for Windows 8 login then you have a chance to get your login details of Windows 8 back. Open your Hotmail email ID on another computer and then change its password with a new one. After changing the Hotmail password, try to login on Windows 8 using the new password and make sure that your Windows 8 is connected to internet during this time.

Option 3: Enter 4 Digit Windows PIN Code

If you have used this way on Windows 8 previously then you can use it again to login on Windows 8. I have mentioned all the possible ways to login on Windows 8 above but if none of them work for you, I have a another solution and that is a bootable password reset disk.

Option 4: Bootable Password Reset Utility

It is the ultimate solution with a 100% success rate. It is the only solution you need if you fail to log into Windows 8 after using all the above methods. Password Recovery Bundle can help us to create a bootable password reset disk on CD/DVD or USB flash drive, which can be used to reset lost Windows 8, 7, Vista, XP, 2000 and NT passwords easily. Once you boot and log in with its bootable disk, it will reset the Windows 8 password and make it blank. After that, you can log into Windows 8 without entering any password or you can set a different password after successfully logging into Windows 8 to prevent unauthorized access by someone else.

How to Turn On / Off Passcode In iPhone 4s

April 7th, 2012 by Admin

This article describes steps to enable Passcode for those who like it and steps to disable Passcode for those who don’t like it in iPhone 4s.

Passcode is a secure way in order to protect your iPhone from strangers. Meaning a security Passcode (something like password of accounts you have to remember) must be entered before accessing the device. Some people think this feature is useful and want to enable it but some think it’s annoyed and want to disable from their iPhone.

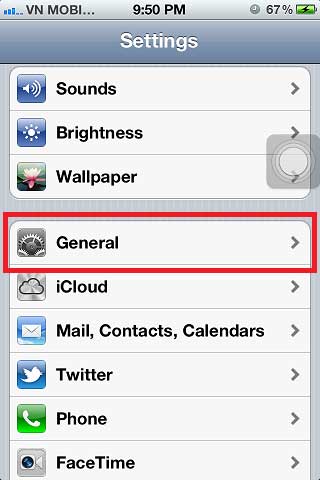
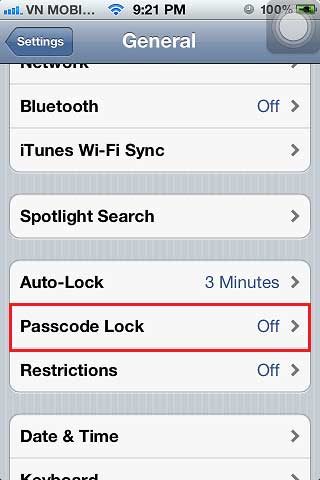
Before changing this configure, turn on your iPhone then tap on Settings icon at home screen. Then tap on General icon.

How to Turn On Passcode in iPhone 4s:

Passcode Lock should be Off status in this case:

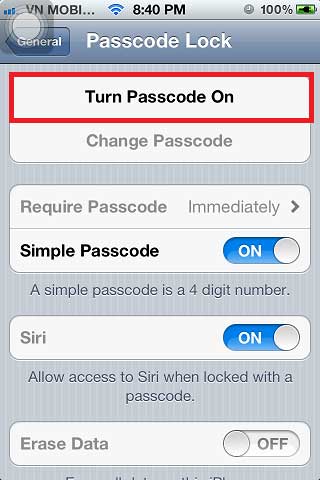
Tap on Passcode Lock menu in order to Turn Passcode On.

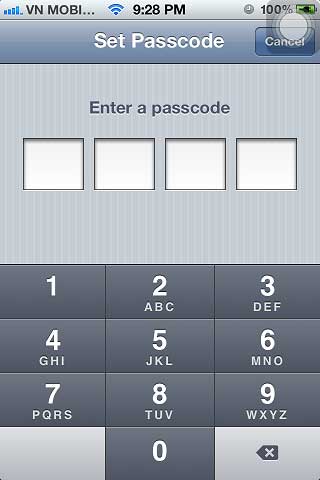
Simply type and re type (to confirm) 4 digits to set your Passcode.

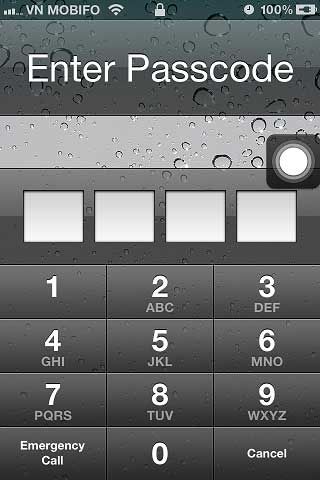
That’s all. Try to turn off or clock your iPhone then turn on again, you will be asked to enter passcode like this:

How to Turn Off Passcode in iPhone 4s:

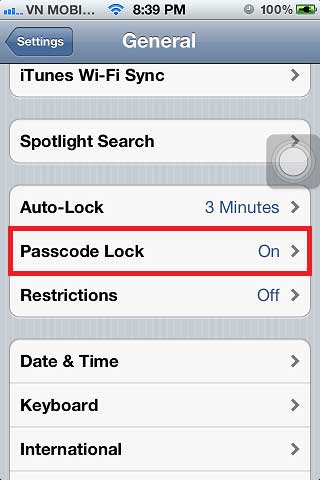
Passcode Lock should be On status in this case:

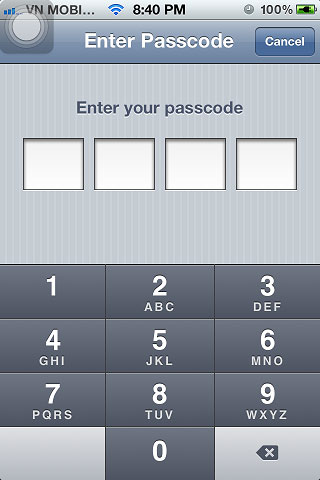
Tap on Passcode Lock menu in order to Turn Passcode Off. You will be asked to enter Passcode:

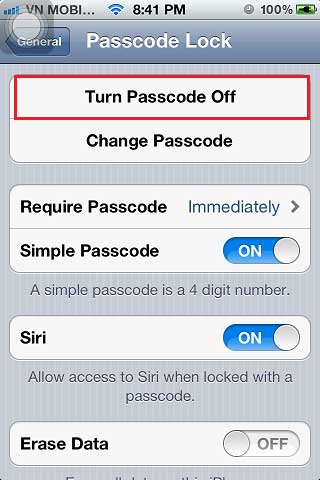
After entering right Passcode, tap on Turn Passcode Off menu to disable Passcode.

You will be asked to enter Passcode again in order to confirm disable Passcode.

How to Reset Lost Administrator Password on Windows 7, Vista and XP

April 5th, 2012 by Admin

Still trying to recall the administrator password to get into your computer and keep failing again and again? If you forgot Windows administrator password and don’t have a password reset disk, you won’t be able to get into your computer and reset the lost password. If there are no other user accounts on the computer, you can never use your computer again until you reinstall the system. That’s really depressing. If you have a Windows password recovery disk, things will become easier than you may think.

In this post we’ll show you how to easily reset lost administrator password on Windows 7, Vista and XP. You only need to burn the ISO image of Reset Windows Password to a blank CD, then set your locked computer to boot from the CD and it’ll guide you to reset the forgotten Windows password to blank. This CD can be used to reset lost password on any Windows system, While the password reset disk created by Windows built-in features works only on the specific computer it’s burned.

Reset Windows Password is a professional and powerful password recovery tool to help you get into the computer and reset forgotten Windows password as blank, and it is always the best way to reset lost administrator password on Windows 7, Vista and XP. Just follow this step-by-step guide:

Step 1: Create a Bootable Windows Password Reset CD

First download the .zip archive of Reset Windows Password to any accessible computer (not the computer you want to unlock). Unzip the download file, you’ll get the ISO image: ResetWindowsPwd.iso.

Then you’ll need to get a CD/DVD-recording software to burn the ISO image to a blank CD or DVD. We recommend you to use this freeware: BurnCDCC. Launch this program, point the File Image to ResetWindowsPwd.iso and select your CD-DVD Burner, then click Start to begin the creating of Windows password reset CD.

Step2: Reset Lost Windows Administrator Password

Insert the password reset CD into your locked computer. Turn on (or restart) your computer, and let’s it boot from the password reset CD. If it still boots from the local hard drive, you might need to change the BIOS setting and set CD-ROM as the first boot device.

When the boot procedure is complete, the Reset Windows Password program will automatically launch.
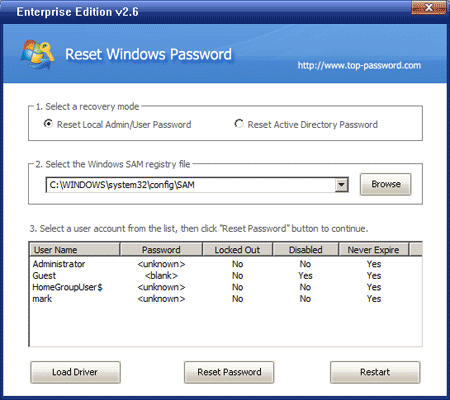
Select the administrator account, then click Reset to remove its password.

Eject the password reset CD and click on Restart to reboot the computer. Now you are able to log into your locked computer with the administrator account.

Note: This trick can be used to reset lost Windows administrator passwords on both 32-bit and 64-bit operating systems. With a password reset disk at hand, you can easily reset lost Windows passwords for any computer whose password you forgot.

How to Remove / Recover MS Excel Password

March 29th, 2012 by Admin

Can’t open password-protected Excel files? How many times has happened that you set a password on an Excel spreadsheet or workbook and then you forget about it? or worst, the person that set up the password on the spreadsheet no longer works with you, and you have a spreadsheet that can’t modify. what do you do? easy, use Excel Password Remover.

Note: Excel Password Remover can’t be used to remove password set to open a spreadsheet. If you are unable to open the file because it asks you for a password, this program won’t help you. Then you need to get our Excel Password Recovery program to crack the file open password.

Excel Password Remover is a program to remove the password to be able to modify an existing password protected workbook or spreadsheet, with that in mind let’s proceed on how to use it.

Download Excel password remover from this link. Unzip the download file, there are two files: password.xla and password_2007_2010.xlam. password.xla is designed to remove MS Excel 97/2000/XP/2003 passwords while password_2007_2010.xlam is for removing Excel 2007/2010 passwords.

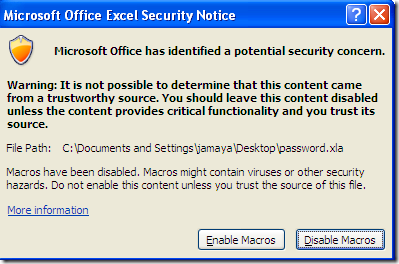
Here we’ll show you how to remove MS Excel XP password. Open your password-protected sheet or workbook. After the password-protected sheet is open, click to open the password.xla add-in, you should get a warning like this:

If you get a different message, probably you need to lower your security settings on your Excel. If your current settings are high, set them to medium.

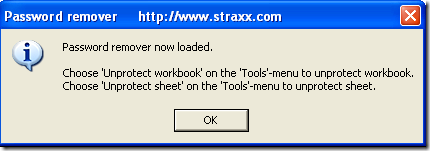
After you click on Enable Macros, you will get a pop-up saying the macro is loaded:

After you get the pop-up, on Excel go to Tools, and click on Unprotect workbook and Unprotect sheet.

You should get a pop-up window when your spreadsheet has been unprotected:

That’s it, your Excel workbook or spreadsheet should be now unprotected.

Never Forgot The Hard Drive Password You Set

March 28th, 2012 by Admin

Hard drive passwords block access to all the files stored on the hard disk in your computer. They offer great security without having to install any software, without having to learn much, without having to spend a nickel and at the minor nuisance cost of entering a single password when turning on your computer. They are more secure than operating system passwords or BIOS-resident power-on passwords. Hard drive passwords only comes into play when a computer is turned on.

To begin with, not all computers offer hard disk passwords as an option. To see if it’s available, you have to get into the BIOS setup/configuration program and poke around. If it’s there, it will probably be in a “Security” or “Password” section.

In a corporate environment the home office techies should have set the Master password which allows them access even when employees forget their User level password. Outside of a corporation, you should be able to set both the Master and User passwords, in effect, giving you two passwords. Remember either one and you’re fine. I say “should” because the Acer Aspire One only allows you to set a single password. In contrast, ThinkPad lets you set both User and Master passwords. If multiple users in a household share a common computer they would all need to know the hard disk password. The only protection provided in this case would be if the machine was stolen.

But if you forgot the hard drive password, don’t expect any help from the computer manufacturer in bypassing a hard drive password. Lenovo/IBM says:

Do not forget your hard disk password! Keep it in a safe place. If you forget your hard disk password, there is no way to reset your password or recover data in the hard disk drive. Neither an IBM authorized reseller nor IBM marketing representative can make the hard disk drive usable.

Elsewhere, HP warns:

In the event that both DriveLock passwords are lost, the hard drive is rendered unusable . . . There is no “back-door” that can be used to unlock the drive if both passwords are lost.

Likewise, Hitachi says:

There is no way to bypass the security password feature of Hitachi hard disk drives. If the password is not known or has been misplaced, Hitachi will not be able to assist in gaining access to the data on the drive.

So you should know how secure the hard drive passwords are. Never forgot the hard drive password you set until you know exactly how to hack a hard disk password.

Password Protect Folders in Windows Without Any Software

March 27th, 2012 by Admin

Most of us have private data. Not all of us have a private computer to keep that data. So, we just end up with other people viewing that data. Although password protecting software do work, it is almost useless to hide private data with these software (because we are always questioned as to what it is that we are hiding with the help of these software).

Hidden folders do not work as they can be easily searched with Windows Search. So, we need an alternative way to create hidden password-protected folders which only we can access. And that is exactly what we will learn in this post.

With this trick, you can create a secure password-protected folder in Windows which no one except you can access. To use this trick, please click here to download a self-extracting file and save it to your desktop or other location. Uncompress the .zip file, you’ll see the batch file: protectfolder.bat.

How to Lock Your Folder with Password:
1) Double-click on the batch file. A new folder will be created.
2) Copy your personal data or secret files into that folder. Again, double-click on the batch file. Type Y and press Enter. The folder will be hidden from view.

How to Unlock Your Folder:
1) To re-view your folder, double-click on the batch file.
2) Enter password as “www.top-password.com” without quotes and press Enter key. This is also the default password. Your folder will be visible again.

The overall usability of this trick can be improved by deleting the batch file after hiding your folder and re-creating it when you wish to access your folder again. If you face any problem using this trick, you can write a comment and I will do my best to help you.

Note: This works on Windows 7, Windows XP and Vista. First try this on useless data to be sure and then only hide your personal data. If you need a more secure and reliable method to protect your private data, please refer to our product – Protect My Folders.

How to Recover Lost Product Keys on Windows 7

March 25th, 2012 by Admin

Lost your product key somewhere but now you have to reformat Windows 7 system and you cant find the box that contain the key. How to recover lost product keys on Windows 7? The product keys of installed Windows programs will lost after reinstalling the operating system or in the event of a system crash. So you’ll know the importance of performing regular backups to save your product keys in case of a system failure.

In this article, we’ll provide a way to quickly and easily recover and backup the product keys for most commercial software installed on your local computer. To get started you need to download and install the latest version of Product Key Finder. Then follow these steps:

How to Recover Lost Product Keys on Windows 7

  1. Launch the Product Key Finder program.

  2. Click the Start Recovery button, it will bring up a drop-down menu that provides three recovery mode: From current system,From non-booting system and From remote computer.
  3. Select the From current system mode from the drop-down menu. This program will automatically scan your Windows 7 system for product keys. Quickly recover and display product keys for Windows 7, Office, Adobe Photoshop, Adobe Reader, SQL Server, VMware Workstation, MS Exchange and and many other software products installed in your Windows 7 system.
  4. Click the Save To File button to backup all of the recovered product keys to a safe place, or even print it out so all of your Windows 7 product keys are available on one sheet of paper.

How to Recover Accidentally Deleted Files

March 23rd, 2012 by Admin

Something that most of us will do in our computing lives is accidentally deleting files. Sometimes people will empty the recycle bin without checking its contents, press SHIFT+DELETE on a file or folder (which deletes it without going to the recycle bin) or delete a file or folder from the command line. All of these operations will make the file or folder disappear in Windows and is seemingly lost forever. Luckily for us nothing is ever really deleted on your computer unless something else takes place on the hard drive; Chances are that your files are recoverable.

Today we look at Restoration, a free tool that helps you restore accidentally deleted files. It is effective at recovering deleted files and it doesn’t require any sort of installation so you can store it on a USB drive if you like. Click here to download a copy of Restoration.

How to Recover Accidentally Deleted Files

1) To use Restoration, simply choose the Hard Drive which your deleted file was originally on from the drop-down list in the upper right. For example, I want to recover the file F:\test.txt that I just deleted by press SHIFT+DELETE, so I will choose F: drive.

2) Click the Search Deleted File button, the program will scan the target hard drive for deleted files.

3) When the scanning procedure is complete, it will show a list of files that are recoverable.

4) Click the Restore By Copying button to restore the files. Be sure to restore them to another partition or drive to avoid the risk of overwriting the original information you are trying to recover.

This method solves all file loss problems – recovering files emptied from Recycle Bin, formatted hard drive or lost partition and other unknown reasons under Windows 2000 / XP / 2003 / Vista / 2008 / 7.