Archive for November, 2017

How to Reset PIN from Lock Screen on Windows 10 Fall Creators Update

November 9th, 2017 by Admin

Forgot your PIN login and can’t sign into Windows 10? Starting from Windows 10 Fall Creators Update, the lock screen lets you reset lost PIN when using a Microsoft account. In this tutorial we’ll walk you through the steps to reset forgotten PIN from the lock screen on Windows 10 Fall Creators Update.

How to Reset PIN from Lock Screen on Windows 10 Fall Creators Update?

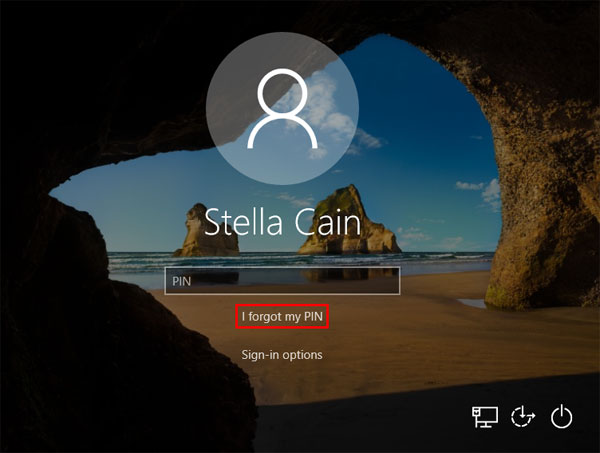
  1. When you’re at Windows 10 sign-in screen, click the “I forgot my PIN” link just below the PIN box.

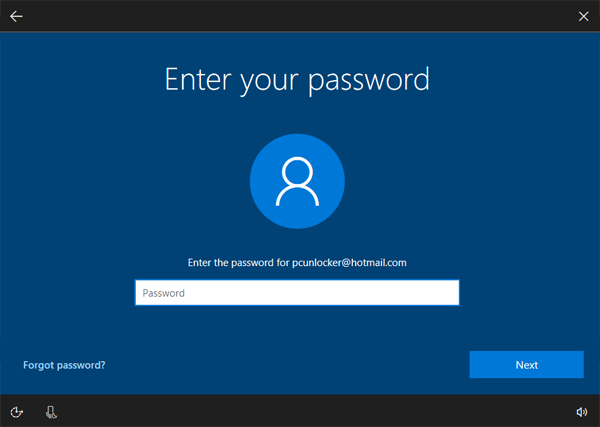
  2. You’ll see the Just a moment screen while Windows prepares to reset PIN. Enter your Microsoft account password and click Next.

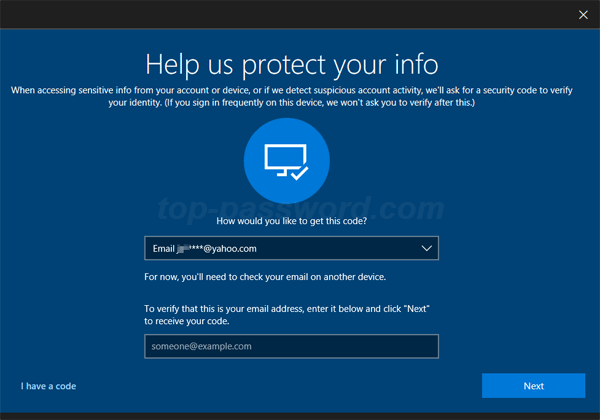
  3. If you have enabled two-step verification for your Microsoft account, you have to enter the recovery email address or phone number to verify your ownership.

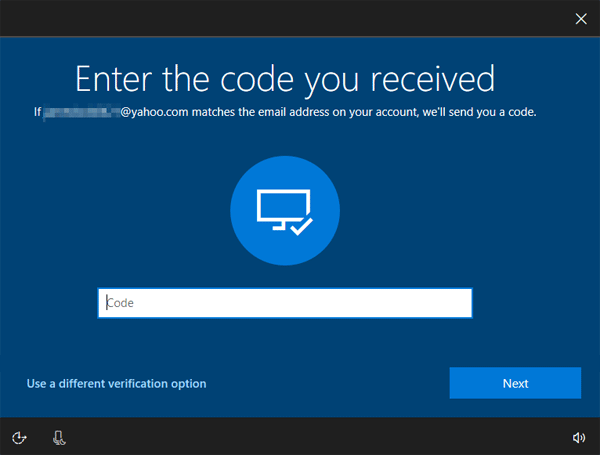
  4. Enter the security code you’ve received from Microsoft, and click Next.

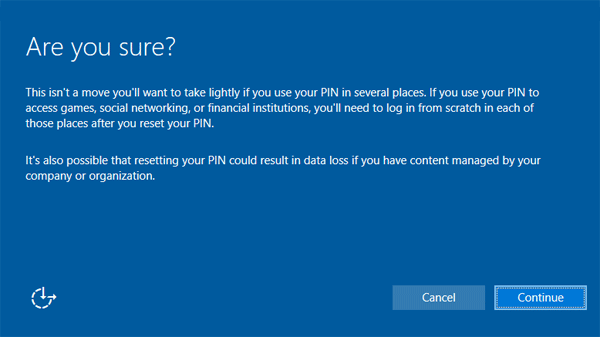
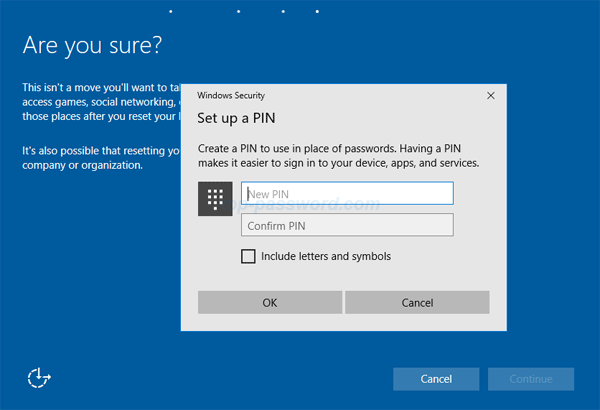
  5. The subsequent screen will warn you that it’s possible that resetting your PIN could result in data loss. Click Continue to confirm.

  6. A popup will appear and you’re prompted to set up a PIN. Enter your new PIN code twice and click OK.

    After resetting PIN successfully, it will take you back to the sign-in screen, where you can log in to Windows 10 with your new PIN.

However, the “I forgot my PIN” option is only available at the sign-in screen when using a Microsoft account. If you’re using a local account, you have to reset forgotten PIN from the Settings app on Windows 10.

Change from Double Click to Single Click to Open Folders in Windows 10

November 8th, 2017 by Admin

By default, Windows allows you to open items (files, folders or applications) with a double left click. If you’re tired of double-tapping on your mouse or touchpad, you can enable single click to open folders or files. In this tutorial we’ll show you how to change from double click to single click to open folders/files in Windows 10.

How to Change from Double Click to Single Click to Open Folders in Windows 10?

  1. Type folder options into the Cortana Search box, which is located at the bottom left corner of the Windows 10 taskbar. Click on File Explorer Options.

  2. On the General tab in Folder Options, enable the option Single-click to open an item (point to select).

    Update: If the “Single-click to open an item (point to select)” option is greyed out, you need to disable the “Turn on Classic Shell” group policy.

  3. Click Apply then OK to save the settings. Now, when you move your mouse over a folder or file, it will underline the icon title and you can open it with a single click.

That’s it! If you would like to open items with double-click later on, just open the Folder Options and enable the option Double-click to open an item (single-click to select).

Add Devices and Printers To My Computer in Windows 10 / 8 / 7

November 6th, 2017 by Admin

How can I find Devices and Printers in Windows 10? Devices and Printers lets you easily view and manage peripheral devices in one place, such as printers, webcams, external storage devices and monitors. In this tutorial we’ll show you how to add Devices and Printers to My Computer (or “This PC”) in Windows 10 / 8 / 7.

How to Add Devices and Printers To My Computer?

  1. Open the Command Prompt as administrator.
  2. Copy-paste the following command and press Enter.

    reg add HKEY_LOCAL_MACHINE\SOFTWARE\Microsoft\Windows\CurrentVersion\Explorer\MyComputer\NameSpace\{A8A91A66-3A7D-4424-8D24-04E180695C7A}

  3. Once pressing Enter, open the Windows Explorer again and you can see the “Devices and Printers” shortcut appear in My Computer (or “This PC”).

If you want to remove Devices and Printers from My Computer (or “This PC”) again, just copy-paste the following command instead:

reg delete HKEY_LOCAL_MACHINE\SOFTWARE\Microsoft\Windows\CurrentVersion\Explorer\MyComputer\NameSpace\{A8A91A66-3A7D-4424-8D24-04E180695C7A} /f

It’s that simple!

How to Open the Devices and Printers in Windows 10

November 6th, 2017 by Admin

Device and Printers gives you a simple way to access and manage external devices (including printers, scanners, faxes, cameras) connected to your computer. From there you can see how many documents are in the printing queue, set the paper size for printing, add or delete a printer, etc. In this tutorial we’ll show you 4 quick ways to access the Devices and Printers in Windows 10.

Method 1: Open the Devices and Printers in Windows 10 from Run or Command Prompt

Simply press the Windows key + R shortcut to bring up the Run dialog, or open the Command Prompt. Type control printers and press Enter. The Devices and Printers window will open immediately.

Method 2: Open the Devices and Printers in Windows 10 from Control Panel

Open the Control Panel and choose Large icons under the View by drop-down list. Click on Devices and Printers.

Method 3: Open the Devices and Printers in Windows 10 from Settings

Press the Windows key + I shortcut to open Settings, and then click Devices.

Scroll down to the “Related settings” section on the right pane, click the Devices and printers link.

Method 4: Add the Devices and Printers Context Menu in Windows 10

If you need to access Devices and Printers frequently, you can add Devices and Printers to the Desktop context menu. Follow these steps:

  1. Download the registry files from this link (in .zip format). Extract the zip archive and you’ll get two .reg files.
  2. Double-click on the add-devices-and-printers-context-menu.reg file in File Explorer.
  3. When you see the User Account Control, click Yes to continue. Afterwards, click Yes to add the information to Registry.

  4. Now, right-click on the empty space on your desktop. You can get to the “Devices and Printers” shortcut from the context menu.

How to Remove / Restore “3D Objects” Folder on Windows 10

November 3rd, 2017 by Admin

After upgrading to Windows 10 Fall Creators Update, you may noticed a weird folder under This PC of File Explorer. It’s called 3D Objects. By default, that folder is empty and any creations you make in Paint 3D or 3D Builder application are saved into it.

If you’re not interested in 3D printing, you can remove the “3D Objects” folder from ‘This PC’ in File Explorer. Here’s a simple way to remove or restore “3D Objects” folder on Windows 10.

Part 1: Remove “3D Objects” Folder on Windows 10

  1. Open the Command Prompt in Windows 10.
  2. Copy and paste the following command in the Command Prompt, and press Enter.

    reg delete HKEY_LOCAL_MACHINE\SOFTWARE\Microsoft\Windows\CurrentVersion\Explorer\MyComputer\NameSpace\{0DB7E03F-FC29-4DC6-9020-FF41B59E513A} /f

  3. You’re now done. Close File Explorer and open it again, the “3D Objects” folder should be gone from ‘This PC’ on Windows 10.

Part 2: Restore “3D Objects” Folder on Windows 10

If you want to restore the “3D Objects” folder back to ‘This PC’ in File Explorer, just run the following command at the Command Prompt:

reg add HKEY_LOCAL_MACHINE\SOFTWARE\Microsoft\Windows\CurrentVersion\Explorer\MyComputer\NameSpace\{0DB7E03F-FC29-4DC6-9020-FF41B59E513A}

When it’s done, open File Explorer again and you’ll see the ‘3D Objects’ folder reappear in ‘This PC’.

How to Map a Network Drive in Windows 10

November 2nd, 2017 by Admin

If you need to frequently access a shared folder that is stored on a networked PC, it’s necessary to map a drive letter to that shared folder to make it easier to access. In this tutorial we’ll walk you through the steps of mapping a network drive in Windows 10.

How to Map a Network Drive in Windows 10?

  1. Press the Windows key + E shortcut to open a File Explorer window.
  2. Click This PC from the left navigation pane. Select the Computer tab at the top and then click the Map network drive button.

  3. Click the Drive drop-down menu and choose the drive letter you want to assign, then enter the address of the shared folder to which you want to map the drive and click Finish.

  4. When the Windows Security dialog box appears, type the username and password of the computer that is sharing the folder you want to map. Note: If you keep getting the error message “username or password is incorrect“, try to give the username as “ip_address\username“.

  5. After mapping, the network drive will show up in File Explorer. You can click that drive to access the shared folder as though it were a local drive.

    If you want to remove mapped network drive, just right-click on it and select Disconnect.

If you’re running Windows Server Core without a GUI, you can map a network drive using the command line. Just type the following command, where Z: is the drive letter you want to assign to the shared folder. The persistent switch can make the mapped drive persist over reboots.

net use Z: \\remotepc\sharename /persistent:yes

Once pressing Enter, it will prompt you to enter the credentials of an account authorized to access the shared folder.

You can later delete a mapped network drive by typing in the command below.

net use Z: /delete

That’s all there is to it. If you have any problems mapping a network drive in Windows 10, post a comment. Enjoy!