Archive for December, 2014

Windows 10: Associate a File Type with a Specific App

December 6th, 2014 by Admin

A default program is the program that Windows uses automatically when you open a particular type of file. For example, when you double-click a file with .wmv, Windows Media Player opens up and that’s because the extension name .wmv is associated with Windows Media Player by default.

But sometimes you might want to change file association from the default program to your favorite app. Here are two ways to re-associate the file back to the program of your choice in Windows 10. The methods below apply to Windows 8.1/8/7 too.

Method 1: Change File Associations in Control Panel

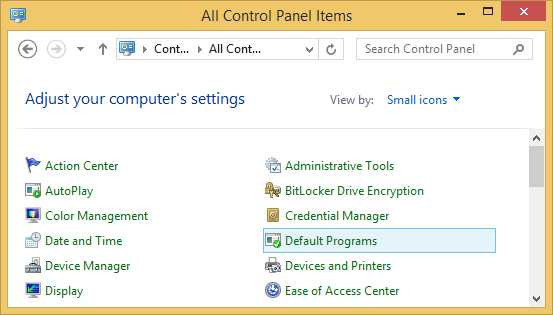
  1. Open the Control Panel. At top right of the Control Panel, set the View by option to Small icons. Click on the Default Programs icon.

    control-panel

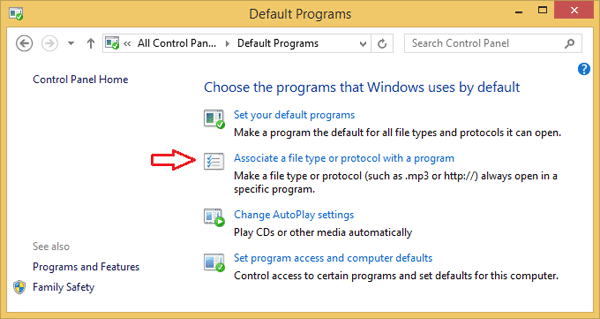
  2. Under the Default Programs window, click on the “Associate a file type or protocol with a program” link.

    default-programs

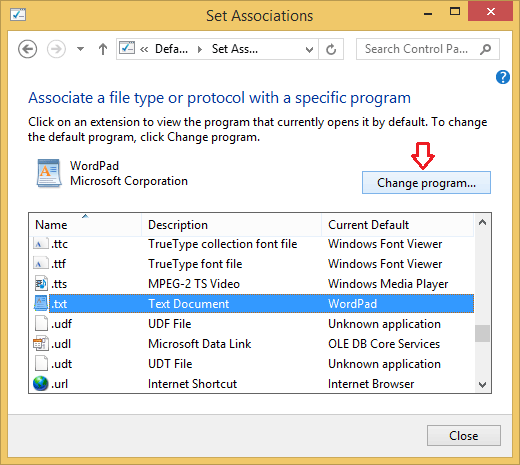
  3. In the Set Associations window, scroll down the list until you see the file extension that you want to change the default program for. Select your desired file extension and click on Change Program.

    set-associations

  4. The Open With dialog box should appear. Choose a program from the list or recommended or other programs or else click Browse to select one.
  5. Click OK when you’re done. Windows 10 will refresh the list of file associations to show the new default program to open this type of file.

Method 2: Change File Associations from Context Menu

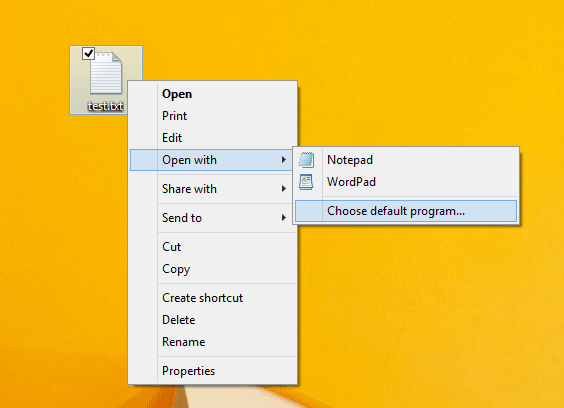
  1. In Windows Explorer, navigate to the file you want to change the file association with. Right-click on that file and select Open with -> Choose default program from the pop-up menu.

    choose-default-program

  2. Click the program you want to use to open the file. If you want all files of that type to open in the same software program, select the Always use the selected program to open this kind of file check box, and then click OK.
  3. From this point forward, when you double-click on any file with this particular file extension, the new program you associated it with will launch and open the particular file.

Windows 8.1 Displays Context Menu on the Left Instead of Right Side

December 5th, 2014 by Admin

If you’ve upgraded to Windows 8.1 or Windows 10, you may notice that the context menu is displayed at left side of where you click at, but in Windows 8, 7 or Vista the menu expands to right side by default. For example, when you right-click a file, the context menu may appear on the left hand side, rather than on the right-hand side. This misbehavior also happens with the drop-down menus in other applications.

right-handed-menu

This has to do with a Tablet PC Setting which controls how the menu items are displayed. This tutorial will show you how to set the context menu to open to the right side of where you click at in Windows 8.1 and Windows 10.

How to Set Context Menu to Open to the Left Instead of Right Side?

  1. Press the Windows key + R to bring up the Run box.
  2. Copy and paste shell:::{80F3F1D5-FECA-45F3-BC32-752C152E456E} into the Run box, and then press Enter.
  3. You should see Tablet PC Settings dialog box, regardless of your PC type. Go to the Other tab and check the box Left-handed.

    handedness

  4. Click OK. You should now see the context menu expand to right side.

    left-handed-menu

    This trick also works for Windows 8, 7 and Vista.

Fix ‘VMware Workstation Does Not Recognize USB Drive’

December 4th, 2014 by Admin

VMware Workstation does not recognize your USB drive? If you’ve used VMware Workstation for some time, you might ever face the situation where you can use the USB drive well on the host PC (physical machine), but no USB drive is shown up under the VM -> Removable Devices menu within VMware Workstation. Here is how to fix it.

First of all, shutdown the virtual machine if it’s running, and then exit the VMware Workstation program. Right-click on the VMware Workstation shortcut from your desktop and then select “Run as administrator” to run it with admin privilege. This has fixed the problem that I experienced just a few days ago and eventually found out that VMware Workstation have insufficient privileges to capture the USB device.

vmware-not-recognize-usb

If you still don’t see the USB drive in the VM menu, follow the below steps to check if the VMware USB Arbitration service is not running:

  1. Press the Windows key + R to bring up the Run box.
  2. Type services.msc and press Enter.
  3. Search for a service named VMware USB Arbitrator Service. If this service is not running, right-click on it and select Properties, set Startup Type to Automatic and also click Start button to run it.

Note: After starting the VMware USB Arbitrator Service manually, you need to re-launch the VMware Workstation to make the changes to take effect.

Additionally, VMware Workstation does not support USB3.0 natively and you need extra drivers in the guest for the USB device. I highly recommend to use USB 2.0 for your virtual machine. Go to the Virtual Machine Settings and Make sure the USB Controller is present in the device list and USB compatibility is set to USB2.0.

vmware-usb-version

I hope this article helps someone out there that has encountered this issue.

Enable Hardware Virtualization VT-x/AMD-v in BIOS

December 3rd, 2014 by Admin

When you try to install Windows 8, you might receive an error message that says “This PC can’t run Windows 8 – Your PC’s CPU isn’t compatible with Windows 8“. To fix this problem you have to enable hardware virtualization VT-x/AMD-v for your CPU in BIOS.

cpu-not-compatible-with-win

On Intel platforms, you can normally turn VT-x on and off in the BIOS, whereas on AMD platforms, AMD-V is on all the time (at least I have not come across a BIOS which contains an option to enable/disable AMD-V).

How to Enable Hardware Virtualization in BIOS?

Usually, the VT-x feature is disabled by default in the BIOS for some reason. To enable it on your model, you have to find the option in your BIOS, it’s usually called “Hardware virtualization support”, ” Intel(R) Virtualization Technology” or something similar.

Here is how to enable Hardware Virtualization in BIOS:

  1. Power on your computer. Enter the BIOS setup by pressing F2, F12, Del or other key (The key may vary depending on your system model).
  2. Look for an option labeled by ‘Virtualization Technology’ or ‘Intel(R) Virtualization Technology’ under ‘CPU Configurations’, ‘System Configurations’, ‘Advanced’ or ‘Security’ tab and check if the option is enabled or disabled.
  3. Enable Intel Virtualization Technology (VT) or AMD-V depending on the brand of the processor.

    enable-hardware-virtualizat

  4. Save the BIOS settings. However, a warm reboot is insufficient for the change to take effect. You need to power off the machine and disconnect the power supply.

If you can’t find the hardware virtualization settings in BIOS, I highly recommend to check the manual or online guide of your motherboard vendor, and some old computers might don’t support virtualization technology (vt-x/amd-v) at all.

How to Confirm Hardware Virtualization is Enabled?

There is a tool available from Microsoft which can help you check if virtualization technology (vt-x/amd-v) is enabled on your Intel and AMD processor.

Download the Microsoft hardware-assisted virtualization detection tool

Installation is not required here, execute the EXE file and following result will appear.

virtualization-detection

However, this tool doesn’t work on Windows 8. To work around this problem, you can run this tool in compatibility mode by following these steps:

  1. Right-click on the EXE file (havdetectiontool.exe) and then click Properties.
  2. Click on the Compatibility tab.
  3. Compatibility mode lets you choose how to run the EXE file. You can choose anything from Windows 7 to Windows XP, as the virtualization detection tool works with Windows 7/Vista/XP.

    compatibility-mode

  4. click Apply then click OK to save the changes. You can then run virtualization detection tool on Windows 8 to check if virtualization technology (vt-x/amd-v) is enabled on your computer.

How to Burn ISO to Disc in Windows 10/8/7 without Any Software

December 2nd, 2014 by Admin

ISO files are frequently used to distribute CD or DVD images. For example, if you download a Linux distribution or WinPE image, what you’ll most likely download is actually a .iso file that needs to be burned to a disc. Since Windows 7, Microsoft has added native support for burning ISO image directly to disc without using any third-party tools. Here’s how you can burn ISO to CD/DVD from Windows Explorer or Command Prompt in Windows 10, 8.1, 8 and 7.

Option 1: Burn ISO to Disc in Windows 10/8/7 from Windows Explorer

In Windows Explorer, navigate to the ISO image file you want to burn. Right-click on it and select Burn disc image.

burn-disc-image

Windows Disc Image Burner will now open. You can choose which disk burner to use, if you have more than one, in the Disc burner drop-down list. Insert a blank disc in your DVD or CD burner, wait for a few seconds and click on Burn. If you check the “Verify disc after burning” option, it will verify the content of burned CD and ISO file which will require additional time.

disc-image-burner

After the burning process finishes, the DVD/CD tray will automatically open and you will see a confirmation message if the burning process was successful.

Option 2: Burn ISO to Disc in Windows 10/8/7 from Command Prompt

If the “Burn disc image” option is missing from the right-click context menu, you can also launch the built-in Windows Disc Image Burner from Command Prompt. Here’s how to burn ISO file to CD / DVD at the Command Prompt:

Open an elevated Command Prompt. In Windows 10 or 8, just press the Windows key + X to open the Quick Access menu and then click “Command Prompt (Admin)“.

At the Command Prompt, type the following command and press Enter.
isoburn.exe /Q [path to ISO file]

isoburn

Disc Image Burner will launch. Insert an empty CD and click the Burn button to begin burning the selected ISO image file. If you want to verify the disc for any errors after burning, check the option labelled “Verify disc after burning” option before clicking Burn button.

Conclusion

Disc Image Burner (isoburn.exe) is available in Windows 7 or later version of Windows. For Windows Vista or XP, you’ll need to install the third-party application to burn ISO files, such as ISO2Disc, ImgBurn, etc.

Display My Computer Icon on Desktop in Windows 10

December 2nd, 2014 by Admin

Starting from Windows 7, the system only puts the Recycle Bin icon on the desktop after performing a clean install. For many users, one of the first things you’ll want to do is add back some of the desktop icons that are missing by default. Follow the steps below you can display the My Computer, Network, My Documents or Control Panel icons on the desktop in Windows 10. But this procedure applies to Windows 8.1, Windows 8 and 7 too.

How to Display My Computer Icon on Desktop in Windows 10?

Right-click on the desktop background and choose Personalize from the shortcut menu that appears.

personalize

In the Personalization window, click the Themes in the left navigation pane. Next click on the “Desktop icon settings” link.

personalization

Here, under Desktop icons section, tick Computer checkbox and then click Apply button to show the Computer icon on the desktop. You can also show/hide Recycle Bin, Network, and Control Panel icons on the desktop from here.

desktop-icon-settings

So this is how can you display the My Computer icon on the desktop in Windows 10. Having the My Computer icon on your desktop can be one of the quickest ways to access your local disk, removable drives, libraries and more.