Archive for May, 2013

How to Reset Forgotten XPMUser Password in Windows XP Mode?

May 21st, 2013 by Admin

I have Virtual PC setup running Windows XP Mode with default logon of XPMUser but I have no idea what my password is. How can I reset or remove the XPMuser password without reinstall XP Mode?

During initial setup of Windows XP Mode, you are required to set a password for default XPMUser account. What to do if you forgot the XPMUser password? Or you are not aware of password been created for XPMUser during initial configuration of XP Mode? Here is a solution for you to reset forgotten XPMUser password in Windows XP Mode. Quickly resolve the problem of being unable to log in to Windows XP Mode due to wrong or incorrect password.

How to Reset Forgotten XPMUser Password in Windows XP Mode?

Reset Windows Password utility is a Windows PE boot disk that we’ll used in this guide. It comes as a bootable ISO image that could be used to boot off your Windows XP Mode virtual machine and then reset your forgotten XPMUser password. Let’s proceed.

Step #1: Download the Reset Windows Password utility and save it to your host operating system. After the download is complete, unzip the download file and you’ll find the ResetWindowsPwd.iso file.

Step #2: Next, mount the ISO image to your Windows XP Mode virtual machine and get it to boot from CD-ROM. To achieve this, follow this step-by-step guide: How to Boot from CD or ISO Image in Windows XP Mode.

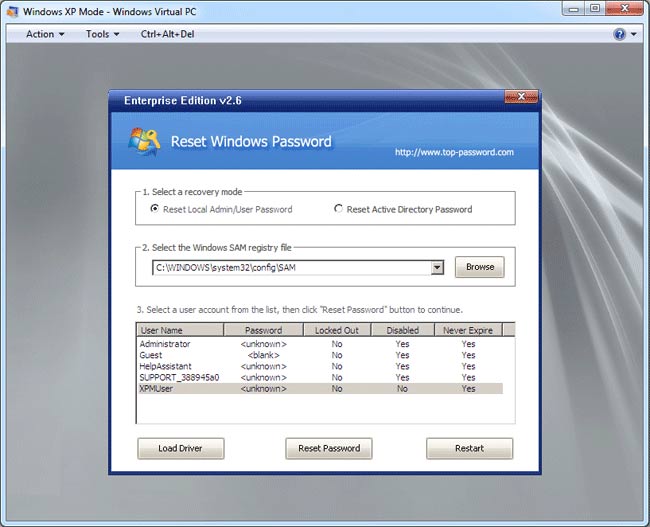
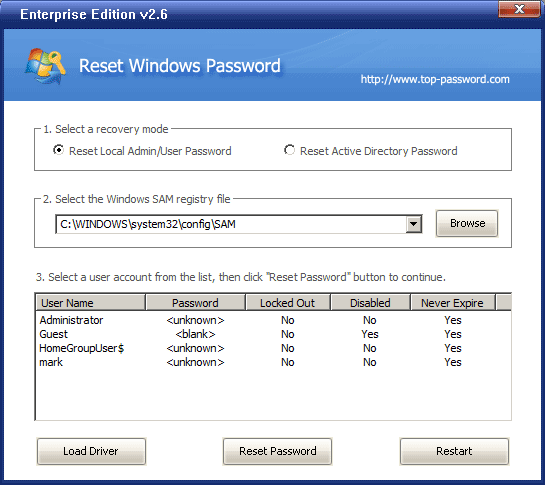
Step #3: Once the virtual machine successfully boots from the ISO image, you’ll see the Reset Windows Password program after a few minutes.

reset-windows-xp-mode-password

Step #4: Choose the XPMUser account and then click on “Reset Password” button. It will unlock/reset your forgotten Windows XP Mode password immediately.

Step #5: After resetting the password, restart the virtual machine and revert your changes in BIOS so it will boot from your hard drive instead of ISO image.

Step #6: During the booting screen, if you are prompt to enter the login password in a dialog which opens up in your host operating system, just click Cancel. That is because this logon dialog won’t accept blank/empty password.

login

Step #7: When your virtual machine boots to the Windows XP login screen, choose the default user XPMUser and left the password blank, then press Enter and you can quickly log back into the virtual machine. Done!

Conclusion

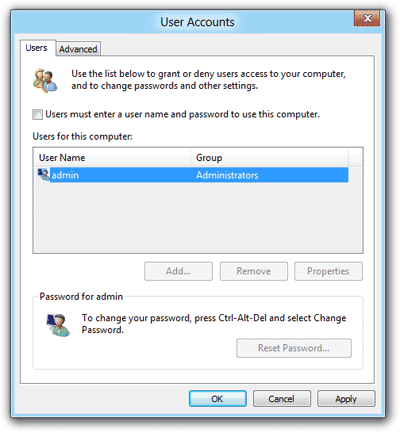
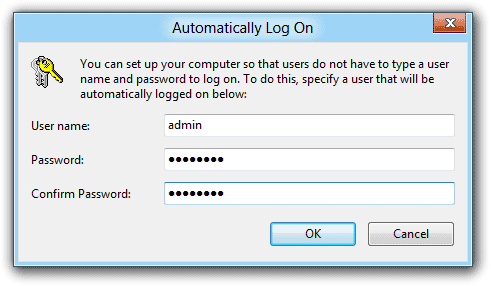
After reset the forgotten Windows XP Mode password and get into the virtual machine, you can set a new password for the XPMUser account. If you are prompted to enter logon information next time you start the Windows XP Mode, type your new password and check the “Remember my credentials” option. Your Windows XP mode should logon automatically for you from now on.

How to Boot from CD or ISO Image in Windows XP Mode

May 21st, 2013 by Admin

Unable to boot from CD or ISO image in XP Mode? Sometimes we may need to boot from a boot disk in order to fix the virtual machine, but Windows XP Mode doesn’t provide a straightforward option to either change the boot order or get into BIOS. In this article we’ll walk you through how to get your Windows XP Mode virtual machine to boot from CD or ISO image.

How to Boot from CD or ISO Image in Windows XP Mode?

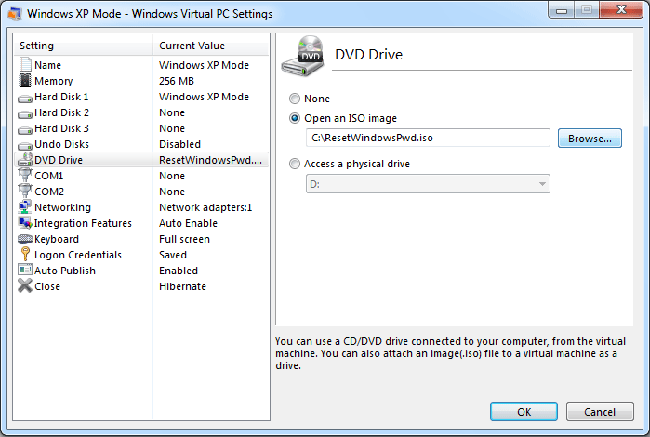
  1. From the Windows XP Mode window, click the Tools menu, and then click Settings.
  2. In the left panel, click on DVD Drive. In the right panel, you can specify a bootable ISO image or a physical drive existing in your physical machine. Click OK to save your changes.

    mount-iso

  3. Now turn on or restart your Windows XP Mode virtual machine.
  4. Once the virtual machine starts booting, you’ll see a progress bar window shown as follow.

    starting-xp-mode

  5. Press SHIFT + ESC and you’ll see a blank booting screen instead of a progress bar. Next, quickly hit Del to get into the BIOS of your virtual machine. You have to be pretty quick the with the SHIFT + ESC if you want to get into the BIOS.
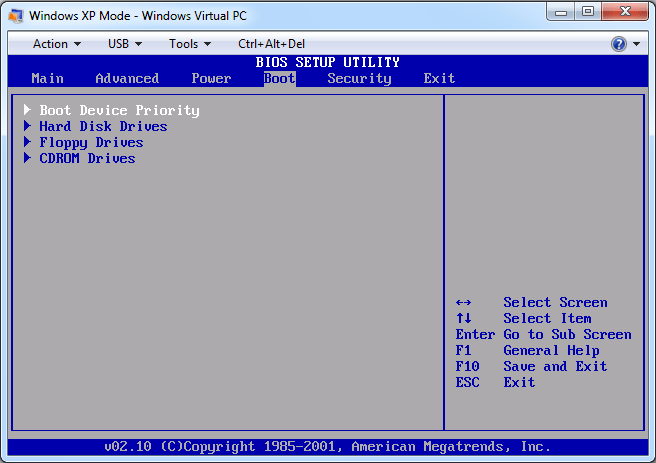
  6. After getting into BIOS, use the arrow keys to select the Boot menu, then select Boot Device Priority and press Enter.

    boot-device-priority

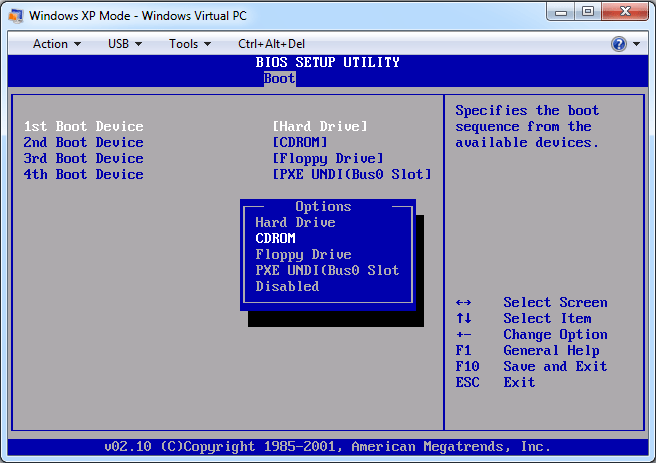
  7. Select 1st Boot Device and press Enter to change it to CDROM.

    change-boot-order

  8. Press F10 to save your changes. The virtual machine will automatically restart and boot from your physical CD or ISO image.

Best Windows Key Finder to Find Your Lost Windows Product Key Easily

May 20th, 2013 by Admin

Normally, Windows product key will either be displayed on the Windows installation CD sleeve or on the top/bottom of your desktop tower or laptop. However, over time these either get lost or become unreadable. What to do if you lost your Windows product key but have to do a reinstall? This is where 3rd party Windows key finder programs come in.

Product Key Finder is the best Windows key finder program which can help you find lost Windows 8/7/Vista/XP product key easily. It’s a well-known fact that Windows product key is stored in the registry, but it is encrypted for security reasons, so it won’t be of any use to you. With Product Key Finder you can get back your lost product key in just a few simple steps!

How to Find Lost Windows Product Key Using Windows Key Finder program?

Download Product Key Finder and save it on your computer. After the download is complete, double-click on the download file and install it. Next launch the application. Click on the “Start Recovery” button and then choose the “From current system” option. The program will go through the registry on your computer and locate your Windows product key and some keys for other software installed on your machine.

Write down the product keys and then you can reinstall Windows, or place the key in a database where you won’t lose it. Product Key Finder is a handy recovery tool to keep in your software utility toolbox.

That’s all there is to it. The use of this type of Windows key finder program is not illegal, because it is simply locating and providing the product key that you purchased.

How to Find Windows Vista Product Key

May 17th, 2013 by Admin

I have a 3 year old OEM HP laptop with Windows Vista on it. The problem is that my Windows Product Key sticker (COA) on the back of my laptop has faded away. I can hardly read the key on it. Can you please help me by suggesting ways of retrieving it.

I don’t know how many times people have asked me for a way to find Windows Vista product key because they threw away the documentation that came with their computer, thinking they didn’t need it. Another common reason for needing to recover Vista product key is that the product key sticker on the computer is worn and you can’t read it. Well, you are in luck because there is a simple, quick way to find out your lost Windows Vista product key.

With Product Key Finder program you can recover and find Windows Vista product key from your current system. Just a few steps to get lost Vista product key back. No need to purchase a new copy of Windows Vista after misplace the product key.

How to Find Windows Vista Product Key?

  1. Download and install the Product Key Finder software, then launch it. From the main screen, click on the “Start Recovery” button. It will display a list of recovery options.
  2. Choose the “From current system” option, the program will recover and find your Windows Vista product key inside the Windows registry.
  3. Copy the product key to a text file or print it for safe keeping.

It’s that easy! Follow the steps above you can easily retrieve Windows Vista product key from either pre-installed OEM machine or a retail copy of Windows Vista system. Well, now I hope you were able to find your Vista product key and now you are ready for a reinstall of Vista or you can save the key for later use.

How to Fix the Logon Error: The local policy of this system does not permit you to logon interactively

May 16th, 2013 by Admin

Problem

Apart from the obvious logon error of typing in a wrong username or password, there exists another common problem that users come across when logging on: When you try to log on to a Windows machine and you may receive the error message “The local policy of this system does not permit you to log on interactively.” This can happen in a number of scenarios, and the way to resolve the issue depends on the cause of the problem.

Solution A

If the Local Security Policy is set to disallow local logons to Everyone, then the error message will pop up for any user who tries to log on, including an administrator. This can be fixed in just a few steps, if you can still get into Windows:

  1. Press Windows + R to bring up the Run box. Type in gpedit.msc and press Enter.
  2. When the Group Policy Object Editor appears, navigate to: Computer Configuration > Windows Settings > Security Settings > Local Policies > User Rights Assignment.
  3. In the right-hand panel, locate the entry named “Deny Log on locally” and double-click on it.
  4. Highlight your user account and click Remove.

If you can’t log on your computer using any administrator account, you are unable to edit any settings of your local policy. In this situation, you need to use a third-party software – Reset Windows Password utility. This software comes as a bootable CD image which need to be burned onto a blank CD or USB drive. Just boot your problematic computer from the CD or USB drive. When the Reset Windows Password program opens up, select your user account and click on “Reset Password” button, the program will delete the existing Windows password and also tweak the improper local security policy which prevents you from logging on locally. That’s it!

Solution B

If the logon error message pops up when you are trying to connect via Remote Desktop or a Terminal Services connection, you will need to take a different set of actions.

To resolve this issue, add allowed users to the Remote Desktop Users list:

  1. Click Start, point to Settings, and then click Control Panel.
  2. Double-click System, and then on the Remote tab, click Select Remote Users.
  3. Click Add type in the user account name, and then click OK.
    If you are adding more than one user name, use a semicolon to separate the names.

Note: Adding users to the Remote Desktop Group requires that you are logged on through an administrator account.

Also, make sure that the Remote Desktop Users group has sufficient permissions to log on through Terminal Services. To do this, follow these steps:

  1. Click Start, click Run, type secpol.msc, and then click OK.
  2. Expand Local Policies, and then click User Rights Assignment.
  3. In the right pane, double-click the “Allow logon through Terminal Services” option. Make sure that the Remote Desktop Users group is listed. Click OK.
  4. In the right pane, double-click the “Deny logon through Terminal Services” option. Make sure that the Remote Desktop Users group is not listed, and then click OK.
  5. Close the Local Security Settings snap-in.

How to Unlock a Password Protected Computer Running Windows 7, Vista or XP

May 16th, 2013 by Admin

I have my Windows 7 account password protected but now I can’t remember the password. I just set it up today but I forgot the password I chose. How do I unlock this password so I can use my computer?

Protecting your computer with a password should be common practice, especially if other people potentially have physical access to it. But if you forget the Windows password, you’ll lock yourself out of your computer. How to unlock a password protected computer without formatting the hard drive?

Fortunately, there is a Windows password unlocker software called Reset Windows Password, which can help you to reset/unlock lost administrator and other user passwords that are used to log on to Microsoft Windows operating system. In this article we’ll walk you through the steps to unlock any password protected computer running Windows 7, Vista or XP.

How to Unlock a Password Protected Computer without Logging in?

Step #1: First of all you’ll have to download Reset Windows Password utility on another computer. Once the download is complete, unzip the download file and you’ll get the bootable ISO image: ResetWindowsPwd.iso. Burn it to a blank CD using a image burning software like ISO2Disc or ImgBurn.

Step #2: Now turn on your password protected computer, insert the burned disc into your CD/DVD-ROM. Make sure you have set the boot sequence to CD first in your BIOS.

Step #3: Once your computer boots from the CD, it will start the Reset Windows Password program soon after the booting procedure is complete. By default, the program will display a list of local user accounts inside your Windows SAM database.

Step #4: Choose a user account and then click on “Reset Password” button. Confirm your operation and the program will reset the password and also unlock your user account when it was locked out or disabled.

Step #5: After unlocking the password, restart the computer and take the bootable CD out from the CD/DVD drive. When booting to the Windows login screen, left the password area empty and you can then log on your computer immediately.

Conclusion

So that is how can you unlock a password protected computer running Windows 7, Vista or XP. If your computer doesn’t have a CD/DVD drive, you can use a USB flash drive instead and follow the same steps above to unlock your computer password easily.

How to View the Product Key in Windows 7, Vista and XP

May 13th, 2013 by Admin

I have a laptop that came with Windows 7 Professional installed. But I recently have to format it. I need to enter the product key again but the sticker on the laptop is not readable now as it is quite old now. Is there a way out to view my Windows 7 product key?

In order to reinstall Windows, you must have access to a product key for that version of the operating system. The product key can typically be found on a yellow sticker on the CD case of the installation CD, or on a small sticker on the outside of the PC’s case. What to do if you misplace the product key and have to reinstall Windows? Don’t worry! With Product Key Finder you can easily view the product key for your Windows 7, Vista and XP installations.

Product Key Finder is one of the best product key viewer utilities which allows you to view the product keys of Windows, Office, SQL Server and many other software installed on your computer.

How to View the Product Key in Windows 7, Vista and XP?

  1. Download and install Product Key Finder, then launch it. From the main screen, click on the “Start Recovery” button. It will display a list of recovery options.
  2. Choose the “From current system” option, the program will quickly extract and find Windows product key for your current Windows installation.
  3. You are then allowed to view your Windows product key and copy it to a text file or print it for safe keeping.

So that is how can you view Windows 7, Vista and XP product key using product key viewer program. This utility can be useful if you lost the product key of your Windows/Office, and you want to reinstall it on your computer.

How to Reset Windows 7 Home Premium Password After Forgotten

May 13th, 2013 by Admin

I have a HP laptop with Windows 7 home premium and stupid me forgot the password and didn’t make a disk to recover it. I tried the F8 with safe mode and nothing works, it keeps rebooting to the password screen. I don’t know how to get around this and reset the password. Please Help.

Forgot your Windows 7 home premium password? How to reset lost password of the only existing administrator account? There are times when you forget your Windows 7 home premium login password or someone changes it without your knowledge. In such situations, you will be locked out of Windows. In this article we’ll explain how to reset Windows 7 home premium password when you lost or forgot the login password.

How to Reset Windows 7 Home Premium Password After Forgotten?

Step #1: First of all you’ll have to download Reset Windows Password utility on another computer. Once the download is complete, unzip the download file and you’ll get the bootable ISO image: ResetWindowsPwd.iso. Burn it to a blank CD using a image burning software like ISO2Disc or ImgBurn.

Step #2: Now when ever you forget or lose your Windows 7 home premium password. On system restart, insert the burned disc into your CD/DVD-ROM. Make sure you have set the boot sequence to CD first.

Step #3: Once your computer boots from the CD, it will start the Reset Windows Password program soon after the booting procedure is complete. By default, the program will display a list of Windows 7 local user accounts inside your Windows SAM database.

Step #4: Choose a user account and then click on “Reset Password” button. Confirm your operation and the program will reset your Windows 7 home premium password immediately.

Step #5: Now you can take the bootable CD out from the CD/DVD drive and start booting into Windows 7 home premium. left the password field as blank at the Windows login screen, you can then quickly logged back on your Windows 7 home premium.

Conclusion

This tutorial is aimed at people who have forgotten Windows 7 home premium password or have been locked out of their account by a family member or friend.  Quickly and easily reset Windows 7 home premium login password without data loss!