Archive for the ‘Windows XP’ category

3 Ways to Disable Registry Editor in Windows 11, 10, 8 and 7

June 12th, 2016 by Admin

Making improper changes to the Registry can cause Windows to become unusable or unbootable. To prevent, restrict or block anyone from accessing Registry Editor in Windows 11, 10, 8 and 7, you can disable Registry Editor using group policy, registry trick or third-party software.

Method 1: Disable Registry Editor Using Group Policy

  1. Press the Windows key + R to bring up the Run box. Type gpedit.msc and press Enter.

    gpedit

  2. When Group Policy Editor opens, navigate to User Configuration > Administrative Templates > System. Double-click on Prevent access to registry editing tools on the right panel.
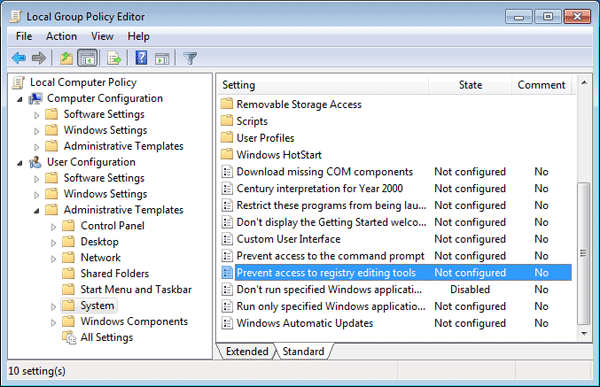
    prevent-access-to-regedit

  3. Select the radio button next to Enabled, click Apply and then OK, then close out of Group Policy Editor and reboot your computer.
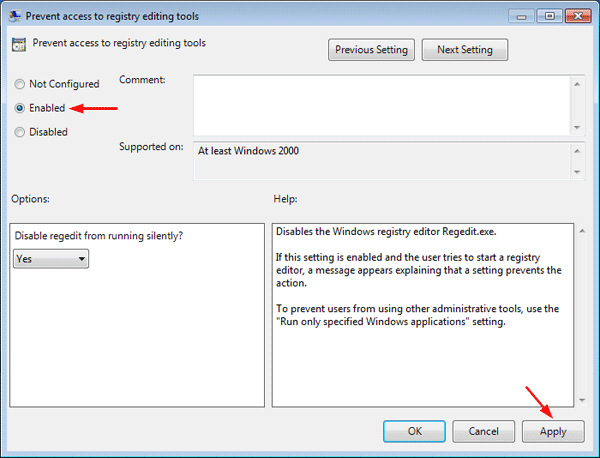
    prevent-access-registry-edit

  4. When a user tries to access Registry Editor, they will get an error message saying “Registry editing has been disabled by your administrator“.
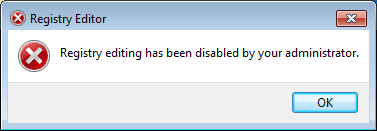
    registry-editing-disabled

This method will prevent all users from accessing Registry Editor, including yourself. To regain access to Registry Editor, you have to open Group Policy Editor again, and change the policy to Disabled or Not Configured.

Method 2: Disable Registry Editor Using Registry Trick

  1. Press the Windows key + R to bring up the Run box. Type regedit and press Enter.
  2. When Registry Editor opens, navigate to:
    HKEY_CURRENT_USER > SOFTWARE > Microsoft > Windows > CurrentVersion > Policies > System

    If the System key doesn’t exist, you need to create it.

  3. In the right pane, right-click on any empty space and select New > DWORD (32-bit) Value. Name it DisableRegistryTools and set its value to 1.
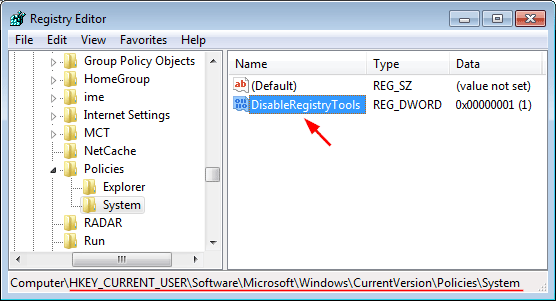
    disable-registry-tools

  4. When you try to access Registry Editor, you’ll also get the same error message “Registry editing has been disabled by your administrator“.

This method will prevent your current user from accessing Registry Editor. To regain access, you have to log on as another administrator account and delete the registry value DisableRegistryTools.

Method 3: Disable Registry Editor Using Third Party Software

Using Protect My Folders you can lock & protect Registry Editor with a password. Anyone can’t access Registry Editor without knowing your password.

  1. Download and install Protect My Folders program on your computer. The first time you launch this program it will prompt your to set a password. Don’t forgot it as you’ll need it next time you run it.
  2. When Protect My Folders starts, click on Add/Lock button.
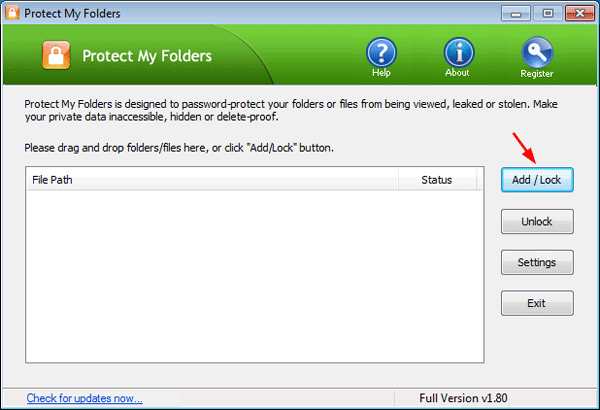
    protect-my-folders

  3. The File/Folder selection dialog should open, choose the C:\Windows\regedit.exe file and click Add, next click OK.
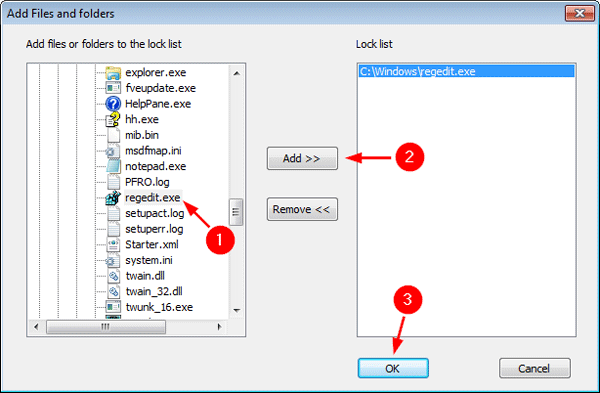
    select-regedit

  4. Now you’ll see the regedit application is locked. Close Protect My Folders program.
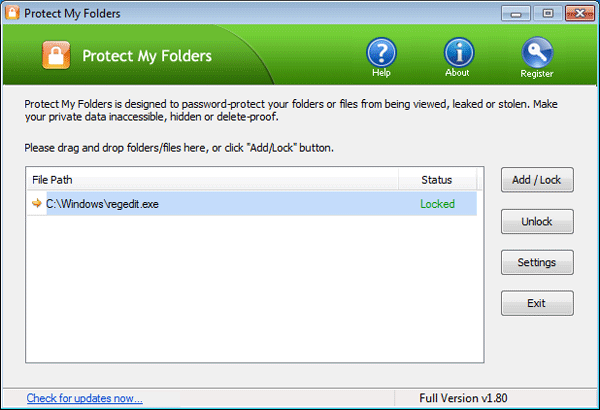
    lock-registry-editor

  5. When you try to access Registry Editor, you’ll receive the following error message:

    cannot-find-regedit

This method will block all users from accessing Registry Editor. To regain access you have to relaunch Protect My Folders, enter your password and unlock the regedit.exe app.
How to Disable Caps Lock Key in Windows and Mac

April 14th, 2016 by Admin

“Whenever I type, my baby finger hits the Caps Lock key and all my typing ends up in caps. I want to disable it completely and just use the Shift key for capitals. How do I disable the Caps Loks key in Windows 10? Please help!”

Without the Caps Lock key, you can still type the letter you want to capitalize by holding down the Shift key. Pressing the Shift key once is much more efficient than pressing the Caps Lock key twice. If you don’t need to use the Caps Lock key, you can disable it permanently. In this tutorial we’ll show you how to disable Caps Lock key in Windows 10/8/7/Vista/XP and Mac OS X.

Part 1: Disable Caps Lock in Windows 10/8/7/Vista/XP

There is no built-in settings available in Windows that allow you to disable Caps Lock key, so we have to use a registry hack to map the Caps Lock key to doing nothing. Follow these steps:

  1. Press the Windows key + R to open the Run box. Type notepad and press Enter.
  2. Copy the lines below and then paste them into the NotePad:
    Windows Registry Editor Version 5.00
    [HKEY_LOCAL_MACHINE\SYSTEM\CurrentControlSet\Control\Keyboard Layout]
    "Scancode Map"=hex:00,00,00,00,00,00,00,00,02,00,00,00,00,00,3a,00,00,00,00,00

    notepad

  3. Click the File menu and select Save as. Select “All Files” from the “Save as type” drop-down box. Type the file name as Disable_Caps_Lock.reg. Click Save.

    save-as

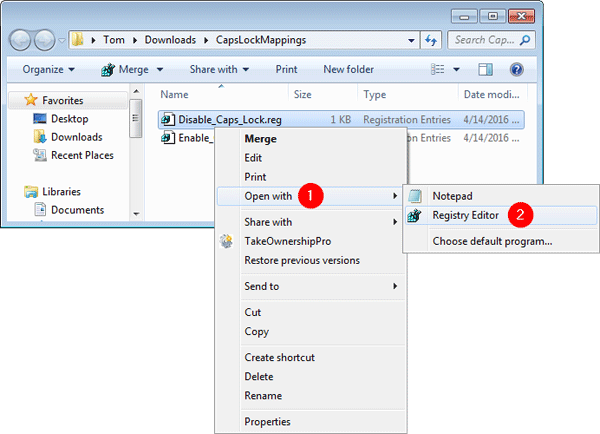
  4. Double-click the .reg file, or right-click on it and select “Open with” -> “Registry Editor“. If prompted by UAC, click on Yes.

    open-with-registry-editor

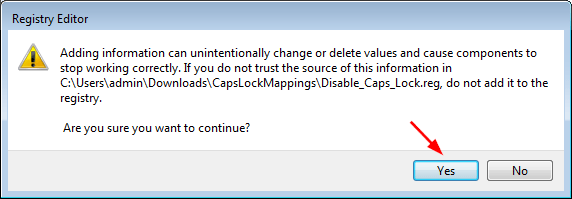
  5. Registry Editor will confirm if you want to import the registry settings in your .reg file, click Yes.

    import-into-registry

    Now log out (and back in) or reboot to make this registry trick to take effect.

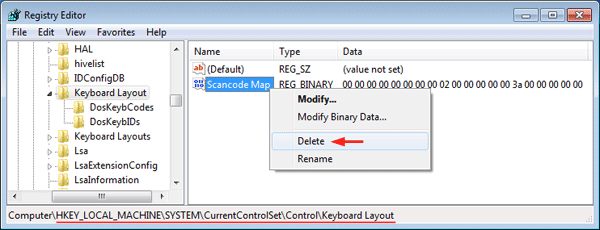
If you want to enable the Caps Lock key again, open the Registry Editor and navigate to HKEY_LOCAL_MACHINE\SYSTEM\CurrentControlSet\Control\Keyboard Layout, then delete the Scancode Map entry entirely.

enable-caps-lock

Part 2: Disable Caps Lock in Mac OS X

It’s pretty easy to actually turn the Caps Lock key off if you’re using a Mac. Here’s how:

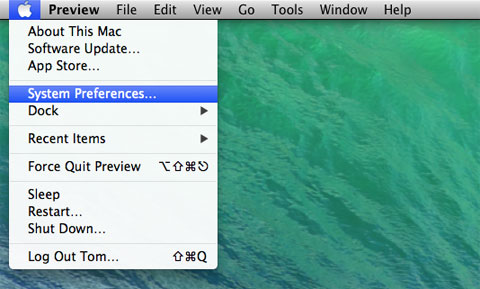
  1. Click the Apple icon in the top-left corner of your desktop, then select System Preferences from the drop-down menu.

    system-preferences

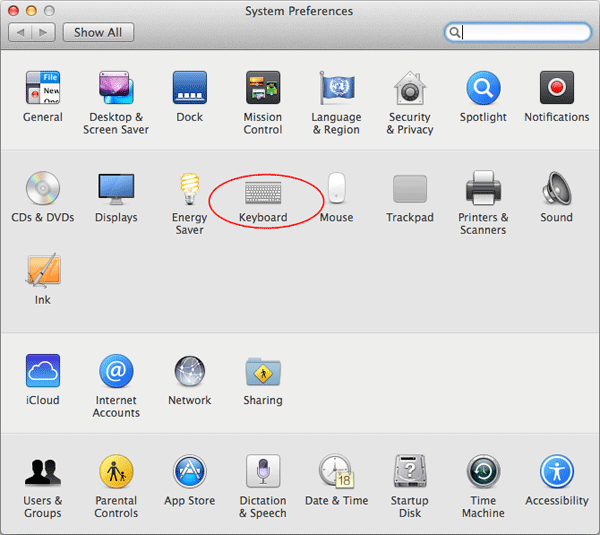
  2. Click on the Keyboard icon to launch the preferences pane.

    keyboard-utility

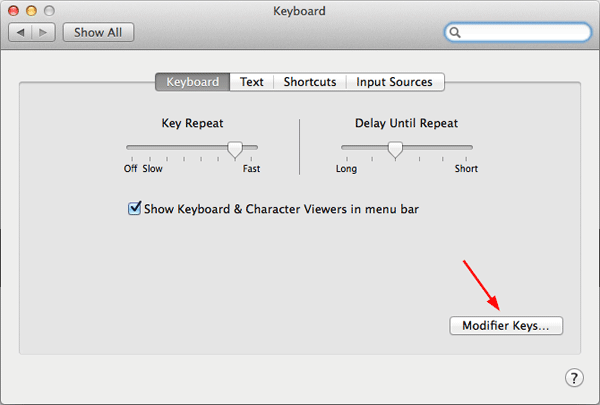
  3. Click the Modifier Keys button in the bottom-right corner.

    modifier-keys

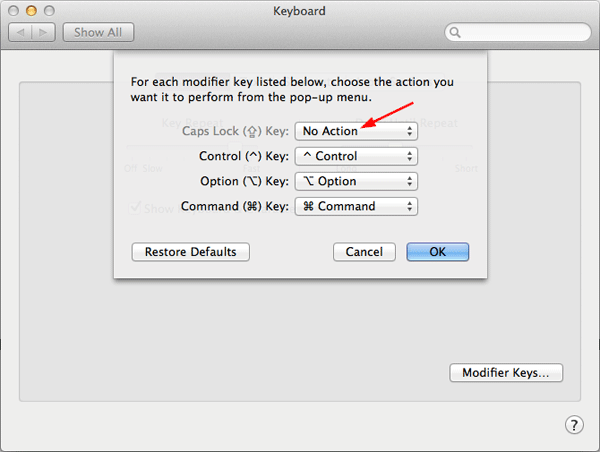
  4. A new window will slide down with a setting for the Caps Lock key at the top. click on the drop-down menu next to the Caps Lock Key title, and choose No Action.

    disable-mac-caps-lock

  5. Click OK. Now, whenever you hit the Caps Lock key by mistake, nothing will happen.

How to Disable Caps Lock Pop-up Notification in Windows 10 / 8 / 7

March 11th, 2016 by Admin

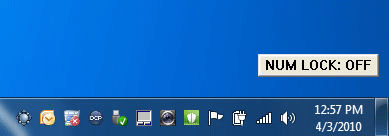
Every time you press the Caps Lock key, you might see a popup notification near the bottom-right corner of your screen. This can be a big problem since it takes focus off of the window/app you’re typing in. If you’re playing a game and accidentally press Caps Lock, clicking the popup will minimize the game.

caps-lock-notification

In this tutorial we’ll show you all possible ways to disable Caps Lock notification that pops up at the bottom right of your screen. The methods differ depending on the manufacturer of your computer.

Method 1: For HP computers

Here’s how to turn off Caps Lock notification on HP computers:

  1. Press the Windows logo key + R to bring up the Run box. Type regedit and hit Enter.
  2. After the Registry Editor opens, navigate to:
    HKEY_LOCAL_MACHINE\SOFTWARE\Policies\Hewlett-Packard\HP HotKey Support
  3. In right pane, double-click on the CapsLockOSD entry and set its value to 0.

Method 2: For Dell computers

Dell Quickset is supposedly a helpful little program that helps you keep track of your power management and other system settings. To disable Caps Lock notification on Dell computer, you can uninstall Quickset, or make a registry change by following the steps below:

  1. Press the Windows logo key + R to bring up the Run box. Type regedit and hit Enter.
  2. After the Registry Editor opens, navigate to:
    HKEY_LOCAL_MACHINE\SOFTWARE\Dell Computer Corporation\QuickSet
  3. In right pane, double-click on the QuickSetControl entry and set its value to 1.

Method 3: For Lenovo computers

  1. Open the Control Panel. Set the View by option to Large icons.
  2. Click on Display icon, then click on Change display settings on left panel.
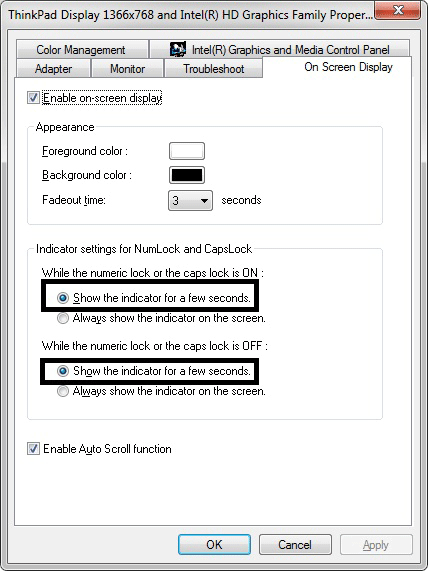
  3. Click on the Advanced settings, then click on On-Screen Display tab.
  4. Check Enable on-screen display.
  5. Under “Indicator settings for NumLock and CapsLock” section, look for “While the numeric lock or caps lock is ON” section, choose the “Show the indicator for a few seconds” option.

    disable-caps-lock-indicator

  6. Click Apply, then click OK.

Method 4:

The Caps Lock notification might be handled by BlueTooth (BTTray.exe) process. You must edit the following registry entries to ged rid of this ugly alert:

  1. Press the Windows logo key + R to bring up the Run box. Type regedit and hit Enter.
  2. When the Registry Editor opens, navigate to:
    HKEY_LOCAL_MACHINE\SOFTWARE\Widcomm\BTConfig\General
  3. Change the value of KeyIndication from 1 to 0.
  4. Reboot your computer and the Caps Lock pop-up notification is gone!

Method 5:

This is a common method to decrease the display time for Caps Lock notification:

  1. Open Control Panel. Set the View by option to Large icons.
  2. Click Ease of Access Center.
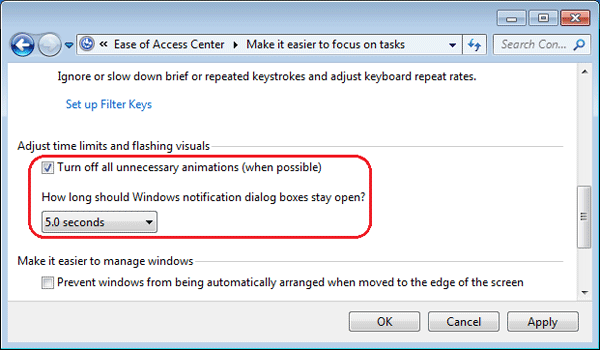
  3. Select “Make it easier to focus on tasks“.
  4. Scroll down to the “Adjust time limits and flashing visuals” section, Check the checkbox to “Turn off all unnecessary animations (when possible)“. Under the option “How long should Windows Notification dialogue boxes stay open“, select 5 seconds.

    turn-off-notication

  5. Click Apply/OK.

The end result is that you will still see the notification that Caps Lock has been turned on or off, but it will not cause a pause in your typing.

How to Know Your Windows is 32-bit or 64-bit

January 23rd, 2016 by Admin

All versions of Windows are available in two different flavors: 32-bit and 64-bit. For most people, whether they use a 32-bit or 64-bit version of Windows doesn’t make a difference. But it’s necessary to find out your running Windows is 32-bit or 64-bit when performing certain tasks, such as install drivers for your new device. Here are 3 simple ways to know your Windows is 32-bit or 64-bit.

Method 1: Right-click on My Computer

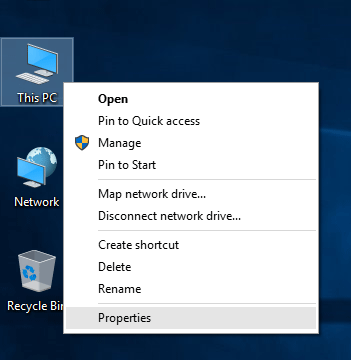
Simply right-click on “My Computer” (or “This PC” if you’re running Windows 10) icon on your desktop, and then select Properties from the drop-down context menu.

my-computer-properties

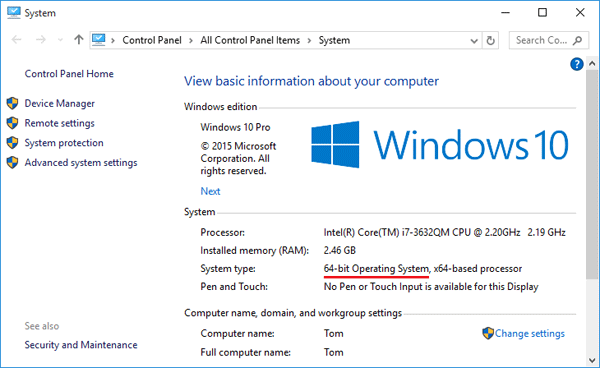
The System Control Panel will now open. In this screen you will see various information about your computer and Windows. The System type field indicates whether your computer are running a 32-bit or 64-bit version of Windows.

system-info

Method 2: Use the MSINFO32 Command

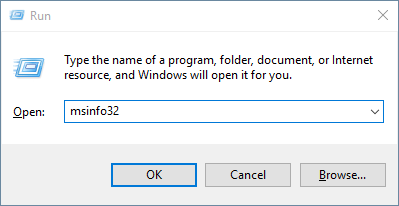
Press the Windows key + R on your keyboard to open the Run dialog. Type msinfo32 and hit Enter.

msinfo32

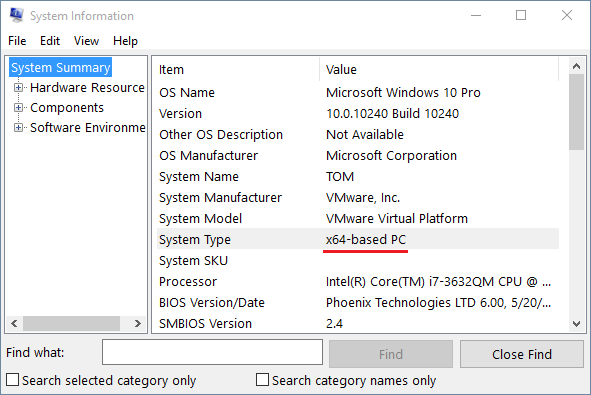
This opens the System Information window which shows details of almost everything in the system. Click the System Summary node on the left, then locate the System Type entry. If it’s x64-based PC, you’re running 64-bit Windows. If it’s x86-based PC, your Windows is 32-bit.

system-information

Method 3: Check the Program Files (x86) Folder

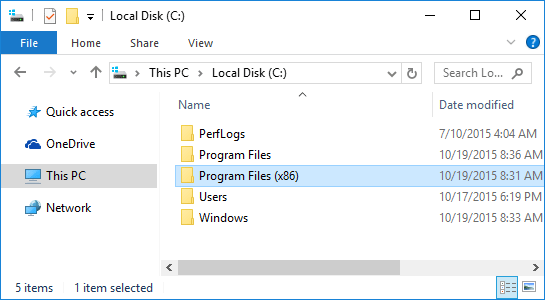
For purposes of backward compatibility, 64-bit version of Windows needs to run both 64-bit and 32-bit programs. 32-bit application are installed in the “Program Files (x86)” folder but native 64-bit application run in the normal “Program Files” folder.

program-files-x86

So if you can see the “Program Files (x86)” folder under the root path of your system partition, your Windows is 64-bit. Otherwise it’s 32-bit OS.

How to Restore Local Security Policy to Default in Windows 10, 8, 7, Vista and XP

December 14th, 2015 by Admin

Did you mess with the local security policy? Or a certain program changed the security policy that caused some strange issues? Luckily there is a simple way to reset / restore your local security policy settings to default in Windows 10, 8, 7, Vista and XP, if you mess up.

How to Restore Local Security Policy to Default in Windows 10, 8, 7, Vista and XP?

This method uses the default security configuration templates to reset the local policies (including account lockout and password complexity requirements policy). Here’s how to reset local security policy settings to their default values:

  1. Open an elevated Command Prompt. In Windows 10 and 8, press the Windows + X key combinations to open the Quick Access menu and choose Command Prompt (Admin). In Windows 7 or Vista, click the Start menu, then select All Programs -> Accessories, right-click on Command Prompt and select “Run as administrator”.
  2. Now copy and paste the following command into the Command Prompt. Hit Enter.
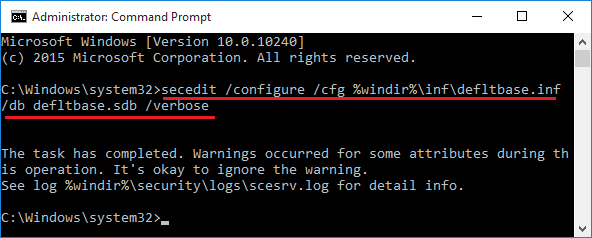
    secedit /configure /cfg %windir%\inf\defltbase.inf /db defltbase.sdb /verbose

    If you are running Windows XP and need to reset the security settings to their default values, use this command instead:
    secedit /configure /cfg %windir%\repair\secsetup.inf /db secsetup.sdb /verbose

    reset-local-security-policy

  3. This will take a few minutes to reset all the policies back to the Windows defaults. you’ll have to restart the computer to see the changes.

2 Ways to Set Password Hint for Windows User Account

November 9th, 2015 by Admin

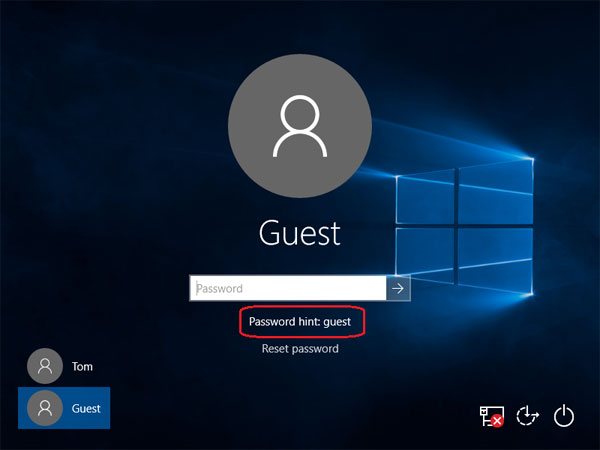
“I have activated the built-in guest account on my system so guests can use to work on my computer. To log on they must enter a password. How can I set a password hint to inform users of the correct password when entering wrong password? Please help!”

windows-password-hint

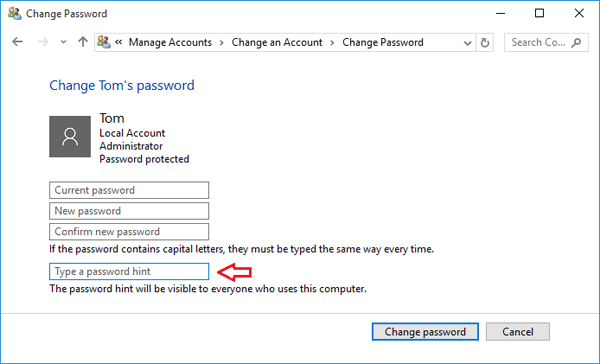
The password hint is used to remind you of your password in case you forget it. In this article we’ll show you 2 ways to set up a password hint for any user account in Windows 10, 8, 7, Vista and XP. The first method is the most common way of setting a password hint, but it doesn’t work for Windows guest account. While the second method is a bit complicated but it works with any situation.

Method 1: Set A Password Hint Through Control Panel

It’s super easy to set up a password hint when you change or reset your Windows user password. Follow these steps:

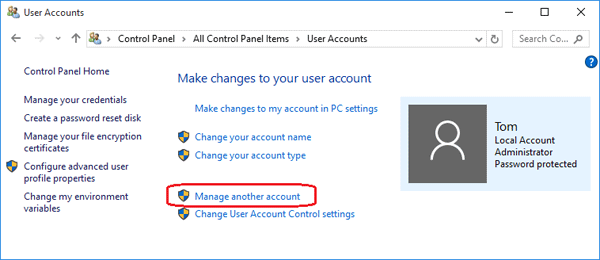
  1. Open the Control Panel. Set the View by option to Large icons. Click on User Accounts.

    control-panel

  2. Once on your user account page, click on the Manage another account link at the bottom.

    user-accounts

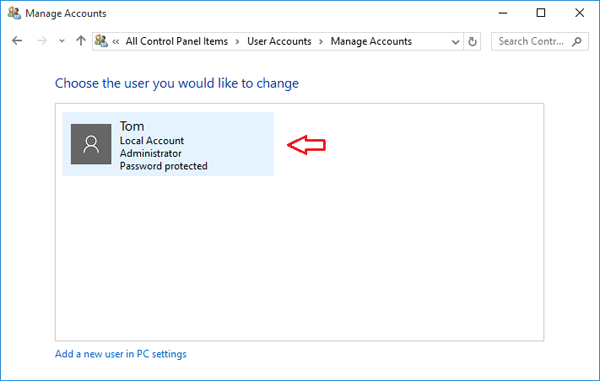
  3. Click on the user account whose password hint you want to create or change.

    manage-accounts

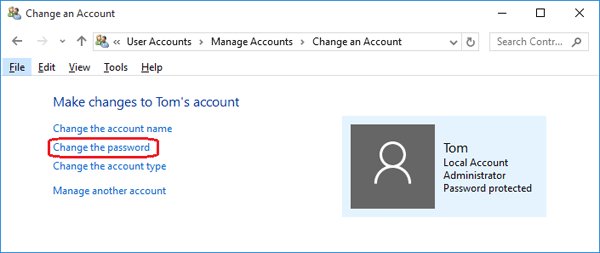
  4. In the next window, click on Change the password.

    change-windows-password

  5. Type your current password and set a new password. Next enter a word or sentence for your password hint that will help you (and you only!) remember your password. Click Change password when you are done.

    set-up-password-hint

Method 2: Set A Password Hint Through Windows Registry

It turns out that the password hint is stored in Windows registry as a readable format after you set up it through the Control Panel. Here we’ll walk you through the steps of set a password hint directly from the registry.

  1. Press the Windows key + R to open the Run box. Type regedit and hit Enter.
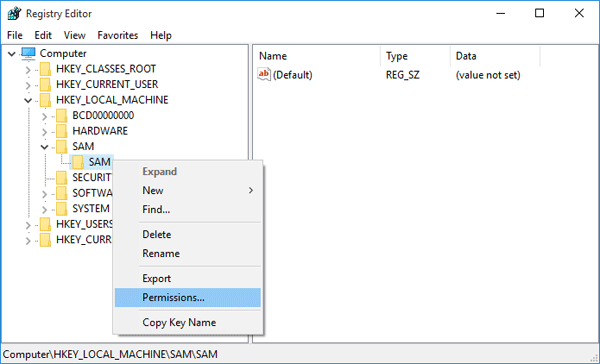
  2. When the Registry Editor opens, navigate to HKEY_LOCAL_MACHINE\SAM\SAM. To go beyond SAM you have to give yourself permission by right-clicking the second SAM Key and selecting Permissions….

    sam-permissions

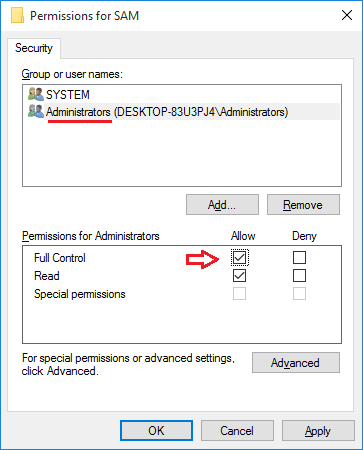
  3. In the Permissions for SAM dialog box, highlight the “Administrators” and click the “Full Control” box, click Apply and OK.

    permissions-for-sam

  4. Press F5 to refresh the registry and you’ll be able to navigate to: HKEY_LOCAL_MACHINE\SAM\SAM\Domains\Account\Users.
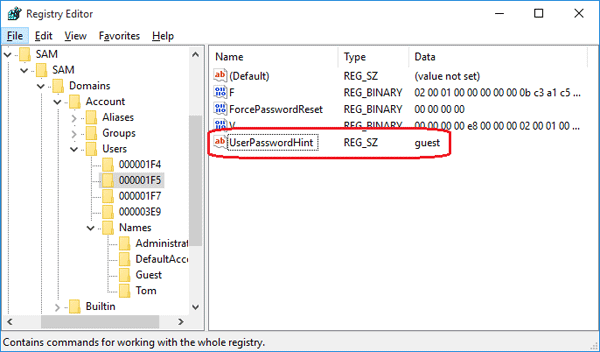
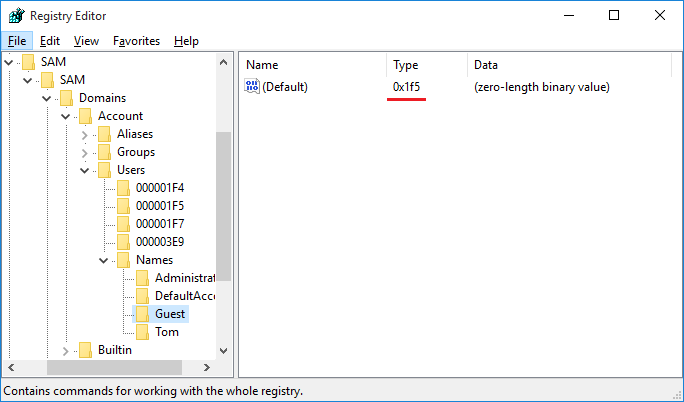
  5. You’ll notice a Names subkey with a registry key for each user account. Click on your desired account and you’ll see the RID of your account in the right pane. In my example, 0x1F5 is the RID of the built-in Guest account.

    account-rid

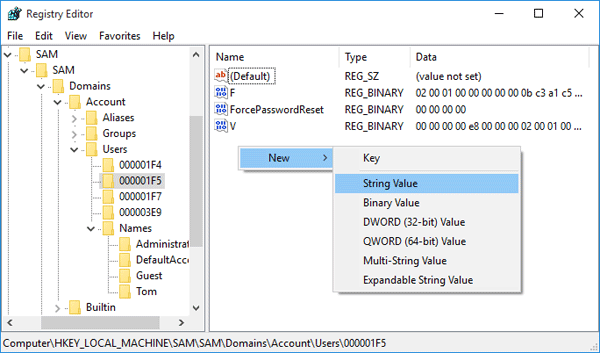
  6. Navigate to HKEY_LOCAL_MACHINE\SAM\SAM\Domains\Account\Users\{User_RID}. Right-click on an empty area in the right pane. From the pop up menu, select New > String Value.

    new-string-value

  7. Rename New Value #1 to UserPasswordHint. Next double-click on UserPasswordHint, type your password hint and click OK. Close the Registry Editor and it’s done.

    UserPasswordHint

After setting the password hint, log off or restart your computer. Type in a wrong password at the Windows login screen and it will show you the password hint as a reminder of the password. Make sure you choose a good and secure password hint. If you’re locked out and the password hint couldn’t remind you of the forgotten password, you have to use PCUnlocker to reset the login.

2 Options to Add a User to Local Administrators Group

July 13th, 2015 by Admin

Only an administrator can perform the administration tasks such as installing a driver or an application. If you have an existing standard or limited account, you can grant it administrator privileges by adding it to the built-in Administrators group. Here are two options to add a user to the local Administrators group in Windows 10, 8, 7, Vista or XP.

Option 1: Computer Management

The easier way to add a user to the local Administrators group is to use the Computer Management app. Here’s how:
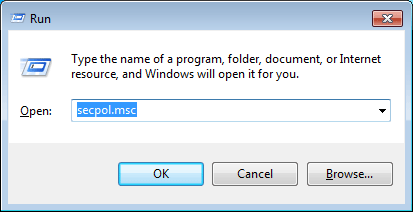
  1. To open the Computer Management, right-click on My Computer icon on your desktop and then select Manage. Another method is to press the Windows key + R to bring up the Run box, then type compmgmt.msc and hit Enter.
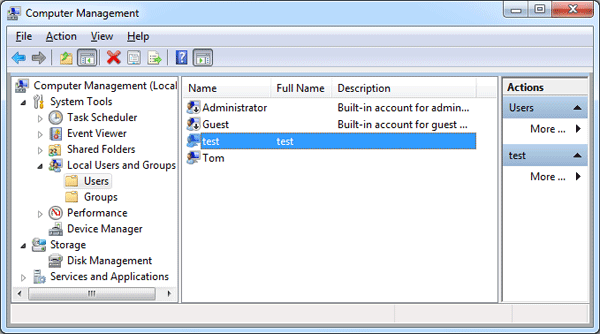
  2. When the Computer Management window opens, expand Local Users And Groups in the left pane, and click on Users (Please skip to the option 2 below if you don’t see Local Users and Groups.)

    local-users-and-groups

  3. Double-click your desired user account in the right hand side.
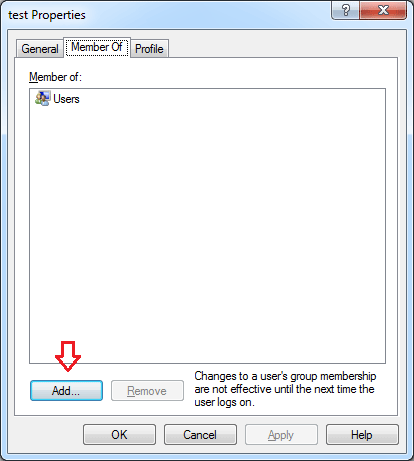
  4. In the User Properties window, click the Add button.

    account-properties

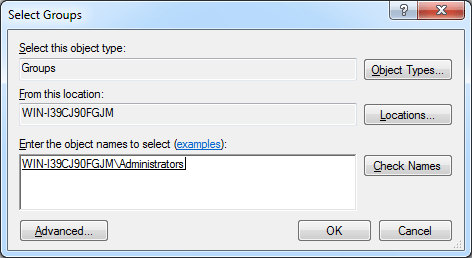
  5. In the Select Groups dialog, type the name of your administrators group. Click Check Names, and then click OK.
    select-groups

    If you don’t know the name of your administrator group, click Advanced and next click Find Now.

Option 2: Command Prompt

However, not every edition of Windows have the Local Users and Groups entry in the Computer Management (for example, Windows 8 Home and domain controller). This method will work on all editions of Windows.

  1. Open an elevated Command Prompt. In Windows 10 or 8, press the Windows key + X and then click “Command Prompt (Admin)“. In Windows 7 or Vista, go to Start > All Programs > Accessories, then right-click on Command Prompt shortcut and select “Run as Administrator“.
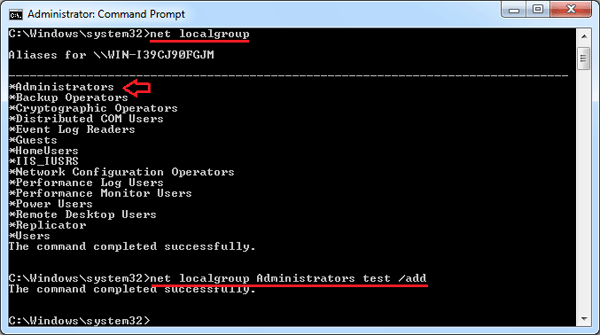
  2. To see a list of local groups available, just type:
    net localgroup
  3. You can add a user to the built-in Administrators group by running the following command:

    net localgroup Administrators [username] /add

    For example, add a user named test to the administrators group, we can run the below command.
    net localgroup Administrators test /add

    add-user-to-group